Working with Drawing Brushes
Ok folks, I've got a few minutes, and I've been seeing some discussion on our internal lists about Drawing Brushes, how to use them, what they're good for, etc... Sounds like a good time for a Blog post.
First off, what is a DrawingBrush? It's one of the three kinds of TileBrushes that WPF recognizes (along with ImageBrush and VisualBrush). Simply put, it allows you to use a Drawing as a brush, to use on any arbitrary shape.
So, what's a Drawing? A Drawing is simply a set of Visual Elements. You can use pretty much any visuals, rectangles, buttons, Images, etc... but once they become a Drawing, they are no longer interactive. In other words, you can use a Button in a Drawing, but it becomes a 'picture' of a Button, not a real button that can take events, rollover effects, etc... A Drawing is also static. You can't really change it after the fact (Ok, you MAY be able to do it withing code, but I've never tried that).
And, well, since Blend is my area of expertise, I'll demonstrate how to do it with Blend.
(Advance warning... as of right now, Silverlight doesn't support Drawing Brushes, so until they do, this post is only for the WPF crowd, but since we keep seeing more and more of WPF's capabilities moved into Silverlight, it wouldn't surprise me to see DrawingBrushes over there eventually. Also, no, I don't know of any specific plans to move DrawingBrush into Silverlight, and it's possible they never will... I can't tell the future, and I'm not actually on the Silverlight product team).
So, go ahead and fire up Blend and create a WPF Project.
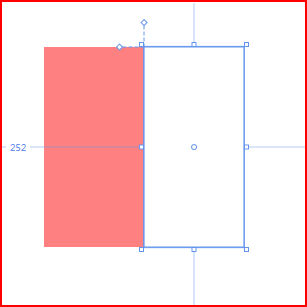
Using the Rectangle Tool, create a rectangle that is 200x100 pixels. Remove the Stroke and set the Fill to a 50% Alpha Red. (#7FFF0000).
Copy and Paste that rectangle, and place the new rectangle adjacent to the first, so it looks like you have a square. Set the Fill of the new Rectangle to have a Fill of 50% Alpha White (#7FFFFFFF).
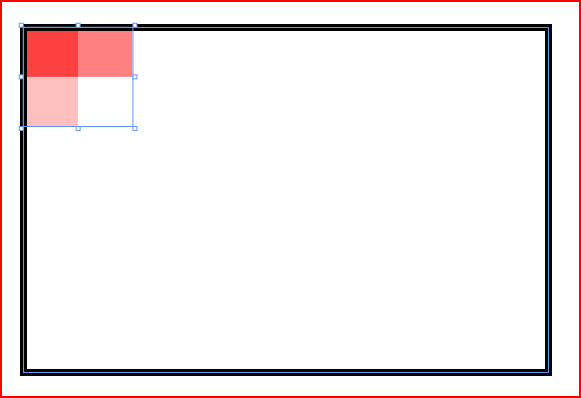
You should have something like what I'm showing here:
Ok, now group those two rectangles into a Canvas. (You can do Grid too, if you prefer. It really doesn't matter).
Copy and Paste the Canvas, then rotate it 90 degrees. You should start to get an idea of the effect we're looking for here. (Anyone want to go out for pizza?)

To create a DrawingBrush, you need a single base element, and Blend will take all the children and move them into the DrawingBrush for you. At the moment, the two Canvas elements are siblings, and their only parent is the LayoutRoot, which isn't going to work. So, group the two Canvas elements into another Canvas. The visual tree should look like this:

Now, select that base Canvas (the one I have selected in the image above), and in the Tools Menu, select "Make Brush Resource" and "Make Drawing Brush". You're going to get the "Create Resource" dialog, since TileBrushes are handled, by Blend, as resources. Go ahead and set the name and scope to whatever you want and hit Ok.
If it looks like nothing happened, that's Ok. What it did was copy all of the contents of the selected Rectangle and create a Drawing out of them, and create a resource for you. If you don't believe me, switch over to the Resources pane, and look for the Drawing Brush.
In fact, now, we don't even need the original canvas any more, so go ahead and delete it.
Now draw a nice big rectangle (or you could even use your LayoutRoot, if you wanted to).
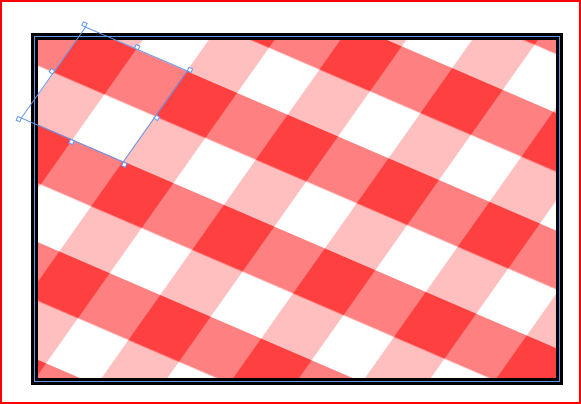
Go to the Property Inspector, and set the Fill to the new DrawingBrush. It should paint your rectangle with our red cross hatch. Grab the BrushTransform tool, and your rectangle's corner adorners will show up, just as if you were going to resize it. However, when you grab the bottom right adorner and drag it up, you'll see that you're resizing the BRUSH, and not the whole rectangle. That's exactly what you want. In the Image below, I've given my rectangle a thick, black stroke, so you can see that I've resized the FILL, and not the whole rectangle.
You'll also notice that as soon as you do this, you'll break the connection from the DrawingBrush resource. That's Ok. The Resource is of the two rectangles at a specific size, and in this case, we want to have our brush tile for us.
The final step is to set the TileMode on the Fill to Tile. You can also use the BrushTransform tool to mess with the Brush a bit more... maybe rotate it or give it a skew, and you'll get something like this:
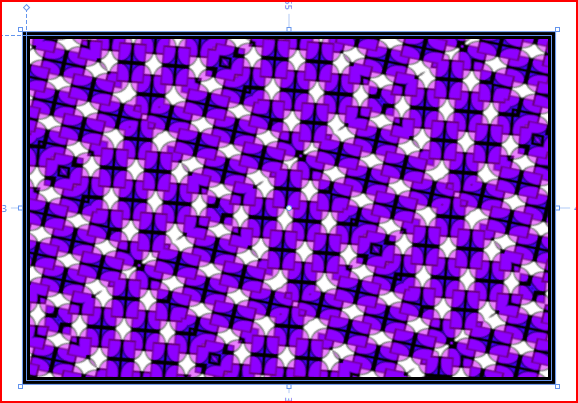
There you have it. You can continue to experiment... try taking the Stroke off the rectangle you just made, and convert *IT* into a Drawing Brush, and reuse it. Maybe try with a FlipXY, and you can get wild pretty quickly. Here's a quick example of something I threw together using two rectangles and an ellipse, and just keep reusing the "Make Drawing Brush" command with the Brush Transform tool.
Now, a feature that some folks probably don't know about, is that you can actually edit a DrawingBrush after the fact. To do so, follow these instructions:
Switch to the Resources pane.
Drag the DrawingBrush that you want to edit to the artboard. You'll get a context menu as normal, but there's an option to "Copy DrawingBrush to Canvas". When you do this, you'll get a Canvas with your DrawingBrush exactly as it was before you made it into a DrawingBrush at the beginning.
Go ahead and make any changes you want. (Maybe if you were following the steps here, you'll want to change the 50% white rectangle to a completely empty rectangle, which will change the visuals slightly.
When you're done, right click the BASE canvas that was created, in the Timeline, and you'll find commands for "Move into Source DrawingBrush" or "Copy into Source DrawingBrush". If you choose Move, the canvas that was created will be destroyed, but the information will be moved into your resource. If you choose Copy, it will update the resource, but not delete your Canvas. This latter option is helpful if you just want tweak your brush, see how it looks, and so on.
Remember, though, that as soon as you used the Brush Transform tool, it broke the resource connection, so if you followed THESE steps, you're not going to see it update immediately in the full tablecloth, but you should be able to take the updated DrawingBrush and go through the last steps pretty easily.
Have fun with it!