Run Java with GlassFish in Windows Azure
At PDC10 (Microsoft’s Professional Developers Conference 2010), Microsoft has again provided affirmation of support for Java in Windows Azure. “We're making Java a first-class citizen with Windows Azure, the choice of the underlying framework, the choice of the development tool.”, said Bob Muglia (President of Server and Tools at Microsoft), during his keynote presentation (transcript). Then during PDC Vijay Rajagopalan delivered a session (Open in the Cloud: Windows Azure and Java) which provided more details on the state of many deliverables, including:
- Windows Azure SDK for Java
- Windows Azure Tools for Eclipse
- Tomcat Solution Accelerator
- Windows Azure AppFabric SDK for Java
- Restlet Extension for OData (Java)
Vijay also talked about, during his presentation, a successful deployment of Fujitsu’s Interstage application server (a Java EE 6 app server based on GlassFish) in Windows Azure. Plus a whole slew of base platform improvements announced via the Windows Azure team blog, which helped to address many of the limitations we observed last year, such as not being able to use NIO as described in my earlier work with Jetty and Windows Azure.
Lots of great news, and I was finally able to sit down and try some things hands-on, with the latest release of the Windows Azure SDK (version 1.3; November 2010) that included many of the announced improvements.
Java NIO now works!
First off, one major limitation identified previously was that because of the networking sandbox model in Windows Azure (for security reasons) also blocked the loopback adapter which NIO needed. At PDC this was discussed, and the fact that Fujitsu Interstage app server worked (which used GlassFish which used NIO) proved this works. And fortunately, there isn’t anything additional we need to do to “enable” NIO; it just works now. I tried my simple Jetty Azure project by changing it back to using the org.eclipse.jetty.server.nio.SelectChannelConnector, deployed into Windows Azure, and it ran!
Also worth noting was that the startup time in Windows Azure was significantly improved. My Jetty Azure project took just a few minutes to become accessible on the Internet (it had taken more than 20 minutes at one point in time).
Mario Kosmiskas also posted an excellent article which showed Jetty and NIO working in Windows Azure (and many great tips which I leveraged for the work below).
Deploying GlassFish
 Since Fujitsu Interstage (based on GlassFish) already works in Azure, GlassFish itself should work as well. So I thought I’d give it a try and learn from the exercise. First I tried to build on the Jetty work, but started running into issues with needing Visual Studio and the Azure tools to copy/move/package large amounts of files and nested folders when everything is placed inside of the project structure – GlassFish itself has 5000+ files and 1100+ folders (the resulting super-long file path names for a few files caused the issue). This became a good reason to try out the approach of loading application assets into role instances from Blob storage service, instead of packaging everything together inside of the same Visual Studio project (as is the best practice for ASP.NET Web Role projects).
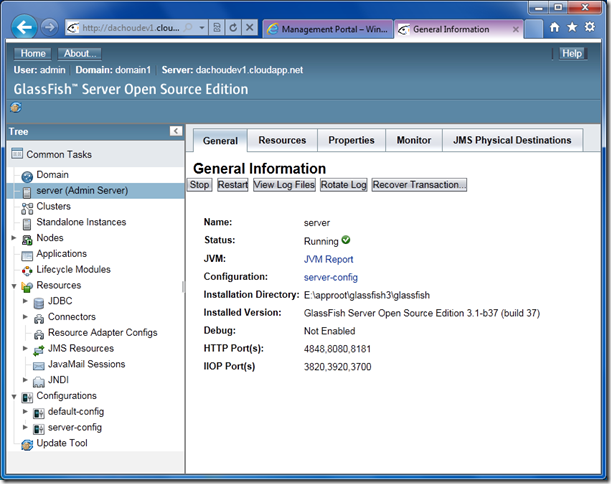
This technique was inspired by Steve Marx’s article last year (role instance using Blob service), and realized using the work from Mario Kosmiskas’ article (PowerShell magic), I was able to have an instance of GlassFish Server Open Source Edition 3.1 (build 37; latest at the time of this writing) deployed and running in Windows Azure, in a matter of minutes. Below is a screenshot of the GlassFish Administration Console running on a cloudapp.net subdomain (in Azure).
To do this, basically just follow the detailed steps in Mario Kosmiskas’ article. I will highlight the differences here, plus a few bits that weren’t mentioned in the article. Easiest way is to just reuse his Visual Studio project (MinimalJavaWorkerRole.zip). I started from scratch so that I could use GlassFish for various names.
1. Create a new Cloud project, and add a Worker Role (I named mine GlassFishService). The project will open with a base project structure.
2. Copy and paste in the files (from Mario’s project, under the ‘JettyWorkerRole’ folder, and pay attention to his comments on Visual Studio’s default UTF-8 enocding):
- lib\ICSharpCode.SharpZipLib.dll
- Launch.ps1
- Run.cmd
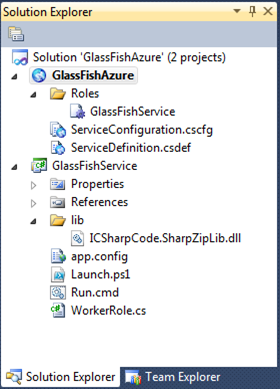
Paste them into Worker Role. For me, the resulting view in Solution Explorer is below:
3. Open ServiceDefinition.cscfg, and add the Startup and Endpoints information. The resulting file should look something like this:
 <?xml version="1.0" encoding="utf-8"?>
<ServiceDefinition name="GlassFishAzure" xmlns="https://schemas.microsoft.com/ServiceHosting/2008/10/ServiceDefinition">
  <WorkerRole name="GlassFishService">
    <Imports>
      <Import moduleName="Diagnostics" />
    </Imports>
    <Startup>
      <Task commandLine="Run.cmd" executionContext="limited" taskType="background" />
    </Startup>
    <Endpoints>
      <InputEndpoint name="Http_Listener_1" protocol="tcp" port="8080" localPort="8080" />
      <InputEndpoint name="Http_Listener_2" protocol="tcp" port="8181" localPort="8181" />
      <InputEndpoint name="Http_Listener_3" protocol="tcp" port="4848" localPort="4848" />
      <InputEndpoint name="JMX_Connector_Port" protocol="tcp" port="8686" localPort="8686" />
      <InputEndpoint name="Remote_Debug_Port" protocol="tcp" port="9009" localPort="9009" />
    </Endpoints>
  </WorkerRole>
</ServiceDefinition>
As you can see, the Startup element instructs Windows Azure to execute Run.cmd as a startup task. And the InputEndpoint elements are used to specify ports that GlassFish server needs to listen to for external connections.
4. Open Launch.ps1 and make a few edits. I kept the existing functions unchanged. The parts that changed are shown below (and highlighted):
 $connection_string = 'DefaultEndpointsProtocol=http;AccountName=dachou1;AccountKey=<your acct key>

# JRE
$jre = 'jre-1.6.0_23.zip'
download_from_storage 'java' $jre $connection_string (Get-Location).Path
unzip ((Get-Location).Path + "\" + $jre) (Get-Location).Path

# GlassFish
$glassfish = 'glassfish-3.1-b37.zip'
download_from_storage 'apps' $glassfish $connection_string (Get-Location).Path
unzip ((Get-Location).Path + "\" + $glassfish) (Get-Location).Path

# Launch Java and GlassFish
.\jre\bin\java `-jar .\glassfish3\glassfish\modules\admin-cli.jar start-domain --verbose
Essentially, update the script with:
- Account name and access key from your Windows Azure Storage Blob service (where you upload the JRE and GlassFish zip files into)
- Actual file names you’re using
- The appropriate command that references eventual file locations to launch the application (or call another script)
The script above extracted both zip files into the same location (at the time of this writing, in Windows Azure, it is the local storage at E:\approot). So your commands need to reflect the appropriate file and directory structure based on how you put together the zip files.
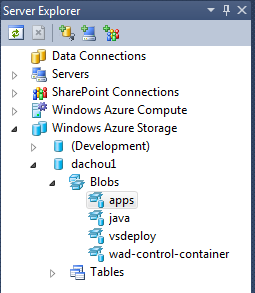
5. Upload the zip files into Windows Azure Storage Blob service. I followed the same conventions of placing them into ‘apps’ and ‘java’ containers. For GlassFish, I used the glassfish-3.1-b37.zip downloaded directly from glassfish.java.net. For Java Runtime (JRE) I zipped the ‘jre’ directory under the SDK I installed. To do the upload, many existing tools can help you do this from a user’s perspective. I used Neudesic’s Azure Storage Explorer. As a result, Server Explorer in Visual Studio showed this view in Windows Azure Storage (and the containers would show the uploaded files):
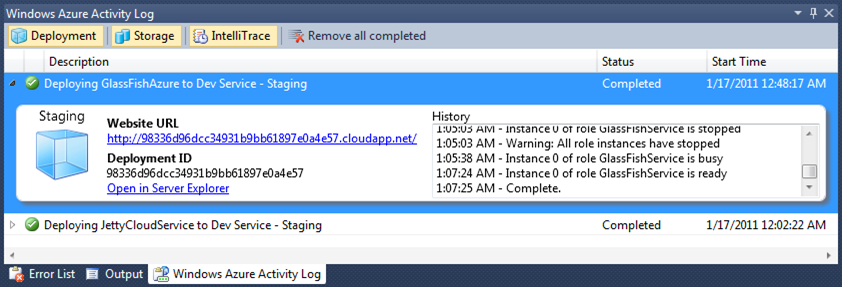
That is it! Now we can upload this project into Windows Azure and have it deployed. Just publish it and let Visual Studio and Windows Azure do the rest:
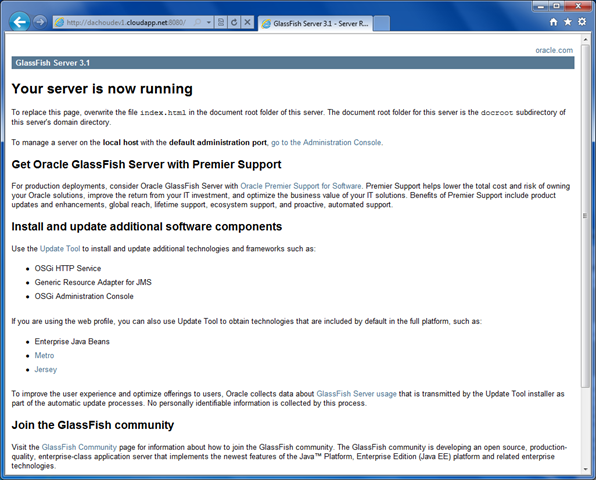
Once completed, you could go to port 8080 on the Website URL to access GlassFish, which should show something like this:
If you’d like to use the default port 80 for HTTP, just go back to ServiceDefinition.cscfg and update the one line into:
<InputEndpoint name="Http_Listener_1" protocol="tcp" port="80" localPort="8080" />
GlassFish itself will still listen on port 8080, but externally the Windows Azure cloud environment will receive user requests on port 80, and route them to the VM GlassFish is running in via port 8080.
Granted, this is a very simplified scenario, and it only demonstrates that the GlassFish server can run in Windows Azure. There is still a lot of work that are needed to enable functionalities Java applications expect from a server, such as systems administration and management components, integration points with other systems, logging, relational database and resource pooling, inter-node communication, etc.
In addition, some environmental differences such as Windows Azure being a stateless environment, non-persistent local file system, etc. also need to be mitigated. These differences make Windows Azure a little different from existing Windows Server environments, thus there are different things we can do with Windows Azure instead of using it simply as an outsourced hosting environment. My earlier post based on the JavaOne presentation goes into a bit more detail around how highly scalable applications can be architected differently in Windows Azure.
Java deployment options for Windows Azure
With Windows Azure SDK 1.3, we now have a few approaches we can pursue to deploy Java applications in Windows Azure. A high-level overview based on my interpretations:
Worker Role using Visual Studio deployment package – This is essentially the approach outlined in my earlier work with Jetty and Windows Azure. With this approach, all of the files and assets (JRE, Jetty distributable, applications, etc.) are included in the Visual Studio project, then uploaded into Windows Azure in a single deployment package. To kick-off the Java process we can write bootstrapping code in the Worker Role’s entry point class on the C# side, launch scripts, or leverage SDK 1.3’s new Startup Tasks feature to launch scripts and/or executables.
Worker Role using Windows Azure Storage Blob service – This is the approach outlined in Mario Kosmiskas’ article. With this approach, all of the files and assets (JRE, Jetty distributable, applications, etc.) are uploaded and managed in the Windows Azure Storage Blob service separately, independent of the Visual Studio project that defines the roles and services configurations. To kick-off the Java process we could again leverage SDK 1.3’s new Startup Tasks feature to launch scripts and/or executables. Technically we can invoke the script from the role entry class in C# too, which is what the initial version of the Tomcat Accelerator does, but Java teams may prefer an existing hook to call the script.
Windows Azure VM Role – The new VM Role feature could be leveraged, so that we can build a Windows Server-based image with all of the application files and assets installed and configured, and upload that image into Windows Azure for deployment. But note that while this may be perceived as the approach that most closely aligns to how Java applications are deployed today (by directly working with the server OS and file system), in Windows Azure this means trading off the benefits of automated OS management and other cloud fabric features.
And perhaps, with the new Remote Desktop feature in Windows Azure, we can probably manually install and configure Java application assets. But doing so sort of treats Windows Azure as a simple hosting facility (which it isn’t) and defeats the purpose of all the fault-tolerance, automated provisioning and management capabilities in Windows Azure. In addition, for larger deployments (many VM’s) it would become increasingly tedious and error-prone if each VM needs to be set up manually.
In my opinion, the Worker Role using Windows Azure Storage Blob service approach is ideally suited for Java applications, for a couple of reasons:
- All of the development and application testing work can still be accomplished in the tools you’re already using. Visual Studio and dealing with Windows Azure SDK and tools are only needed from a deployment perspective – deploying the script that launches the Java process
- Managing individual zip files (or other archive formats) and at any granularity level, instead of needing to put everything into the same deployment package when using Visual Studio for everything
- Loading application assets from the Windows Azure Storage Blob service also provides more flexibility for versioning, reuse (of components), and managing smaller units of changes. We can have a whole set of scripts that load different combinations of assets depending on version and/or intended functionality
Perhaps, at some point we could just upload scripts into Blob service and the only thing is to tell the Windows Azure management portal to run, as the Startup Task, which scripts for which roles and instances from the assets we store in the Blob service. But there are still things we could do with Visual Studio – setting up IntelliTrace, facilitating certificates for Remote Desktop, etc. However, treating the Blob service as a distributed storage system, automating the transfer of specific components and assets from the storage to each role instance, and launching the Java process to run the application, could be a very interesting way for Java teams to run applications in Windows Azure platform.
Lastly, this approach is not limited to Java applications. In fact, as long as any software components that can be loaded from Blob storage, then installed in an automated manner driven by scripts (and we may even be able to use another layer of script interpreters such as Cygwin), they can use this approach for deployment in Windows Azure. By managing libraries, files, and assets in Blob storage, and maintaining a set of scripts, a team can operate and manage multiple (and multiple versions of) applications in Windows Azure, with comparatively higher flexibility and agility than managing individual virtual machine images (especially for smaller units of changes).
