
Introduction to Queues in Microsoft Dynamics CRM 2011
What is a queue?
The analog predecessor to the CRM queue was the incoming and outgoing box on an employee’s desk. When someone has a work item for you to work on they filled out a form and set it in your “incoming” box. Employees often would have different boxes to manage different types of incoming items (different queues) this allows the employee to classify their work. When the item was completed the item would then be moved to the “outgoing” box to be picked up for the next person to work on or file because the item is complete. The problem with the analog process is there is no clear visibility to who is working on what and for how long the papers have been in the inbox. As work volume increases managing work can quickly spiral out of control. The goal of queues in Microsoft Dynamics CRM 2011 is to mimic this analog process and enhance it with the workflow, tracking, automation, and management capabilities.
Queues in CRM 2011
In CRM 2011, queues get a new avatar. Here’s a brief on this:
A queue is a container for just about anything that demands some action – a task that needs to be done, a case that needs to be closed, a phone call that needs to be made – essentially a queue can act as a one stop place for all things you need to work on.
Default Queue:
To get you started, every CRM user and team gets a default queue created with the user or team name respectively. You can choose to use this queue for all your work items, or you can create new queues to organize your stuff, for example on the basis of Priority.
This is different from CRM 4, where every user would have two queues – a private queue, and a work in progress queue created automatically. These queues were like system records, which could not be created externally, and could not be deleted as well. Apart from these queues, an end user could create public queues. In CRM 2011, we have simplified queues such that all queues are alike – there is no notion of a private or a work in progress queue. You can pick up any queue you want, and set it as the default queue for a user or a team. This is a one to many relationship, which means that the same queue can be used as the default queue for multiple users and/or teams.
Enabling Queues:
Out of box, you can add all activities, and cases to queues – this is similar to what you could accomplish in CRM 4 as well. In CRM 2011, you can enable other entities for queues as well. In order to do so, you will need to go to the entity’s customization screen, and check the checkbox: Queues.

Adding objects to queue:
If you have already enabled your entity for queuing, and want to add a record to the queue now, all you need to do is: Select the record from its grid, and click on the Ribbon Button: Add To Queue. Select the queue you want to use, and you are done. If you want to see the queue in which a particular record is present, use the Queue Item Details button. Also note that the queue item details button is available only on the form and not the grid.
Add To queue:

Queue Item Details:

What happens when you add an object to a queue?
Suppose you add a case to a queue. A record of an entity called “queue item” gets created and acts as a link between your case and the respective queue. You can use this queue item record to set additional properties like who’ll be working on this case, or what is the priority for this case, etc. This is a customizable entity, and you can add fields which you want to use to track the record in the queue. When you go to workplace->queues, the grid shows your case record. Selecting this record and clicking Queue Item Detail shows the respective queue item that tracks this case.
What all can you do with the queue item?
You can use the Working on field in the queue item to add a user who’ll be working on the queue item. When you are done with your work, you can release the queue item, which means, there’s no one working on it now. You can also route the queue item to another queue using Add to Queue functionality. The most powerful thing you can do with queue items is: write workflows on this entity. For example, you can write a workflow to send an email to the new worker when the worker on a queue item changes, you can write workflows to escalate a case, if it has stayed in a queue for a certain duration, and so on and so forth.
Auto routing a record:
You can enable auto routing for an entity again via customization. When you do so, creating a record for this entity automatically adds it to the record owner’s default queue. Assigning this record to another user routes this to the new owner’s default queue automatically.
Please note that this behavior is different from CRM 4 behavior, where auto routing could not be controlled by the end user. Creating an activity or case would automatically add it to the in progress queue of the owning user. Assigning an activity would add it to the private queue of the assignee.
Auto routing is automatically enabled for activities and cases in a CRM deployment upgraded from CRM 4 to CRM 2011. In fresh CRM 2011 however, this is turned off by default.
Queue Security Model:
Unlike CRM 4, queues are now a user owned entity, which means various privilege depths are now available for this entity. This ensures that you get control on who all can access your queues.
Queue Item, being a child entity of queue, is owned by the owner of the respective queue. However, in order to create, update or delete a queue item, you do not need create, update or delete privilege on the queue. Rather, you would need AppendTo privilege on the queue to be able to do so.
Emails: are they special?
In general, at a given time, a record can be present in one and only one queue. The only exception to this rule is email in received state. If auto routing is enabled for email, a received email goes to all the recipient queues as well as users’ default queues.
Using workflows to manage:
Back in the v4 days, we had a workflow step called Assign, which would enable you to route an object to a queue. In v5, this has been changed, and is in-line with rest of the entities. If you want to route an object to a queue, use the “Create” step instead, and create a queue item entity. If you are upgrading from v4 to v5, the system will automatically convert your old workflows to use the new constructs.
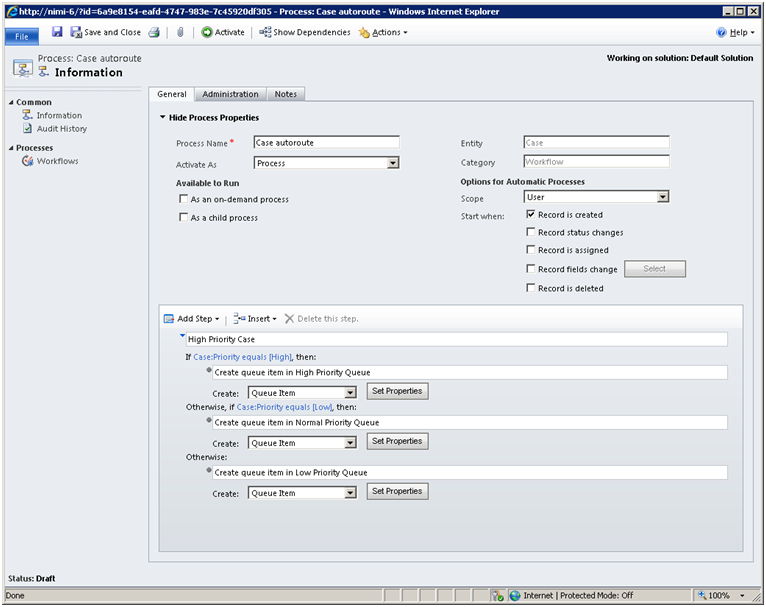
Let us say, you have to deal with 500 new cases every day, and you want to automate the case assignment process to a customer service representative’s queue based on the priority of the case. You can define workflows on case entity in order to do so. Here’s how you’ll do it:
1. Suppose you have three customer service representatives, who take care of high priority, low priority and normal priority cases respectively. Create three queues – high, low and normal. Let us say that the respective Customer Service Representatives monitor these queues.
2. Create a workflow that triggers on Case Create.
3. Add a condition clause on the case’s priority as shown above.
4. Add a create step to create a queue item. Set the properties, and specify the High Priority queue in the queue lookup and the case as the queue item.
5. Repeat similar steps for low and normal priority cases as well.
6. Publish the workflow and you are done!
Another scenario where workflows could be handy are: suppose you want to notify a Customer Service Representative by email, whenever a case has been routed to him to work upon.
Steering your way through the queue SDK:
AddToQueue message:
You can use this message for adding any queue enabled entity record to a queue. If the record is already present in a queue, you can change the queue using this message, or you can update the queue item properties as well. You can refer to the Microsoft Dynamics CRM SDK documentation for code samples around this.
Enabling queues/autorouting:
There are two metadata flags for each entity:
IsValidForQueue: If you set this flag to true for an entity, you can add records of this entity to any queue. By default, this is on for all activities, and Case entity. Please note that the database schema name for this column is IsCollaboration, and you’ll find it in the Entity table.
AutoRouteToOwnerQueue: If you set this flag to true for an entity for which IsValidForQueue = true, then on record create or assign, the record is added to the default queue of the record owner.
Fun with charts:
Queue Items support visualizations and you can create useful charts using these. For example, you can use a chart to track all items on the basis of their priority. Add a custom field called priority to Queue Item, and populate it with desired values for various queue items. Add this field to queue item form and views.
Go to Workplace-> Queues.
Click Charts-> New Charts button.
For Y axis, select Queue Item. For x-axis, select priority.
Save the chart, and you are ready to go!


