Working with Data Maps in Microsoft Dynamics CRM Online
In the Microsoft Dynamics CRM Online November 2009 Service update release, one of the key delivered features was enhanced Import Data Wizard. This feature brings lots of power and functionality and one of its main components that work behind the scene to make everything possible is Data Map. It works as back-bone of Import process by mapping source file and columns to their corresponding target record types and fields in MSCRM.
You have already seen how Import wizard works and how data maps are used in various situations to map the data during import. This blog focuses on Data map save, import and export in MSCRM system.
While doing import, you select data maps on the Select Data Map screen of the wizard and proceed with import. You must be curious about where all these maps reside. Go to Settings > Data Management > Data Maps and you will see all user Import Data Maps available in the system (user should have read privilege on Data Maps). These maps will not include the OOB system maps for SalesForce.com.
Working with Data Maps:
Data Map is a complex entity and contains many kinds of sub-mappings in it. For basic Data Map manipulations, you can use the Wizard itself. However for advanced editing, you may need to Export the data map, make changes with your favorite XML editor and import back in with new user friendly name.
Manipulating Data Map Manually:
While importing a map xml file in MSCRM system, system checks for few properties of map:
- Duplicate map name
- Map XML is well formed
- Target record type and field names do exist in MSCRM
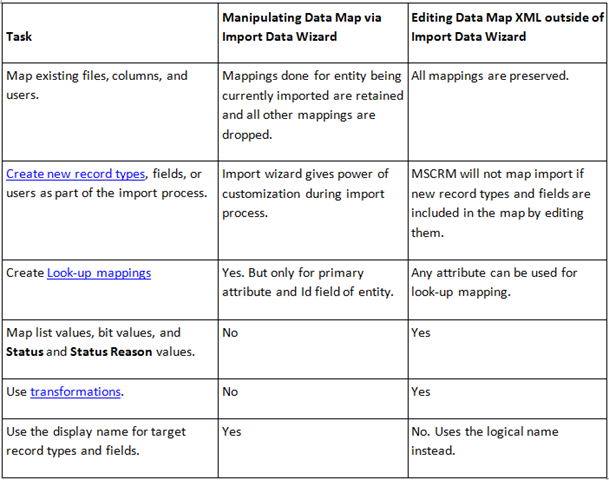
Import wizard also provides a way to modify any existing map during import process. But there are few specific scenarios where complex data transformation is required and in that case, it is recommended that the user edit the map manually to provide transformation mappings. Below table compares the scenarios when the user may need to manipulate the maps outside of Import Data Wizard:
Once the map is edited and uploaded to the system, it can be used for future import processes.
Manipulating Data Map via Import Wizard:
During import via Import Wizard, after selecting a file, user is presented with Select Data Map screen. There user has to select between AutoMap and Existing map in the system. Now user can create/edit the data map as below:
- To create a data map select AutoMap, let the system take the first attempt at creating a map that can be used
- To edit any existing map, select that map and start the import process. The original copy of map is saved and all changes are done in a temporary copy of this map.
- Proceed with wizard and specify new mappings as required.
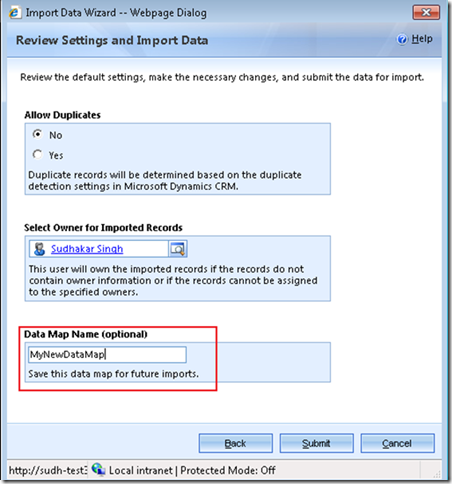
- On “Review Settings and Import Data” screen of wizard, user can save his new map. Please notice that the mappings done for record types that are present in the user data files being imported are saved and other mappings are dropped from map.
This map will be saved in system and can be used for the future imports.
I hope this little introduction with data maps will come handy while doing the import.


