
Error Handling in Data Migration Wizard
In this entry I am going to talk about different features in Data Migration Manager(DMM) where error situations can appear, how the tool notifies the user, filters out the erroneous content and proceeds for migration with the acceptable data. Let’s take them one by one.
A. Data Migration:
DMM follows the following sequence of actions in order to upload the data
- Selection and parsing of source files
- Syncing customizations from CRM Server
- Conversion of the parsed data to a format understood by CRM server.
- Uploading of data on to the server.
At each of these stages errors can occur each of which can be broadly classified into two types
File specific errors – This type refers to a kind when whole of the file cannot be used for further. Files encountering such errors will not be included for further processing. In case one wants to include these files, one has to start over after removing the errors.
Record specific errors – This type of errors occur on specific row of data. These errors are record specific and have line numbers associated with them on the error page. One can continue with the data uploading excluding these records or can start over after correcting the data in these rows.
Now let us get back to the 4 stages and see what type of errors can occur in each of them
1. File uploading and parsing:
While uploading the file DMM is smart enough to let you know if that big a file will be processed or not beforehand rather than telling that in the end, DMM lets you know if the file size is too large to upload. Empty files, files with duplicate headers and similar problems are shown to the user on an error page. The user may want to rectify the errors or may choose to skip these files and proceed with rest of them.
After uploading and during parsing it might encounter empty rows, rows with more/less number of column values than expected, rows with data longer than the text size limitation etc. i.e. errors which are row specific. Those rows are displayed in the error screen with the reason of failure.
To migrate those records user can start over after correcting the data or might continue with rest of the data present in that file. The rows in which errors are found will be excluded from any further processing.
2. Customization:
CRM server customizations are synced with the DMM twice – Once when the application is launched and one more time before starting conversion. DMM won’t allow to create a duplicate entity in normal situations, but what if an entity is created after DMM has synced. If the same entity creation is asked from DMM – error will be reported. Same is the case with attributes. There errors are shown on the conversion error screen(duplicate entity, attribute etc) or the upload error screen(picklist customization etc). Note that the entity level failures are treated as file specific errors(whole file has to be ignored), while attribute level failures are treated as record level failures(that attribute will be ignored, rest of the data can be migrated). If your data contains list values which are not present on the CRM server or the length of the attribute values is more than what is present in server, DMM enables you to customize the server as per the data this can be done by selecting the checkbox on the “Get Started” page. If you get errors saying the list value does not exist on the server that means you have unchecked the checkbox in the beginning, to get the data in restart migration with the checkbox selected.(The check box is selected by default).

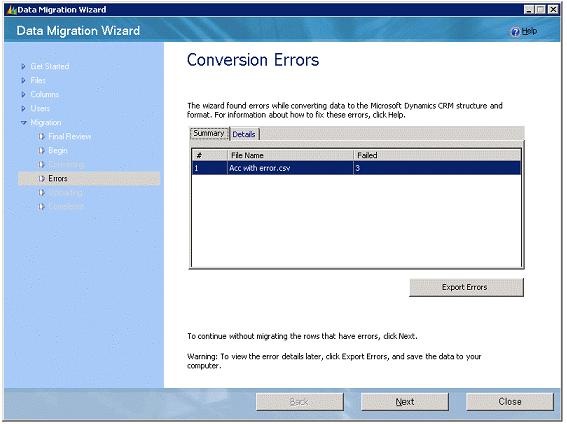
3. Conversion:
In this stage the parsed data gets converted to a CRM format.
This phase not only converts the data but also rejects the files which contain inconsistent data, for e.g. files which do not have correct target entity defined, files with invalid lookup column mappings and similar are also detected and are shown to the user. Errors which persists at file level are shown on the conversion error screen, they don’t have any line number associated with them. Since other data is also converted to CRM understandable format, record level errors like invalid date-time format, unresolved or duplicate lookup references are also detected. These errors are row specific and have line numbers associated with them in the error page. One can continue with the data uploading excluding these records.
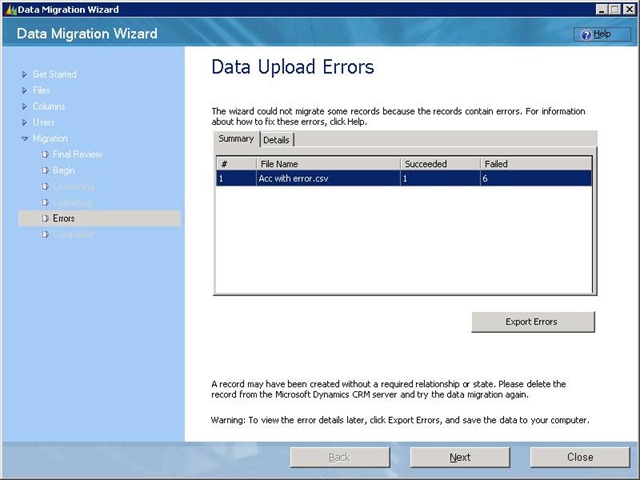
4. Uploading data on the server: The data is now ready to be uploaded on the CRM server.
The record creation/updation might fail for a number of reasons say when the mandatory columns are missing, when CRM attribute expects data in some other format(date time) and a whole bunch of other reasons. The whole file can be treated as erroneous if the target attribute defined is wrong or when target attribute is deleted when the migration started. Once again DMM shows these errors on the upload error screen with details.
B. Exporting of errors in DMM:
At every stage during the migration you may encounter an error screen and at every screen there is an export functionality provided by DMM. For the parsing stage you can export the errors so as to correct records in the original file and retry them. All the failed records columns, error description and necessary information to correct the data in all the files are exported here. For Conversion and Upload each of the corresponding error screen will have two level of details
1. File level summary of failed records. If you export the errors while on the summary tab, all the errors of all the files with corresponding line number, column header, column value with some More information will be exported. One needs to keep this list, rectify the errors in the original file and re-import them.
2. Details of failed records per file.
- On the other hand if one exports the errors while on the details tab, all the errors of the particular file(which was highlighted on the summary screen) will be exported with Errorcode, description, erroneous column and its value and the most importantly with all the column values of that record.
- One needs to just export, make correction in the column as specified in the error description and re-import this exported file. The benefit here is that one doesn’t need to go back and modify the original file remove successful records from there and then try to re-import. All the data and the ways to correct data are present in the exported file itself which makes life easier.
Sometimes, when the description is not clear More Information column becomes very useful. This column is not visible on DMM, it appears only when the errors are exported and the error file is viewed.
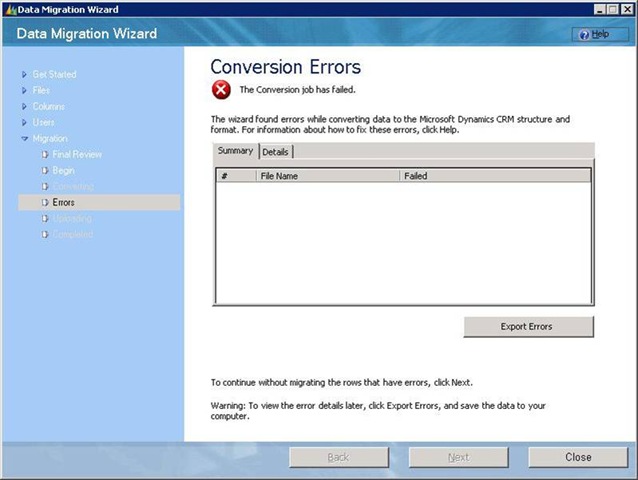
C. Exceptional Cases – There are exceptional cases when in any of the above stages this screen(or similar) might appear with no summary and no details, in such cases one needs to go through the traces and see the reason of failure. There are other cases too when the DMM is not able to proceed, for all such cases traces are helpful.
To enable traces you need to
- Edit the registry key [HKEY_LOCAL_MACHINE\SOFTWARE\Microsoft\Data Migration Wizard] and set the value of TraceEnabled to 1.
- Look for other values such as TraceCategories to set depth of trace.
- Log and trace files are created in ” %USERPROFILE%\Application Data\Microsoft\OrgName”.
- Look for CrmAsyncService-bin in the file name, this is the log of the service which does the task of parsing, conversion and uploading and find the error. Two other important trace files contains “DMHoster” and “DMWizard” in them. DMHoster is the local web server which is responsible for making web-service calls, DMWizard is what you see as DMM, any problems of the application(including initialization, authentication) can be looked up here. A combination of these three logs can be used to figure out most problems in the functionality of DMM.
- Go through the trace files to rectify the problem.
D. Data Maps:
DMM provides import, export and deletion of data maps into the tool. While exporting the map means dumping the data map in a file, Import of a map requires validations, validations such as invalid schema, duplicate map name, duplicate target-attribute mapping, mapping to a non-existent attribute or to a non-existing entity, mismatched attribute mapping(picklist to lookup), mapping to an attribute which is not valid for create etc. A whole lot of validations are done while importing and any failed validation is shown as an error to the user. Deletion of a map ensures that the map being deleted is not used by any other running job. If it is being used then the error is shown, else the map is deleted. Here is the screen notifying the user.

As an end note I would like to throw some light on the difference between field and data delimiter which has been causing lot of confusion
- Field delimiter – This is the separator for data values, this is mandatory to be present in files if files have multiple fields
- Data Delimiter – This is a container which contains the data value, this need not be present around data values
Lets understand this by an example by setting the field delimiter as ‘,’ and the data delimiter as ‘ “ ‘ . Following are the examples which will help understanding their meanings and usage.
Full Name, Address
Adam, Street B NewYork – Correct
Adam Smith, Street B, NewYork – InCorrect
“Smith, Adam”, “Street B, NewYork” – Correct(this is the way to go if data contains field delimiter)
“Adam Smith, Street B, Newyork” – Incorrect( it will be treated as a single column)
Note that the data delimiter takes a precedence over the field delimiter as shown in the 3rd row.


