Many-to-many Relationships in MS Dynamics CRM 3.0
Ronald Lemmen is not only an CRM MVP, he is one of the most helpful people in the field answering questions for users and programmers alike. So it is with great pleasure that we highlight this guest blogger.
The Microsoft Dynamics CRM 3.0 product comes with a predefined set of entities, attributes and relationships. This set of metadata can be extended by the system customizer to make the product fit the client’s needs. This person can remove attributes and entities and also add new metadata including relationships between entities. The adding of relationships is unfortunately limited to the addition of many-to-1 or 1-to-many relationships. Many-to-many relationships are needed in some business cases though. This article will do a deep dive into the many-to-many relationship possibilities within the Microsoft Dynamics CRM 3.0 product.
I will use one business case for all of the possibilities in this article. Let’s pretend to be a wholesale company which is selling branded cloths. Our company wants to keep track of the brands their resellers sell. Based on that information we can do marketing campaigns related to specific brands.
First approach: Checkbox list
Before going into deep customizations I’d like to stretch that sometimes a simple change can already be the solution for the business case. This first approach only uses attributes. You can add several checkboxes to a section of a tab or even a new tab to let the end user select what brands this retailer sells.
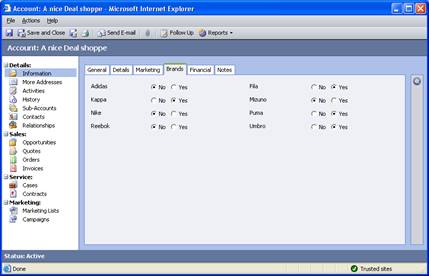
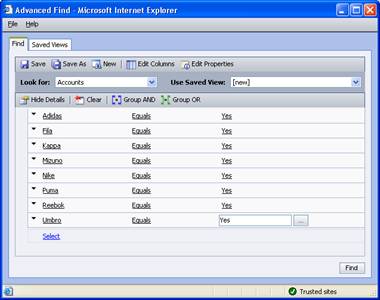
Creating a marketing campaign based on the selection as made in these fields is very easy. In the Advanced Find you can search for Accounts which have any of these attributes set to true or false based on the goal of your campaign.
This approach works best if you do not have more than 10 checkboxes and if the system administrator is allowed to change the values. Working with more the 10 checkboxes is not advised due to the amount of data on the screen and the clicks needed to make a selection in the advanced find.
Second approach: Multi select box
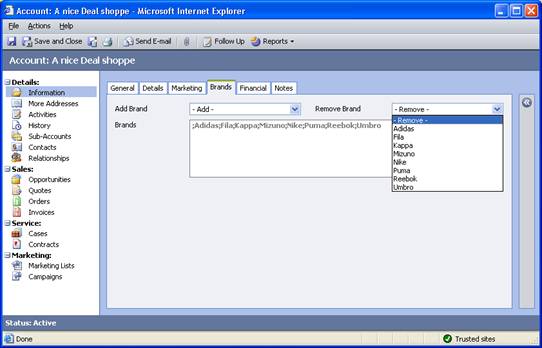
This approach also stays within the borders of a single entity. In this approach we’ll create two pick lists and one NText field. One of these pick lists will be labeled ‘Add Brand’, the other ‘Remove Brand’. The selected value will be added or removed from the Ntext field. There are a few tasks we need to perform to achieve this:
-
- Add two pick lists (“Add Brand” and “Remove Brand”) and a Ntext field (“Brands”, suggested maximum length of 5000) to the attribute list
-
- Fill the picklist “Add Brand” with all the brands that should be available for selection.
-
- Create JavaScript codes to add and remove the selected value from the Ntext field, including a separator character
-
- Set the Add and Remove pick lists to be not searchable. This can be done after applying hot fix rollup 1
- Set the Ntext field itself as read-only
The JavaScript codes are added to this post. Those are based on a post by James Wilcox.
If you choose to use this approach, then you can use the advanced find to fetch all data that matches the rule: Ntext field – contains – [your value]. You will have to enter your value by hand.
This approach works best if you do not have more than 25 possible values and if the system administrator is allowed to change the values. In this case I do advice not to work with more than 25 possible values because of the usability of the advanced find feature.
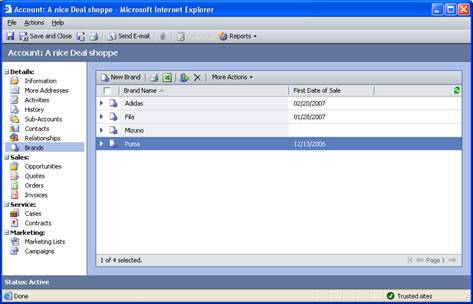
Third approach: Brands entity
This approach will add just a single entity named Brands with a one-to-many relationship with account. On the entity Brand will be a picklist to be able to select the right brand value.
The Requirement Level of the Primary Attribute should be set to ‘No Constraint’ while creating the entity Brand. You can find this setting on the tab Primary Attribute. If you wish you can uncheck the Notes and Activities options.
A pick list named “Brand Name” needs to be added to the entity Brands after the creation. The Requirement Level of this picklist should be set to Business Required. Fill the picklist with all the brands that should be available for selection. If you wish you can add other fields which provide more information regarding the relationship as well. An example in this business case would be ‘First date of sale’.
After adding the attributes to the entity and its form, then create a many-to-one relationship between the entities Brand and Account. Name this relationship ‘Account’ and set its relationship to Parental. The records related to the account should be deleted as soon as the account is deleted.
You should also modify the associated grid views to contain the picklist value and eventually the additional data fields. Best practice is to set the name, which is the primary attribute, to the value of the selected picklist value. This value will be shown when the entity is used in another one-to-many relationship. In the code example I do set the value by using JavaScript on the attribute’s OnChange event. In the form OnLoad I do hide the name field. A better approach would be to use a callout, but due to the scope of this article the JavaScript solution is enough.
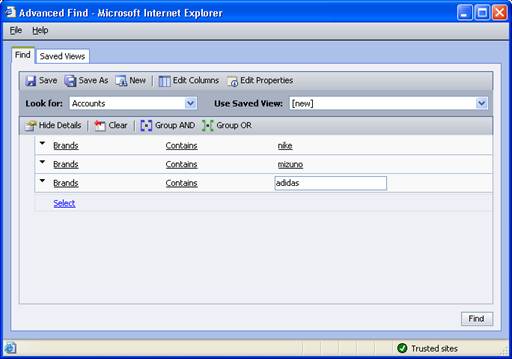
Fetching all accounts which match any of the selected brands can be done by using the Related Brands(Account). You are able to select all accounts which do have a related brand with the brand name set to be equal to any selection you wish. An example is shown below.
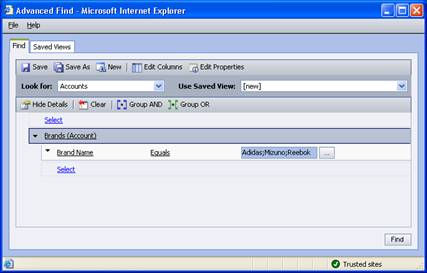
This approach works best if you do not have more than 50 possible values, due to the usability of the picklist, and if the system administrator is allowed to change the values.
Fourth approach: True many-to-many relationships
This is a solution which will be defined as the best many-to-many relationship. By developers. The structure of storage matches the mind of a developer, but this will not necessarily match the mind of the end user. In this part I’ll describe how to create this many-to-many relationship and how the end user will work with it.
This approach will use two custom entities of which one is a linker entity. It is a bit more work than the previous approaches, but you have the advantages of the proven methodology of many-to-many relationships. These advantages include:
-
- You can bind the entity Brand to other entities
-
- End users can add new Brands themselves
-
- Basically no restriction of amount of Brands
- You can add detailed information to both the Brand as well as the relationship
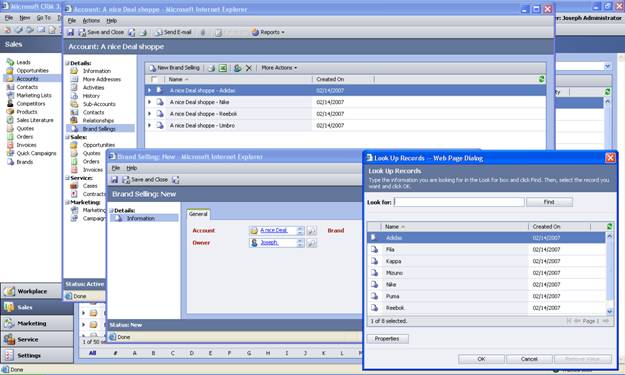
The first step is to create a new entity Brand. You can set some extra attributes on this entity like “Website” and “Customer Service Email”. Also add these attributes to the form and views. You can set the area sales as the area to show this entity. The end user will then be able, if they have appropriate rights, to add new brands.
The second step is to create a linker entity. The name used in the example is “Brand Selling”. This entity will function as an intermediate table between the two related entities. While creating the entity make sure that you uncheck the Notes and Activities Options. If needed add some relationship properties. The Requirement Level of the Primary Attribute should be set to ‘No Constraint’ while creating the entity Brand. You can find this setting on the tab Primary Attribute.
Now create a many-to-one relationship between the entity Account and the linker entity. The Type of behavior should be referential. Set the Requirement Level of the Account to Business Required. Then create a one-to-many relationship between the linker entity and the entity Brands. Again the type of behavior should be referential and the Requirement Level to Business Required. After creating the relationships add both lookup fields to the linker entity’s form.
Again the grid views of the linker entity should be modified. Add the lookup fields, remove the owner, created date and name. Also add additional fields if needed. After publishing your modifications you can add a brand to an account from an account view, but also from a brand.
Some minor changes should be done to fine-tune this relationship. These are the settings for the primary attribute and checking for duplicate relationships. For this approach there are two ways of dealing with the Primary Attribute. The value of this attribute, by default the name attribute, should be set if you are going to use this entity in another relationship. You could either remove the primary attribute and set it by using a callout or hide it and set the value by using JavaScript. In this example the latter option is used. Another callout could be added for dealing with duplicate relationships. If the relationship already exists, then the creation of the relationship can be canceled.
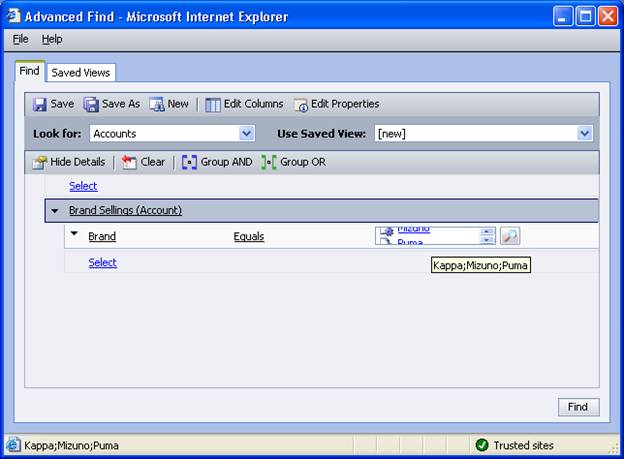
The addition of new brands to an account is not too hard to understand for an end user. It will be harder to make them understand the way to work with this in advanced find. You will need to use twice the related entity. You will search for accounts which have a related brand selling of which the brand is set to the brand they want to work with. To help the users find their data quickly, you can create several reports which perform the most executed search queries.
Final Notes
As you have seen in this document, there are different solutions to implement a many-to-many relationship. The examples shown in this article all stay within the borders of Microsoft Dynamics CRM. It is of course possible to create a solution which uses an IFrame with custom code instead of showing an linker table. Other solutions can be bought by ISV’s like c360 or Axonom.
With all this in mind, we can only wait for Titan to be released and see if Microsoft managed to get an even better solution into the new Dynamics CRM product.