Deploying a VSTO 2003 add-in is a little more complicated than the 2007 and 2010 versions. This is because VSTO 2003 solutions require explicit code execution permissions to be assigned using the CASPOL tool, otherwise they will fail to load.First we need to build a very simple Word 2003 add-in project. 1. Open 'Visual Studio 2008';2. Go to 'File' > 'New' > 'Project';3. In 'Project Types' > go to 'Visual C# ' > 'Office' > '2003' and select 'Word 2003 Add-in';4. Choose a Name and a Location for the project, then click 'OK';5. Insert the following code in 'ThisAddIn.cs':
using System;using System.Windows.Forms;using Microsoft.VisualStudio.Tools.Applications.Runtime;using Word = Microsoft.Office.Interop.Word;using Office = Microsoft.Office.Core;namespace WordAddIn2003_AllUsersDeployment { public partial class ThisAddIn { private void ThisAddIn_Startup(object sender, System.EventArgs e) { this.Application.Startup += new Microsoft.Office.Interop.Word.ApplicationEvents4_StartupEventHandler (Application_Startup); } void Application_Startup() { System.Windows.Forms.MessageBox.Show("Test add-in loaded."); } privatevoid ThisAddIn_Shutdown(object sender, System.EventArgs e) {} #regionVSTO generated code ///<summary>/// Required method for Designer support - do not modify /// the contents of this method with the code editor. ///</summary> privatevoid InternalStartup() { this.Startup += new System.EventHandler(ThisAddIn_Startup); this.Shutdown += new System.EventHandler(ThisAddIn_Shutdown); } #endregion }} |
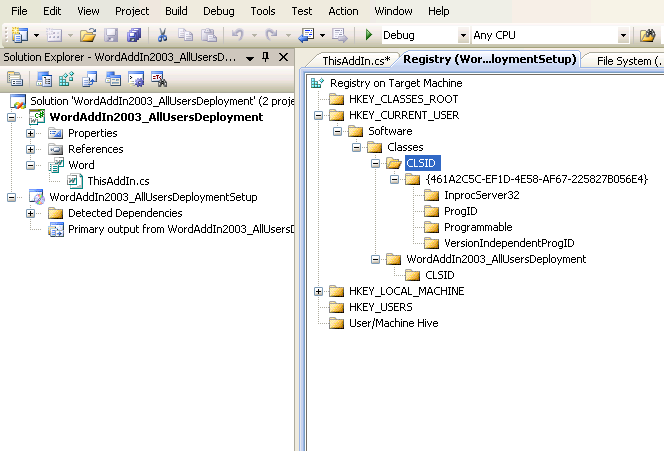
Customizing the deployment projectAs you might have noticed, the Visual Studio wizard already built a Setup Project for our add-in Solution. If we take a look at its Properties, we'll notice that the add-in is already selected as 'Primary Output'.The next thing we need to check are the Registry settings: right-click on the Setup project from 'Solution Explorer' view, select 'View' > 'Registry'.
If we dump the key structure in Notepad, it will look like this:
| Windows Registry Editor Version 5.00[HKEY_CURRENT_USER\Software\Classes\CLSID\{461A2C5C-EF1D-4E58-AF67-225827B056E4}] @="WordAddIn2003_AllUsersDeployment -- an addin created with VSTO technology" [HKEY_CURRENT_USER\Software\Classes\CLSID\{461A2C5C-EF1D-4E58-AF67-225827B056E4} \InprocServer32] @=hex(2):25,00,43,00,6f,00,6d,00,6d,00,6f,00,6e,00,50,00,72,00,6f,00,67,00,72,\ 00,61,00,6d,00,46,00,69,00,6c,00,65,00,73,00,25,00,5c,00,4d,00,69,00,63,00,\ 72,00,6f,00,73,00,6f,00,66,00,74,00,20,00,53,00,68,00,61,00,72,00,65,00,64,\ 00,5c,00,56,00,53,00,54,00,4f,00,5c,00,38,00,2e,00,30,00,5c,00,41,00,64,00,\ 64,00,69,00,6e,00,4c,00,6f,00,61,00,64,00,65,00,72,00,2e,00,64,00,6c,00,6c,\ 00,00,00 "ManifestName"="WordAddIn2003_AllUsersDeployment.dll.manifest" "ThreadingModel"="Both" "ManifestLocation"="C:\\Program Files\\ms\\WordAddIn2003_AllUsersDeploymentSetup\\"[HKEY_CURRENT_USER\Software\Classes\CLSID\{461A2C5C-EF1D-4E58-AF67-225827B056E4}\ProgID] @="WordAddIn2003_AllUsersDeployment"[HKEY_CURRENT_USER\Software\Classes\CLSID\{461A2C5C-EF1D-4E58-AF67-225827B056E4} \Programmable] [HKEY_CURRENT_USER\Software\Classes\CLSID\{461A2C5C-EF1D-4E58-AF67-225827B056E4}\VersionIndependentProgID] @="WordAddIn2003_AllUsersDeployment" [HKEY_CURRENT_USER\Software\Classes\WordAddIn2003_AllUsersDeployment] @=""[HKEY_CURRENT_USER\Software\Classes\WordAddIn2003_AllUsersDeployment\CLSID] @="{461A2C5C-EF1D-4E58-AF67-225827B056E4}" |
As you may have noticed, the setup project targets the HKEY_CURRENT_USER Registry location. For us to successfully install the add-in to all users, we need to target the HKEY_LOCAL_MACHINE hive. We can quickly drag and drop these keys using the mouse, to fix this problem ...
Manually granting CASPOL access to our solution
The article https://msdn.microsoft.com/en-us/library/6exya3kf.aspx (Security Requirements to Run Office Solutions (2003 System) ) states that Application-level and Document-level 2003 solutions will require full trust permission in .Net Framework ..
Security Requirements to Run Office Solutions (2003 System) https://msdn.microsoft.com/en-us/library/6exya3kf.aspx=======================================================================[..]
Document-level customizations and application-level add-ins incorporate the security features available in the .NET Framework. This enables your solution to take advantage of a range of evidence on which to base trust decisions.
To deploy and run a Microsoft Office solution, you must grant full trust to the assemblies in the security policy of each end user. In the case of customizations, if the document is in a network location instead of on the user's computer, you must grant full trust to the document as well. For information about setting security policy on end user computers, see Deploying Security Policy.
Microsoft Office solutions add a custom security restriction of not accepting All Code or Zone-based evidence types, which means that Microsoft Office applications will not run any assemblies that are on the local computer, the network, or the Internet until the assembly is given permission (granted trust) in your security policy.Levels of Trust
Levels of trust in .NET Framework security include these three:
Full trust. This level grants the code permission to do any action that the current user can do. All code must have full trust to run in Office solutions.
Partial trust. This level is a restricted permission set that grants only specified permissions. Partially trusted code will not run in Office solutions.
Untrusted. This level grants no permissions, so the code does not run.
The required permission set is full trust; Office solutions do not run managed code extensions that have partial trust or no trust. For more information about permission sets, see Named Permission Sets.
Types of Evidence
Types of evidence in .NET Framework security include the following:
All code. Application directory. Global assembly cache (GAC). Hash. Publisher. Site. Strong name. URL. Zone. Custom. (msosec.dll for Office solutions. For more information, see How to: Grant Permissions to Documents and Workbooks in Shared Locations (2003 System).)
[..] |
We can manually grant full trust permission to our add-in using these steps:
How to: Grant Permissions to Folders and Assemblies (2003 System) https://msdn.microsoft.com/en-us/library/zdc263t0.aspx=======================================================================[..]
The following procedures grant full trust permissions to an assembly or folder in a Visual Studio Tools for Office solution. Normally, you grant permissions to a specific assembly. If you have several assemblies, and you are certain that the location is secure, you can grant full trust to the folder where the assemblies are located. If you grant trust to the folder, all the assemblies in that folder and its subfolders are also trusted.
There are three ways to grant permissions to folders and assemblies in Office solutions:
Using the Trust Assemblies Location property in Visual Studio. (Useful only during development.)
The Trust Assemblies Location property only works during development; it has no effect on end users. For this reason, you cannot use this method for deployment. For more information, see Properties in Visual Studio Tools for Office Projects. Using the Microsoft .NET Framework 2.0 Configuration tool.
This tool provides a graphical user interface for working with security policy. It is not included with Visual Studio 2008. You can download the tool as part of the .NET Framework 2.0 SDK from the Microsoft Download Center. For an example, see .NET Framework 2.0 Software Development Kit (SDK) (x86). Using the Code Access Security Policy tool (Caspol.exe).
This tool is a command-line interface for working with security policy.
[..]Using the .NET Framework 2.0 Configuration Tool
To install this tool, download and install the .NET Framework 2.0 Software Development Kit (SDK) from the Microsoft Download Center.
The procedure to follow depends on where the assembly or folder is located: > On your local computer. > On another computer on a network (or a mapped drive).
To grant full trust to an assembly or folder on your local computer
| 1. In Control Panel, open Administrative Tools. 2. Run Microsoft .NET Framework 2.0 Configuration. Note: There might be several similar tools with names that start with Microsoft .NET Framework. Ensure that the configuration tool you use matches your version of the runtime.
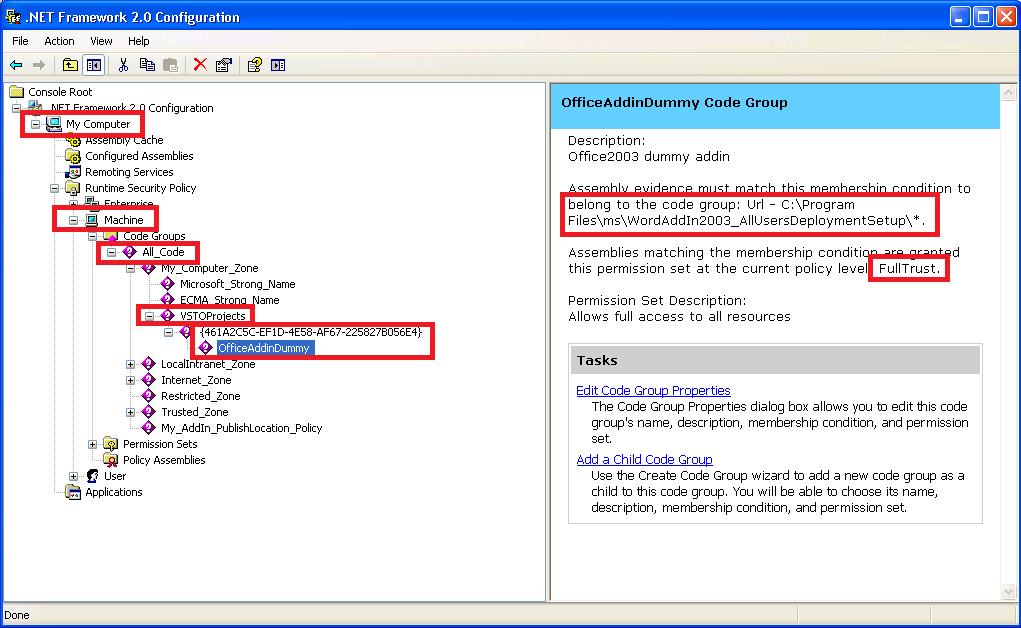
3. In the treeview on the left side, expand .NET Framework 2.0 Configuration, expand My Computer, expand Runtime Security Policy, expand User, expand Code Groups, expand All_Code, and then expand VSTOProjects. Note: If you have not compiled a Visual Studio Tools for Office project before, you will not have the VSTOProjects folder. You can add the new code group to the All_Code root node, or you can compile a Visual Studio Tools for Office project to have the VSTOProjects folder created automatically.
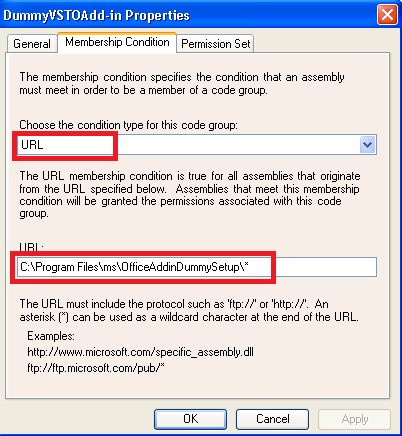
On the right is the VSTOProjects Code Group description, which has aTasks section at the bottom of the page. 4. In the Tasks section, click Add a Child Code Group.The Create Code Group wizard starts. 5. Select Create a new code group, and type a name and description that will help you identify the project. Click Next. 6. In the Choose the condition type for this code group list, click URL. 7. In the URL box, type the full path to the assembly, or the path to the bin folder of the project followed by an asterisk (for example, c:\path\ExcelApplication1.dll or c:\path\ExcelApplication1\bin\*). Click Next. Note: If you type the path to the bin folder, all assemblies in that folder and all its subfolders are granted full trust on your computer. Ensure that no unauthorized people have access to folders that are fully trusted, or someone could put a malicious assembly in the folder and the assembly would run with full trust.
Caution: Do not grant permissions to an entire hard disk (such as C:\*) or to general folders such as My Documents, because you might grant permissions to cached assemblies from the Internet or from e-mail messages. Only grant permissions to specific project folders that contain assemblies you know are safe to run.
9. Select Use existing permission set, and then select FullTrust from the list. 10. Click Next. 11. Click Finish. |
[..]Using the Code Access Security Policy Tool (Caspol.exe)
You can also grant full trust to a folder from a command prompt by using the Code Access Security Policy tool (Caspol.exe) . For more information about Caspol.exe, see Code Access Security Policy Tool (Caspol.exe).You can grant trust to a folder on your local computer at the User level with normal user permissions. To grant trust to a network location, you must have administrator privileges and change the security policy at the Machine level. The Machine policy level acts independently ofthe User policy level, and the Machine policy level does not grant full trust to the Intranet zone even if the User policy does. The policy levelsmust agree.
| Type the commands manually. Copying and pasting the commands into the command prompt might result in Unknown Option errors. |
To grant full trust to a local folder > Type the following command at the Visual Studio Command Prompt.
caspol -u -ag All_Code -url C:\<FolderName>\<FolderName>\* FullTrust -n "<Name>" -d "<Description>"
[..]
For more information, see How to: Add Code Groups Using Caspol.exe.Note: After policy is deployed, everyone that is affected by the policy change must quit and then restart all Office applications used in the solution before the policy changes are enforced. If Microsoft Office Word is part of the solution, users must also quit and restart Microsoft Office Outlook. Also, if a user has opened a document or workbook in Internet Explorer, the process could still be running. Check Windows Task Manager to ensure there are no instances of the Office application. Other applications that host Office applications can also prevent the new permissions from being enforced. Users should quit all applications that use Office, hosted or stand-alone, when security policies are changed. |
|
Here is how my .NET Framework 2.0 Configuration console looks like:
If you don't feel like downloading the entire .NET SDK to be able to use this tool (while the add-in is still under development and you need to experiment with CASPOL permissions), you may download MSCORCFG.MSC from here: https://blogs.msdn.com/b/astebner/archive/2006/01/23/516671.aspx. Once you run the setup project, the tool found at "C:\Program Files\Microsoft.NET\SDK\v2.0\Bin\mscorcfg.msc" or at "C:\Windows\Microsoft.NET\Framework\v2.0.50727\mscorcfg.msc".
If you prefer the command-line version, you may create the same setup by running these commands:
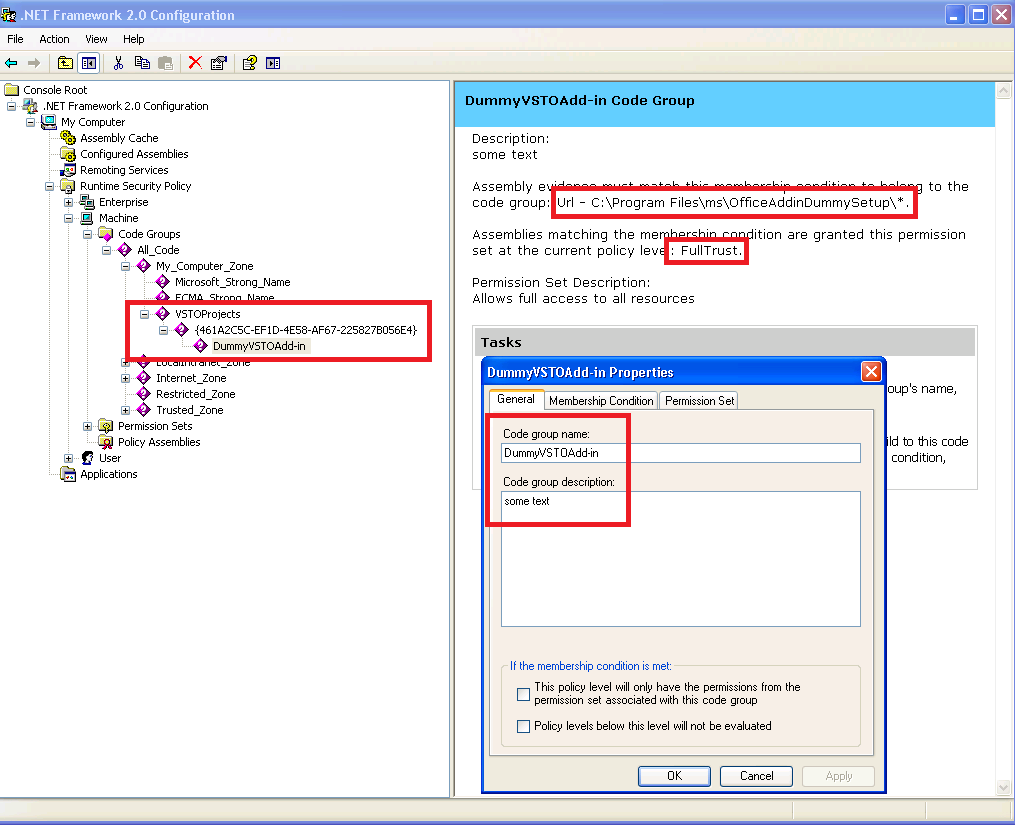
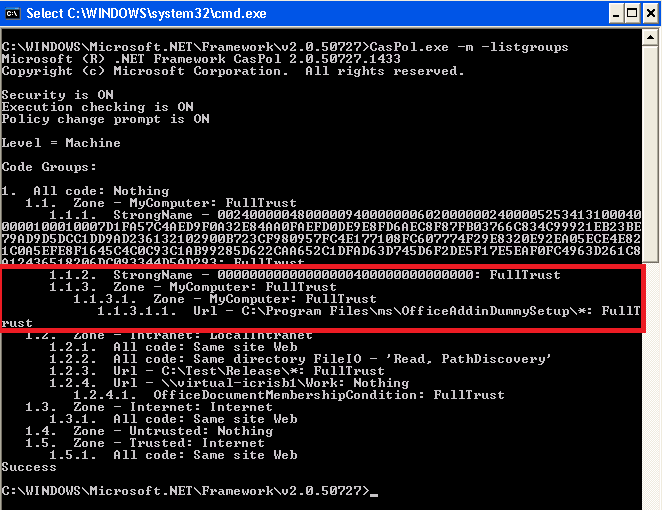
C:\WINDOWS\Microsoft.NET\Framework\v2.0.50727>CasPol.exe -machine -addgroup 1.1. -zone MyComputer FullTrust -n "VSTOProjects"C:\WINDOWS\Microsoft.NET\Framework\v2.0.50727>CasPol.exe -machine -addgroup "VSTOProjects" -zone MyComputer FullTrust -n "{461A2C5C-EF1D-4E58-AF67-225827B056E4}" C:\WINDOWS\Microsoft.NET\Framework\v2.0.50727>CasPol.exe -machine -addgroup "{461A2C5C-EF1D-4E58-AF67-225827B056E4}" -url "C:\Program Files\ms\OfficeAddinDummySetup\*" FullTrust -n "DummyVSTOAdd-in" -d "some text"
.. and as you can see from the screenshot below, the results are similar.
Of course .. you can just run this commandline: CasPol.exe -m -listgroups .. to visualize your entries, but mscorcfg.msc makes it a lot more easier in my opinion.
How to automate the CASPOL tool?
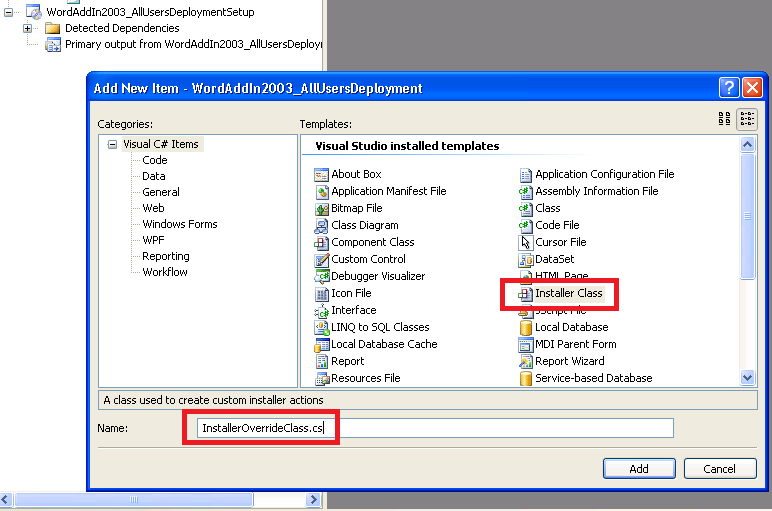
We need to add a special type of class which executes our custom code when the MSI Installer is executed on the end-user's machine:1. Right-click on the entire Solution in 'Solution Explorer' and select 'Add' > 'New Project... ';2. From the 'Visual Studio installed templates' list, select 'Empty Project'; Enter some name (I chose the name InstallerOverrideProject for this example) and click OK;3. Right-click the newly inserted project and select 'Add' > 'New Item ... ', select 'Installer Class'; Enter any name you want (for this example I used: InstallerOverrideClass) and close the window;
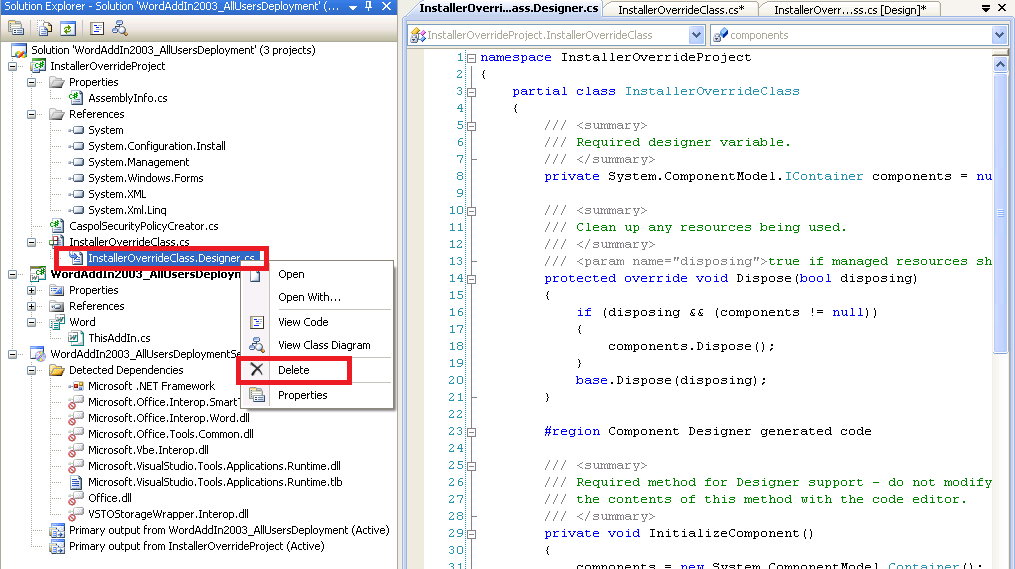
If you open the 'InstallerOverrideClass.cs', you will see that this class derives from System.Configuration.Install.Installer. Delete the InstallerOverrideClass.Designer.cs:
4. Repeat the same actions from the previous step to insert another simple C# class named 'CaspolSecurityPolicyCreator.cs'; Paste the following code inside:
| //-------------------------------------------------------------------//// Copyright (C) Microsoft Corporation. All rights reserved.//// THIS CODE AND INFORMATION ARE PROVIDED AS IS WITHOUT WARRANTY OF // ANY KIND, EITHER EXPRESSED OR IMPLIED, INCLUDING BUT NOT LIMITED // TO THE IMPLIED WARRANTIES OF MERCHANTABILITY AND/OR FITNESS FOR A// PARTICULAR PURPOSE.//-------------------------------------------------------------------
using System;using System.Diagnostics;using System.IO;using System.Reflection;using System.Runtime.InteropServices;using System.Security.Permissions;using System.Text;
namespace InstallerOverrideProject{[PermissionSet(SecurityAction.Demand, Name = "FullTrust")]
classCaspolSecurityPolicyCreator{ private CaspolSecurityPolicyCreator() {} internal static void AddSecurityPolicy( bool machinePolicyLevel, string solutionPath, //string solutionCodeGroupDescription, //string assemblyPath, string assemblyCodeGroupName, string assemblyCodeGroupDescription) { string frameworkFolder = GetFrameworkFolder(); string policyLevel; string parentCodeGroup; if (machinePolicyLevel) { policyLevel = "-m"; // Use Machine-level policy. parentCodeGroup = "My_Computer_Zone"; // Use My_Computer_Zone for assemblies installed on the computer. } else { policyLevel = "-u"; // Use User-level policy. parentCodeGroup = "All_Code"; }
//// Add the solution code group. Grant no permission at this level.//string arguments = policyLevel + " -q -ag " + parentCodeGroup + " -url \"" + solutionInstallationUrl +// "\" Nothing -n \"" + solutionCodeGroupName + "\" -d \"" + solutionCodeGroupDescription +// "\"";//try//{// RunCaspolCommand(frameworkFolder, arguments);//}//catch (Exception ex)//{// string error = String.Format("Cannot create the security code group '{0}'.", solutionCodeGroupName);// throw new Exception(error, ex);//}// Add the assembly code group. Grant FullTrust permissions to the main assembly.try
{
// Use the assembly strong name as the membership condition.// Ensure that the assembly is strong-named to give it full trust.//AssemblyName assemblyName = Assembly.LoadFile(assemblyPath).GetName();StreamWriter sw = newStreamWriter(@"C:\deployment.txt", true);string arguments = policyLevel + " -q -ag " + parentCodeGroup + " -url \"" + solutionPath + "*\" FullTrust -n \"" + assemblyCodeGroupName + "\" -d \""
+ assemblyCodeGroupDescription + "\"";
sw.WriteLine("arguments: " + arguments);
sw.Close();
//arguments = policyLevel + " -q -ag \"" + solutionCodeGroupName + "\" -strong -file \"" + assemblyPath +// "\" \"" + assemblyName.Name + "\" \"" + assemblyName.Version.ToString(4) +// "\" FullTrust -n \"" + assemblyCodeGroupName + "\" -d \"" + assemblyCodeGroupDescription +// "\"";
RunCaspolCommand(frameworkFolder, arguments);
}
catch (Exception ex)
{
try
{
// Clean the solutionCodeGroupName.
RemoveSecurityPolicy(machinePolicyLevel, solutionPath);
}
catch
{
}
string error = String.Format("Cannot create the security code group '{0}'.", assemblyCodeGroupName);thrownewException(error, ex);
}
}
internalstaticvoid RemoveSecurityPolicy(bool machinePolicyLevel,string solutionCodeGroupName)
{
string frameworkFolder = GetFrameworkFolder();string policyLevel;if (machinePolicyLevel)
policyLevel =
"-m"; // Use Machine-level policy.else
policyLevel =
"-u"; // Use User-level policy.string arguments = policyLevel + " -q -rg \"" + solutionCodeGroupName + "\"";
RunCaspolCommand(frameworkFolder, arguments);
}
privatestaticstring GetFrameworkFolder()
{
// Get the targeted Framework folder.Version version = newVersion(2, 0, 50727);return GetRuntimeInstallationDirectory(version, true);
}
privatestaticvoid RunCaspolCommand(string frameworkFolder, string arguments)
{
ProcessStartInfo processStartInfo =
new ProcessStartInfo(Path.Combine(frameworkFolder, "caspol.exe"));
processStartInfo.CreateNoWindow =
true;
processStartInfo.WindowStyle = ProcessWindowStyle.Hidden;
processStartInfo.WorkingDirectory = frameworkFolder;
processStartInfo.Arguments = arguments;
processStartInfo.RedirectStandardError =
true;
processStartInfo.RedirectStandardOutput =
true;
processStartInfo.UseShellExecute =
false;
Process process = Process.Start(processStartInfo);
string caspolOutputMessage = process.StandardOutput.ReadToEnd();
process.WaitForExit();
int exitCode = 0;if (process.HasExited)
exitCode = process.ExitCode;
if (exitCode != 0)
{
string message = null;if (!String.IsNullOrEmpty(caspolOutputMessage))
{
String[] outputMessageLines = caspolOutputMessage.Split('\n');for (int i = 2; i < outputMessageLines.Length; i++)
{
string line = outputMessageLines[i].Trim();if (!String.IsNullOrEmpty(line))
{
message = line;
break;
}
}
}
if (String.IsNullOrEmpty(message))
message =
"Cannot run the Code Access Security Policy tool (caspol.exe).";thrownewApplicationException(message);
}
}
[
DllImport("mscoree.dll", CharSet = CharSet.Unicode, ExactSpelling = true, PreserveSig = true,
SetLastError =
false)]privatestaticexternint/* [HRESULT] */ GetRequestedRuntimeInfo(string/* [LPCWSTR] */ pExe,string/* [LPCWSTR] */ pwszVersion,string/* [LPCWSTR] */ pConfigurationFile,uint/* [DWORD] */ startupFlags,
RuntimeInfo
/* [DWORD] */ runtimeInfoFlags,StringBuilder/* [LPWSTR] */ pDirectory,uint/* [DWORD] */ dwDirectory,outuint/* [DWORD *] */ dwDirectoryLength,StringBuilder/* [LPWSTR] */ pVersion,uint/* [DWORD] */ cchBuffer,outuint/* [DWORD *] */ dwLength
);
///<summary>/// Returns the installation directory of the specified .NET runtime.///</summary>///<param name="version">/// The version of the runtime.///</param>///<param name="upgradeVersion">/// True to return the installation directory of the nearest compatible runtime version, or false for an exact match.///</param>///<returns>/// The .NET runtime installation directory.///</returns>privatestaticstring GetRuntimeInstallationDirectory(Version version, bool upgradeVersion)
{
string versionString = "v" + version.ToString(3);
RuntimeInfo runtimeInfo = RuntimeInfo.DoNotShowErrorDialog;
if (upgradeVersion)
runtimeInfo |= RuntimeInfo.UpgradeVersion;
StringBuilder runtimeDirectory = newStringBuilder(270);StringBuilder runtimeVersion = newStringBuilder("v65535.65535.65535".Length);uint runtimeDirectoryLength;uint runtimeVersionLength;int errorCode = GetRequestedRuntimeInfo(null, versionString, null, 0, runtimeInfo, runtimeDirectory,
(
uint)runtimeDirectory.Capacity, out runtimeDirectoryLength,
runtimeVersion, (
uint)runtimeVersion.Capacity,out runtimeVersionLength);Marshal.ThrowExceptionForHR(errorCode);returnPath.Combine(runtimeDirectory.ToString(), runtimeVersion.ToString());
}
#region
Nested type: RuntimeInfo
[
Flags]
privateenumRuntimeInfo : uint
{
UpgradeVersion = 0x1,
// RUNTIME_INFO_UPGRADE_VERSION
RequestIA64 = 0x2,
// RUNTIME_INFO_REQUEST_IA64
RequestAmd64 = 0x4,
// RUNTIME_INFO_REQUEST_AMD64
RequestX86 = 0x8,
// RUNTIME_INFO_REQUEST_X86
DoNotReturnDirectory = 0x10,
// RUNTIME_INFO_DONT_RETURN_DIRECTORY
DoNotReturnVersion = 0x20,
// RUNTIME_INFO_DONT_RETURN_VERSION
DoNotShowErrorDialog = 0x40
// RUNTIME_INFO_DONT_SHOW_ERROR_DIALOG
}
#endregion
}
} |
5. Paste the following code inside 'InstallerOverrideClass.cs':
| using System; using System.Collections;using System.Collections.Generic;using System.ComponentModel;using System.Configuration.Install;
namespace InstallerOverrideProject{ [RunInstaller(true)] [System.Security.Permissions.PermissionSetAttribute (System.Security.Permissions.SecurityAction.Demand, Name = "FullTrust")] public class InstallerOverrideClass : Installer { protected string targetDir; // Override the Install method to update the customization location // in the application manifest. public override void Install(System.Collections.IDictionary stateSaver) { targetDir = this.Context.Parameters["target_folder"];
base.Install(stateSaver); string solutionCodeGroupName = "{461A2C5C-EF1D-4E58-AF67-225827B056E4}"; string solutionCodeGroupDescription = "WordAddIn2003_AllUsersDeployment"; //string site = targetDir.Substring(0, targetDir.Length - 1); string site = targetDir; // Note that a code group with solutionCodeGroupName name is created in the // Install method and removed in the Rollback and Uninstall methods. // The solutionCodeGroupName must be a unique name to ensure that the // correct code group is removed during Rollback and Uninstall. if (String.IsNullOrEmpty(solutionCodeGroupName)) throw new InstallException ("Cannot set the security policy. The specified solution code group name is not valid."); if (String.IsNullOrEmpty(solutionCodeGroupDescription)) throw new InstallException("Cannot set the security policy. The specified solution code group description is not valid."); if (String.IsNullOrEmpty(site)) throw new InstallException("Cannot set the security policy. The specified site is not valid."); if (stateSaver == null) throw new ArgumentNullException("stateSaver"); try { // Note that Install method may be invoked during Repair mode and the // code group may already exist.To prevent adding of another code group, // remove the code group if it exists.
/* try { // The solutionCodeGroupName must be a unique name; otherwise, the // method might delete wrong code group.
CaspolSecurityPolicyCreator.RemoveSecurityPolicy(solutionCodeGroupName); } catch {}*/
CaspolSecurityPolicyCreator.AddSecurityPolicy( true, site, "SampleAddin", solutionCodeGroupDescription); } catch (Exceptionex) { throw new InstallException("Cannot set the security policy.", ex); }
}
public override void Commit(IDictionarysavedState) {base.Commit(savedState);} public override void Rollback(IDictionarysavedState) {base.Rollback(savedState);} public override void Uninstall(IDictionarysavedState) {base.Uninstall(savedState);} }} |
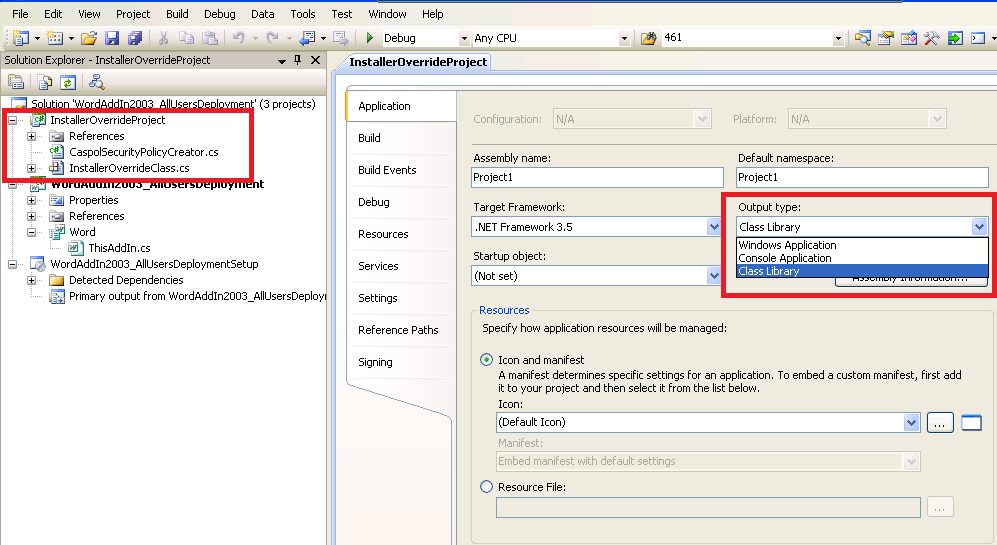
6. We need to change the default output type for our project to make it a ClassLibrary: right-click it from 'Solution Explorer' > go to 'Properties' > select 'Application' > and choose 'Class Library' from ' Output type'.
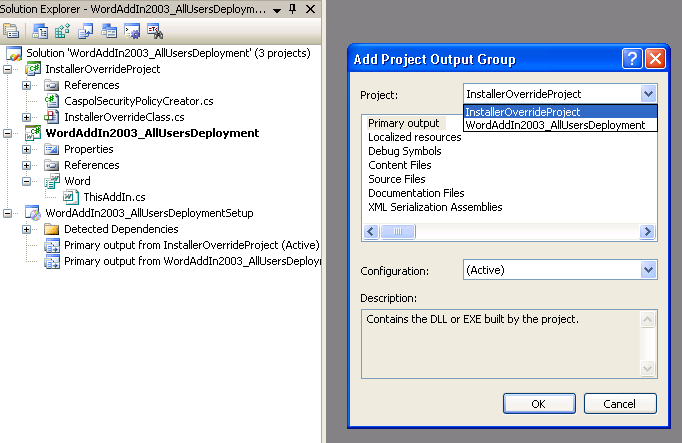
The last thing that needs to be done is finding a way to transmit information about the destination folder to our 'InstallerOverrideClass' at runtime. This is achieved using MSI Installer Setup project Custom Actions.7. Right-click the MSI Setup project, select 'Add' > 'Project Output' > select 'InstallerOverrideProject' > click OK.
8. In the 'Solution Explorer', right-click again the Setup project > expand 'View' > 'Custom Actions' > in the Custom Actions editor window, right-click 'Custom Actions' root node and click 'Add Custom Action'.
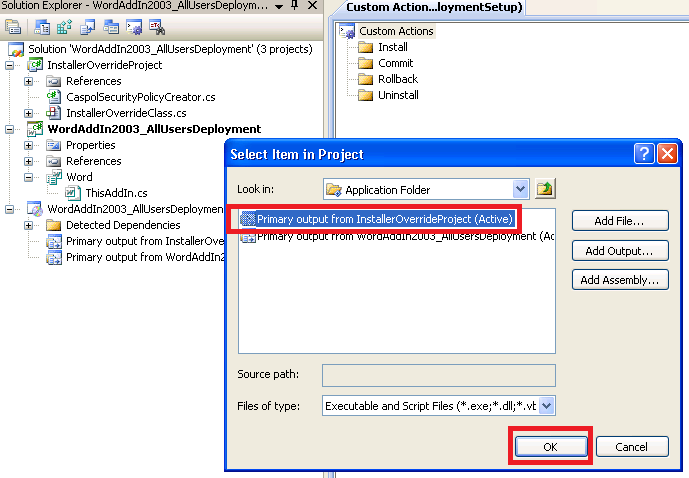
9. In the 'Select Item in Project' pop-up window, go to the 'Look In' drop-down list and click 'Application Folder'. Select 'Primary Output from InstallerOverrideProject (Active) ' and click OK.
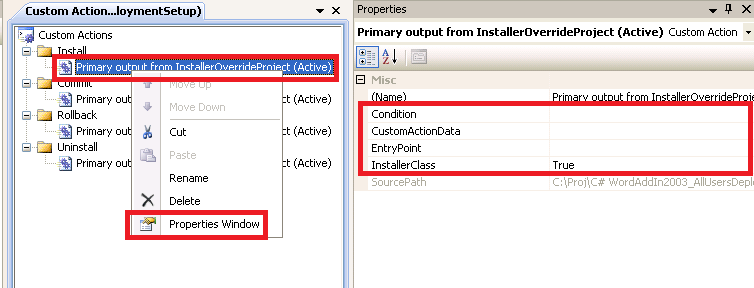
10. In the Custom Actions editor, right-click on Primary output from InstallerOverrideProject (Active) and click Properties.
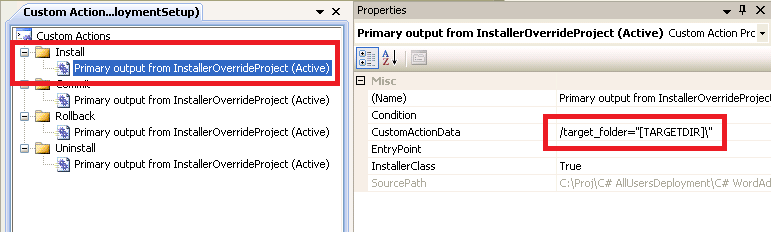
11. Enter the following value in the CustomActionData property: /target_folder="[TARGETDIR]\" This passes in the location of the add-in's DLL at runtime to any class which derives from Installer.
|