VSTO - How to build a setup project which targets x64 bit OS, and add custom Registry Launch Condition that checks if a key is found in the native 64bit registry hive.
A developer that needs to learn all about building and deploying a VSTO 2010 installer project, should carefully review this very nice article: https://msdn.microsoft.com/en-us/library/ff937654.aspx (Deploying a Visual Studio 2010 Tools for Office Solution Using Windows Installer).
Starting from the 2010 version, Office applications come in two flavors: x32 bit and x64 bit.
If you need to take advantage of the x64 bit architecture in your add-in, you also have to ensure that it gets properly built and installed. For x64 bit native components, the known VSTO add-in registry keys (Root\Software\Microsoft\Office\application name\Addins\add-inID https://msdn.microsoft.com/en-us/library/bb386106.aspx) will have to be written in the default place, but for 32 bit solutions, they get deployed to Wow6432Node(Root\Software\Wow6432Node\ Microsoft\Office\application name\Addins\add-inID).
| 32-bit and 64-bit Application Data in the Registryhttps://msdn.microsoft.com/en-us/library/windows/desktop/ms724072(v=vs.85).aspx=======================================================================
On 64-bit Windows, portions of the registry entries are stored separately for 32-bit application and 64-bit applications and mapped into separate logical registry views using the registry redirector and registry reflection, because the 64-bit version of an application may use different registry keys and values than the 32-bit version. There are also shared registry keys that are not redirected or reflected. The parent of each 64-bit registry node is the Image-Specific Node or ISN. The registry redirector transparently directs an application's registry access to the appropriate ISN subnode. Redirection subnodes in the registry tree are created automatically by the WOW64 component using the name Wow6432Node. As a result, it is essential not to name any registry key you create Wow6432Node. The KEY_WOW64_64KEY and KEY_WOW64_32KEY flags enable explicit access to the 64-bit registry view and the 32-bit view, respectively. For more information, see Accessing an Alternate Registry View. To disable and enable registry reflection for a particular key, use the RegDisableReflectionKey and RegEnableReflectionKey functions. Applications should disable reflection only for the registry keys that they create and not attempt to disable reflection for the predefined keys such as HKEY_LOCAL_MACHINE or HKEY_CURRENT_USER. To determine which keys are on the reflection list, use the RegQueryReflectionKey function. |
Registry Redirectorhttps://msdn.microsoft.com/en-us/library/windows/desktop/aa384232(v=vs.85).aspx======================================================================= The registry redirector isolates 32-bit and 64-bit applications by providing separate logical views of certain portions of the registry on WOW64. The registry redirector intercepts 32-bit and 64-bit registry calls to their respective logical registry views and maps them to the corresponding physical registry location. The redirection process is transparent to the application. Therefore, a 32-bit application can access registry data as if it were running on 32-bit Windows even if the data is stored in a different location on 64-bit Windows. A subset of keys under redirected registry paths are shared. 32-bit registry calls to shared keys are not redirected. Instead, one physical copy of the key is mapped into each logical view of the registry. For a list of redirected keys and shared keys, see Registry Keys Affected by WOW64. Windows Server 2008, Windows Vista, Windows Server 2003, and Windows XP: To enable application interoperability through COM and other mechanisms, a subset of redirected registry keys are also reflected. The process of registry reflection copies registry keys and values between two registry views to keep them synchronized. Registry reflection was removed starting with Windows 7 and Windows Server 2008 R2. For more information, see Registry Reflection. The following scenario illustrates the use of these logical views:
Redirected keys are mapped to physical locations under Wow6432Node. For example, HKEY_LOCAL_MACHINE\Software is redirected to HKEY_LOCAL_MACHINE\Software\Wow6432Node. However, the physical location of redirected keys should be considered reserved by the system. Applications should not access a key's physical location directly, because this location may change. For more information, see Accessing an Alternate Registry View. To help 32-bit applications that write REG_SZ or REG_EXPAND_SZ data containing %ProgramFiles% or %commonprogramfiles% to the registry, WOW64 intercepts these write operations and replaces them with "%ProgramFiles(x86)%" and "%commonprogramfiles(x86)%". For example, if the Program Files directory is on the C drive, then "%ProgramFiles(x86)%" expands to "C:\Program Files (x86)".[...] |
As the article says, if we compile our MSI installer project to explicitly target the x64 bit architecture, then the Registry redirector feature will ensure that it finds the right logical view of the registry.
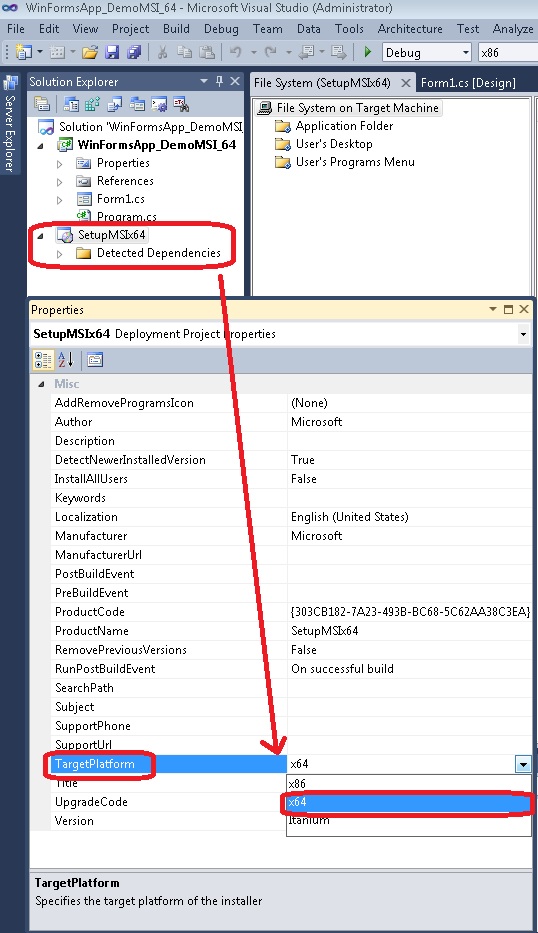
The https://msdn.microsoft.com/en-us/library/ff937654.aspx article tells us that all we have to do is change the TargetPlatform for our MSI installer project to x64 and then we can deploy our 64-bit add-in to a 64-bit OS .
 |
There is another step linked to the previous one .. at a later stage, we will need to introduce some Launch Conditions and check whether some keys are found in Registry. Depending on the result, we will continue with our installation, or we abort the operation.
The https://msdn.microsoft.com/en-us/library/ff937654.aspx example show us how we build a simple Launch Condition to test if a 32-bit key exists:
> SOFTWARE\Microsoft\VSTO Runtime Setup\v4 (for x86 OS);
> SOFTWARE\Wow6432Node\Microsoft\VSTO Runtime Setup\v4 (for x64 OS);
Since the article doesn't contain an explicit warning about scenarios when we explicitly target an x64 bit registry key with our Launch Condition, one would assume that we only need to input the correct registry path and things will work out as expected. Unfortunately, everything will not run as smooth as we'd like ... due to some MSI installer issue in Visual Studio 2010, you will never be able to target the x64bit registry location. Every time, your search will be redirected to the x32 bit hive.
A quick internet search reveals that other people have noticed this fact:
> "Launch condition issue while running on Windows server 2008 (64 bit)"
(https://social.msdn.microsoft.com/forums/en-us/winformssetup/thread/1DF0D4D6-3D84-4D81-ABF4-100F457FAE5A);
> "What Is need to support 64-bit 'msi' files"
(https://social.msdn.microsoft.com/Forums/en-US/winformssetup/thread/7f87ff71-8871-4047-becb-3381173cb915);
Let's test this, shall we ?
I am using a machine with Windows7 x64 + Office 2010 x64 + Visual Studio 2010.
Steps to reproduce the issue:
1. Create a new Windows Forms Application project (we won't use a VSTO add-in project because the issue can be reproduced with any type of solution, as long as we build a MSI deployment project for it);
2. After Visual Studio generates the project's structure, go to the 'Solution Explorer' window, right click on the solution and choose 'Add' > 'New Project';
3. In the 'Add New Project' window, browse to 'Other Project Types' > 'Visual Studio Installer' > select 'Setup Project' in the right-hand panel;
4. Once the new project is added to your solution, click with the left-mouse button to select it in the 'Solution Explorer' window; This should populate the 'Properties' window with the items specific to a setup project;
If the Properties window is not visible, go to 'View' > 'Properties Window (F4) ';
5. Locate the 'Target Platform' property item and select 'x64' from the drop-down menu;
 |
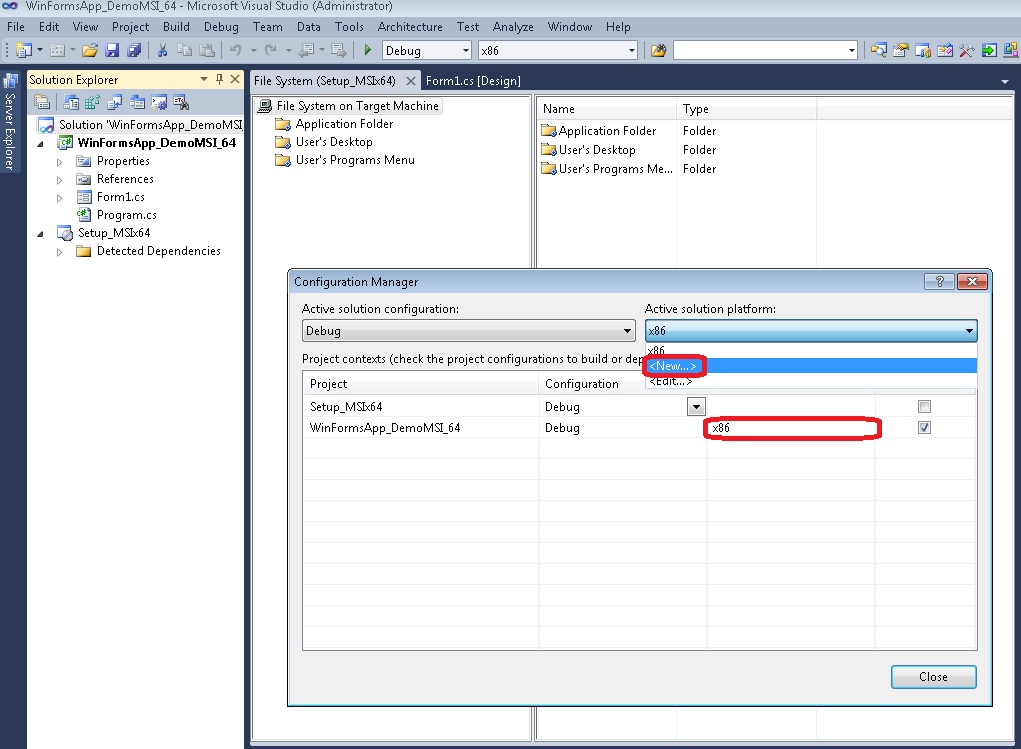
6. Right-click the solution in 'Solution Explorer' window, select 'Configuration Manager';
7. In the 'Configuration Manager' window, only the default 'x86' value should be available for the 'Active Solution Platform'; Click on this drop-down, and select 'New'; A new solution setup window appears:
> select 'x64' from 'Type or select the new platform' drop-down;
> select ' <Empty> ' in 'Copy settings from' drop-down;
> click OK;
 |
8. When you return to the 'Configuration Manager' panel, you should see that the 'Platform' project configuration setting for your Windows Forms project is set to the newly added item: 'x64'; (if it is still pointing to x86, change it to x64);
9. Notice the 'Build' project configuration check-box setting: if it is only checked for the Windows Forms solution, mark the other project's check-box as enabled, so that you also generate a setup MSI output file when you trigger the 'Build' action;
10. Close 'Configuration Manager' window;
11. In 'Solution Explorer', right-click on the setup project, choose 'Add' > 'Project Output.. ' > select 'Primary Output' and choose the name of your Windows Forms solution from the 'Project' drop-down menu, then click OK;
12. In 'Solution Explorer', right-click again on the setup project, select 'View' > 'Launch Conditions';
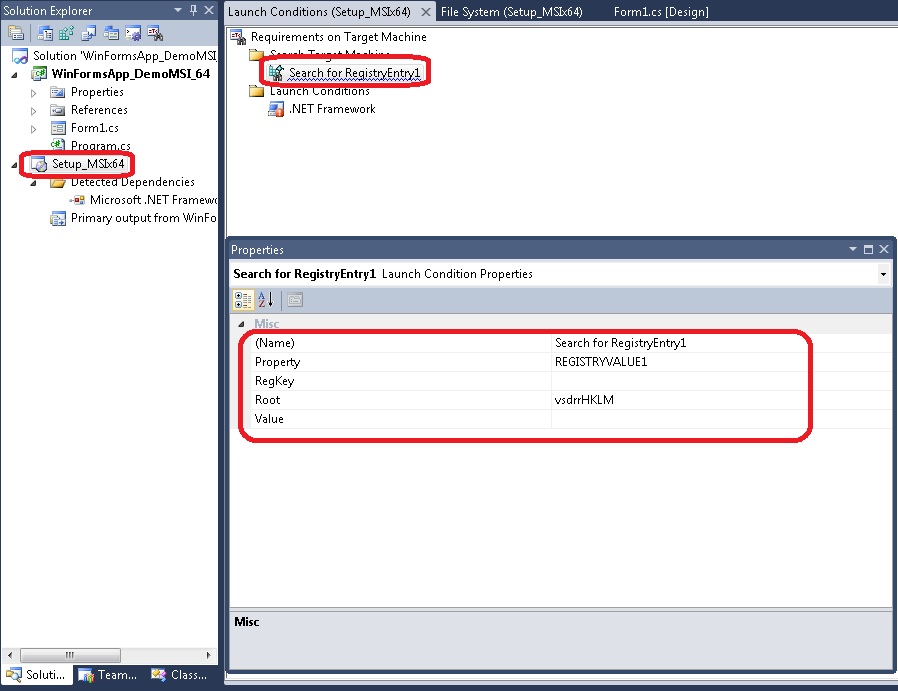
13. The 'Launch Conditions' window appears; Right click on the root node 'Requirements on Target Machine' > select 'Add Registry Launch Condition';
14. Notice that 2 new items appear:
> the 'Search Target Machine' node contains a child item named 'Search for RegistryEntry1';
> the 'Launch Conditions' node contains a child item named 'Condition1';
 |
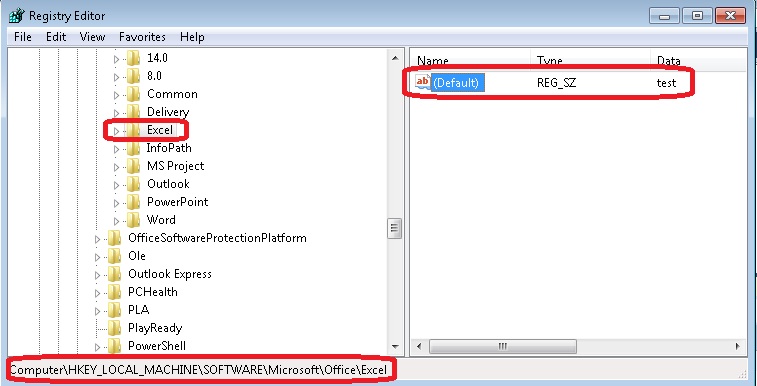
For demonstrating the issue, I am going to search if a native x64-bit registry key exists: "SOFTWARE\Microsoft\Office\14.0\Excel" ...
15.
You need to customize these entries:
> click to select the 'Search for RegistryEntry1' node to bring its 'Properties' page into view;
> the 'Property' field should have the value "REGISTRYVALUE1";
> the 'RegKey' has to receive the value "SOFTWARE\Microsoft\Office\14.0\Excel" >> don't include the quotes (for this test we are trying to verify if Excel key can be accessed in
x64bit environments; You may use any other registry location);
> the 'Root' has to receive the value "vsdrrHKLM";
> the 'Value' field remains empty (here things get more complicated .. it seems that the way Windows Installer's 'Value Property' works is a little bit non-intuitive. For more details, see the clarifications from below, otherwise skip to step #16);
The help page for the 'Value Property' of Windows Installer says:
.. also this how-to article makes it clear that we cannot search if a key exists unless it holds some non-empty value:
As the aforementioned article states, if we leave the 'Value' field empty, then we have to make sure that the key we are searching for has a non-empty (Default) value; Otherwise the setup project will mark this Launch Condition as failed; So this is why we have to introduce the value 'test' at step #19; |
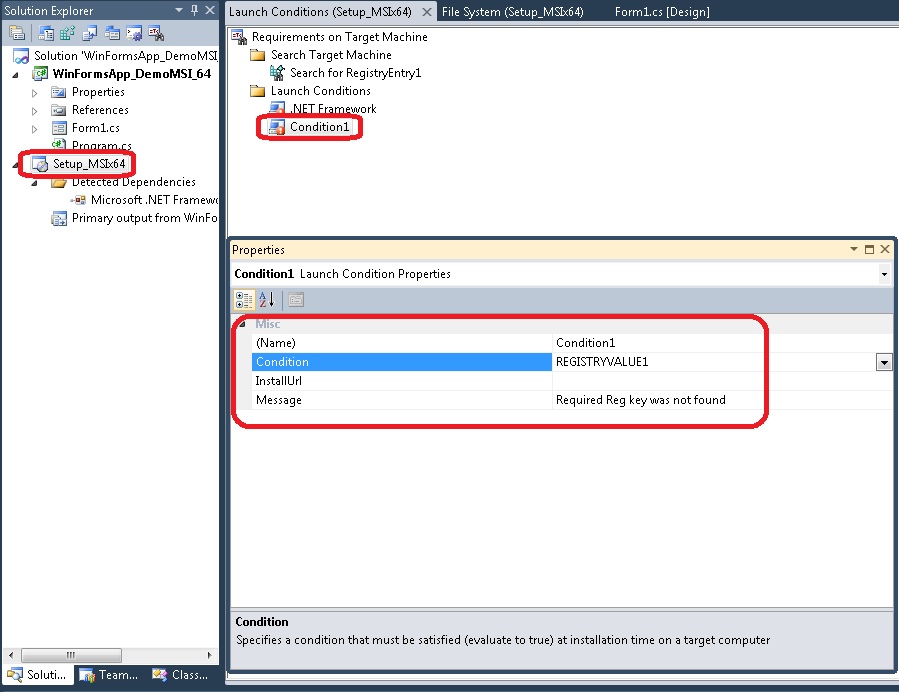
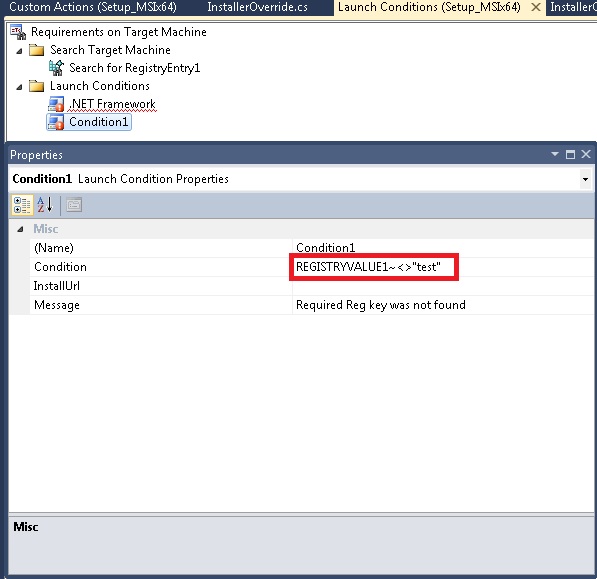
16. Next, we will set up what happens in case this key is not found; For this purpose, we select 'Condition1' to bring its 'Properties page into view';
> the 'Condition' field should have the value "REGISTRYVALUE1";
> the 'InstallUrl' should be empty;
> the 'Message' should contain "Required Reg key was not found" string;
 |
17. Build the Visual Studio solution;
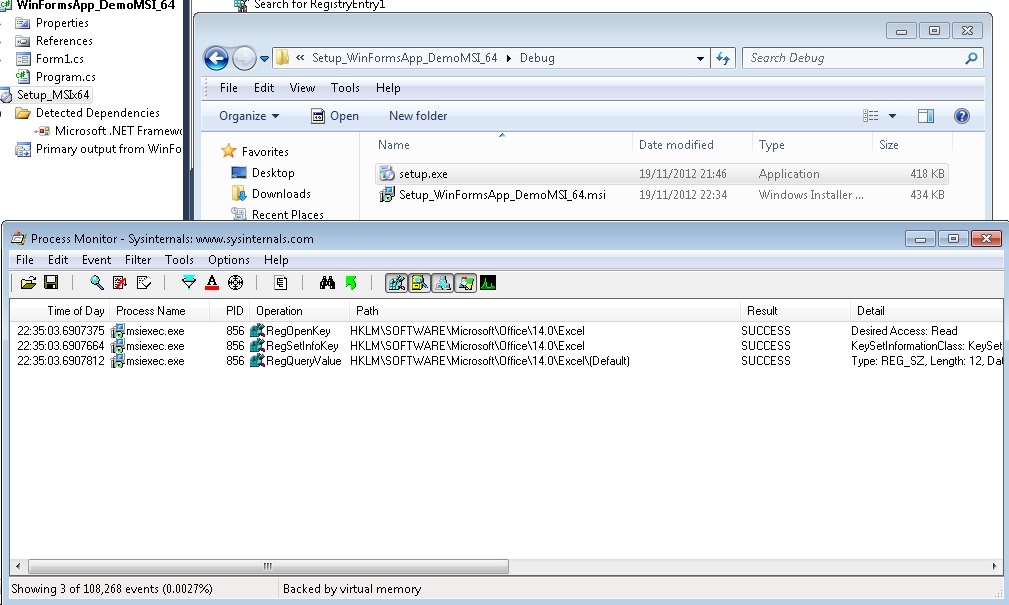
18. Right-click the setup project, select 'Open Folder in Windows Explorer', go to ' \..\x64\Debug' folder and locate the 'setup.exe' file;
19. Before running the installer, open the Registry, navigate to "HKLM\SOFTWARE\Microsoft\Office\14.0\Excel", double click on the '(Default)' key and write the string "test";
 |
20. Run the setup ..
Actual result: the installation will fail, and you should get the error message: "Required Reg key was not found";
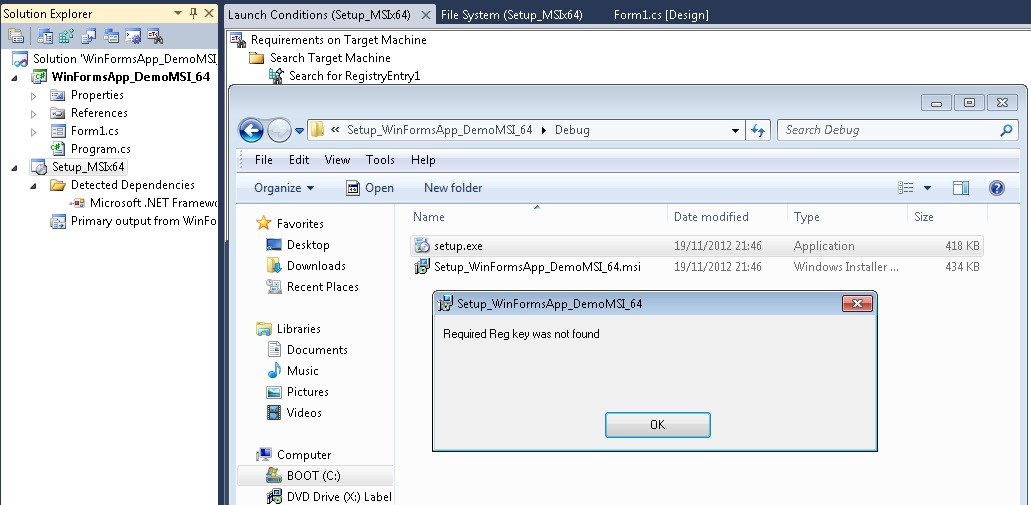 |
Expected result: the setup should complete, because the Excel registry key exists in the native x64bit node, and we built a x64bit setup project;
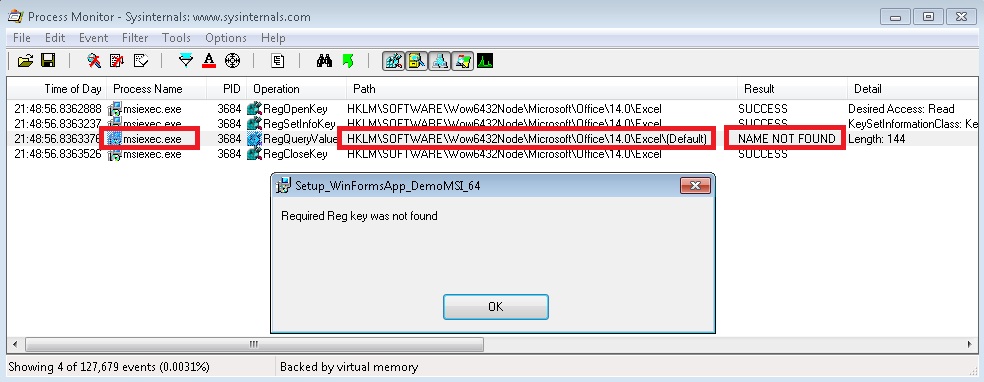
If we run ProcMon while executing the setup project, we notice that the 'msiexec.exe' process is actually querying the 32-bit key:
| msiexec.exe RegOpenKey HKLM\SOFTWARE\Wow6432Node\Microsoft\Office\14.0\Excel SUCCESS Desired Access: Readmsiexec.exe RegQueryValue HKLM\SOFTWARE\Wow6432Node\Microsoft\Office\14.0\Excel\(Default) NAME NOT FOUND Length: 144msiexec.exe RegCloseKey HKLM\SOFTWARE\Wow6432Node\Microsoft\Office\14.0\Excel SUCCESS |
 |
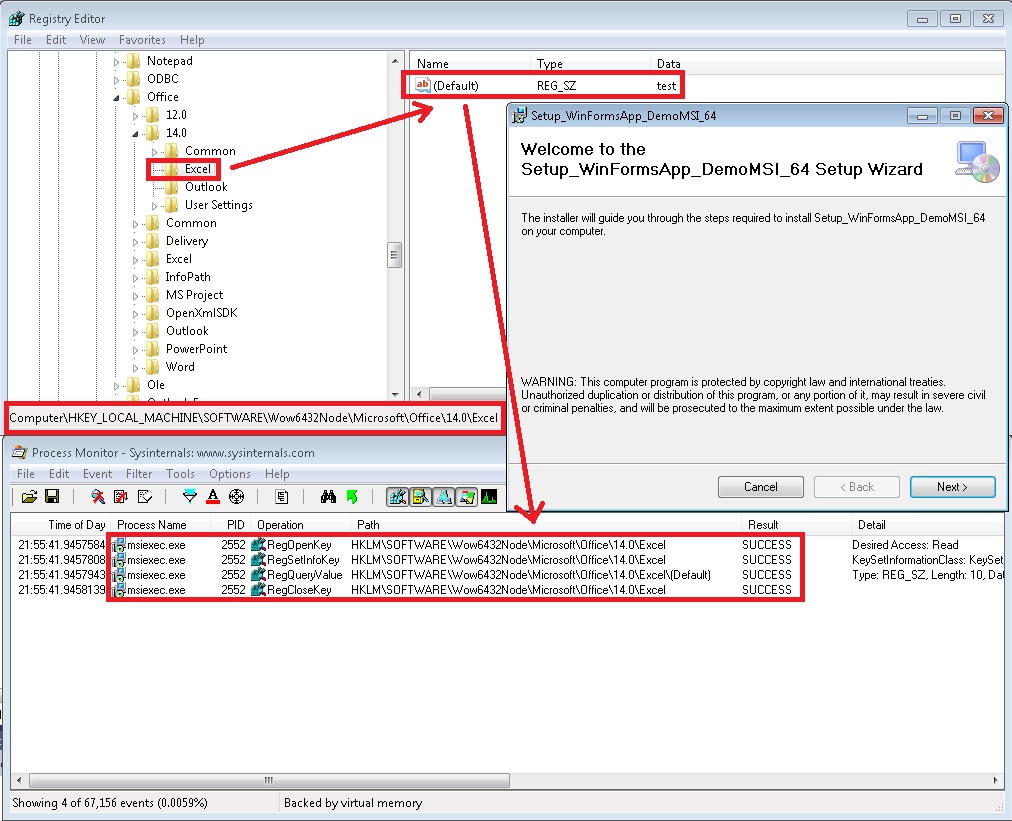
.. and if we create this key, then if we add a non-empty string in the '(Default)' node, then the setup completes successfully;
 |
So why do we get this problem?
We can research: "How to: Create a Windows Installer for a 64-bit Platform" (https://msdn.microsoft.com/en-us/library/cd7a85k9(v=vs.100).aspx) to make sure that we performed the correct steps when trying to build the native 64bit setup project:
How to: Create a Windows Installer for a 64-bit Platformhttps://msdn.microsoft.com/en-us/library/cd7a85k9(v=vs.100).aspx=======================================================================The deployment tools in Visual Studio allow you to create installers for 64-bit applications and components. The TargetPlatform Property of a deployment project determines whether an installer will target a 32-bit or a specific 64-bit platform. The target platforms are x86 for 32-bit platforms, x64 for computers supporting the AMD64 and EM64T instruction sets, and Itanium for the 64-bit Itanium processor. In addition, three special folders are available in the File System editor: for 64-bit applications, Common Files (64-bit) , Program Files (64-bit) , and System (64-bit) are the native folders; Common Files, Program Files, and System are the Windows on Windows folders. In general, 32- and 64-bit Microsoft Installer (MSI) packages are treated in the same way except for how Windows Installer treats folder variables such as [Program Files] and [System Folder], and how it writes components into the registry or GAC. When you create a 32- or 64-bit MSI package, the processor architecture is noted in the .NET Framework assembly's strong name identity when it is installed in the GAC. You can also create setup projects for 64-bit computers from 32-bit computers. 64-bit MSI packages can support both 32- and 64-bit DLLs or EXEs to perform custom actions; however, 32-bit MSI packages cannot support 64-bit DLLs or EXEs to perform custom actions. [...] To distribute a .NET Framework application both to 32- and 64-bit platforms, build two MSI packages, one targeted at a 32-bit and the other a 64-bit computer. The user can install the 32-bit setup project package and it will most likely run as a 64-bit application, only the 64-bit setup project will install to the "Program Files64" directory. [...] To create an installer for a 64-bit platform 1. Open a deployment project. For more information, see How to: Create or Add Deployment Projects.2. In the Solution Explorer, select the deployment project.3. In the Properties window, select the TargetPlatform property.4. Choose either Itanium for an Intel Itanium 64-bit platform, or x64 for any other 64-bit platform (such as AMD64 and EM64T instruction sets). At installation time, an error will be raised and installation will be halted if the target computer is not compatible with the specified platform. |
... but we don't get any clue. Also "Properties for the Launch Conditions Editor" (https://msdn.microsoft.com/en-us/library/5ecafwe3(v=vs.100).aspx#vxconlaunchconditionpropertiesanchor2) doesn't seem to point us on the right path.
The answer is given this thread: "Launch condition issue while running on Windows server 2008 (64 bit)" (https://social.msdn.microsoft.com/forums/en-us/winformssetup/thread/1DF0D4D6-3D84-4D81-ABF4-100F457FAE5A):
| Launch condition issue while running on Windows server 2008 (64 bit) =======================================================================I have created a setup package in VS 2008 setup and deployment project. I have added a launch condition using registry search for MSCRM 4.0. Setup works fine on 32 bit operating system but MSCRM 4.0 pre requisite fails on Windows Server 2008 (64 bit) operating system. It shows the message for pre requisite while MSCRM is installed and registry values also exist. i have tried to create setup x64 too. but same issue appears.
[...] Setup projects only ever do a registry search in the 32-bit part of the registry, even if they are built for x64. Internally, the RegLocator table does not have the msidbLocatorType64bit bit set in the Type field on x64 builds. So on an x64 system the MSCRM registry item might exist only in the 64-bit part of the registry, and not in the 32-bit view, the Wow6432Node, and both x86 and x64 setups would fail to find it. If you look at the registry and that's the issue, then I'm not sure what you'd do except use Orca to update your x64 MSI file in the RegLocator table: https://msdn.microsoft.com/en-us/library/aa371171(VS.85).aspx (RegLocator Table); |
Similar threads:
> "Setup project: search registry always return false" https://social.msdn.microsoft.com/Forums/en-US/winformssetup/thread/007318ae-fc2c-4912-8801-74ea48f9199a;
Let's see what role RegLocator table plays for a Windows Installer Database:
| RegLocator Tablehttps://msdn.microsoft.com/en-us/library/aa371171(VS.85).aspx=======================================================================
The RegLocator table holds the information needed to search for a file or directory using the registry, or to search for a particular registry entry itself. This table has the following columns.
The following table lists valid values. Set one of the first three values and msidbLocatorType64bit if necessary. If the entry in this field is absent, Type is set to be 1.
|
Fixing our MSI installer
First you need to download and install the ORCA database table editor. Then you need to perform these steps:
1. Open the output .MSI file and locate the "ReqLocator" table entry;
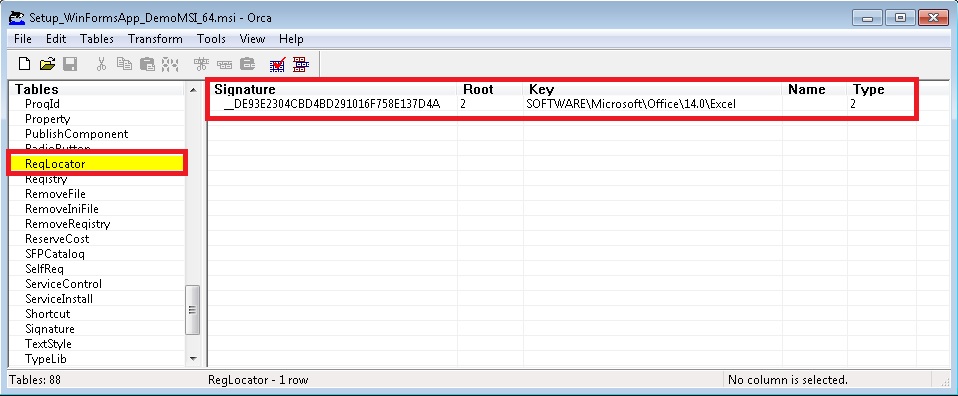 |
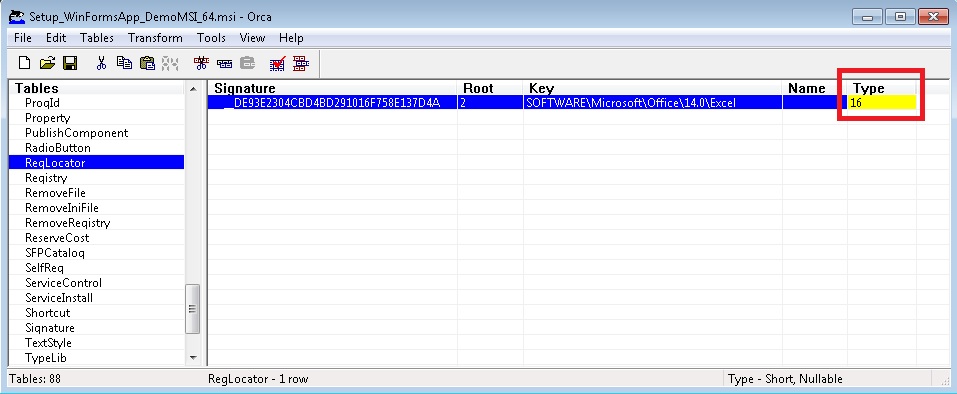
2. Notice that that it is pointing to the a different type: "Type" = 2;
3. Assign the value 0x010 to the "Type" property and press ENTER;
 |
4. Save and run the project;
This time we notice that the search is directed to the correct registry hive. Please note that it doesn't mean the problem was solved ... :-( !
 |
Unfortunately, even if we managed to overcome the RegLocator bug (yes .. it's a bug, and it afects Visual Studio 2005, 2008, 2010 - I haven't tested with 2012 version yet), we have an even bigger problem that can't be solved, as far as I know.
Fixed MSI installer still won't properly read the 64-bit registry value
While testing, I noticed that no matter which Launch Condition I used (REGISTRYVALUE1="test" , REGISTRYVALUE1~="test" ..more details on "Windows Installer Conditional Statement Syntax": https://msdn.microsoft.com/en-gb/library/windows/desktop/aa368012(v=vs.85).aspx ), the project would always fail to validate my Condition statement.
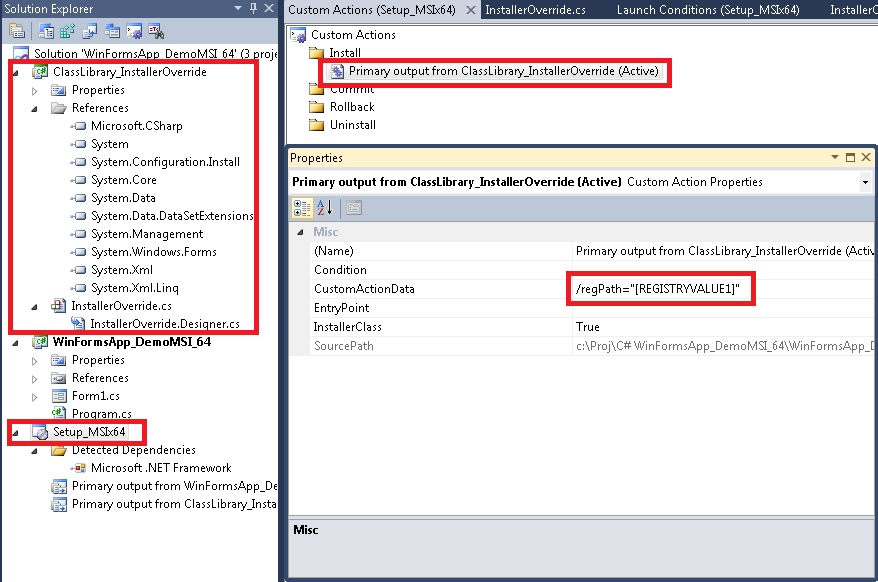
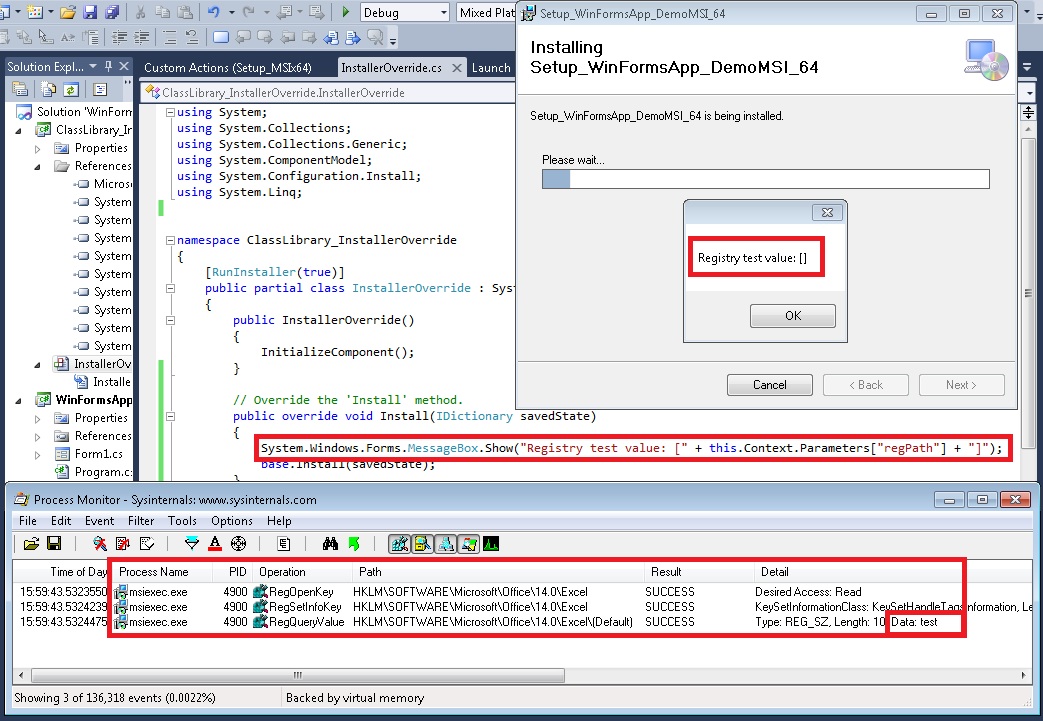
It was very strange since ProcMon clearly showed the key gets accessed and read. In order to troubleshoot this issue, I created an Installer Override custom project.
| using System;using System.Collections;using System.Collections.Generic;using System.ComponentModel;using System.Configuration.Install;using System.Linq; namespace ClassLibrary_InstallerOverride{[RunInstaller(true)]publicpartialclassInstallerOverride : System.Configuration.Install.Installer{ publicInstallerOverride() { InitializeComponent(); }
// Override the 'Install' method. publicoverridevoid Install(IDictionary savedState){ System.Windows.Forms.MessageBox.Show("Registry test value: [" + this.Context.Parameters["regPath"] + "]"); base.Install(savedState);}}} |
The project displays a message box, which contains the value read from our Custom Launch Condition variable. Using a little Windows Installer trick, we can access custom defined variables at runtime from an Installer Override class. We may use message boxes or text files to dump their contents.
 |
More details:
> "HOW TO: Retrieve a Value from the Registry and Then Use the Value in a Setup Project in Visual Studio .NET"
https://support.microsoft.com/kb/827026;
> "Walkthrough: Deploying a Document-Level Customization Using a Windows Installer File"
https://msdn.microsoft.com/en-us/library/ms268758(v=vs.80).aspx >> shows you all the steps for adding a
custom installer override project and how you can define your own runtime variables for a MSI project;
Since the test was always failing, I couldn't get as far as the step when my Custom Installer code kicks in. Therefore I had to modify my launch condition to always return TRUE (for example, if "REGISTRYVALUE1" Custom Launch Condition is different than the searched string).
 |
I rebuilt the project, fixed the RegLocator with ORCA editor and executed the setup. For x64bit registry keys, the message box was empty!
 |
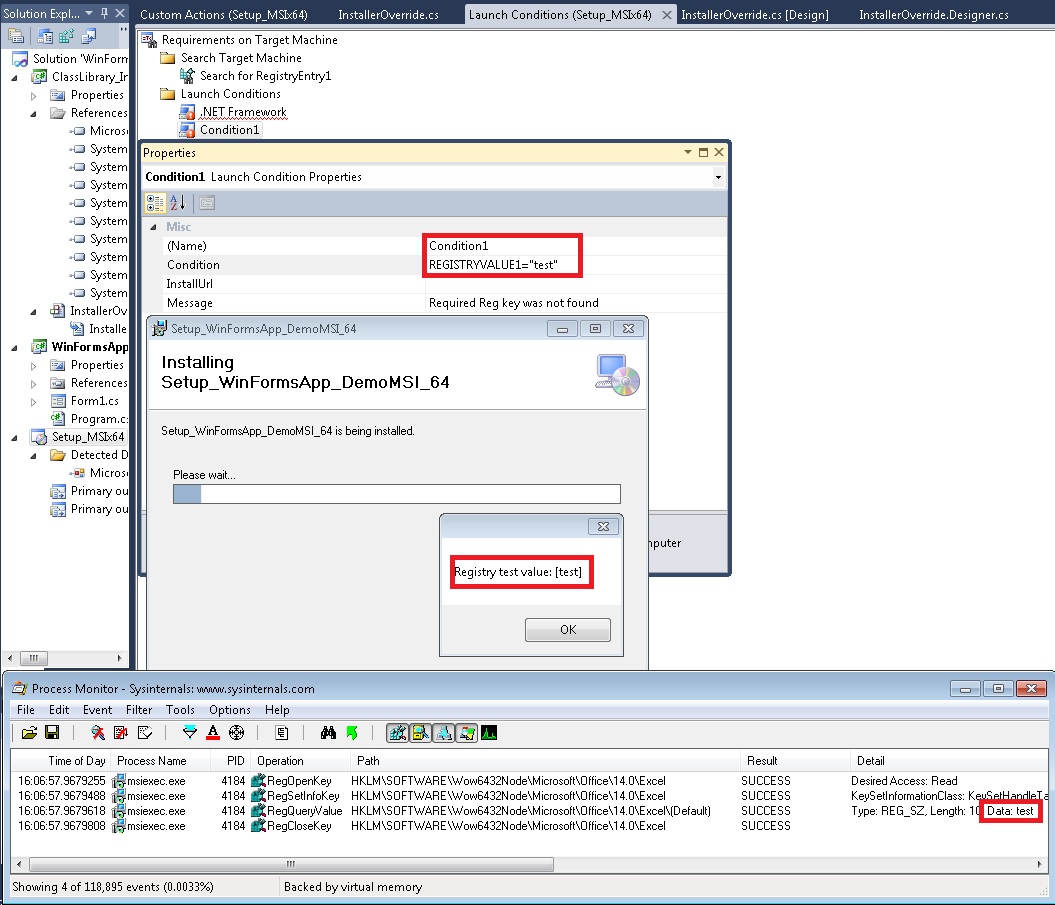
To test if my code really works, I rebuilt the MSI (since the Custom Launch condition gets read properly now, we have to set its expression back to the initial format: REGISTRYVALUE1="test" ). We can see that when it is targeting the 32-bit registry view, it is indeed working properly:
 |
Conclusions:
> I did some research in our internal database and it doesn't look like the Visual Studio team is aware
of the second issue;
> I'll try to file a bug-fix request internally, but without a significant impact, it is unlikely that it will ever
be addressed;
> in the meantime, developers that need to deploy x64bit applications with Windows Installer projects
should find alternative ways to check for the existence of 64-bit registry keys;
Thank you for reading my article! Bye :-)