CI/CD of Containers from Visual Studio to Service Fabric
CI/CD is all the rage for software deployment for good reason. Docker Containers are all the rage for software packaging and distribution for good reason. When the two are combined you get much more than the sum of the parts, they come together in a very natural way that suggests that they were created to act as one. We are not going to get into the details of all that here, there is plenty of coverage of that elsewhere.
In this post we will be presenting the complete sequence of steps you can take to implement full CI/CD of containers from new or legacy source in Visual Studio to production in Azure Service Fabric.
We will present a step by step sequence starting from scratch, and due to certain features being available only in pre production at this time (May 23 2017) you may be better off starting from scratch yourself even if you already have a running service fabric.
Prereqs
- Windows 10
- Azure Subscription
- Visual Studio (Preview)
Steps
- Obtain a Visual Studio Online account
- Install Docker for Windows
- Select an Azure Subscription
- Create Azure Container Repository
- Log in to Azure from Powershell
- Create Key Vault
- Create Certificate and Key
- Import Certificate to local cert store
- Create a Service Fabric Cluster
- Edit load balancer
- Create/open app
- Add Docker support
- Edit ports
- Add solution to source control
- Add CI/CD
- Verify site access
- Check In
Obtain a Visual Studio Online account
A Visual Studio Team Services account will be needed to facilitate the CI/CD automation
You may skip this step if you already have a Visual Studio Team Services account
1) Contact support at your workplace for details on using an in house instance of Visual Studio Team Services or Create an individual Visual Studio Team Services account at https://www.visualstudio.com/team-services/
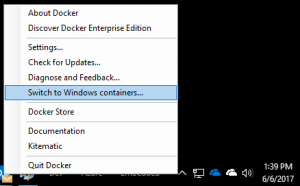
Install Docker for Windows
1) Obtain Docker for Windows here https://www.docker.com/docker-windows, It is recommended that you install the stable version
2) Configure to run Windows Containers
Select an Azure Subscription
You will create all of your assets there: Container repository, Key Value, Service Fabric. Certain steps in this process will fail if you try to cross Subscriptions. Select one and stick with it throughout the entire process.
Create an Azure Container Registry
This is where the CI/CD workflow will store your containers for Service Fabric to reference.
1) Open https://portal.azure.com
2) Browse to New Service and select 'Azure Container Service'
3) Select the Azure Subscription chosen to contain all assets
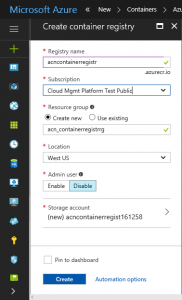
4) Select 'Create' and wait for completion. For more information: /en-us/azure/container-registry/
Log in to Azure from Powershell
Open an Administrator Powershell session. You will refer to this frequently so leave it open throughout the entire process.
1) Log in to Azure
PS Login-AzureRmAccount
2) List your subscriptions
Get-AzureRmSubscription
3) Change context to the subscription selected to contain all assets
Set-AzureRmContext -SubscriptionId <guid>
Create a Key Vault
This is where the CI/CD workflow will store your key (from your certificate) for Service Fabric to reference. If you already have a key vault in the selected subscription then feel free to skip over this step.
1) Create resource group for key vault (provide your own values here)
PS C:\WINDOWS\system32> New-AzureRmResourceGroup -Name mwkeyvaultrg -Location 'West US'ResourceGroupName : mwkeyvaultrg Location : westus ProvisioningState : Succeeded Tags : ResourceId : /subscriptions/00f885db-ef1d-4545-ad2d-64c0caf93356/resourceGroups/mwkeyvaultrg
2) Create key vault (provide your own values here)
PS C:\WINDOWS\system32> New-AzureRmKeyVault -VaultName 'mwkeyvault' -ResourceGroupName 'mwkeyvaultrg' -Location 'West US' -EnabledForDeploymentVault : mwkeyvault Resource Group : mwkeyvaultrg Location : West US Resource : /subscriptions/00f885db-ef1d-4545-ad2d-64c0caf93356/resourceGroups/mwkeyvaultrg/providers/Microsoft.KeyVault/vaults/mwkeyvault Vault : https://mwkeyvault.vault.azure.net Tenant ID : 72f988bf-86f1-41af-91ab-2d7cd011db33 SKU : Standard Enabled For Deployment? : True Enabled For Template Deployment? : False Enabled For Disk Encryption? : False Access Policies : Tenant ID : 72f988bf-86f1-41af-91ab-2d7cd011db33 Object ID : 41df24f8-cbe5-4635-bde3-e15c54291f99 Application ID : Display Name : Mark West (markwes@microsoft.com) Permissions to Keys : get, create, delete, list, update, import, backup, restore, recover Permissions to Secrets : get, list, set, delete, backup, restore, recover Permissions to Certificates : get, delete, list, create, import, update, deleteissuers, getissuers, listissuers, managecontacts, manageissuers, setissuers
Create a Certificate and Key
You need to create a certificate and key in order to all the CI/CD workflow to interact with Service Fabric. In this step we will create a self-signed certificate and place copies in the local file system and the key store created above.
Fetch ServiceFabricRPHelpers.psm1 from here: https://github.com/ChackDan/Service-Fabric/tree/master/Scripts/ServiceFabricRPHelpers. Place in a directory. in the example we will use C:\temp\ServiceFabricRPHelpers.
1) Select a directory in which to store certificates, in the example we will use C:\Data\Keys.
2) Return to the Administrator Powershell session opened above
3) Create variable for the following values (provide your own values here)
PS C:\WINDOWS\system32> $ResouceGroup = "mwkeyvaultrg" PS C:\WINDOWS\system32> $VName = "mwkeyvault" PS C:\WINDOWS\system32> $SubID = "00f885db-ef1d-4545-ad2d-64c0caf93377" PS C:\WINDOWS\system32> $locationRegion = "westus" PS C:\WINDOWS\system32> $newCertName = "cloudmsserfabt1cert1" PS C:\WINDOWS\system32> $dnsName = "cloudmsserfabt1.westus.cloudapp.azure.com" PS C:\WINDOWS\system32> $localCertPath = "C:\Data\Keys"
Navigate to parent folder of ServiceFabricRPHelpers.psm1, import, and run Invoke-AddCertToKeyVault
PS cd C:\temp\ServiceFabricRPHelpers PS C:\temp\ServiceFabricRPHelpers> Import-Module ".\ServiceFabricRPHelpers.psm1" PS C:\temp\ServiceFabricRPHelpers> Invoke-AddCertToKeyVault -SubscriptionId $SubID -ResourceGroupName $ResouceGroup -Location $locationRegion -VaultName $VName -CertificateName $newCertName -CreateSelfSignedCertificate -DnsName $dnsName -OutputPath $localCertPathcmdlet Invoke-AddCertToKeyVault at command pipeline position 1 Supply values for the following parameters: Password: *** Switching context to SubscriptionId 00f885db-ef1d-4545-ad2d-64c0caf93332 Ensuring ResourceGroup mwkeyvaultrg in westus Using existing valut mwkeyvault in West US Creating new self signed certificate at C:\Data\Keys\cloudmsserfabt1cert1.pfx Reading pfx file from C:\Data\Keys\cloudmsserfabt1cert1.pfx Writing secret to cloudmsserfabt1cert1 in vault mwkeyvaultName : CertificateThumbprint Value : 25AF2CDFE070D84D7548DFC5382EC73DB007F947Name : SourceVault Value : /subscriptions/00f885db-ef1d-4545-ad2d-64c0caf93321/resourceGroups/mwkeyvaultrg/providers/Microsoft.KeyVault/vaults/mwkeyvaultName : CertificateURL Value : https://mwkeyvault.vault.azure.net:443/secrets/cloudmsserfabt1cert1/ac8bf2e94fca4d0a88cc9e76d38f3a92
*** you will be prompted for the certificate password. Supply one and DO NOT FORGET IT. It is up to you to securely store the password by whatever mechanism you choose.
Copy the values for CertificateThumbprint, SourceVault, and CertificateURL. You WILL NEED THESE later.
More information: /en-us/azure/service-fabric/service-fabric-cluster-creation-via-arm#create-key-vault
Import Certificate to local cert store
In this step we import the certificate and key into local certificate stores. You will need to import to both the Current User Store and The Local Machine Store. In the example we will demonstrate importing to The Current User Store and leave it up to you to repeat for The Local Machine Store.
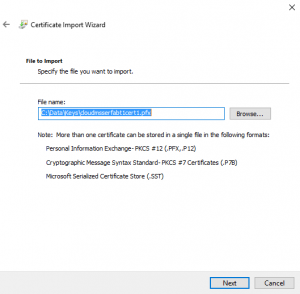
1) Navigate to the directory used to store certificates. In our case we are using C:\Data\Keys.
2) Open the certificate file, in our case we are using C:\Data\Keys\cloudmsserfabt1cert1.pfx.
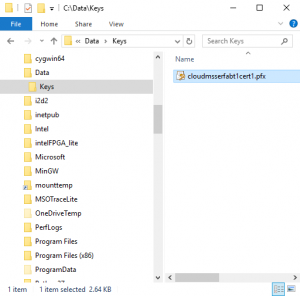
A certificate import wizard will open.
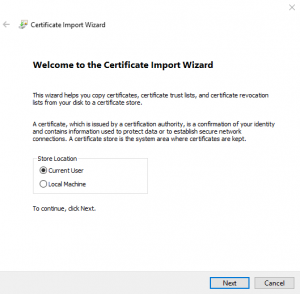
3) Click Next, leave as is
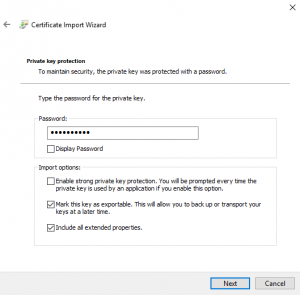
4) Click Next, supply password specified in the Create a Certificate and Key step above, check 'Mark this key as exportable' checkbox
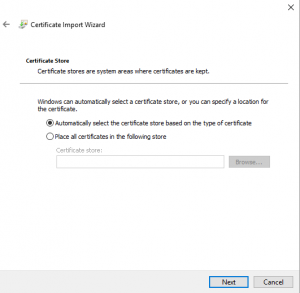
5) Click Next, leave as is
6) Click Next, then click Finish

If all goes well you will see a success message. If not, see https://msdn.microsoft.com/en-us/library/bb950259(v=bts.10).aspx for more information.
Create a Service Fabric Cluster
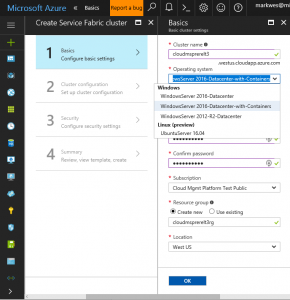
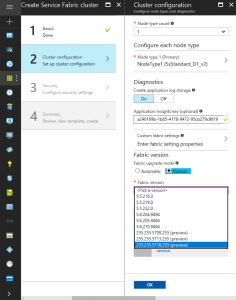
Here we create a Service Fabric Cluster to house our containerized apps. As of this date (20170606) it is mandatory to choose a prerelease version of Service Fabric in order to support the CDT (CD/CD Tooling) extension in Visual Studio and that is what we will demonstrate. When the required features go GA, you will not be required to use a pre-release version.
1) Select WindowsServer 2016-Datacenter-with-Containers in the Operating system dropdown
2) Select the Select the Azure Subscription chosen to contain all assets in the Subscription dropdown
3) Select OK
4) Optional + Recommended : Supply an Application Insights key (ref)
5) Select Manual Fabric upgrade mode
6) Select latest preview, in our case 255.255.5718.255 (preview)
7) Select OK
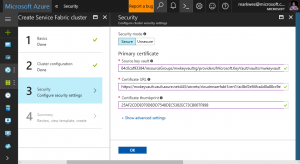
8) Provide the exact values of CertificateThumbprint, SourceVault, and CertificateURL that you obtained in the Create a Certificate and Key step above.
9) Select OK
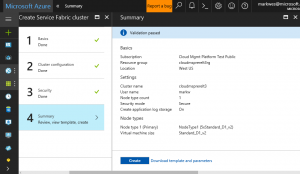
10) Select Create, wait for completion
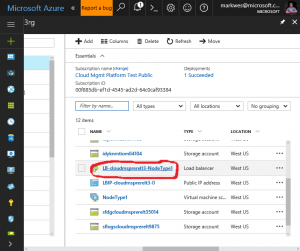
Edit load balancer
We must configure the Azure Load Balancer of the Service Fabric in order to expose the application endpoint.
1) Open the Resource Group of the Service Fabric
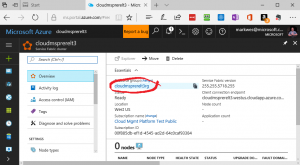
2) Open the Load Balancer
3) Add a Health Probe (note port 80 to match the port of the containerized application)

4) Add a load balancing rule (note port 80 in and out to match the port of the containerized application). Alternate out ports may be specified to suit your desired configuration.
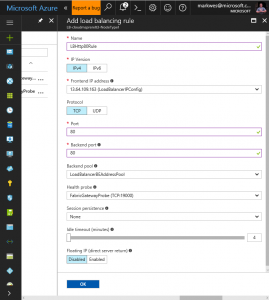
Note the front end address of 13.64.109.163
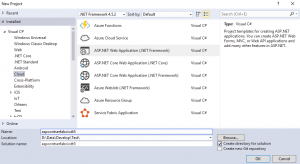
Create/open app
1) With Visual Studio, open an existing app or create a new one. In our case we will create a new one based on classic ASP.NET Web Forms to fit the pattern of many legacy apps
2) Build and run the app to make sure it is working
Add Docker support
1) Right click on the project to bring up the context menu
2) Select Add -> Docker Support
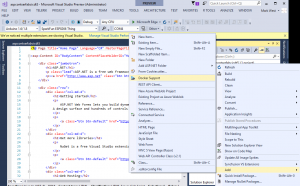
This will add a file called Dockerfile to the project and a project called docker-compose to the solution
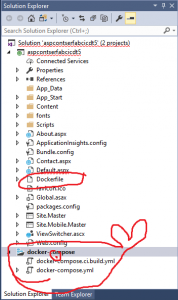
The Dockerfile is like a make file for containers
FROM microsoft/aspnet:4.6.2 ARG source WORKDIR /inetpub/wwwroot COPY ${source:-obj/Docker/publish} .
The docker-compose file contains a docker-compose.yml file which describes how containers work together in an application
version: '3' services: aspcontserfabcicdt5: image: aspcontserfabcicdt5 build: context: .\aspcontserfabcicdt5 dockerfile: Dockerfile
Edit ports
We need to edit both the Dockerfile and the docker-compose.yml files in order to expose the application port to the outside network. Without this step the application endpoints will not be reachable from a client outside of the Service Fabric.
1)Edit the Dockerfile to Expose port 80
FROM microsoft/aspnet:4.6.2 ARG source WORKDIR /inetpub/wwwroot COPY ${source:-obj/Docker/publish} . EXPOSE 80
2) Edit the docker-compose.yml to map internal port 80 to external port 80
version: '3' services: aspcontserfabcicdt5: image: aspcontserfabcicdt5 build: context: .\aspcontserfabcicdt5 dockerfile: Dockerfile ports: - '80:80'
3) Build the solution.
*** If you get this error 'Volume sharing is not enabled. Enable volume sharing in the Docker CE for Windows Settings' then you need to switch Docker to run Windows Containers. See step
Add solution to source control
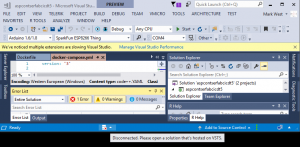
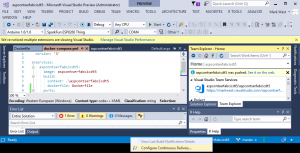
1) Hover over the server stack with red X icon at the bottom Visual Studio status bar, this is the CI/CD button.
If your solution is not checked into source control then a tooltip will appear as shown here
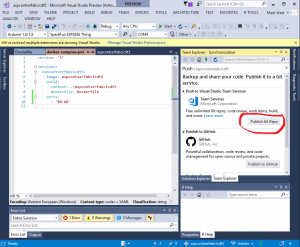
2) Add your solution to your chosen Team Services repo
Add CI/CD
1) Click on the CI/CD Button -> Configure Continuous Delivery
Provide the values in the dialog.
2) First select the subscription chosen in the Select an Azure Subscription step above. All other drop downs will populate allowing you to choose the Target Host and Container registry that you created earlier.
3) The Cluster Certificate Password is the Certificate password that you provided in the Create a Certificate and Key Step above.
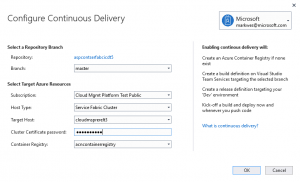
4) Select OK. Visual Studio will now create a CI/CD pipeline for you in Team Services
5) Carefully watch the Output Panel for progress and error messages. The example below shows a successful pipeline creation along with information about the definitions which were created. You should record this information.
Setting up CI/CD for project aspcontserfabcicdt5 to Service Fabric Cluster cloudmsprerelt3.....................................done The continuous build delivery setup for Team Project aspcontserfabcicdt5 completed successfully. Builds are now automatically generated and deployed to Service Fabric Cluster cloudmsprerelt3 upon code updates. Details: Service Fabric Cluster: cloudmsprerelt3 fabric:/aspcontserfabcicdt5 VSTS Team Project Name: aspcontserfabcicdt5 VSTS Team Project: https://markwest.visualstudio.com/aspcontserfabcicdt5 Build Definition: https://tfs.app.visualstudio.com/A8ecae3e6-5faf-4e4b-93b9-904d82a94a113/_permalink/_build/index?collectionId=8ecae3e6-5faf-4e4b-93b9-904d82a94a80&projectId=6a758b34-dcef-427f-ad15-92d80759a447&definitionId=10 Release Definition: https://markwest.visualstudio.com/6a758b68-dcef-427f-ad15-92d80759a455/_release?definitionId=1
6) Team Services will attempt to build and deploy immediately. Check the status of the workflows at the URL of the VSTS Team Project indicated above. In our case this is https://markwest.visualstudio.com/aspcontserfabcicdt5 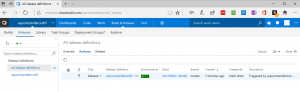
Here we see the release was successful, which implies that the build was also successful.
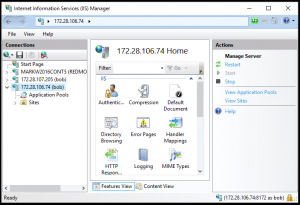
Verify site access
- It may take Azure an hour or more to deploy load balancer changes, so the changes made in the Edit Load Balancer step above may not yet be complete. The site URL will be inaccessible until after the load balancer changes have been fully deployed (i.e. you'll just have to wait).
1) Browse to the URL of the load balancer front end address, in this case https://13.64.109.163 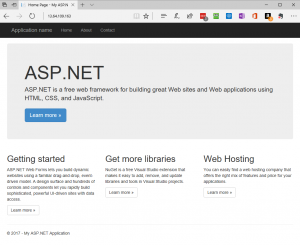
Check In
The set-up and validation phase is now complete. From now on, whenever you push to the repo, the Build and Release will execute automatically.
To trigger a new build and release changes, just commit + sync + push.
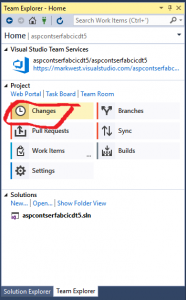
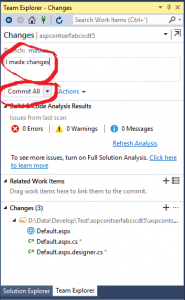
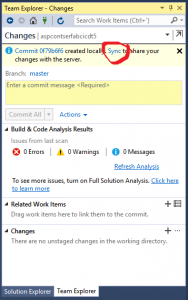
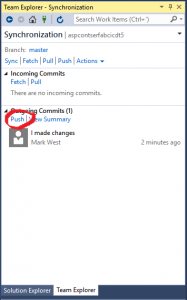
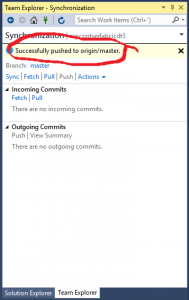
At this point the code changes are checked in and the build and release processes are underway.
A really great video which covers much of the Visual Studio portion of this process can be found at Get my ASP.NET 4 app running in containers in Azure