[Sample of Mar 28th] Customize Visual Studio Tool Window
 |
 |
|
 |
 |
|
Sample Downloads
C# version: https://code.msdn.microsoft.com/CSVSToolWindow-95484c1e
VB version: https://code.msdn.microsoft.com/VBVSToolWindow-0f0b71b1
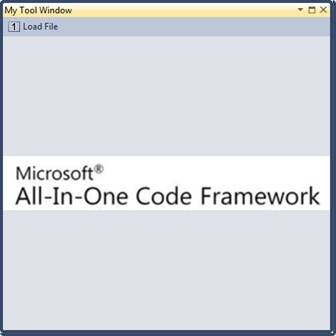
Today’s code sample demonstrates how to customize Visual Studio Tool Window. It creates a simple VSPackage with a tool window that has a toolbar and an image.
The sample was written by our star sample developer: Ruiz Yi.
 You can find more code samples that demonstrate the most typical programming scenarios by using Microsoft All-In-One Code Framework Sample Browser or Sample Browser Visual Studio extension. They give you the flexibility to search samples, download samples on demand, manage the downloaded samples in a centralized place, and automatically be notified about sample updates. If it is the first time that you hear about Microsoft All-In-One Code Framework, please watch the introduction video on Microsoft Showcase, or read the introduction on our homepage https://1code.codeplex.com/.
Introduction
VSPackages are software modules that make up and extend the Visual Studio integrated development environment (IDE) by providing UI elements, services, projects, editors, and designers. VSPackages are the principal architectural unit of Visual Studio, and are the unit of deployment, licensing, and security also. Visual Studio itself is written mostly as a collection of VSPackages.
This sample demonstrates how to create a simple VSPackage with a tool window that has a toolbar and an image.
Building the Sample
VS 2010 SP1 SDK must be installed on the machine. You can download it from:
Visual Studio 2010 SP1 SDK
Set the Start Action and Start Options of Debug.
Start Action: C:\Program Files\Microsoft Visual Studio 10.0\Common7\IDE\devenv.exe (32bit OS) or C:\Program Files (x86)\Microsoft Visual Studio 10.0\Common7\IDE\devenv.exe (64bit OS)
Start Option: /rootsuffix Exp
Running the Sample
1. Press F5 to debug this project.
2. In the new instance of Visual Studio, click View=>Other Windows => My Tool Window, or Press Ctrl + Shift +Y, you will see the Tool Window.
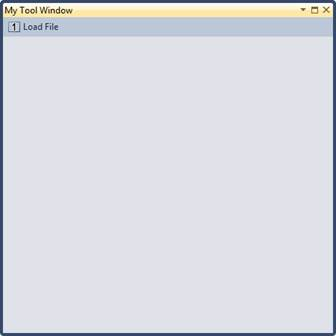
3. Click the Load File button on the Tool Window, and select an image, the image will be displayed in the Tool Windows.
Using the Code
1. Create a VS Package Project .
Use Visual Studio Integration Package Wizard to create a simple VSPackage project. You can follow the steps in Walkthrough: Creating a Tool Window.
2. Modify the Command Table (.vsct file).
a. Add a button to View=>Other Windows
 <!-- Add a button to View=>Other Window-->
<Button guid="guidCSVSToolWindowCmdSet" id="cmdidMyTool" priority="0x0100" type="Button">
    <Parent guid="guidSHLMainMenu" id="IDG_VS_WNDO_OTRWNDWS1"/>
    <Icon guid="guidImages" id="bmpPic2" />
    <Strings>
        <CommandName>cmdidMyTool</CommandName>
        <ButtonText>My Tool Window</ButtonText>
    </Strings>
</Button>
b. Define a Menu which will be displayed as a Toolbar in the Tool Window.
 <!--Define the toolbar of the ToolWindow. This toolbar will be added in the MyToolWindow.cs-->
<Menu guid="guidCSVSToolWindowCmdSet" id="ToolbarID"
      priority="0x0000" type="ToolWindowToolbar">
    <Parent guid="guidCSVSToolWindowCmdSet" id="ToolbarID" />
    <Strings>
        <ButtonText>Tool Window Toolbar</ButtonText>
        <CommandName>Tool Window Toolbar</CommandName>
    </Strings>
</Menu>
c. Add a button to the Toolbar.
 <!--Define a child group of the Toolbar, any button of this group will be added the Toolbar-->
<Group guid="guidCSVSToolWindowCmdSet" id="ToolbarGroupID" priority="0x0000">
    <Parent guid="guidCSVSToolWindowCmdSet" id="ToolbarID"/>
</Group>

<!-- Add a button to the ToolbarGroup, which means that it will be added to the ToolBar-->
<Button guid="guidCSVSToolWindowCmdSet" id="cmdidOpenImage" priority="0x0101" type="Button">
    <Parent guid="guidCSVSToolWindowCmdSet" id="ToolbarGroupID"/>
    <Icon guid="guidImages" id="bmpPic1" />
    <CommandFlag>IconAndText</CommandFlag>
    <Strings>
        <CommandName>cmdidOpenImage</CommandName>
        <ButtonText>Load File</ButtonText>
    </Strings>
</Button>
d. Define the Key Binding of the command to open the Toolbar.
 <!-- Set the key binding of the cmdidMyTool command-->
<KeyBindings>
    <KeyBinding guid="guidCSVSToolWindowCmdSet"
                id="cmdidMyTool"
                editor="guidVSStd97"
                key1="Y"
                mod1="Control Shift"/>
</KeyBindings>
3. Handle the cmdidMyTool command in Package.
 /// <summary>
/// Initialization of the package; this method is called right after the package is sited, so this is the place
/// where you can put all the initilaization code that rely on services provided by VisualStudio.
/// </summary>
protected override void Initialize()
{
    Trace.WriteLine (string.Format(CultureInfo.CurrentCulture, "Entering Initialize() of: {0}", this.ToString()));
    base.Initialize();


    // Add our command handlers for menu (commands must exist in the .vsct file)
    OleMenuCommandService mcs = GetService(typeof(IMenuCommandService)) as OleMenuCommandService;
    if ( null != mcs )
    {
        // Create the command for the tool window
        CommandID toolwndCommandID = new CommandID(GuidList.guidCSVSToolWindowCmdSet, (int)PkgCmdIDList.cmdidMyTool);
        MenuCommand menuToolWin = new MenuCommand(ShowToolWindow, toolwndCommandID);
        mcs.AddCommand( menuToolWin );
    }
}
4. Open the Tool Window
 private void ShowToolWindow(object sender, EventArgs e)
{
    // Get the instance number 0 of this tool window. This window is single instance so this instance
    // is actually the only one.
    // The last flag is set to true so that if the tool window does not exists it will be created.
    ToolWindowPane window = this.FindToolWindow(typeof(MyToolWindow), 0, true);
    if ((null == window) || (null == window.Frame))
    {
        throw new NotSupportedException(Resources.CanNotCreateWindow);
    }
    IVsWindowFrame windowFrame = (IVsWindowFrame)window.Frame;
    Microsoft.VisualStudio.ErrorHandler.ThrowOnFailure(windowFrame.Show());
}
5. Add a Toolbar to the Tool Window and set its content.
 /// <summary>
/// Standard constructor for the tool window.
/// </summary>
public MyToolWindow() :
    base(null)
{
    // Set the window title reading it from the resources.
    this.Caption = Resources.ToolWindowTitle;
    // Set the image that will appear on the tab of the window frame
    // when docked with an other window
    // The resource ID correspond to the one defined in the resx file
    // while the Index is the offset in the bitmap strip. Each image in
    // the strip being 16x16.
    this.BitmapResourceID = 301;
    this.BitmapIndex = 1;

    // Create the toolbar.
    this.ToolBar = new CommandID(GuidList.guidCSVSToolWindowCmdSet,
        PkgCmdIDList.ToolbarID);
    this.ToolBarLocation = (int)VSTWT_LOCATION.VSTWT_TOP;


    // Create the handlers for the toolbar commands.
    var mcs = GetService(typeof(IMenuCommandService))
        as OleMenuCommandService;
    if (null != mcs)
    {
        var toolbarbtnCmdID = new CommandID(
            GuidList.guidCSVSToolWindowCmdSet,
            PkgCmdIDList.cmdidOpenImage);
        var menuItem = new MenuCommand(new EventHandler(
            ButtonHandler), toolbarbtnCmdID);
        mcs.AddCommand(menuItem);
    }

    // This is the user control hosted by the tool window
    control = new MyControl();
    base.Content = control;
}
More Information
Walkthrough: Creating a Tool Window