A Quick Start Lesson to the ASP.NET ImageMap Control
The ImageMap control in ASP.NET 2.0 and onward version can be used to create an image that contains defined hot spot regions. When a user clicks a hot spot region, the control can either generate a post back to the server or navigate to a specified URL.
For example, you can use this control to display a map of a geographical region. When a user clicks a specific region on the map, the control navigates to a URL that provides additional data about the selected region. Or, you can use an ImageMap control to capture user responses such as votes. When a user clicks the hot spot region defined for Yes votes, code is called to record a Yes response in a database.
Mixing these two scenarios within a single ImageMap control is also supported. For example, you can specify one hot spot region to navigate to a URL and another hot spot region to post back to the server.
There are three kinds of hot spot regions defined in ImageMap control. They are as follows.
· RectangleHotSpot
· CircleHotSpot
· PolygonHotSpot
As the name implies, the RectangleHotSpot defines rectangular hot spot regions. The CircleHotSpot defines circle-shaped ones and the PolygonHotSpot is use for irregularly shaped hot spot area.
To define the region of the RectangleHotSpot object, use the Left, Top, Right and Bottom property to represent the coordinate of the region itself. For the CircleHotSpot object, set the X and the Y property to the coordinate of the centre of the circle. Then set the Radius property to the distance from the center to the edge. To define the region of a PolygonHotSpot, set the Coordinates property to a string that specifies the coordinates of each vertex of the PolygonHotSpot object. A polygon vertex is a point at which two polygon edges meet.
Let’s take a simple demo that is supposed to create an introduction page to the Solar System to get start using this control.
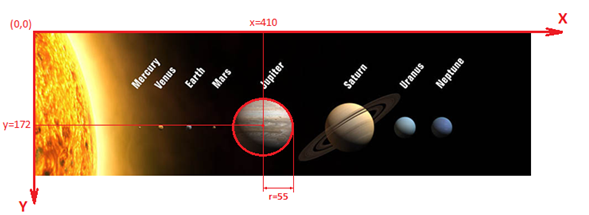
Firstly we may find an image containing all the stars in the Solar System.
Then we will set a corresponding hot spot region to each star in the image so that when a user clicks a specific region, we can do something to make a response. Here I would like to take the Planet Jupiter as an example to show how a CircleHotSpot works as it is large enough for the following demonstration.
As the up-left corner of the image is the origin point of the coordinate system with the X-axis extends to the right and the Y-axis extends downwards, we can get the coordinate of the center of the Planet Jupiter is (410, 172) based on the pix computation. Also, we can obtain the radius of the planet in the image which equals to 55pix.
As a conclusion, we can create a CircleHotSpot within the ImageMap control with the code like this.
<asp:CircleHotSpot PostBackValue="Jupiter"
AlternateText="Jupiter"
X="410" Y="172" Radius="55"
HotSpotMode="PostBack" />
Same things can be done to the other six planets: Mercury, Venus, Earth, Mars, Uranus and Neptune as they all cover circle regions in the image. When it comes to Saturn, the situation will be more complicated.
Since the Saturn has the ring, it covers an irregularly shaped hot spot region in the image. So we need to use the PolygonHotSpot.
And to define a polygon region, we need to use the Coordinates property to specify the coordinates of the vertexes of the region. A polygon vertex is a point at which two polygon edges meet. The string that you specify must be formatted with each coordinate separated by a comma. Each vertex that you specify must have both an x-coordinate and a y-coordinate. For example, the string "128,185,335,157,510,224,510,383,228,383" defines a polygon hot spot with five vertexes.
· (128, 185)
· (335, 157)
· (510, 224)
· (510, 383)
· (228, 383)
Now, let’s take a look at the Saturn here. In order to achieve that wherever a user clicks on the planet itself or the ring around the planet, the handler function can be executed, we place 12 points over the irregularly shaped region as the vertexes of the Saturn.
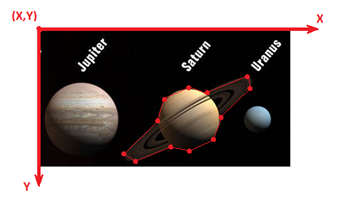
Please pay attention to the up-left corner is no longer (0, 0) for that the screen shut above is snipped from the original image. As the same things we did before, we get these vertexes’ coordinates by (X-coordinate, Y-coordinate) and set their values to the Coordinates property of the PolygonHotSpot. Therefore, the code will be look like this.
<asp:PolygonHotSpot PostBackValue="Saturn"
AlternateText="Saturn"
Coordinates="492,235,
471,228,
522,179,
540,133,
581,126,
593,134,
657,110,
660,126,
615,167,
608,203,
563,219,
542,214"
HotSpotMode="PostBack" />
As we can shape all the planets’ regions in the image now, the thing we need to do next is to handle the click event of the ImageMap control to response for such a behavior from the user.
As we need to raise a postback when a user clicks the ImageMap control, we need to set either the ImageMap.HotSpotMode property or the HotSpot.HotSpotMode property to HotSpotMode.Postback. Also, we need to use the PostBackValue property to specify a name for the hot spot region. This name will be passed in the ImageMapEventArgs event data when a postback event occurs. When a postback HotSpot is clicked, the Click event is raised. To programmatically control the actions performed when a postback HotSpot is clicked, provide an event handler for the Click event.
Let’s have a look at the ImageMap.Click event handler function in the Code-Behind page here.
Protected Sub imgMapSolarSystem_Click(ByVal sender As Object,
ByVal e As System.Web.UI.WebControls.ImageMapEventArgs)
Handles imgMapSolarSystem.Click
'Code
End Sub
In the event handler function, we can use e, the ImageMapEventArgs event data to obtain the information that which region in the ImageMap is clicked. For example, if a user clicks the Earth, we can get this information from the PostBackValue property of e as we have already set the PostBackValue of the CircleHotSpot that covers the Earth to “Earth”.
'If a user clicks on the Earth, the regionName will be equal to Earth
Dim regionName As String = e.PostBackValue
After knowing this, we can finally write the event handler function by using Select Case statement and e.PostBackValue property as following.
Protected Sub imgMapSolarSystem_Click(ByVal sender As Object,
ByVal e As System.Web.UI.WebControls.ImageMapEventArgs)
Handles imgMapSolarSystem.Click
Select Case e.PostBackValue
Case "Mercury"
'When user clicks on the Mercury region
'Code
Case "Venus"
'When user clicks on the Venus region
'Code
Case "Earth"
Case "Mars"
Case "Jupiter"
Case "Saturn"
Case "Uranus"
Case "Neptune"
Case Else
'When user doesn't click on any planet in the image
End Select
End Sub
Till now, we can almost create an introduction page to the Solar System by using the ImageMap control. If you want a complete demo of this sample, you can refer to the project named VBASPNETImageMap from All-In-One Code Framework at https://cfx.codeplex.com/. If there is also any problem, you can have a read at the ReadMe.txt file in the sample project, which contains a step by step tutorial of how to build such a project.
Before this Quick Start Lesson coming to the end, I would like to suggest you refer to the links telling the ImageMap class and the three HotSpot class on the MSDN as well. Definitely they will give you more information and good sample code on how to use the ImageMap control in ASP.NET.