How to implement Insert, Edit, Delete, Paging and Sorting functions in an ASP.NET GridView control
This article illustrates how to populate an ASP.NET GridView control with a SQL Server table and then implement Insert, Edit, Delete, Paging and Sorting functions in it. In this sample, I don’t use DataSource controls and manipulate data in ADO.NET way.
In this sample, we use a simple SQL Server table named which has only three columns:
CREATE TABLE [dbo].[Person](
[PersonID] [int] IDENTITY(1,1) PRIMARY KEY CLUSTERED NOT NULL,
[LastName] [nvarchar](50) NOT NULL,
[FirstName] [nvarchar](50) NOT NULL
) ON [PRIMARY];
And we store the following connection string in the Web.config:
<connectionStrings>
<add name="SQLServer2005DBConnectionString" connectionString="Data Source=localhost;Initial Catalog=SQLServer2005DB;Integrated Security=True"
providerName="System.Data.SqlClient" />
</connectionStrings>
Design the WebForm UI
Step1. Create a C# ASP.NET Web Application in Visual Studio / Visual Web Developer and add a new Web Form in the project.
Step2. Drag a GridView control, a LinkButton control and a Panel control into the ASP.NET HTML page.
(1) Rename the controls as follows:
GridView1 -> gvPerson
LinkButton1 -> lbtnAdd
Panel1 -> pnlAdd
(2) Change the Text property of lbtnAdd to AddNew.
(3) Right-click on gvPerson, select Show Smart Tag -> Auto Format, choose style Oceanica and press OK to save.
(4) On Show Smart Tag, select Add New Columns, choose CommandField, check Delete, Edit/Update and Show cancel button then press OK.
(5) On Show Smart Tag, select Add New Columns, choose BoundField, and add the following three columns:
Header text Data field Read only
---------------------------------------------
PersonID PersonID Y
LastName LastName N
FirstName FirstName N
(6) On Show Smart Tag, select Edit Columns, un-check Auto-generate fields, select LastName field, and click Convert this field into a TemplateField. And then do the same operation to FirstName field.
Related references:
ASP.NET: Using TemplateFields in the GridView Control
https://www.asp.net/learn/data-access/tutorial-12-cs.aspx
MSDN: TemplateField Class
https://msdn.microsoft.com/en-us/library/system.web.ui.webcontrols.templatefield.aspx
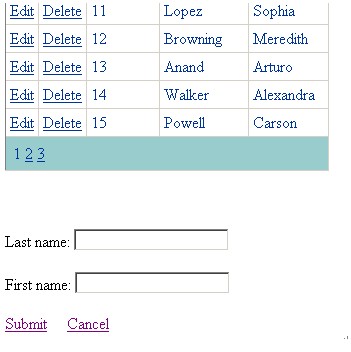
(7) Drag two TextBox controls and two LinkButton controls into pnlAdd. Rename the controls as follows:
TextBox1 -> tbLastName
TextBox2 -> tbFirstName
LinkButton1 -> lbtnSubmit
LinkButton2 -> lbtnCancel
(8) Change the Text properties of lbtnSubmit and to Submit and Cancel.
Following is the complete HTML markup:
<form id="form1" runat="server">
<div>
<asp:GridView ID="gvPerson" runat="server" AutoGenerateColumns="False" BackColor="White"
BorderColor="#3366CC" BorderStyle="None" BorderWidth="1px" CellPadding="4">
<RowStyle BackColor="White" ForeColor="#003399" />
<Columns>
<asp:CommandField ShowEditButton="True" />
<asp:CommandField ShowDeleteButton="True" />
<asp:BoundField DataField="PersonID" HeaderText="PersonID" ReadOnly="True"
SortExpression="PersonID" />
<asp:TemplateField HeaderText="LastName" SortExpression="LastName">
<EditItemTemplate>
<asp:TextBox ID="TextBox1" runat="server" Text='<%# Bind("LastName") %>'></asp:TextBox>
</EditItemTemplate>
<ItemTemplate>
<asp:Label ID="Label1" runat="server" Text='<%# Bind("LastName") %>'></asp:Label>
</ItemTemplate>
</asp:TemplateField>
<asp:TemplateField HeaderText="FirstName" SortExpression="FirstName">
<EditItemTemplate>
<asp:TextBox ID="TextBox2" runat="server" Text='<%# Bind("FirstName") %>'></asp:TextBox>
</EditItemTemplate>
<ItemTemplate>
<asp:Label ID="Label2" runat="server" Text='<%# Bind("FirstName") %>'></asp:Label>
</ItemTemplate>
</asp:TemplateField>
</Columns>
<FooterStyle BackColor="#99CCCC" ForeColor="#003399" />
<PagerStyle BackColor="#99CCCC" ForeColor="#003399" HorizontalAlign="Left" />
<SelectedRowStyle BackColor="#009999" Font-Bold="True" ForeColor="#CCFF99" />
<HeaderStyle BackColor="#003399" Font-Bold="True" ForeColor="#CCCCFF" />
</asp:GridView>
<br />
<asp:LinkButton ID="lbtnAdd" runat="server">AddNew</asp:LinkButton>
<br />
<br />
<asp:Panel ID="pnlAdd" runat="server" Visible="False">
Last name:
<asp:TextBox ID="tbLastName" runat="server"></asp:TextBox>
<br />
<br />
First name:
<asp:TextBox ID="tbFirstName" runat="server"></asp:TextBox>
<br />
<br />
<asp:LinkButton ID="lbtnSubmit" runat="server">Submit</asp:LinkButton>
<asp:LinkButton ID="lbtnCancel" runat="server">Cancel</asp:LinkButton>
</asp:Panel>
</div>
</form>
Populate the GridView control with SQL statement
Following is the C# code to bind the GridView control in the Page Load event of the page:
protected void Page_Load(object sender, EventArgs e)
{
// The Page is accessed for the first time.
if (!IsPostBack)
{
// Enable the GridView paging option and
// specify the page size.
gvPerson.AllowPaging = true;
gvPerson.PageSize = 15;
// Enable the GridView sorting option.
gvPerson.AllowSorting = true;
// Initialize the sorting expression.
ViewState["SortExpression"] = "PersonID ASC";
// Populate the GridView.
BindGridView();
}
}
private void BindGridView()
{
// Get the connection string from Web.config.
// When we use Using statement,
// we don't need to explicitly dispose the object in the code,
// the using statement takes care of it.
using (SqlConnection conn = new SqlConnection(ConfigurationManager.ConnectionStrings["SQLServer2005DBConnectionString"].ToString()))
{
// Create a DataSet object.
DataSet dsPerson = new DataSet();
// Create a SELECT query.
string strSelectCmd = "SELECT PersonID,LastName,FirstName FROM Person";
// Create a SqlDataAdapter object
// SqlDataAdapter represents a set of data commands and a
// database connection that are used to fill the DataSet and
// update a SQL Server database.
SqlDataAdapter da = new SqlDataAdapter(strSelectCmd, conn);
// Open the connection
conn.Open();
// Fill the DataTable named "Person" in DataSet with the rows
// returned by the query.
da.Fill(dsPerson, "Person");
// Get the DataView from Person DataTable.
DataView dvPerson = dsPerson.Tables["Person"].DefaultView;
// Set the sort column and sort order.
dvPerson.Sort = ViewState["SortExpression"].ToString();
// Bind the GridView control.
gvPerson.DataSource = dvPerson;
gvPerson.DataBind();
}
}
The SortDirection property on the GridView is changed only when the GridView is bound to a DataSource control using the DataSourceID property. Otherwise, sort direction always return "Ascending" and needs to be manipulated manually.
In the Page_Load Event, we store a default sorting expression in ViewState.
ViewState["SortExpression"] = "PersonID ASC";
And set the sort column and sort order based on it in BindGridView method.
dvPerson.Sort = ViewState["SortExpression"].ToString();
So when first visiting the page, all Person record will be shown in ascending order of PersonID.
Related references:
MSDN: using Statement (C# Reference)
https://msdn.microsoft.com/en-us/library/yh598w02.aspx
MSDN: Understanding ASP.NET View State
https://msdn.microsoft.com/en-us/library/ms972976.aspx
MSDN: DataView.Sort Property
https://msdn.microsoft.com/en-us/library/system.web.ui.webcontrols.gridview.sorting.aspx

Add new row into the SQL Server table
Double-click on the Click event of lbtnAdd to generate the Event handlder and fill the generated methods with the sample code. Do the same operations to lbtnSubmit and lbtnCancel.
lbtnAdd.Click Event:
Hide the Add button and showing Add panel.
lbtnSubmit.Click Event:
Fetch the values of the TextBox controls and add new row to the
DataTable in ViewState or the table in SQL Server.
lbtnCancel.Click Event:
Show the Add button and hiding the Add panel.
Following is the C# code for inserting a new record into the SQL Server table with the inputted value:
protected void lbtnAdd_Click(object sender, EventArgs e)
{
// Hide the Add button and showing Add panel.
lbtnAdd.Visible = false;
pnlAdd.Visible = true;
}
protected void lbtnSubmit_Click(object sender, EventArgs e)
{
using (SqlConnection conn = new SqlConnection(ConfigurationManager.ConnectionStrings["SQLServer2005DBConnectionString"].ToString()))
{
// Create a command object.
SqlCommand cmd = new SqlCommand();
// Assign the connection to the command.
cmd.Connection = conn;
// Set the command text
// SQL statement or the name of the stored procedure
cmd.CommandText = "INSERT INTO Person ( LastName, FirstName ) VALUES ( @LastName, @FirstName )";
// Set the command type
// CommandType.Text for ordinary SQL statements;
// CommandType.StoredProcedure for stored procedures.
cmd.CommandType = CommandType.Text;
// Append the parameters.
cmd.Parameters.Add("@LastName", SqlDbType.NVarChar, 50).Value = tbLastName.Text;
cmd.Parameters.Add("@FirstName", SqlDbType.NVarChar, 50).Value = tbFirstName.Text;
// Open the connection.
conn.Open();
// Execute the command.
cmd.ExecuteNonQuery();
}
// Rebind the GridView control to show inserted data.
BindGridView();
// Empty the TextBox controls.
tbLastName.Text = "";
tbFirstName.Text = "";
// Show the Add button and hiding the Add panel.
lbtnAdd.Visible = true;
pnlAdd.Visible = false;
}
protected void lbtnCancel_Click(object sender, EventArgs e)
{
// Empty the TextBox controls.
tbLastName.Text = "";
tbFirstName.Text = "";
// Show the Add button and hiding the Add panel.
lbtnAdd.Visible = true;
pnlAdd.Visible = false;
}
Edit and Update an existing record
Navigate to the Property panel of gvPerson and then switch to Event. Double-click on the following events to generate the Event handlers.
(1) RowEditing Event: Occurs when a row's Edit button is clicked, but before the GridView control enters edit mode.
To make the GridView control into edit mode for the select row, we need to set the index of the row to edit and then rebind the GridView control to render data in edit mode.
Related references:
MSDN: GridView.RowEditing Event
https://msdn.microsoft.com/en-us/library/system.web.ui.webcontrols.gridview.rowediting.aspx
MSDN: GridView.EditIndex Property
https://msdn.microsoft.com/en-us/library/system.web.ui.webcontrols.gridview.editindex.aspx
(2) RowCancelingEdit Event: Occurs when the Cancel button of a row in edit mode is clicked, but before the row exits edit mode.
We can click the Cancel button to cancel the edit mode and show data in normal view mode.
In this Event, we need to set the zero-based GridView.EditIndex property to -1, which means no row is being edited, and then rebind the GridView to show data in view mode.
gvPerson.EditIndex = -1;
BindGridView();
Related reference:
MSDN: GridView.RowCancelingEdit Event
https://msdn.microsoft.com/en-us/library/system.web.ui.webcontrols.gridview.rowcancelingedit.aspx
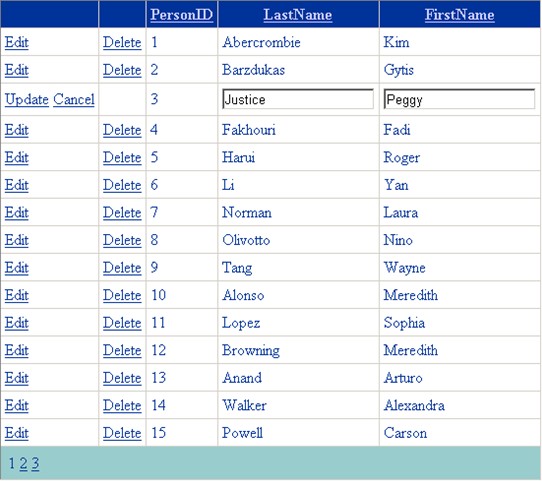
(3) RowUpdating Event: Occurs when a row's Update button is clicked, but before the GridView control updates the row.
After modifying values in the selected row, we click the Update button to save changes back to the data source.
To identify the person for editing, the PersonID value is required, which is read-only and cannot be modified.
string strPersonID = gvPerson.Rows[e.RowIndex].Cells[2].Text;
e.RowIndex is the index of current row.
In Design the WebForm UI we converted LastName and FirstName to TemplateFields, so we cannot get the edit values directly.
Since LastName and FirstName are both string values, Label controls are generated in ItemTemplate for displaying values and TextBox controls are generated in EditItemTemplate for editing values.
We can access the cells and fetch the values in the following way:
string strLastName =
((TextBox)gvPerson.Rows[e.RowIndex].FindControl("TextBox1")).Text;
string strFirstName =
((TextBox)gvPerson.Rows[e.RowIndex].FindControl("TextBox2")).Text;
After fetch these values, we can save them back to the DataTable in ViewState or the table in SQL Server.
Related references:
MSDN: GridView.RowUpdating Event
https://msdn.microsoft.com/en-us/library/system.web.ui.webcontrols.gridview.rowupdating.aspx
ASP.NET: Editing, Inserting, and Deleting Data
https://www.asp.net/learn/data-access/\#editinsertdelete
Following is the C# code for editing an existing new record and update the changes back to SQL Server:
// GridView.RowEditing Event
protected void gvPerson_RowEditing(object sender, GridViewEditEventArgs e)
{
// Make the GridView control into edit mode
// for the selected row.
gvPerson.EditIndex = e.NewEditIndex;
// Rebind the GridView control to show data in edit mode.
BindGridView();
// Hide the Add button.
lbtnAdd.Visible = false;
}
// GridView.RowCancelingEdit Event
protected void gvPerson_RowCancelingEdit(object sender, GridViewCancelEditEventArgs e)
{
// Exit edit mode.
gvPerson.EditIndex = -1;
// Rebind the GridView control to show data in view mode.
BindGridView();
// Show the Add button.
lbtnAdd.Visible = true;
}
// GridView.RowUpdating Event
protected void gvPerson_RowUpdating(object sender, GridViewUpdateEventArgs e)
{
using (SqlConnection conn = new SqlConnection(ConfigurationManager.ConnectionStrings["SQLServer2005DBConnectionString"].ToString()))
{
// Create a command object.
SqlCommand cmd = new SqlCommand();
// Assign the connection to the command.
cmd.Connection = conn;
// Set the command text
// SQL statement or the name of the stored procedure
cmd.CommandText = "UPDATE Person SET LastName = @LastName, FirstName = @FirstName WHERE PersonID = @PersonID";
// Set the command type
// CommandType.Text for ordinary SQL statements;
// CommandType.StoredProcedure for stored procedures.
cmd.CommandType = CommandType.Text;
// Get the PersonID of the selected row.
string strPersonID = gvPerson.Rows[e.RowIndex].Cells[2].Text;
string strLastName = ((TextBox)gvPerson.Rows[e.RowIndex].FindControl("TextBox1")).Text;
string strFirstName = ((TextBox)gvPerson.Rows[e.RowIndex].FindControl("TextBox2")).Text;
// Append the parameters.
cmd.Parameters.Add("@PersonID", SqlDbType.Int).Value = strPersonID;
cmd.Parameters.Add("@LastName", SqlDbType.NVarChar, 50).Value = strLastName;
cmd.Parameters.Add("@FirstName", SqlDbType.NVarChar, 50).Value = strFirstName;
// Open the connection.
conn.Open();
// Execute the command.
cmd.ExecuteNonQuery();
}
// Exit edit mode.
gvPerson.EditIndex = -1;
// Rebind the GridView control to show data after updating.
BindGridView();
// Show the Add button.
lbtnAdd.Visible = true;
}
Delete an existing record
Navigate to the Property panel of gvPerson and then switch to Event. Double-click on the RowDataBound Event and RowDeleting Event.
(1) RowDataBound Event: Occurs when a data row is bound to
data in a GridView control.
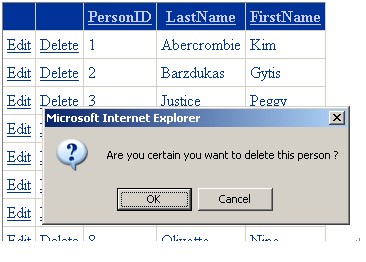
In this event, we add a client-side confirmation dialog box that
appears when the Delete button is clicked. It will prevent deleting a
row accidentally.
Related references:
MSDN: GridView.RowDataBound Event
https://msdn.microsoft.com/en-us/library/system.web.ui.webcontrols.gridview.rowdatabound.aspx
ASP.NET: Editing, Inserting, and Deleting Data
https://www.asp.net/learn/data-access/\#editinsertdelete
ASP.NET: Adding Client-Side Confirmation When Deleting
https://www.asp.net/learn/data-access/tutorial-22-cs.aspx
MSDN: WebControl.Attributes Property
https://msdn.microsoft.com/en-us/library/system.web.ui.webcontrols.webcontrol.attributes.aspx
MSDN: DataControlRowType Enumeration
https://msdn.microsoft.com/en-us/library/system.web.ui.webcontrols.datacontrolrowtype.aspx
MSDN: GridViewRow.RowState Property
https://msdn.microsoft.com/en-us/library/system.web.ui.webcontrols.gridviewrow.rowstate.aspx
(2) RowDeleting Event: Occurs when a row's Delete button is clicked, but before the GridView control deletes the row.
To identify the person for deleting, the PersonID value is required, which is read-only and cannot be modified.
string strPersonID = gvPerson.Rows[e.RowIndex].Cells[2].Text;
After fetching the PersonID, we can delete the person from the DataTable in ViewState or the table in SQL Server.
Related references:
MSDN: GridView.RowDeleting Event
https://msdn.microsoft.com/en-us/library/system.web.ui.webcontrols.gridview.rowdeleting.aspx
ASP.NET: Editing, Inserting, and Deleting Data
https://www.asp.net/learn/data-access/\#editinsertdelete
Following is the C# code for deleting a record:
// GridView.RowDeleting Event
protected void gvPerson_RowDeleting(object sender, GridViewDeleteEventArgs e)
{
using (SqlConnection conn = new SqlConnection(ConfigurationManager.ConnectionStrings["SQLServer2005DBConnectionString"].ToString()))
{
// Create a command object.
SqlCommand cmd = new SqlCommand();
// Assign the connection to the command.
cmd.Connection = conn;
// Set the command text
// SQL statement or the name of the stored procedure
cmd.CommandText = "DELETE FROM Person WHERE PersonID = @PersonID";
// Set the command type
// CommandType.Text for ordinary SQL statements;
// CommandType.StoredProcedure for stored procedures.
cmd.CommandType = CommandType.Text;
// Get the PersonID of the selected row.
string strPersonID = gvPerson.Rows[e.RowIndex].Cells[2].Text;
// Append the parameter.
cmd.Parameters.Add("@PersonID", SqlDbType.Int).Value = strPersonID;
// Open the connection.
conn.Open();
// Execute the command.
cmd.ExecuteNonQuery();
}
// Rebind the GridView control to show data after deleting.
BindGridView();
}
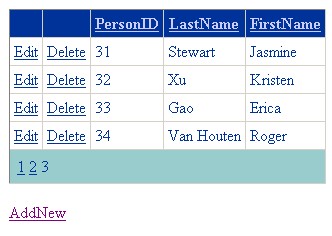
Make the GridView control display records in pages
Navigate to the Property panel of gvPerson and then switch to Event. Double-click on the PageIndexChanging Event
PageIndexChanging Event: Occurs when one of the pager buttons is clicked, but before the GridView control handles the paging operation.
In other to show data in the new page, we need to set the index of new page and then rebind the GridView control to show data in view mode.
When clicking the Edit button to edit a particular row, the GridVew control will enter the edit mode and show Update and Cancel buttons.
Related reference:
MSDN: GridView.PageIndexChanging Event
https://msdn.microsoft.com/en-us/library/system.web.ui.webcontrols.gridview.pageindexchanging.aspx
Following is the C# code for GridView paging:
// GridView.PageIndexChanging Event
protected void gvPerson_PageIndexChanging(object sender, GridViewPageEventArgs e)
{
// Set the index of the new display page.
gvPerson.PageIndex = e.NewPageIndex;
// Rebind the GridView control to
// show data in the new page.
BindGridView();
}
Sort the records by one of the columns in the GridView control
Navigate to the Property panel of gvPerson and then switch to Event. Double-click on the Sorting Event.
Sorting Event: Occurs when the hyperlink to sort a column is clicked, but before the GridView control handles the sort operation.
When clicking a column’s header to sort this column, we need to get previous sort column and sort order and compare the sort column with the current column.
If they are same, we just change the sort order to show data in the other order, e.g. ascending to descending or descending to ascending.
If not, we specify the current column as the sort column and set sort order to ASC. The sort expression is stored into ViewState to persist data across postbacks.
Related references:
MSDN: DataView.Sort Property
https://msdn.microsoft.com/en-us/library/system.data.dataview.sort.aspx
MSDN: GridView.Sorting Event
https://msdn.microsoft.com/en-us/library/system.web.ui.webcontrols.gridview.sorting.aspx
Following is the C# code for GridView sorting:
// GridView.Sorting Event
protected void gvPerson_Sorting(object sender, GridViewSortEventArgs e)
{
string[] strSortExpression = ViewState["SortExpression"].ToString().Split(' ');
// If the sorting column is the same as the previous one,
// then change the sort order.
if (strSortExpression[0] == e.SortExpression)
{
if (strSortExpression[1] == "ASC")
{
ViewState["SortExpression"] = e.SortExpression + " " + "DESC";
}
else
{
ViewState["SortExpression"] = e.SortExpression + " " + "ASC";
}
}
// If sorting column is another column,
// then specify the sort order to "Ascending".
else
{
ViewState["SortExpression"] = e.SortExpression + " " + "ASC";
}
// Rebind the GridView control to show sorted data.
BindGridView();
}

How to Get the Sample
For a complete demo, please refer to the sample named CSASPNETGridView in All-In-One Code Framework project at https://cfx.codeplex.com/.
Feedback
If you have any feedback or questions about the samples, please feel free to post it to the discussion board or directly send it to us. Thanks.