Work with Silverlight Deep Zoom
Introduction
(To get the code sample of this blog post, please refer to the sample named CSSL3DeepZoom in All-In-One Code Framework project at https://cfx.codeplex.com/. This sample will be included in our next release.)
My Name is Yilun Luo. I have worked as a support engineer for 3 years in Microsoft, covering WPF, Silverlight, Azure Services Platform, and so on. Recently I joined All-in-One Code Framework project team to work together with other specialists to create this fabulous framework.
One sample that we planned in our next release will be the cool Silverlight deep zoom. Silverlight deep zoom allows you to display large images or image collections very efficiently. The end users will download a thumbnail of the large image first. As the user zooms in, part of the large image will be downloaded and rendered before the user. Other than the features provided out of box, you can also do a lot of customizations and integrate deep zoom with other parts of Silverlight in your own project.
This sample covers essential areas when working with deep zoom in your application. It demonstrates the following features:
- Generate deep zoom content using Deep Zoom Composer.
- Download and work with metadata.
- Hit test a sub image in a collection.
- Create a custom UIElment, and make it zoom/pan together with the MultiScaleImage.
- Move a sub image in a collection.
- Generate deep zoom content programmatically with the help of DeepZoomTools.dll.
Preparation
We have provided sample source images in the DeepZoomProjectSite\SourceImages folder. In order to reduce the size of the project, we will not include the generated deep zoom contents in the project. The first time you run the sample, we'll demonstrate how to generate deep zoom contents programmatically by calling a WCF service. As long as you don't delete the generated contents, this task will only be performed once. If you want to try again to see how to generate the contents programmatically, please modify the Page class. In its constructor, find the following line:
client.PrepareDeepZoomAsync(false);
And change false to true. This will force the WCF service to regenerate the deep zoom content.
If you want to prepare your own images rather than using those we provide, please follow these steps:
- Generate a deep zoom content using Deep Zoom Composer. Please refer to the "Work with Deep Zoom Composer" part.
- Copy the GeneratedImages folder to the sample, under DeepZoomProjectSite/ClientBin. Override all existing files.
- Comment the code between "Begin Comment" and "End Comment" in the Page class's constructor.
- Locate the Page_Loaded method, and uncomment this.DisplayDeepZoom to display the deep zoom content immediately.
this.DisplayDeepZoom();
Alternatively, you can choose to generate the deep zoom content programmatically. In this case, please follow these steps:
- Put your source image files (at least 2) under DeepZoomProjectSite/SourceImages folder.
- Update DeepZoomProjectSite/ClientBin/Metadata.xml, to provide your own metadata. If you don't know what to write for x, y, Width, Height, you can use Deep Zoom Composer to generate a sample scene. Make sure to put only file name (no directory path) for the FileName element. The samples code logic will look for relative path rather than absolute path.
- In the Page class's constructor, find client.PrepareDeepZoomAsync(false), and change false to true.
Note: When running the sample project, please make sure to set DeepZoomProjectSite (the ASP.NET web site) as the solution's start project, and set Default.html as the start page. Make sure the address in the browser starts with http.
Work with Deep Zoom Composer
Deep Zoom Composer allows you to create deep zoom contents without writing a single line of code! This tool is very easy to use. The following is a quick guide to reproduce the content used for this sample:
- Open Deep Zoom Composer, and create a new project.
- In the Import tab, click Add image to import source images. For this sample to work properly, you need at least two images.
- In the Compose tab, drag and drop the imported images onto the scene. You can overlap images to each other. You can also use your mouse wheel to zoom.
Now it comes the important part. Deep zoom supports two types of scenarios. Single image scenario (composition), and collection scenario. A composition puts all the images into a single large image, and you will not be able to interact with each sub image. This is useful when you're working with a single image. A collection, on the other hand, will generate one pyramid for each sub image. This allows you to interact with each sub image in code, but more files will be generated, and the total size will be larger. If you want to have more control over the images in your application (as demonstrated in this sample), you'll have to choose the collection format.
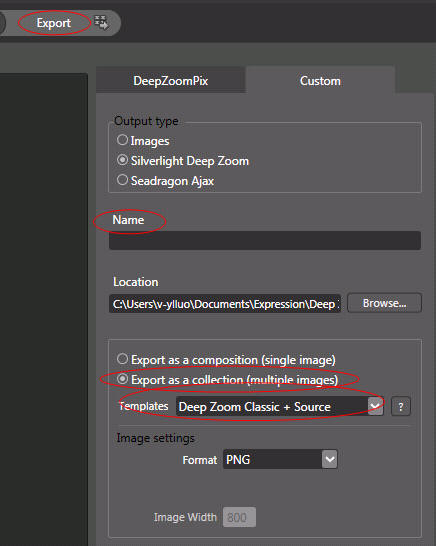
To export the images as a collection, click the Export tab, and then the Custom tab, and make sure to choose Export as a collection. Also remember to type a name, and make sure you choose Deep Zoom Classic + Source as the template:
So what are the differences among those export templates?
- Deep Zoom Classic + Source: It creates a Silverlight project, along with a web site, with full source for you.
- Blend 3 Behaviors + Source: It creates a everything that Deep Zoom Classic + Source creates for you, plus several Behaviors and Actions that are used by Expression Blend at design time (requires Expression Blend SDK). This sample does not intend to demonstrate design time support.
- Deep Zoom Navigation: It creates a Silverlight application with advanced user experience, such as select each sub image. But it doesn't give you the source code due to legal issues. So you will not be able to customize the application.
- Empty Project + Source: Just an empty project. You need to do everything on your own. Choose this template if you don't like the default zoom behavior, or if you want to start from scratch.
- Tag Browser: A sample application created by Kirupa. While this export template doesn't ship the source code, you can download the source code from https://blog.kirupa.com/?p=212.
Other settings in the Export tab includes:
- Export format: Export to DeepZoomPix (a cloud service) instead of a local Silverlight project, export as images or Seadragon Ajax instead of Silverlight.
- Name and location.
- Image format: if your collection contains images with alpha channels, please choose PNG, otherwise the alpha channel will be lost. But PNG format is generally slightly larger than JPEG.
Download and inspect Metadata.xml
Now that we have exported our images as a collection, a Metadata.xml file is generated under the GeneratedImages folder in the web site project. It contains information of each sub image, including the tags we typed. So the first step in our code will be download this xml file. Please refer to the code between "Begin download metadata." and "End download metadata." in the Page class's constructor, the webClient_DownloadStringCompleted method, and the ImageMetadata class to see how to perform this task. We will include separate samples to demonstrate how to work with WebClient and xml in the future.
Hit test a sub image
The next step is to perform hit tests. In the sample, when you move your mouse to a sub image, its tag (got from the metadata) will be displayed. Unfortunately, because MultiScaleSubImage class is not derived from UIElement, VisualTreeHelper.FindElementsInHostCoordinates will not help. We have to perform the hit test ourselves. Fortunately, MultiScale(Sub)Image class provides some properties which can help us. Essentially, ViewportWidth determines the size of an image, while ViewportOrigin determines the position of an image. Together, they can precisely locate a sub image. For a visual description of ViewportWidth/Origin, please refer to
Please refer to the HitTest method in the Page class. It demonstrates how to calculate the width/height of the sub image by inspecting ViewportWidth, and how to calculate the position of a sub image by inspecting ViewportOrigin.
So why do we need to perform a hit test? Because when you can display some information for a "selected" sub image. The HitTestImgae method in the Page class demonstrate how to display the tag (stored in metadata) of a sub image when mouse over.
Make a custom element zoom/pan together with the MultiScaleImage
You can add more images to the MultiScaleImage at runtime by providing a custom source. But sometimes you may want to add non-bitmap contents to the scene, and make it zoom/pan together with the MultiScaleImage. Think of allow the user to add annotation to the scene.
This sample creates a ball (a vector Ellipse instead of a bitmap). When you zoom and pan the scene, you'll notice the ball scales and moves together with the MultiScaleImage. You can change the ball to any FrameworkElement, such as a TextBox by simply updating XAML, and it will still zoom/pan together with the MultiScaleImage.
To do so, first we must understand what happens when an element is scaled and translated. All 2D render transforms can be represented by a 3*3 matrix. Without rotation, the matrix looks like the below:
ScaleX |
0 |
0 |
0 |
ScaleY |
0 |
TranslateX |
TranslateY |
1 |
When you apply the CenterX/Y property for a ScaleTransform, actually the TranslateX/Y field of the matrix will be updated, even though it won't be reflected in a TranslateTransform in the same TransformGroup.
Deep zoom always scales the scene at the currently mouse point. So we will have to update our CenterX/Y along with the current mouse point. However, as we've already seen in the above description. If you update CenterX/Y, the translation will also be updated. That makes it difficult to control our TranslateTransform. So rather than mess with the CenterX/Y, let's apply a MatrixTransform to the ball, so we only need to think about the final result of the matrix.
The ScaleX/Y (M11 and M22) property of the matrix can be calculated very easily. Let's focus on TranslateX/Y (OffsetX/Y property of the matrix). It is usually easier to think with a 1D line rather than a 2D rectangle. Note we only need to consider the final result. No matter how many times the line has been zoomed, as long as we know the final result of n, the final result of n + 1 can always be calculated in the same way. This is similar to Mathematical induction.
![]()
In the above image, suppose the black line AC is scaled to the longer line AE, and the clicked point is B, so it will have to be translated to the position of the green line. That is, the length of FG is the desired translation. The length of FG can be calculated by length(AB) * scale value. Of course, we must add the new translation value with the previous TranslateX/Y. For more information about how to calculate the matrix, please refer to the ZoomBall method in the Page class.
Move sub images in a collection
Another advantage of collection over single image composition is you can move a sub image at runtime, without regenerating the deep zoom content. Suppose you're using the images provided by the sample, if you click the ToggleButton at the top right screen, and then click on the scene, the ball will move to the clicked position. Since the ball is just an Ellipse, it is very easy to modify its MatrixTransform to move it. The interesting part is the wrap in bamboo, together with its child elements, which are all parts of the deep zoom content, will also move together with the ball. You'll notice their relative position remains the same, no matter what zoom level it is. However, the background image, which is also a part of the deep zoom content, will not move. That is, you can move some of the sub images, while keep others in their original position.
Remember we described ViewportOrigin determines the position of a sub image. So to move a sub image, we need to update its ViewportOrigin. The code for this part can be found in the MoveBallAndSubImages method in the Page class. Note MultiScaleImage has its own logical coordinate system. So we need to use ElementToLogicalPoint method to translate the absolute delta from the global coordinate system to the MultiScaleImage's logical coordinate system.
Generate deep zoom content programmatically
Sometimes, rather than create a pre-configured scene using Deep Zoom Composer, you may want to programmatically generate the scene at runtime.
There're two solutions. One is to create a custom MultiScaleTileSource class, so you can provide your own source images rather than relying on the dzc_output.xml. This feature will not be demonstrated in the sample. You can refer to the Deep Earth sample to see how to create a custom MultiScaleTileSource that receives images from Bing Map.
The other solution is to generate the content on the server, by using the DeepZoomTools.dll assembly shipped with DeepZoomComposer. To do so, you will first need to create a list of Microsoft.DeepZoomTools.Image objects (note it's not System.Windows.Controls.Image), which describes the source, size, position, etc, of each sub image. Than you can call the CollectionCreator.Create method to create a collection, or call the ImageCreator.Create method to create a composition. If you don't know what values to provide for the size and position, one solution will be use Deep Zoom Composer to generate a sample content where sub images are positioned in a similar way to what you want to render. Then you can calculate the size and position information by parsing the Metadata.xml generated by Deep Zoom Composer.
The code for this feature can be found in the GenerateDeepZoomService class's CreateDeepZoom method, in the web application (note not in the Silverlight application because we're generating the contents on the server side).
Conclusion
Silvelright deep zoom allows you to display large images or image collections very effectively. In addition to generate the contents using Deep Zoom Composer, you can also programmatically customize a lot of areas.