Configuring Startup and Logon scripts for Azure RemoteApp
Azure RemoteApp (ARA) is an Azure service that enables companies to deploy their business applications as virtualized services. Most 32 or 64 bit Windows applications can be hosted in ARA (such as LOB, legacy, custom, Office, CRM etc. apps). Users can access these applications remotely as if they are running them locally. The ARA application can be accessed from any device (Windows, iOS, Android, MAC etc.) as long as users have downloaded the ARA client for the device. Behind the scenes, the ARA is hosted on Azure VM(s) that have Windows Server RDSH server role enabled. These VMs are managed by the RemoteApp service. When a user accesses an ARA application, it is streamed through the ARA client applications.
Here are some ARA quick links:
- You can access the ARA documentation here - https://azure.microsoft.com/en-us/documentation/services/remoteapp/
- ARA is created and published as a collection (Cloud or Hybrid). To learn what collection you need, visit - https://azure.microsoft.com/en-us/documentation/articles/remoteapp-collections/
- To access ARA, you would need to download the ARA client that you can download from here - https://www.remoteapp.windowsazure.com/
- To learn about requirements for running an application in ARA environment, visit the page here - https://azure.microsoft.com/en-us/documentation/articles/remoteapp-appreqs/
- To get the latest updates and notes from the ARA product team, visit the team blog here - https://blogs.msdn.microsoft.com/rds/
Now for the specific use case
When you want to create and publish your custom/LOB apps in ARA, you create a custom VM image in Azure, install your apps on it and make any necessary customizations. You then generalize/sysprep this VM to create the base image for your ARA collection. However, sysprepping a VM causes user-specific customizations to be wiped out. If these settings are needed in the VMs, created from the base image, to host the ARA collection we need to find some way to recreate them.
In this blog post, I will describe a couple of different ways to use Windows Server startup and logon scripts (which are standard Windows/Windows Server features) to configure machine and user settings in an ARA VM. Note that some of these steps are not unique to ARA so you should be able to use these ideas with regular Azure VMs as well.
In summary, in this example use case, we are going to go through an end-to-end scenario where we create an ARA Cloud collection (without any VNETs or domain joins), create and configure startup and logon PowerShell scripts and make sure that our customizations work as expected in an ARA VM.
Steps for creating an ARA Cloud Collection with custom image
As of this writing, RemoteApp is not fully supported in production Azure portal (not supported in ARM yet), so you would need to use the classic portal at https://manage.windowsazure.com. Although I am summarizing all the steps for creating the ARA collection, our main focus is going to be on step 2 below
- Create the custom VM image
-
- Select portal -> Virtual Machines -> New- > Virtual machine -> From Gallery -> choose “Windows Server Remote Desktop Session Host” image
-
- Install apps and Sysprep VM image
-
- Once VM was created as in step#1, RDP in, install your apps as required (details in the next section)
- Run the preinstalled ARA validator script that validates and syspreps the VM
-
- Capture the snapshot of this image
-
- Select Portal -> Virtual Machine->Instances tab -> select VM instance -> click Capture
-
- Import this image to ARA gallery
-
- Select Portal -> RemoteApp -> Template Images -> Add -> Select Import an image from your Virtual Machines library option -> select image that was created in step#3 -> check the confirm box -> done
-
- The collection should be now ready in the Classic Portal -> RemoteApp -> RemoteApp collections
- Publish the collection and configure User access
-
- Select Portal -> RemoteApp -> click RemoteApp collection -> click publish RemoteApp program -> select apps and done
- Select Portal-> RemoteApp -> click RemoteApp collection -> click configure user access -> add names (Microsoft account or your domain accounts)
-
Diving into Step#2 details
In our example use case, these are some of our requirements:
- Publish a browser as a RemoteApp
- Install custom Certs
- Control user's internet traffic by browser proxy setting
- Prevent users from saving locally
As you can see, last 3 bullets are custom settings. To do this, we need 2 kinds of customized settings - global (machine level) and user specific. We want the global settings to kick in just once when the VM boots up and the user specific settings to kick in when a user logs into the RemoteApp collection. Hence it makes sense that we put the global settings in the Startup script and user settings in the Logon/Logoff scripts and trigger them accordingly. The Startup/Shutdown scripts run on the Local System account whereas the Logon/Logoff scripts run on User Account.
Please note that this blog post is more about the logistics of adding, configuring, triggering the scripts in the context of ARA rather than the content of the scripts themselves. Although these scripts work as is, they are just there to convey our example use case. Based on your specific requirement, you may have scripts that do different things.
Creating scripts
Create a folder C:\Scripts\ on the ARM VM image. Your PowerShell scripts Startup.ps1, Logon.ps1 etc. will be stored here. We are using the C drive here because in Azure, the OS disk of the VM is mapped and persisted on the C Drive, so the scripts are accessible.
- Startup Script (Startup.ps1): This script takes care of installing the cert. This action needs to happen only once when the VM boots up, so this goes in the startup script. Note that the cert is saved here on the local drive for example only. To store secrets and credentials, best practice is to use the Azure Key Vault service (https://azure.microsoft.com/en-us/documentation/services/key-vault/)
- Set-Location -Path cert:\LocalMachine\CA
- Import-Certificate -Filepath "C:\windows\files\mycert.cer
- Logon Script (Logon.ps1): Set the browser proxy setting by adding Proxy auto configuration (pac) file setting in the registry. Since this is a user specific browser setting, we are doing this in the logon script.
- Set-ItemProperty -Path 'HKCU:Software\Microsoft\Windows\CurrentVersion\Internet Settings' -Name AutoConfigURL -Value 'https://myproxyconfigurationfile.pac'-type REG_SZ
- Logoff Script (Logoff.ps1): To prevent users from saving locally, user profile disk (UPD) needs to be disabled (https://blogs.msdn.microsoft.com/rds/2015/11/11/disable-user-profile-disks-upds-in-azure-remoteapp/), and we need to clean up some registry settings when user logs off.
- Set-ItemProperty -Path 'HKLM:\Software\Policies\Microsoft\Windows\System' -Name DeleteRoamingCache -Value '00000001' -type REG_DWORD
- Set-ItemProperty -Path 'HKLM:\Software\Policies\Microsoft\Windows\System' -Name LocalProfile -Value '00000000' -type REG_DWORD
Triggering scripts
Once you have the scripts ready as above, we need to trigger them. I will show a couple of options here - one using the Local Group Policy and another using Task Scheduler.
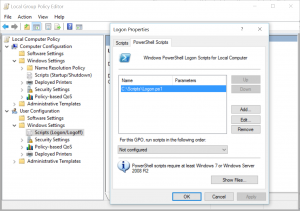
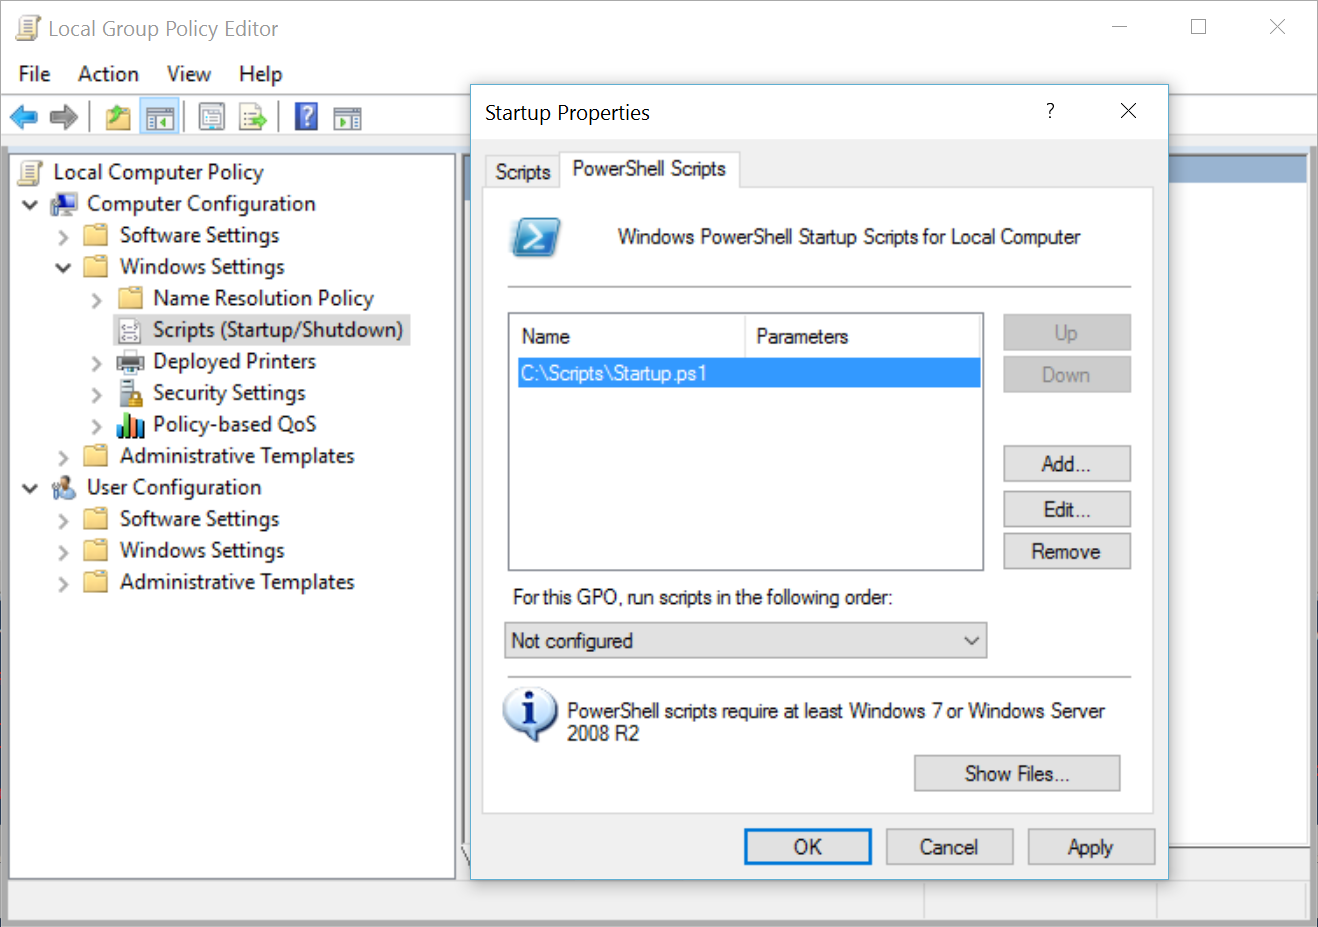
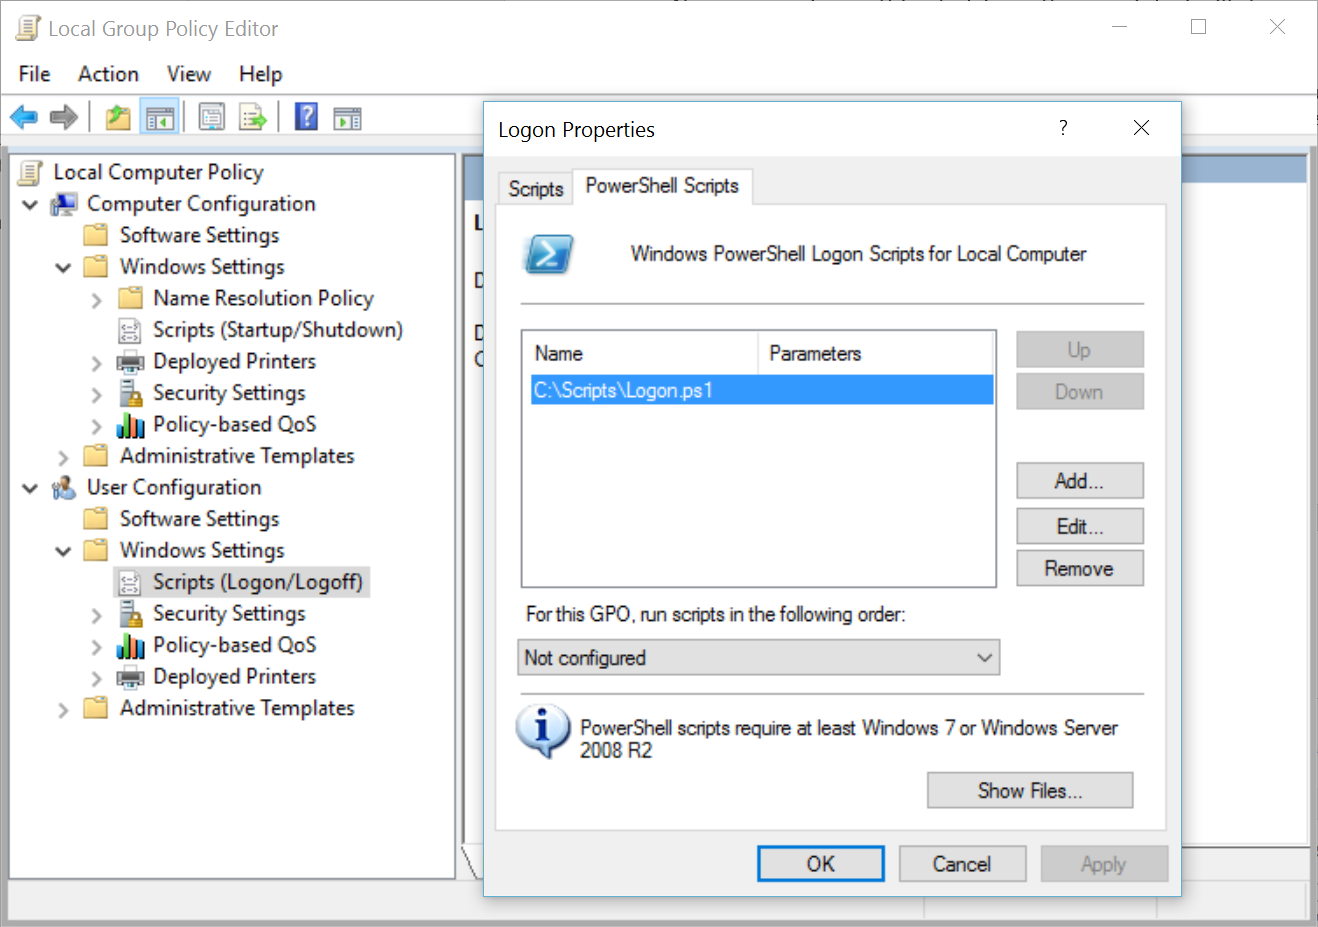
- Using Local Group Policy (GPO)
- In a command prompt, open gpedit.msc to edit the group policy and attach your scripts as shown. You can read more about GPO here: https://technet.microsoft.com/en-us/library/cc753404.aspx
- Attach Startup script to Computer Configuration

- Attach Logon script to User Configuration
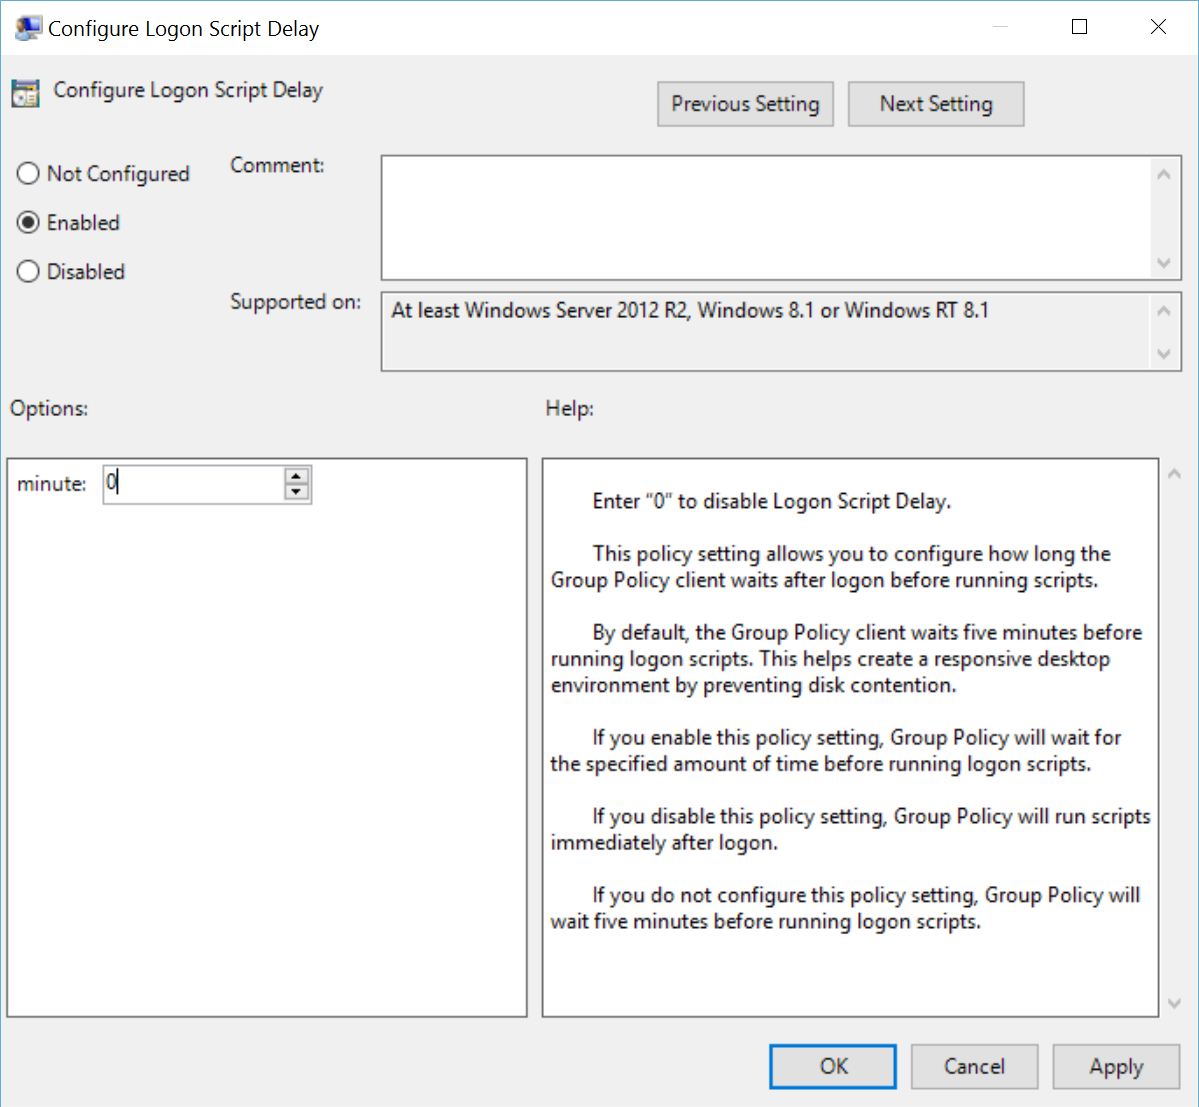
- IMPORTANT: One thing you notice is that user script may not kick in for a while. You might wonder if the script is working at all and this may stump some folks. It turns out that on Windows Server 2012 server, the default setting is set to wait for 5 minutes. That means log on script doesn’t trigger immediately upon logging in. Therefore, if you need it to run immediately, you would need to change the Configure Logon Script Delay property and set to zero as shown (Reference: https://rcmtech.wordpress.com/2014/01/24/logon-scripts-do-not-run-at-logon-server-2012-r2/ )


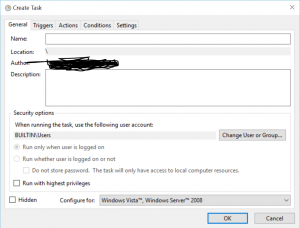
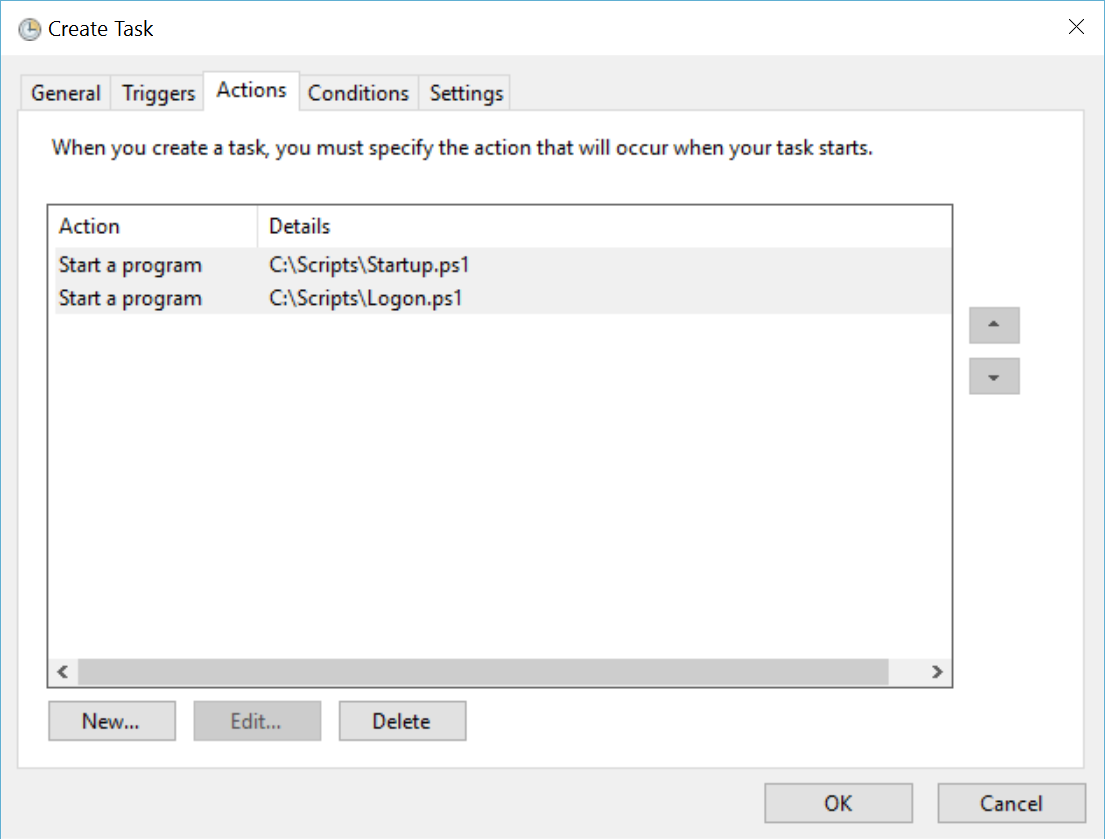
- Using Task Scheduler
- Open the Windows Task Scheduler and create a task
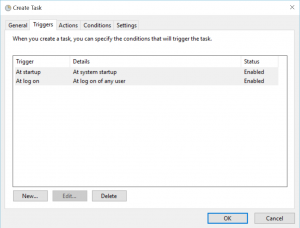
- Add 2 triggers, one at startup and one at logon
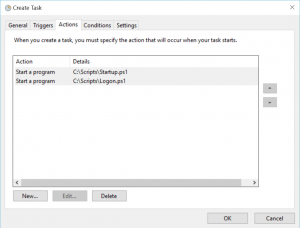
- Attach the scripts to Actions so these scripts are run when the task triggers startup and logon events


Summary
This post showed how to configure scripts to run on the VMs hosting an Azure RemoteApp collection when the VM starts up and each time a user logs in and logs out. Once you have configured your scripts as shown above, you should be able to sysprep the VM, publish your ARA collection and see all the custom settings come to life.
Special thanks to Neil Mackenzie for reviewing the post.