Deploying a SaaS Application in Azure (Data Tier)
First of all, let me apologize for taking so long to get this second posting out there. I ran into some technological hurdles that I had to overcome before I could make either the ARM template or the Power Shell script available. Now that I have resolved those issues, let’s take a look at the data tier for this deployment.
In the last post, I introduced the Use Case of Harrison Hotels, a Software as a Service hotel management application that needs to be deployed in Azure in such a way that it can be available world wide. I also walked through the initial setup of the environment across three distinct regions by creating a virtual network with four subnets in each region where the subnets correspond to different tiers of the application.
It is now time to start implementing one of the tiers of the application and setup connectivity to that tier, both within the virtual network as well as from the outside. In this post, we will be looking at the data tier for the application. Unlike in the previous Lab where we really focused on one single service within Azure, this time we will be looking at a few different services that will all be working together to start implementing the architecture.
- Virtual Machines (Linux)
- Network Security Groups (NSG)
- Public IP Addresses
- Internal Load Balancers
Although we will be deploying the above architectural services, this does not actually provide a data tier for the Harrison Hotel Management application. To help with that, I will be providing a SQL script that can be used to deploy the actual application database within SQL Server, MariaDB, or MySQL, but there is no reason why you couldn’t use Oracle, PostgreSQL or some other database flavor of your choice. We will not be going into the actual setup of the database engines as that can be found within other reference materials. This will post will more focus on the creation of the VMs within Azure and how to configure them appropriately to use SSH authentication.
Although we will be deploying the above architectural services, this does not actually provide a data tier for the Harrison Hotel Management application. To help with that, I will be providing a SQL script in a future lab that can be used to deploy the actual application database within SQL Server, MariaDB, or MySQL, but there is no reason why you couldn’t use Oracle, PostgreSQL or some other database flavor of your choice. We will not be going into the actual setup of the database engines as that can be found within other reference materials. This post will more focus on the creation of the VMs within Azure and how to configure them appropriately to use SSH authentication and work within a secure and resilient network environment.
BEST PRACTICES: Having spent a lot of time designing and implementing architectures for federal government customers over the years, I have a very good understanding of what is required to design a secure architecture within the cloud. To that end, we are going to use a Jump server, also known as a Bastion Host to connect to each of the VMs within the VNet and we will authenticate using an SSH key. However, a security best practice is to have a dedicated authentication source (LDAP, etc.) for when connecting to any underlying VMs within a given environment. This provides for a multi-factor form of authentication where you are using a SSH key to access the Jump server, but use a LDAP based user id and password when accessing the next VM and there by allowing for auditing of access and management of authorization to different servers. This is something that I will be implementing in a much later Lab, but I did want to mention it. Further information about Jump servers can be found in the References section at the end of the post.
Lab - Data Tier
When creating VMs within Azure that use an SSH key for connection and authentication, that key will need to be generated ahead of time and depending on which deployment method you are using (Power Shell, XPLAT CLI, Portal, etc.) it may require a different file to actually associate the key correctly with the new VM.
NOTE: Within the references section, I have provided a link for how to create SSH keys, however this document only applies when using the original portal or when using the Azure Service Management mode. In the script files that I have provided, I am using the new openssh format rather than the x509 certificate which can be created using the PuttyGen tool which can be found at the following location: putty download page. It is this key format that is used within the Azure Resource Management (ARM) mode or the new Portal. You can find information on how to use this tool to create your certificate on the Putty web site.
1.) Create a minimum of one SSH key for deployment within the VM.
Required Storage
In Azure, there is a requirement that a Storage Account be created so that any attached virtual hard drives (VHDs) can be stored appropriately within a given subscription. There are two different kinds of Storage Accounts, Standard and Premium. Each one of these determine the level of performance that you will see with respect to I/O between your VM and any attached VHDs. For more information, please see the following article: Introducing Storage Services.
In this particular instance, I am going to create two different storage accounts. The Premium storage account will be strictly used for the database services as they tend to need a higher level of I/O performance. The Standard storage account will be used for all other VMs.
INFO: Please be aware that there are certain limits within a given storage account. As your environment grows, you may need to spread your VHDs across multiple storage accounts to keep from hitting those limits. See the following for storage account limits: Storage Limits.
2.) Click New -> Data + Storage -> Storage to create a Standard and Premium Storage account
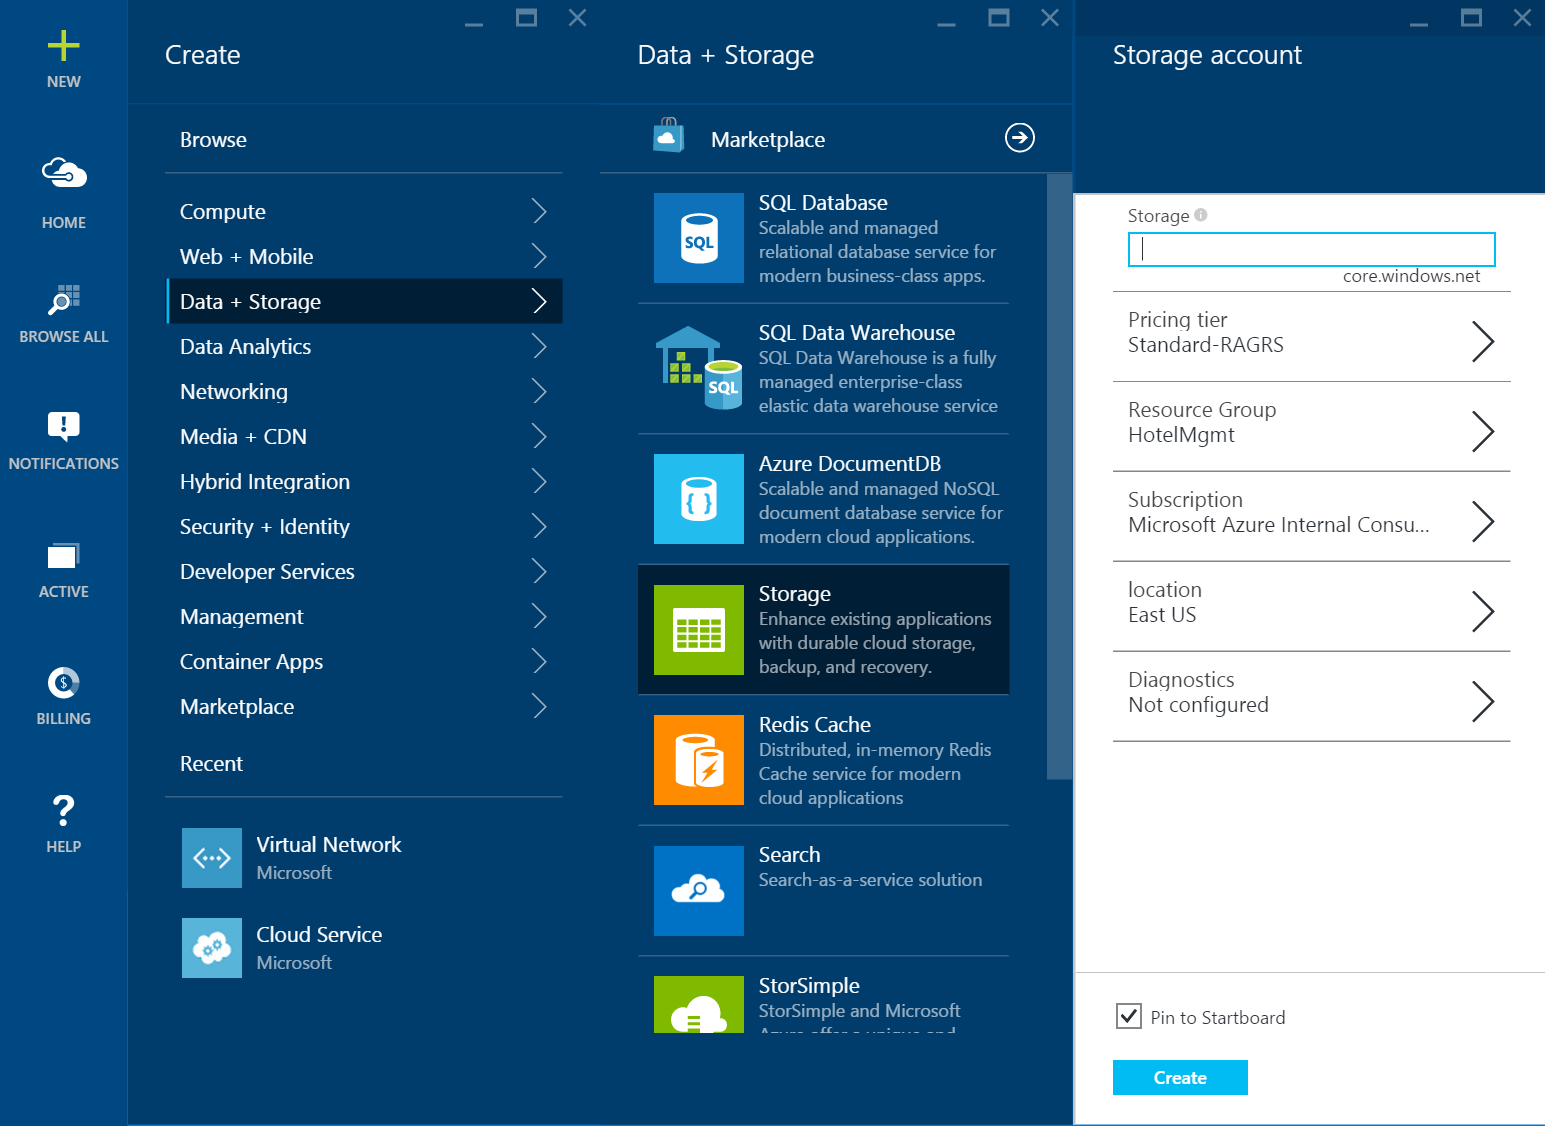
NOTE: Please be aware that Premium Storage is not available in all regions. You will need to take this into account when deploying your application.
Virtual Machines
The next step is to start deploying our VMs and we will start with the Jump server. When creating new resources, I have been primarily using the New button in the top left corner of the Portal. However, there is another way to add resources directly into our existing Resource Group. Due to the fact that I am putting all resources within one Resource Group, I made the decision to “Pin” the Resource Group to my home page to make it much faster to get access to my resources. This can be done using the following steps:
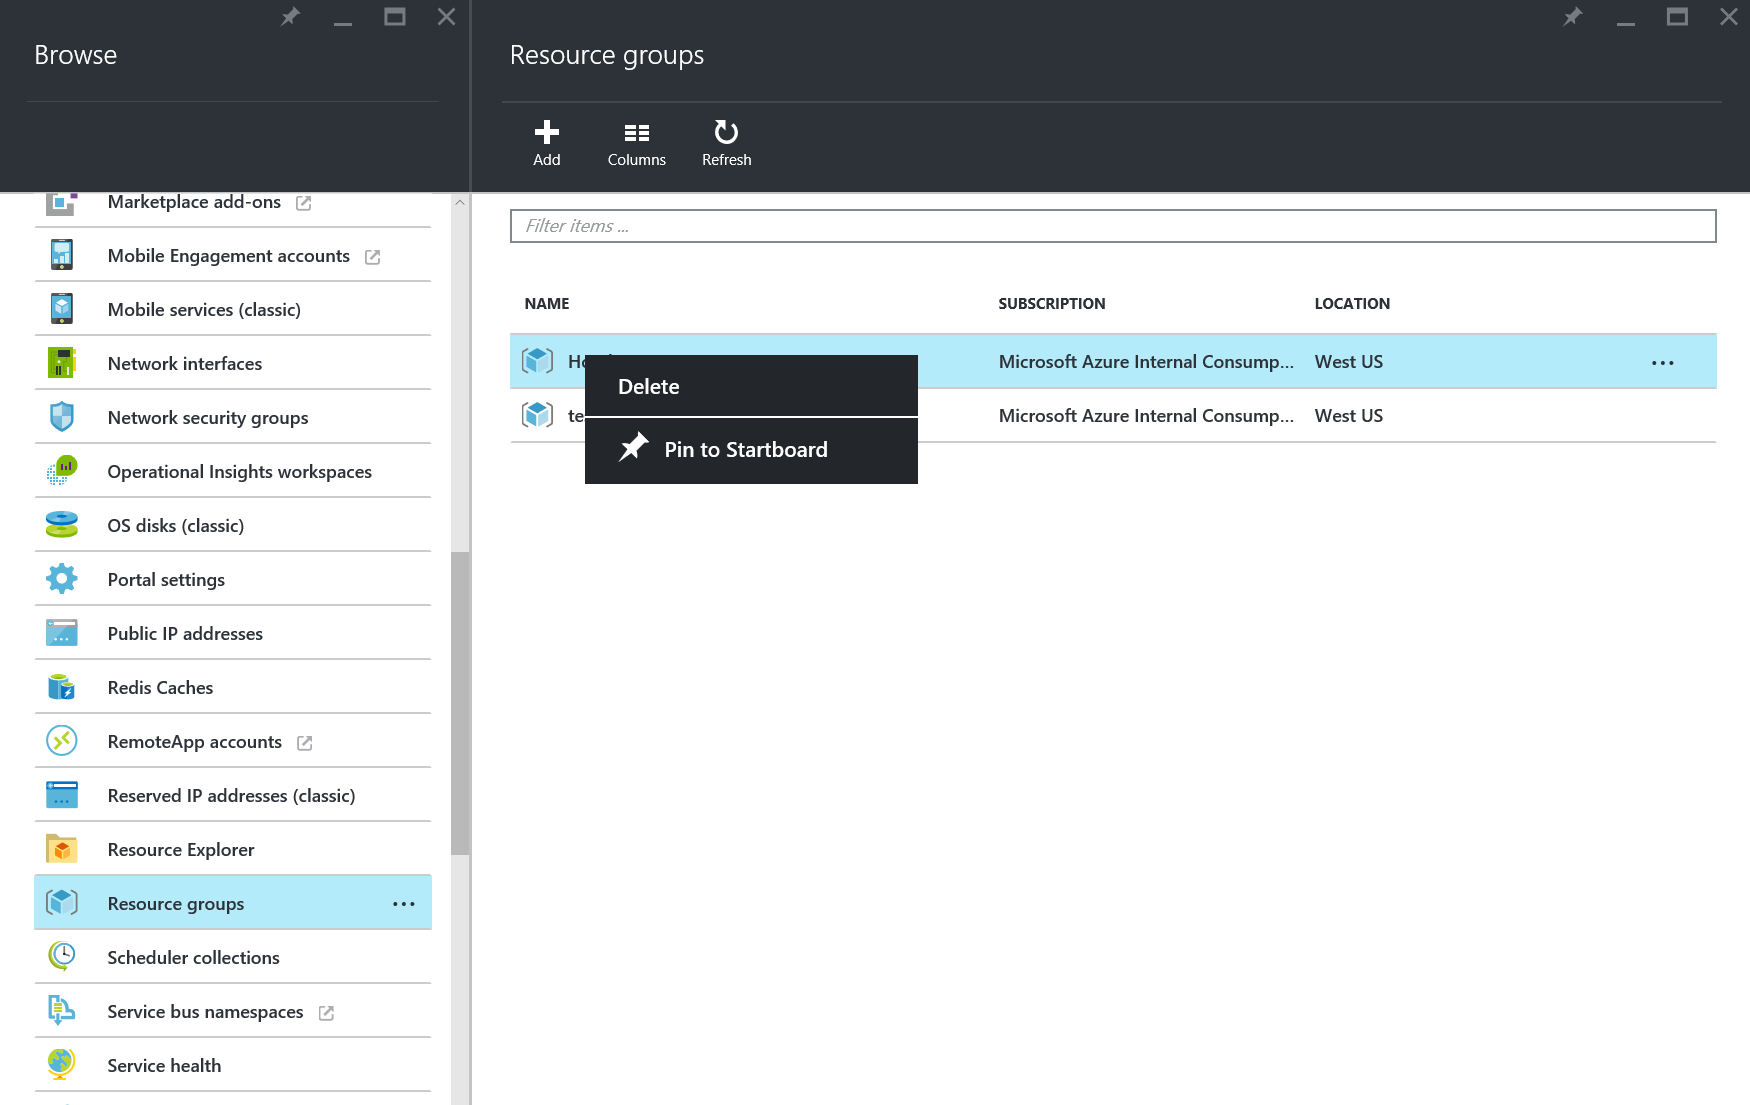
3.) Click Browse All -> Resource Groups
4.) Right Click on your Resource Group -> Click Pin to Startboard
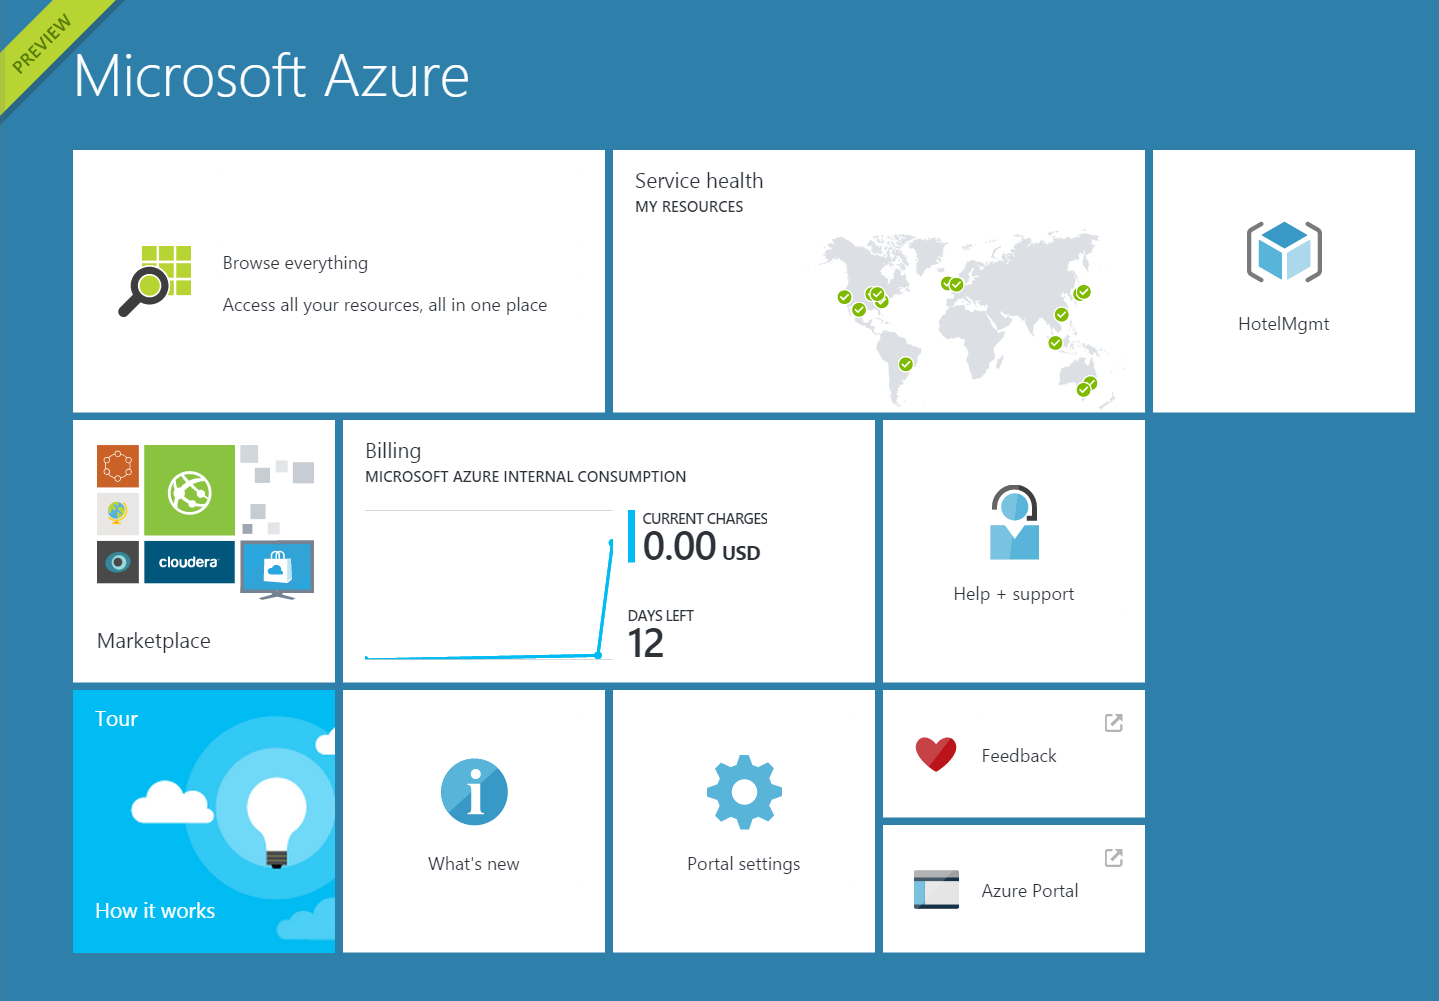
5.) Click Home to Verify that the Resource Group is on your Home page
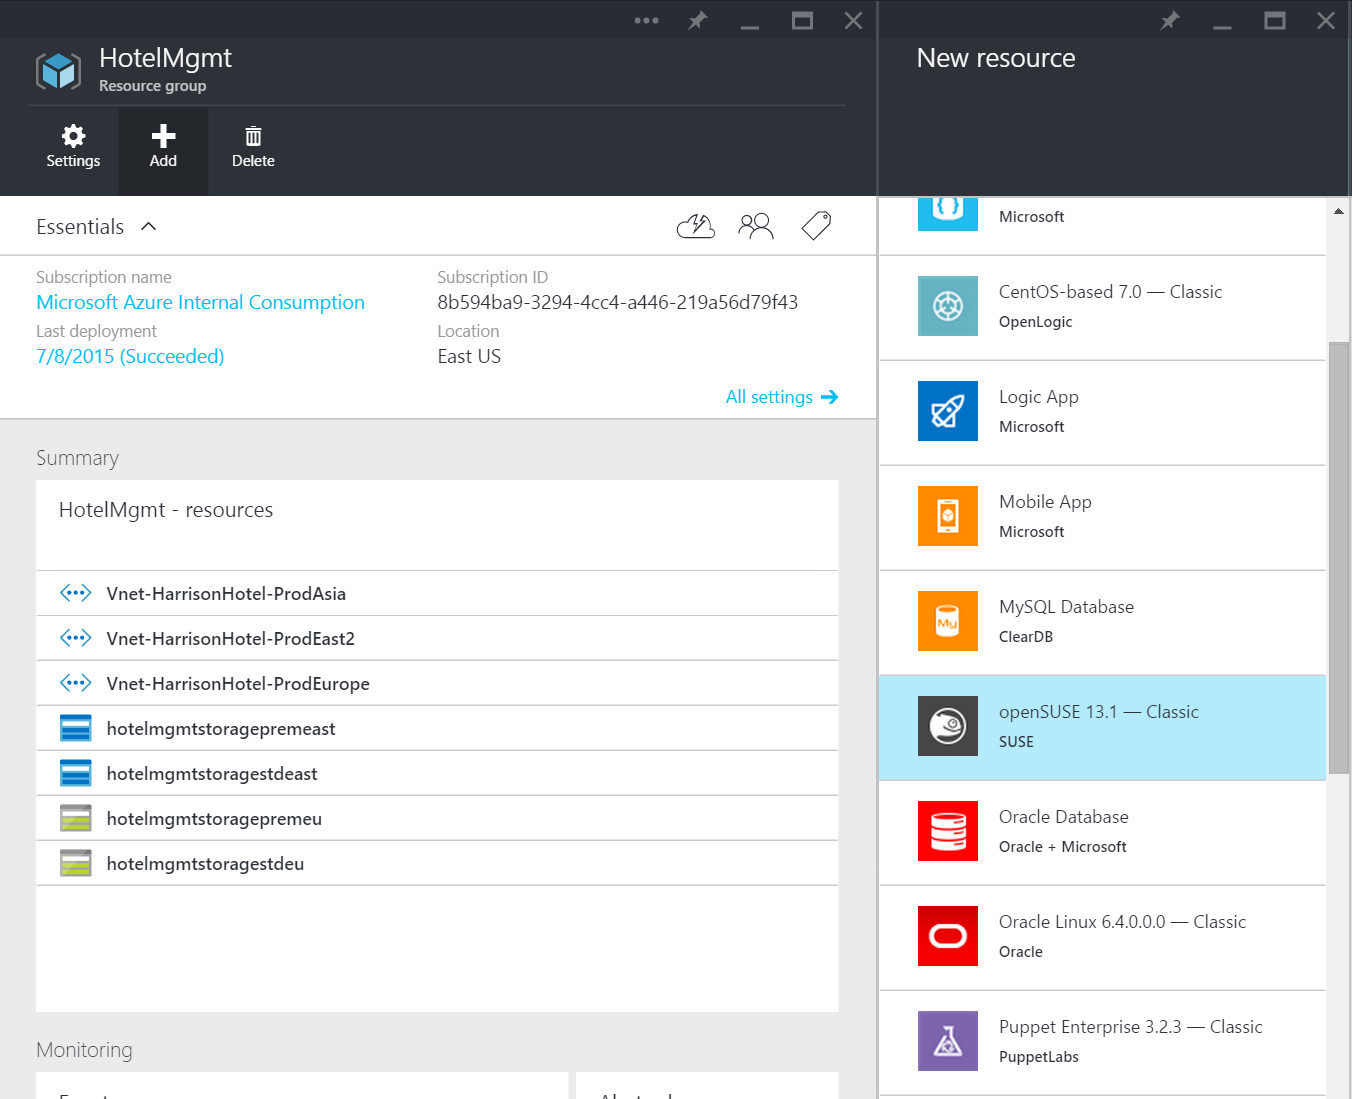
6.) Click on Resource Group tile
7.) Click on Add button within the Resource Group tile and select openSUSE or Linux flavor of your choice
8.) Fill out all of the necessary information for the Jump server
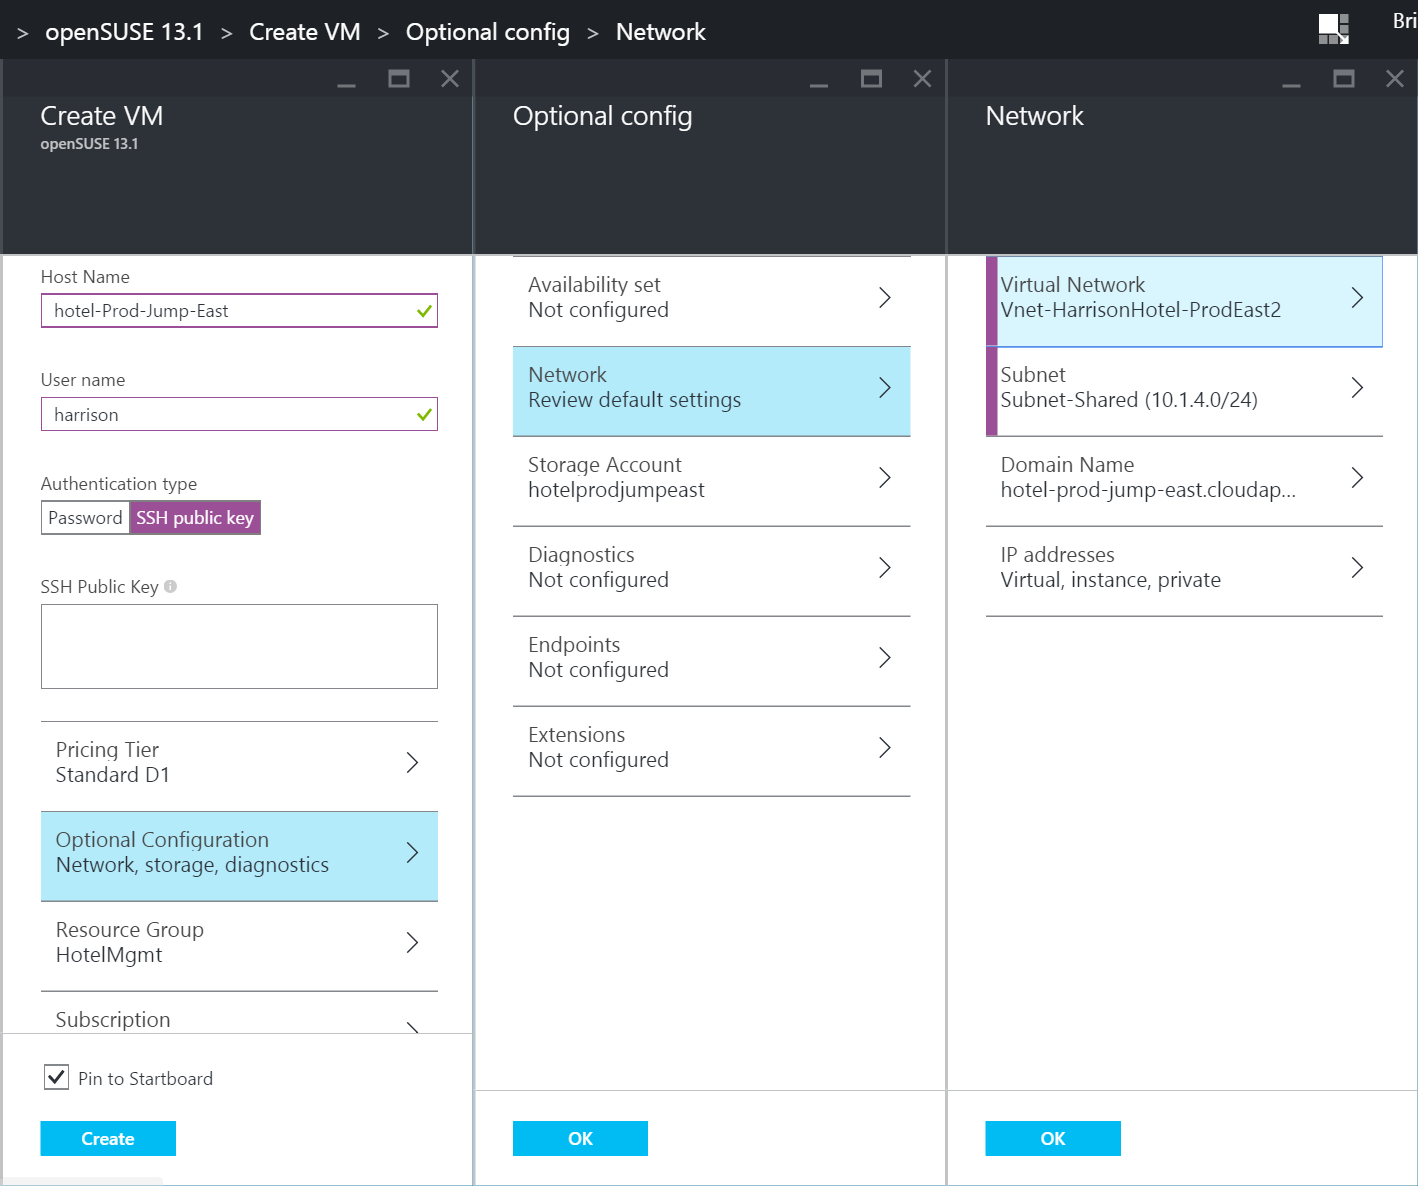
NOTES:
- As this is a Jump server and will not require much in the way of resources to do its work, a Standard A1 should be sufficient
- This server does not need Premium storage, so the Standard Storage account should be chosen here
- As this server should remain up at all times and should have a consistent IP address, I have created and assigned a Public IP to the VM’s NIC Card
Database VMs (MariaDB)
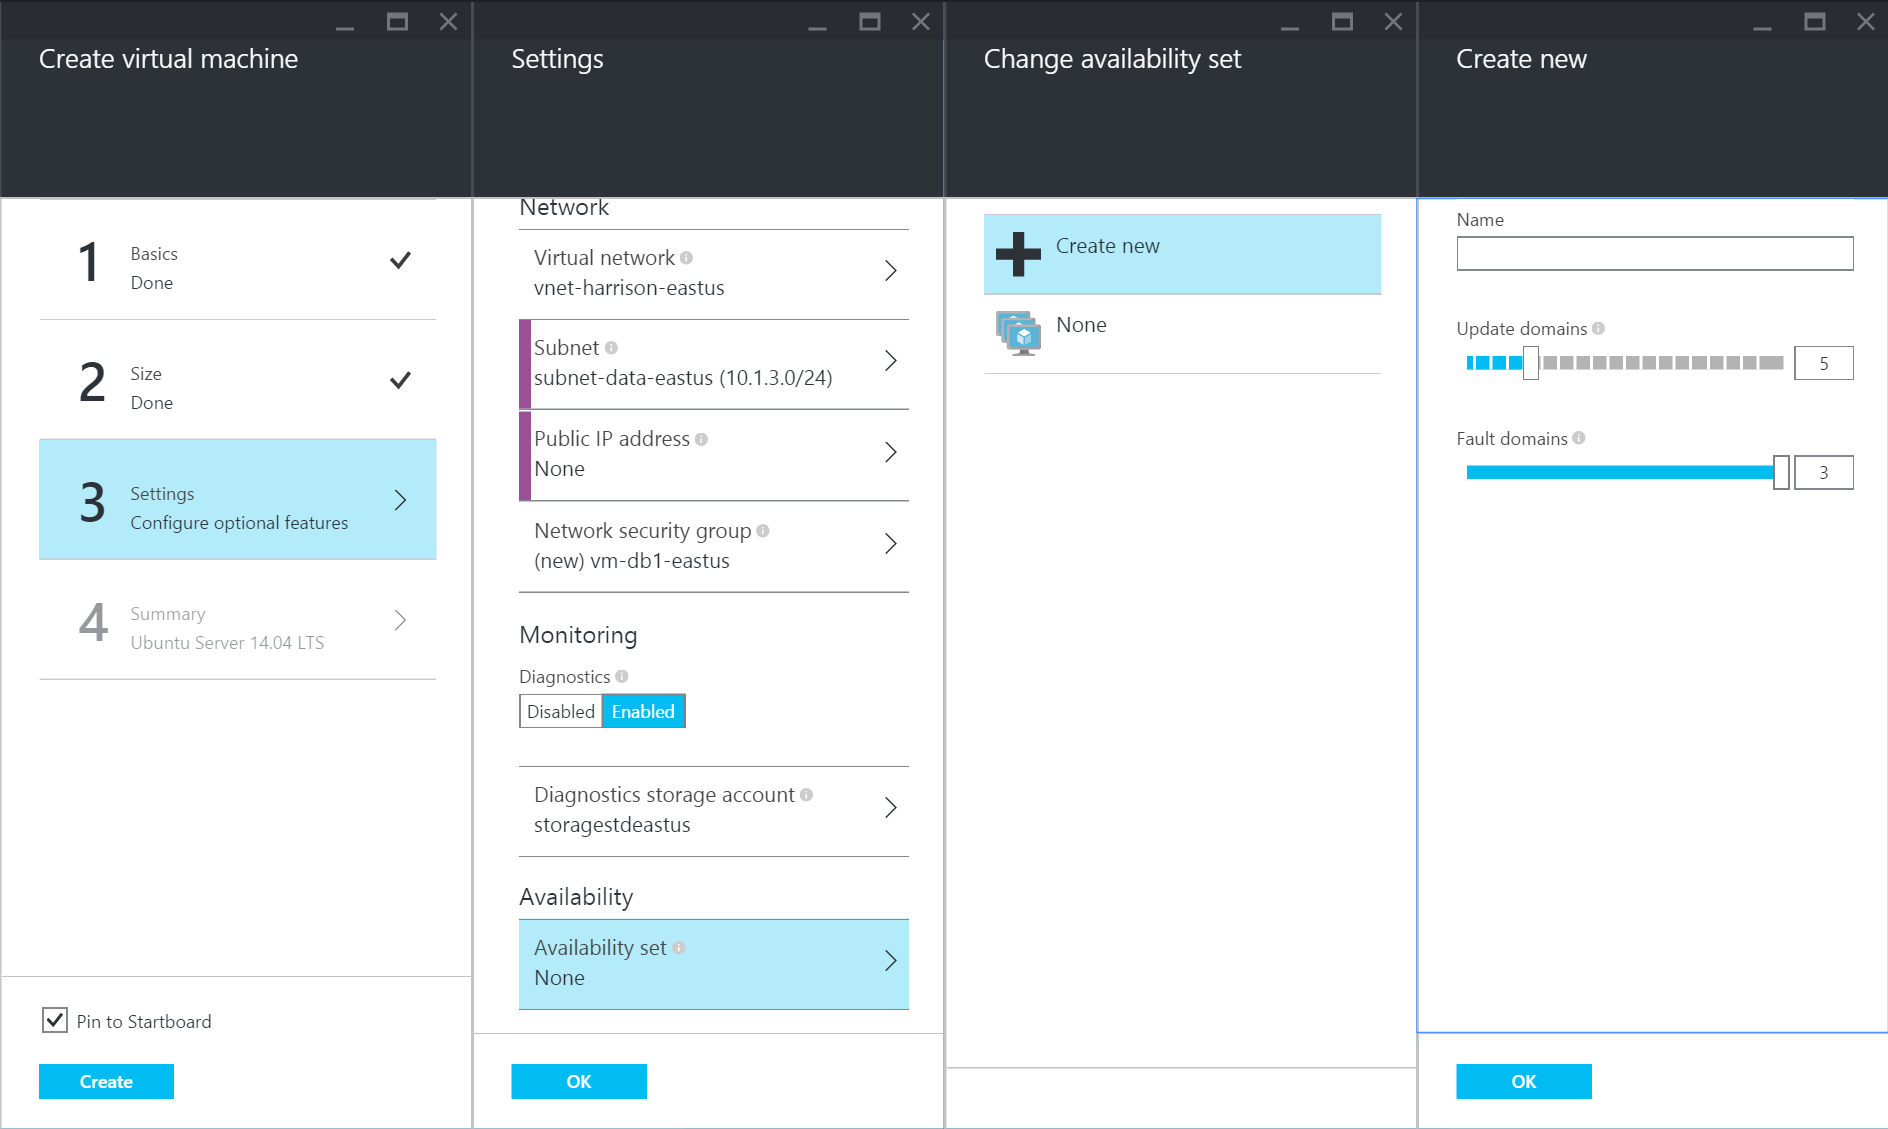
Using the steps above, you can create as many VMs as are necessary for the Data Tier. In my case, I created two database servers within each region. I will walk through how to connect them together from a networking perspective below, but it will be up to you to make the servers talk with one another through the specific database software’s clustering, mirroring, or replication capabilities.
Due to the fact that there should be more than one database server within each region, an Availability Set will need to be created and all of the database servers placed within that Availability Set. This will make sure that each server is upgraded on a different schedule and also make sure that each server is in a different rack within the data center to help prevent a failure across all of the database servers. Once the Availability Set has been created with the first database server, it can be selected for any additional servers.
9a.) Create new DB VMs and Availability Set
TIP: The installation of the database server software will be your responsibility as you may decide to use a different flavor from MariaDB. However, one thing that should be considered is to script the software installation as much as you can and then have it automatically installed during deployment by using the Linux Custom Script Extension. This will allow you to define all the steps necessary to install and/or configure your VM within a shell script and have that shell script executed automatically as the root user of the VM.
FUTURE: I am hoping to provide such a script and update to the ARM template in the future, but not consider it as important to make available as all of the other pieces
Azure SQL
For those that are more Microsoft focused with respect to your databases, we also offer SQL Server as a Service within Azure. Using this service, you will not have to worry about the installation of software or the management of OS based VMs. All that you will have to worry about is the deployment of the number of instances that you want to use and then the database installation and configuration. We will take care of OS and Software updates and management.
9b.) Create Azure SQL Instances
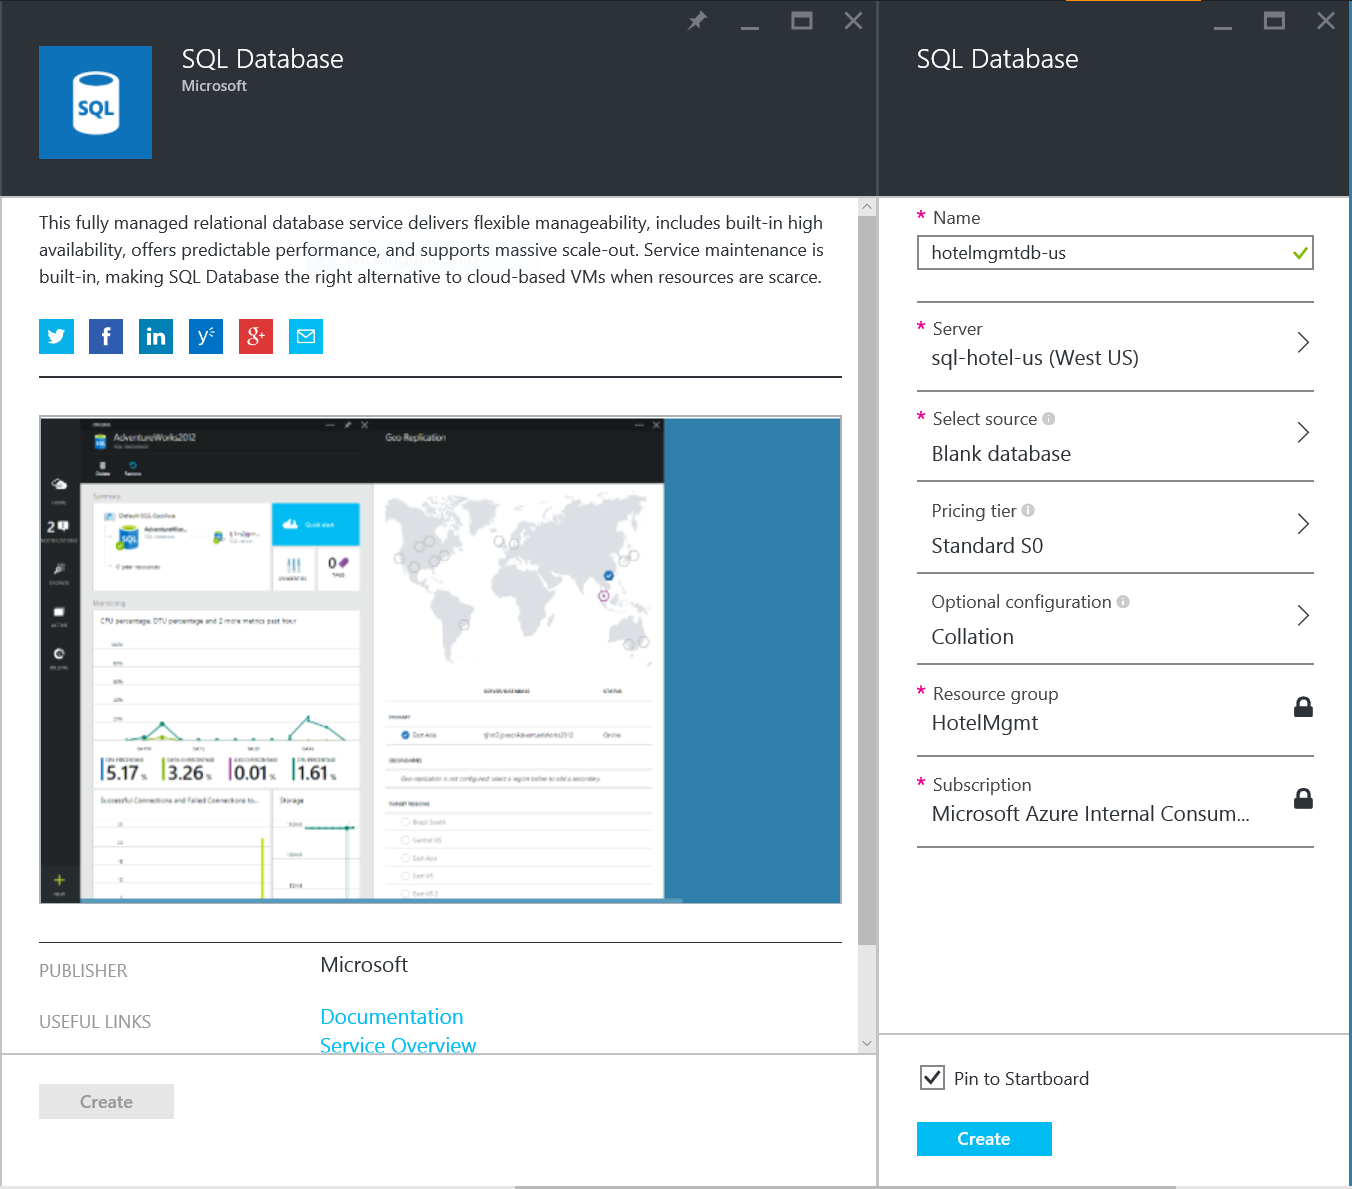
NOTE: You will notice that I have not provided any kind of SQL script to create the database. That is because the API app that will be creating will using the code-first approach of the entity framework within .NET. This will create the database for you and/or verify that you already have an existing one.
Networking
The last area of focus for this particular tier of the architecture is the networking components that should be deployed to help support and secure the data tier. Due to the fact that we deployed multiple VMs to maintain the database for our application, it will be important that we have a load balancer in front of those servers to help manage the traffic and therefore prevent any contention. This does of course make an assumption that we will be using replication to keep the databases in synch. I say this because most clustering systems available have their own monitoring to handle database traffic.
12.) Create Internal Load Balancer to sit in front of database servers
NOTE: In order for load balancer to be used with a set of VMs, the NIC Card will need to be created first as they are what is attached to the Load Balancer within its pool. This is true no matter which deployment method you are using.
To provide network level security for both the Jump server as well as the Database servers, it is imperative that we put a “firewall” in place to make sure that only the traffic that is needed can be allowed in while all remaining traffic is prevented.To that end, we should create two Network Security Groups (NSG), one for the shared subnet where the Jump server resides. This one will only allow TCP traffic through port 22 and then only to the Jump server, while all other traffic will be denied. The second NSG will be placed on the data subnet and this one will allow TCP traffic through port 22 from the shared subnet and it will allow all inbound and outbound traffic for the database port, which for MariaDB is 3306.
13.) Create Network Security Groups to limit traffic between tiers
NOTE: Much like with the Load Balancer, the Network Security Groups should be created before the VNet and corresponding Subnets because they get attached to the Subnet. Although this is not required in all deployment methods, it is required when using ARM templates.
CONSTRAINT: Unfortunately, neither of these items can be created currently using the new Portal, which is why I am unable to provide any screenshots. You can see the network security groups once they have been created and attached to a Subnet, but there is no way to manipulate them. To create either of these objects, please look at the Power Shell script within my GitHub repository as it has all the necessary cmdlets to create them using ARM mode.
Alternate Deployments
As I talked about in the first post, the steps that I walked through above will only deploy the required resources within one region. To duplicate these same deployments in each of our other regions, I have created scripts to make this happen using Power Shell. I have also updated the Resource Manager Template project so that that the template includes all of the resources for all three regions. Each of these can be found in the following location of the GitHub repository: https://github.com/brharr/azuresaas-deploy/tree/master/Lab 2 - Data Tier
FUTURE: In the future I am hoping to provide more and more automation to this process through Linux Script Extension and Azure XPAT-CLI. I will add these to the GitHub repository as I get them complete.
TIP: When creating VMs that will have SSH keys, you can not store the Key Data as a variable within the ARM template and you shouldn't even try to do it in the PowerShell script. You should instead make it a parameter so that it can be entered upon time of the deployment. The primary reason for this is the type of characters that are stored within the key data.
References
INFO - Premium Storage
HOWTO - Create a Virtual Machine Running Linux
HOWTO - Use Azure PowerShell to Create Linux-based VMs
HOWTO - How to Use SSH with Linux on Azure
HOWTO - Configure Software RAID on Linux (Striping)
INFO - Is the Jump Box Obsolete?