Lock Down Your Azure Resources
A common ask when working with Azure is “how do I protect my critical resources?” Often this ask is related to protecting those resources from a human doing something they shouldn’t be doing. There are a few ways to apply varying levels of control to Azure resources: role-based access control (RBAC) and resource locks.
Role-Based Access Control (RBAC)
Using role-based access control, it is possible to restrict control-plane access to various Azure resources. Roles can be assigned at the subscription, resource group, and individual resource scope. A role is associated with specific rights (one or more “action” and “not action” values). There are currently 23 built-in roles.
Leveraging RBAC is a great way to help protect resources in Azure. With the Reader and various Contributor roles (e.g. Virtual Machine Contributor, Storage Account Contributor, SQL DB Contributor, etc.), you can effectively limit the actions that a user can take against a resource. However, even with one of the Contributor roles, it is still possible to delete specific resources. This makes it very easy to accidently delete an item . . . often an item that is not so easy to get back, like an Azure storage account. Oops! Resource locks provide a way to prevent the deletion of resources.
To learn more about RBAC, please check out Neil Mackenzie’s earlier blog post entitled “RBAC and the Azure Resource Manager”, as well as “Role-based access control in the Microsoft Azure portal” on the main Azure site.
Resource Locks
The remainder of this post will focus on a relatively new feature with Azure Resource Manager, resource locks. In order to work with resource locks, you will need to use the Azure PowerShell cmdlets in Azure Resource Manager mode.
> Switch-AzureMode AzureResourceManager
You will also need to be in either an Owner or User Access Administrator role for the desired scope, as only Owners and User Access Administrators have permission to write against the Microsoft.Authorization resources, which is the resource provider that handles resource locks.
For more on information on the “actions” and “not actions” associated with specific roles, please see https://azure.microsoft.com/en-us/documentation/articles/role-based-access-control-configure/#built-in-roles.
Create a Resource Lock
A resource lock can be applied at either the resource group or resource scope. As of Azure PowerShell version 0.9.3, there is only one lock level available – CanNotDelete.
To see resource locks in action, let’s use a basic example of creating an Azure Storage account and applying the CanNotDelete resource lock.
  $resourceGroup = 'CollierMedia'
 $location = 'East US'
 $storageAccountName = 'collierfiles2014'
# Create a new resource group.
New-AzureResourceGroup -Name $resourceGroup -Location $location
# Create a new Azure storage account in the new resource group.
New-AzureStorageAccount -ResourceGroupName $resourceGroup -Name $storageAccountName -Location $location -Type Standard_GRS
# Apply a resource lock to the storage account.
New-AzureResourceLock -LockLevel CanNotDelete `
-LockNotes 'No deleting!' `
-LockName 'CollierLock' `
-ResourceName $storageAccountName `
-ResourceType 'Microsoft.Storage/storageAccounts' `
-ResourceGroup $resourceGroup -Verbose
# List all the resource locks in the current subscription.
Get-AzureResourceLock
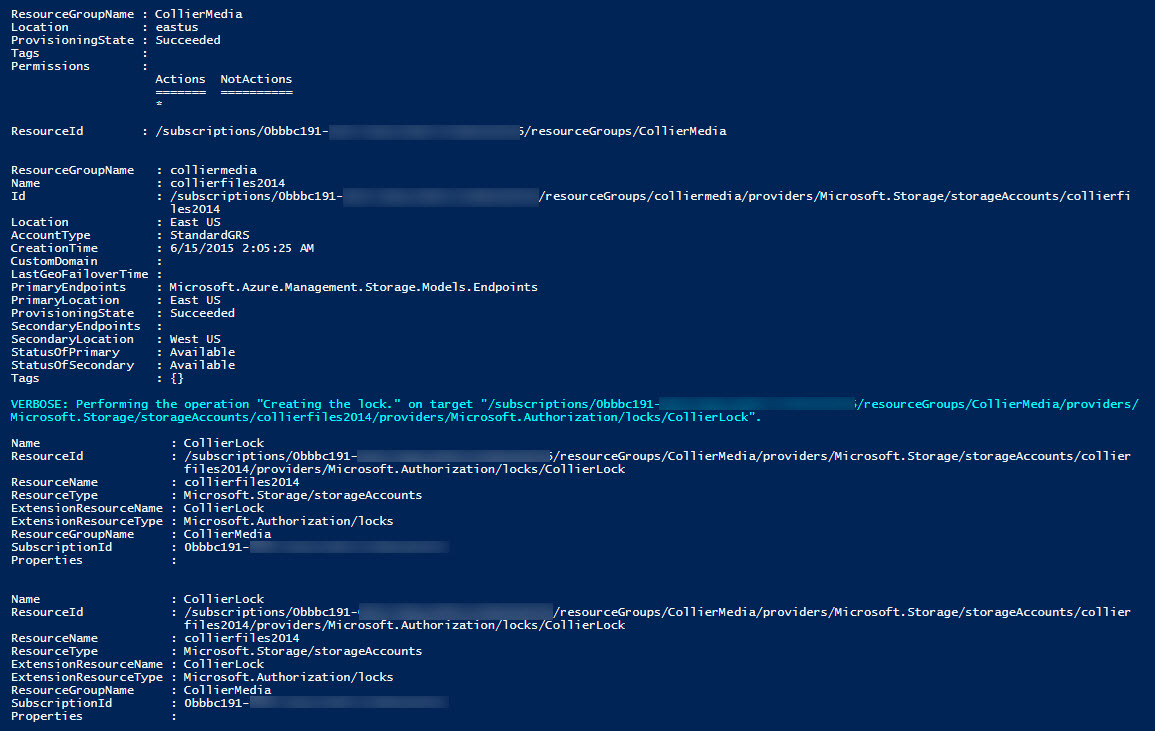
After executing the above PowerShell commands, you should see the following output result:
(click the image to enlarge)
Notice in the above screenshot that the “CollierMedia” resource group was created, a new ‘collierfiles2014’ storage account was created in the “CollierMedia” resource group, and a resource lock applied to the storage account. Take particular note of the ResourceId for the lock – that will be helpful when trying to delete a lock.
With the resource lock in place an attempt to delete the storage account fails with an error message indicating the specified resource is locked and needs to be removed before being deleted:
.jpg)
(click the image to enlarge)
The above example demonstrated creating a resource lock for a specific resource. But what about locking an entire resource group? Placing a resource lock on an entire group could be helpful in situations where you want to ensure no resources in that group are deleted – for example, a resource group containing storage accounts used for Azure Virtual Machines. The example below demonstrates placing a lock on the entire “CollierMedia” resource group.
 New-AzureResourceLock -LockLevel CanNotDelete `
 -LockNotes 'No deleting!' `
 -LockName 'CollierGroupLock' `
 -ResourceGroup 'CollierMedia' -Verbose
.jpg)
(click the image to enlarge)
Remove a Resource Lock
One easy way to remove the resource is to use the ResourceId associated with the lock. The ResourceId is returned when creating the lock. It can also be obtained via the Get-AzureResourceLock cmdlet. By default, Get-AzureResourceLock returns a list of all the locks in the current Azure subscription.
.jpg)
(click the image to enlarge)
View the help (get-help Get-AzureResourceLock) for additional ways to filter the locks returned.
Use the Remove-AzureResourceLock cmdlet, providing the desired ResourceId, to remove the lock.
> Remove-AzureResourceLock -ResourceId '/subscriptions/0bbbc191-xxxx-xxxx-xxxx-xxxxxxxxxxxx/resourceGroups/CollierMedia/providers/Microsoft.Storage/storageAccounts/collierfiles2014/providers/Microsoft.Authorization/locks/CollierLock'
Lock Resources using an Azure Resource Manager Template
Another way to lock a resource is to do so at creation time with an Azure Resource Manager (ARM) template. An ARM template is a JSON-formatted file that describes the desired state of a logically related group of Azure resources. The template could contain the resources needed for a specific web site (i.e. Azure Redis Cache, Azure SQL Database, Azure Storage account and Azure Web App.) or perhaps just a group of related Azure Virtual Machines – the choice is yours. For more information on Azure Resource Manager templates, please follow the links below:
- Azure Resource Manager Template Language
- Authoring Azure Resource Manager Templates
- Azure Resource Manager Quickstart Templates
- Azure Resource Manager (BUILD 2015 session by Ryan Jones)
- Azure Resource Manager Overview
The ARM template below shows an example of creating an Azure storage account and applying the CannotDelete resource lock.
 {
 "$schema": "https://schema.management.azure.com/schemas/2015-01-01/deploymentTemplate.json#",
 "contentVersion": "1.0.0.0",
 "parameters": {
 "newStorageAccountName": {
 "type": "string",
 "metadata": {
 "description": "Name of the Storage Account"
 }
 },
 "storageAccountType": {
 "type": "string",
 "defaultValue": "Standard_LRS",
 "allowedValues": [
 "Standard_LRS",
 "Standard_GRS",
 "Standard_ZRS"
 ],
 "metadata": {
 "description": "Storage Account type"
 }
 },
 "location": {
 "type": "string",
 "allowedValues": [
 "East US",
 "West US",
 "West Europe",
 "East Asia",
 "Southeast Asia"
 ],
 "metadata": {
 "description": "Location of storage account"
 }
 }
 },
 "resources": [
 {
 "type": "Microsoft.Storage/storageAccounts",
 "name": "[parameters('newStorageAccountName')]",
 "apiVersion": "2015-05-01-preview",
 "location": "[parameters('location')]",
 "properties": {
 "accountType": "[parameters('storageAccountType')]"
 },
 "resources": [
 {
 "type": "Microsoft.Storage/storageAccounts/providers/locks",
 "name": "[concat(parameters('newStorageAccountName'), '/Microsoft.Authorization/collierLock')]",
 "apiVersion": "2015-01-01",
 "dependsOn": [ "[concat('Microsoft.Storage/storageAccounts/', parameters('newStorageAccountName'))]" ],
 "properties": {
 "level": "CannotDelete",
 "notes": "Mike's important files - do not delete!"
 }
 }
 ]
 }
 ]
 }
The corresponding template parameters files is as follows:
 {
 "location": {
 "value": "East US"
 },
 "newStorageAccountName" : {
 "value" : "collierimages2015"
 },
 "storageAccountType": {
 "value": "Standard_GRS"
 }
 }
To execute this template, the following PowerShell cmdlet can be used:
  New-AzureResourceGroupDeployment -ResourceGroupName 'CollierMedia' `
 -TemplateFile 'azuredeploy.json' `
 -TemplateParameterFile 'azuredeploy.parameters.json' `
 -Verbose
Tip: If you would like to validate an ARM template before deploying it, you can use the Test-AzureResourceGroupTemplate cmdlet, such as:
 Test-AzureResourceGroupTemplate -ResourceGroupName 'CollierMedia' `
 -TemplateFile 'azuredeploy.json' `
 -TemplateParameterFile 'azuredeploy.parameters.json' `
 -Verbose
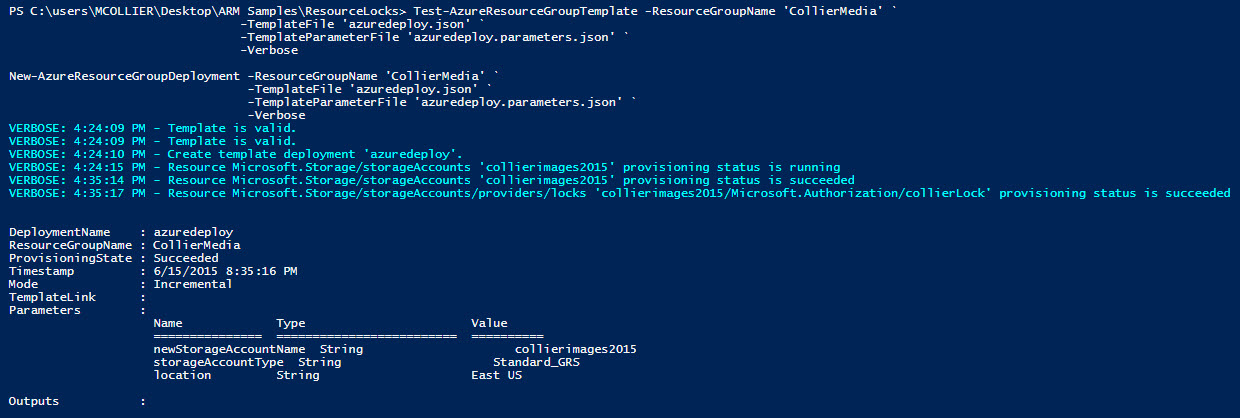
Executing the above cmdlets should result in the following output:
(click the image to enlarge)
If we execute the Get-AzureResourceLock cmdlet again, we would notice the resource lock, “collierlock”, successfully applied to just the newly created ‘collierimages2015’ storage account.
.jpg)
(click the image to enlarge)
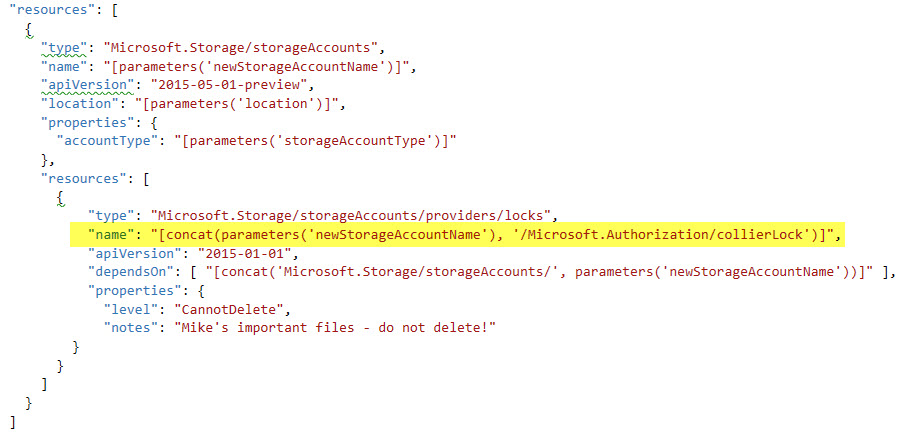
One thing to notice about the ARM template for creating the resource lock on the storage account is the name of the nested resource. In the template (see screenshot below as well), you will notice the resource name is a concatenation of the storage account name and the name of the lock – specifically “/Microsoft.Authorization/collierlock”. In this example, “collierlock” is the name of the resource lock.
The resource name needs to reflect that this is a nested resource. Otherwise, if the resource name was something as simple as “collierlock”, attempting to validate the template with Test-AzureResourceGroupTemplate will result in an error such as the following:
Code : InvalidTemplate
Message : Deployment template validation failed: 'The template resource 'collierlock' for type 'Microsoft.Storage/storageAccounts/providers/locks' at line '49' and column '14' has incorrect segment lengths. A nested resource type must have identical number of segments as its resource name. A root resource type must have segment length one greater than its resource name.'.
Wrapping It Up
Azure’s Role Based Access Control features, along with resource locks, provide multiple options helping to secure critical Azure resources. RBAC roles provide a great way to limit actions against various types of Azure resources. However, an Owner or Contributor can still delete a resource. Mistakes happen, and a valuable resource might be accidentally deleted. By leveraging a resource lock on those most crucial Azure resources, you can help to eliminate those “oops . . . did I delete that” moments.
The preceding sections demonstrated how to create a resource lock against an individual storage account and resource group, removing the resource lock, and applying a resource lock as part of an Azure Resource Manager template. For another example of using resource locks, please see Alexandre Brisebois’ post at https://alexandrebrisebois.wordpress.com/2015/05/26/protect-mission-critial-azure-virtual-machines-from-accidental-deletion/. In his post, Alexandre demonstrates how to create a resource lock against Azure Virtual Machines.
Special thanks to Neil Mackenzie, Charles Lamanna, and Ryan Jones for helping to review this post. Credit to Ryan Jones’ sample on GitHub for information on how to create the resource lock for the storage account.