Create HDInsight Cluster in Azure Portal
Creating an HDInsight cluster from the Azure portal is very easy. However, sometimes you want all the choices and best practices explained as well as the "how to". I have created a series of slides with audio recordings to walk you through the process and choices. They are available as sessions 1-8 of "Create HDInsight Cluster in Azure Portal" on my YouTube channel Small Bites of Big Data.
Playlist Getting Started with HDInsight: https://www.youtube.com/playlist?list=PLAD2dOpGM3s1R2L5HgPMX4MkTGvSza7gv
- Why HDInsight: https://youtu.be/J9KzIShLeD8
- Azure Subscription: https://youtu.be/lSxMtmRE114
- Azure Storage - WASB: https://youtu.be/6OdDDmdaVVE
- Metastore: https://youtu.be/1Og_eftYVpA
- Create HDInsight: https://youtu.be/SysIo3LwONk
- Hive Query: https://youtu.be/DRAuOXsuec0
- Load Demo Data: https://youtu.be/XyiOpRPjfUs
- Pricing, Automation, and Wrapup: https://youtu.be/78YowrOnNGM
PowerPoint deck: https://www.slideshare.net/cindygross1/create-hd-insightfeb2015
Why HDInsight?
HDInsight is Hadoop on Azure as a service.
- Easy, cost effective, changeable scale out data processing
- Lower TCO – easily add/remove/scale
- Separation of storage and compute allows data to exist across clusters
- Hortonworks HDP is one of the 3 major Hadoop
distributors, the most purely open source - HDInsight *IS* Hortonworks HDP as a service in Azure (cloud)
- Metastore (Hcatalog) exists independently across clusters via SQL DB
- #, size, type of clusters are flexible and can all access the same data
- Hive is a Hadoop component that makes data look like rows/columns for data warehouse type activities
It offers the standard advantages of Hadoop:
- Scale-out
- Load data now, add schema later (write once, read many)
- Fail fast – iterate through many questions to find the right question
- Faster time from question to insight
- Hadoop is “just another data source” for BI, Analytics, Machine Learning
In addition you have the advantages of Hadoop in the cloud:
- Instantly access data born in the cloud
- Easily, cheaply load, share, and merge public or private data
- Data exists independently across clusters (separation of storage and compute) via WASB on Azure storage accounts
Recording of why HDInsight on YouTube
Azure Subscription
You have many options to obtain a Microsoft Azure subscription:
- Trial: https://azure.microsoft.com/en-us/pricing/free-trial/
- MSDN Subscription: https://azure.microsoft.com/en-us/pricing/member-offers/msdn-benefits/
- Startup BizSpark: https://azure.microsoft.com/en-us/pricing/member-offers/bizspark-startups/
- Classroom: https://www.microsoftazurepass.com/azureu
- Pay-As-You-Go or Enterprise Agreement: https://azure.microsoft.com/en-us/pricing/
Login to Azure Subscription
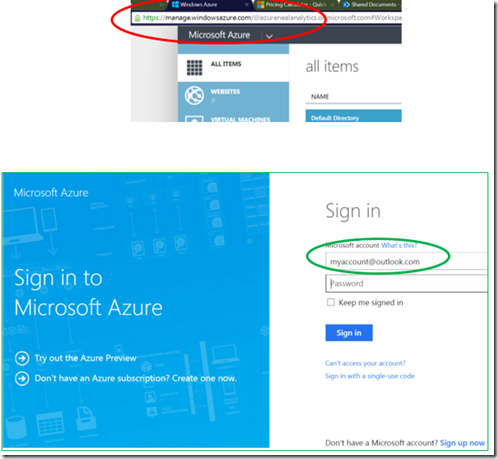
1. Login on Azure Portal https://manage.windowsazure.com
2. Use a Microsoft Account https://www.microsoft.com/en-us/account/default.aspx
Note: Some companies have federated their accounts and can use company accounts.
Choose Subscription
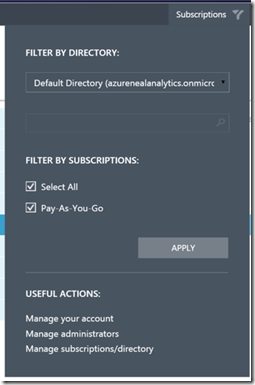
Most accounts will only have one Azure subscription associated with them. But if you seem to have unexpected resources, check to make sure you are in the expected subscription. The Subscriptions button is on the upper right of the Azure portal.
Add Accounts
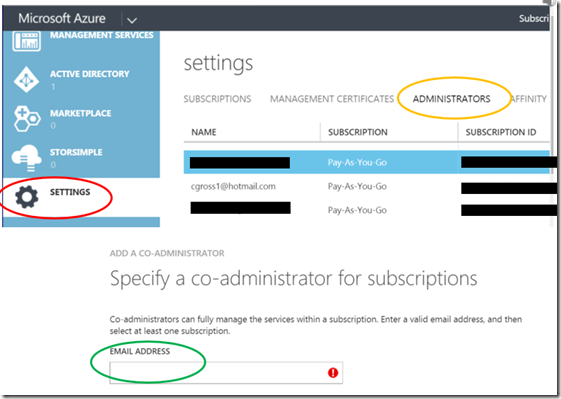
Option: Add more Microsoft Accounts as admins of the Azure Subscription.
1. Choose SETTINGS at the very bottom on the left.
2. Then choose ADMINISTRATORS at the top. Click on the ADD button at the very bottom.
3. Enter a Microsoft Account or federated enterprise account that will be an admin.
Recording of getting started with an Azure subscription on YouTube
Azure Storage - WASB
I recommend you manually create at least one Azure storage account and container ahead of time. While the HDInsight creation dialogue gives the option of creating the storage account and container for you, that only works if you don't plan to reuse data across clusters.
Create a Storage Account
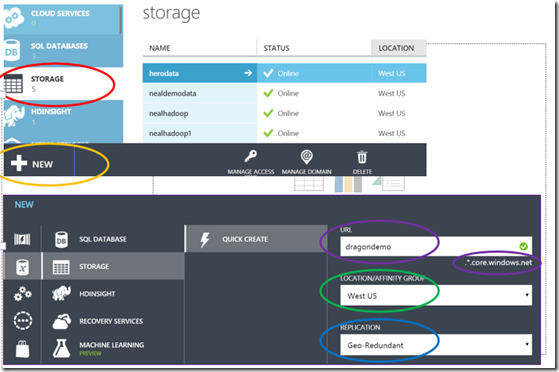
1. Click on STORAGE in the left menu then NEW.
2. URL: Choose a lower-case storage account name that is unique within *.core.windows.net.
3. LOCATION: Choose the same location for the SQL Azure metastore database, the storage account(s), and HDInsight.
4. REPLICATION: Locally redundant stores fewer copies and costs less.
Repeat if you need additional storage.
Create a Container
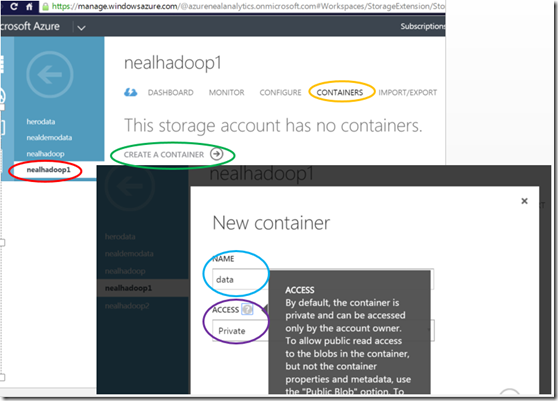
1. Click on your storage account in the left menu then CONTAINERS on the top.
2. Choose CREATE A CONTAINER or choose the NEW button at the bottom.
3. Enter a lower-case NAME for the container, unique within that storage account.
4. Choose either Private or Public ACCESS. If there is any chance of sensitive or PII data being loaded to this container choose Private. Private access requires a key. HDInsight can be configured with that key during creation or keys can be passed in for individual jobs.
This will be the default container for the cluster. If you want to manage your data separately you may want to create additional containers.
WASB
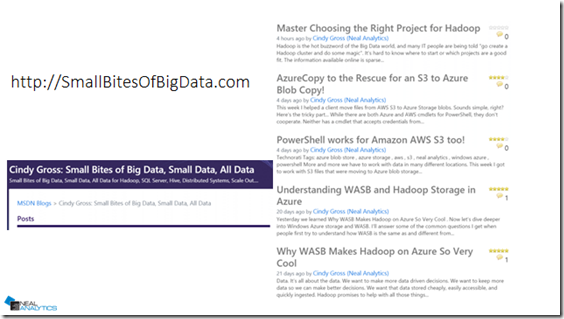
Additional information about storage, including details on Windows Azure Storage Blobs (WASB) is on https://SmallBitesOfBigData.com.
Recording of creating an Azure storage account and container on YouTube.
Metastore (HCatalog)
In Azure you have the option to create a metastore for Hive and/or Oozie that exists independently of your HDInsight clusters. This allows you to reuse your Hive schemas and Oozie workflows as you drop and recreate your cluster(s). I highly recommend using this option for a production environment or anything that involves repeated access to the same, standard schemas and/or workflows.
Create a Metastore aka Azure SQL DB
Persist your Hive and Oozie metadata across cluster instances, even if no cluster exists, with an HCatalog metastore in an Azure SQL Database. This database should not be used for anything else. While it works to share a single metastore across multiple instances it is not officially tested or supported.
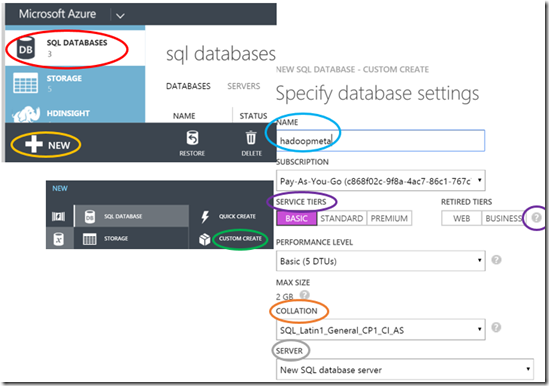
1. Click on SQL DATABASES then NEW and choose CUSTOM CREATE.
2. Choose a NAME unique to your server.
3. Click on the “?” to help you decide what TIER of database to create.
4. Use the default database COLLATION.
5. If you choose an existing SERVER you will share sysadmin access with other databases.
You can make the system more secure if you create a custom login on the Azure server. Add that login as a user in the database you just created. Grant it minimal read/write permissions in the database. This is not well documented or tested so the exact permissions needed for this are vague. You may see odd errors if you don’t grant the appropriate permissions.
Firewall Rules
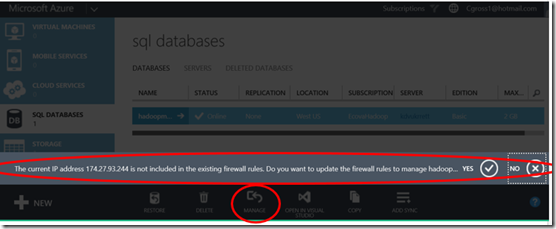
In order to refer to the metastore from automated cluster creation scripts such as PowerShell your workstation must be added to the firewall rules.
1. Click on MANAGE then choose YES.
2. You can also use the MANAGE button to connect to the SQL Azure database and manage logins and permissions.
Recording of creating the metastore on YouTube.
Create the HDInsight Cluster
Now that we have the pre-requisites done we can move on to creating the cluster.
- Quick Create through the Azure portal is the fastest way to get started with all the default settings.
- The Azure portal Custom Create allows you to customize size, storage, and other configuration options.
- You can customize and automate through code including .NET and PowerShell. This increases standardization and lets you automate the creation and deletion of clusters over time.
- For all the examples here we will create a basic Hadoop cluster with Hive, Pig, and MapReduce.
- A cluster will take several minutes to create, the type and size of the cluster have little impact on the time for creation.
Quick Create Option
For your first cluster choose a Quick Create.
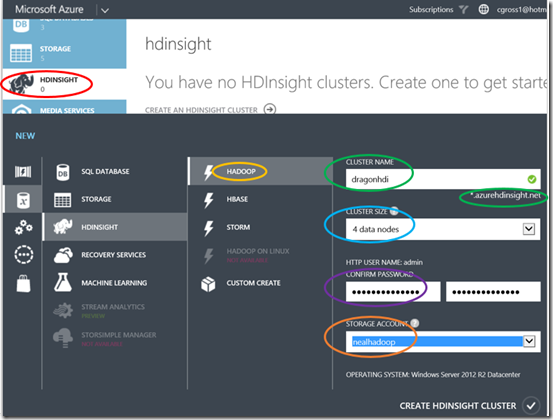
1. Click on HDINSIGHT in the left menu, then NEW.
2. Choose Hadoop. HBase and Storm also include the features of a basic Hadoop cluster but are optimized for in-memory key value pairs (HBase) or alerting (Storm).
3. Choose a NAME unique in the azurehdinisght.net domain.
4. Start with a small CLUSTER SIZE, often 2 or 4 nodes.
5. Choose the admin PASSWORD.
6. The location of the STORAGE ACCOUNT determines the location of the cluster.
Custom Create Option
You can also customize your size, admin account, storage, metastore, and more through the portal. We’ll walk through a basic Hadoop cluster.
New
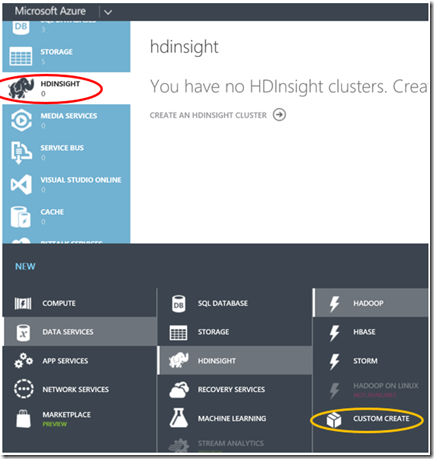
1. Click on HDINSIGHT in the left menu, then NEW in the lower left.
2. Choose CUSTOM CREATE.
Basic Info
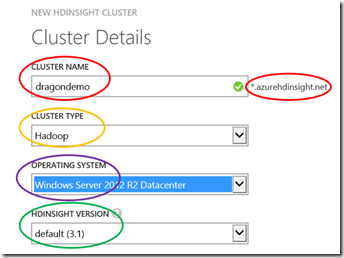
1. Choose a NAME unique in the azurehdinisght.net domain.
2. Choose Hadoop. HBase and Storm also include the features of a basic Hadoop cluster but are optimized for in-memory key-value pairs (HBase) or alerting (Storm).
3. Choose Windows or Linux as the OPERATING SYSTEM. Linux is only available if you have signed up for the preview.
4. In most cases you will want the default VERSION.
Size and Location
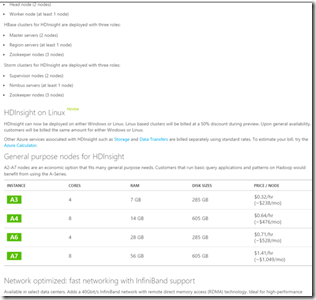
1. Choose the number of DATA NODES for this cluster. Head nodes and gateway nodes will also be created and they all use HDInsight cores. For information on how many cores are used by each node see the “Pricing details” link.
2. Each subscription has a billing limit set for the maximum number of HDInsight cores available to that subscription. To change the number available to your subscription choose “Create a support ticket.” If the total of all HDInsight cores in use plus the number needed for the cluster you are creating exceeds the billing limit you will receive a message: “This cluster requires X cores, but only Y cores are available for this subscription”. Note that the messages are in cores and your configuration is specified in nodes.
3. The storage account(s), metastore, and cluster will all be in the same REGION.
Cluster Admin
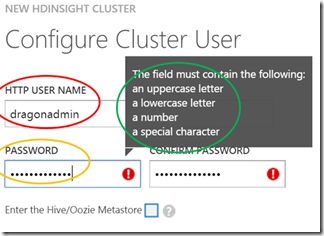
1. Choose an administrator USER NAME. It is more secure to avoid “admin” and to choose a relatively obscure name. This account will be added to the cluster and doesn’t have to match any existing external accounts.
2. Choose a strong PASSWORD of at least 10 characters with upper/lower case letters, a number, and a special character. Some special characters may not be accepted.
Metastore (HCatalog)
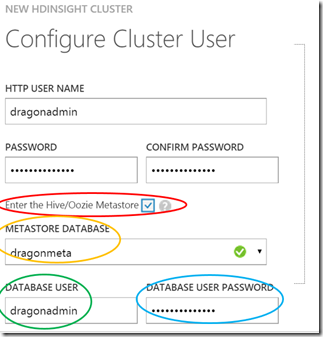
On the same page as the Hadoop cluster admin account you can optionally choose to use a common metastore (Hcatalog).
1. Click on the blue box to the right of “Enter the Hive/Oozie Metastore”. This makes more fields available.
2. Choose the SQL Azure database you created earlier as the METASTORE.
3. Enter a login (DATABASE USER) and PASSWORD that allow you to access the METASTORE database. If you encounter errors, try logging in to the database manually from the portal. You may need to open firewall ports or change permissions.
Default Storage Account
Every cluster has a default storage account. You can optionally specify additional storage accounts at cluster create time or at run time.
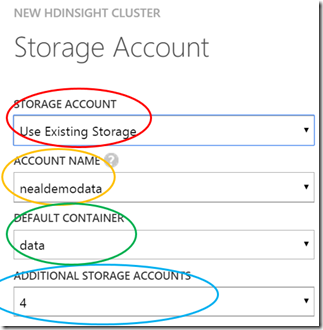
1. To access existing data on an existing STORAGE ACCOUNT, choose “Use Existing Storage”.
2. Specify the NAME of the existing storage account.
3. Choose a DEFAULT CONTAINER on the default storage account. Other containers (units of data management) can be used as long as the storage account is known to the cluster.
4. To add ADDITIONAL STORAGE ACCOUNTS that will be accessible without the user providing the storage account key, specify that here.
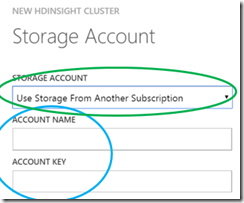
Additional Storage Accounts
If you specified there will be additional accounts you will see this screen.
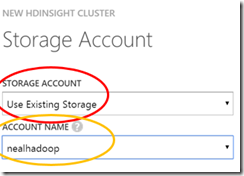
1. If you choose “Use Existing Storage” you simply enter the NAME of the storage account.
2. If you choose “Use Storage From Another Subscription” you specify the NAME and the GUID KEY for that storage account.
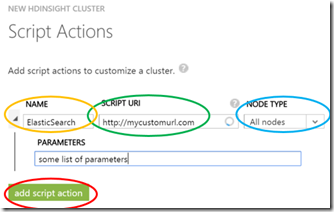
Script Actions
You can add additional components or configure existing components as the cluster is deployed. This is beyond the scope of this demo.
1. Click “add script action” to show the remaining parameters.
2. Enter a unique NAME for your action.
3. The SCRIPT URI points to code for your custom action.
4. Choose the NODE TYPE for deployment.
Create is Done!
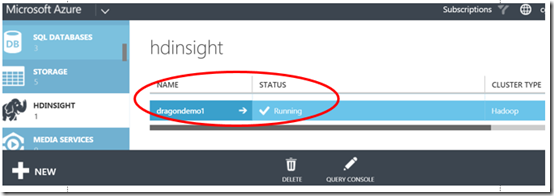
Once you click on the final checkmark Azure goes to work and creates the cluster. This takes several minutes. When the cluster is ready you can view it in the portal.
Recording of HDInsight quick and custom create on YouTube
Query with Hive
For most people the easiest, fastest way to learn Hadoop is through Hive. Hive is also the most widely used component of Hadoop. When you use the Hive ODBC driver any ODBC-compliant app can access the Hive data as "just another data source". That includes Azure Machine Learning, Power BI, Excel, and Tableau.
Hive Console
The simplest, most relatable way for most people to use Hadoop is via the SQL-like, Database-like Hive and HiveQL (HQL).
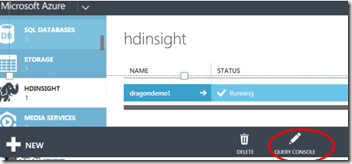
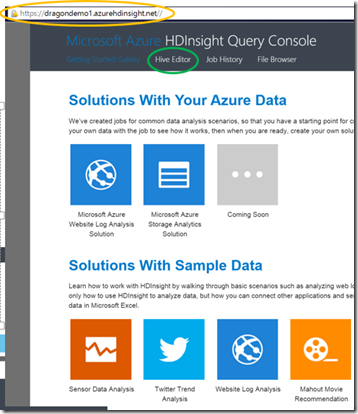
1. Put focus on your HDInsight cluster and choose QUERY CONSOLE to open a new tab in your browser. In my case it opens: https://dragondemo1.azurehdinsight.net//
2. Click on Hive Editor.
Query Hive
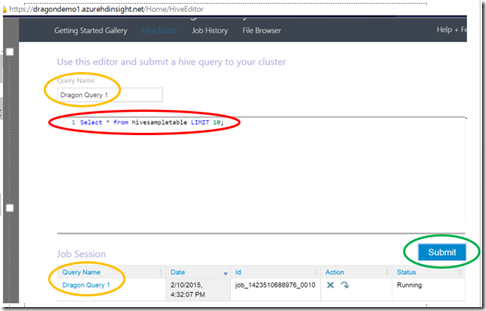
The query console defaults to selecting the first 10 rows from the pre-loaded sample table. This table is created when the cluster is created.
1. Optionally edit or replace the default query:
Select * from hivesampletable LIMIT 10;
2. Optionally name your query to make it easier to find in the job history.
3. Click Submit.
Hive is a batch system optimized for processing huge amounts of data. It spends several seconds up front splitting the job across the nodes and this overhead exists even for small result sets. If you are doing the equivalent of a table scan in SQL Server and have enough nodes in Hadoop, Hadoop will probably be faster than SQL Server. If your query uses indexes in SQL Server, then SQL Server will likely be faster than Hive.
View Hive Results
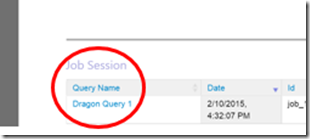
1. Click on the Query you just submitted in the Job Session. This opens a new tab.
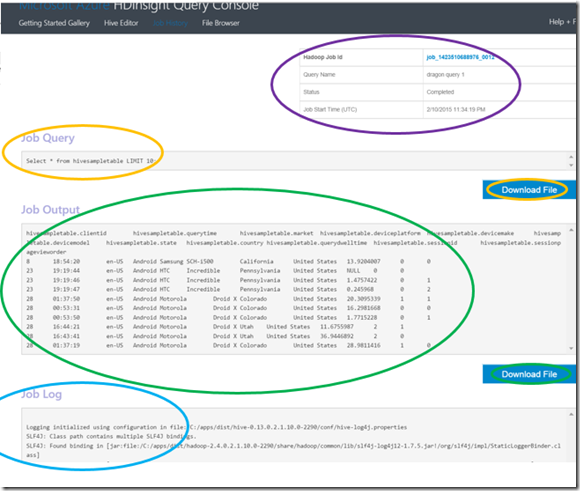
2. You can see the text of the Job Query that was submitted. You can Download it.
3. The first few lines of the Job Output (query result) are available. To see the full output choose Download File.
4. The Job Log has details including errors if there are any.
5. Additional information about the job is available in the upper right.
View Hive Data in Excel Workbook
At this point HDInsight is “just another data source” for any application that supports ODBC.
1. Install the Microsoft Hive ODBC driver.
2. Define an ODBC data source pointing to your HDInsight instance.
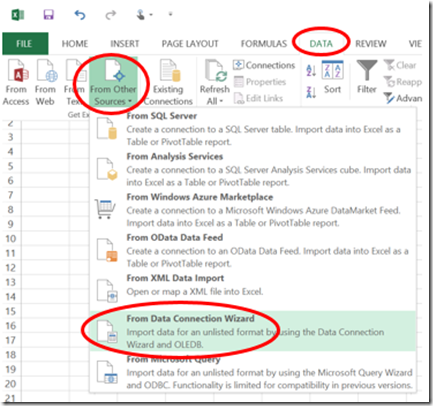
3. From DATA choose From Other Sources and From Data Connection Wizard.
View Hive Data in PowerPivot
At this point HDInsight is “just another data source” for any application that supports ODBC.
1. Install the Microsoft Hive ODBC driver.
2. Define an ODBC data source pointing to your HDInsight instance.
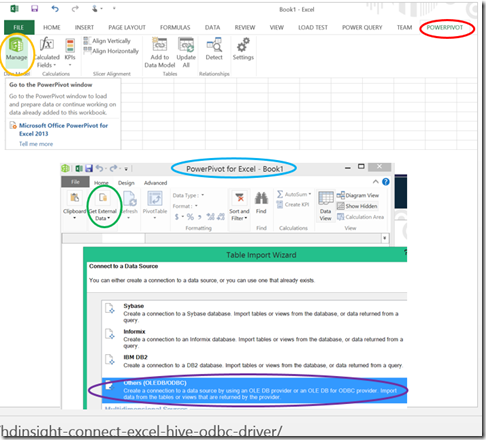
3. Click on POWERPIVOT then choose Manage. This opens a new PowerPivot for Excel window.
4. Choose Get External Data then Others (OLEDB/ODBC).
Now you can combine the Hive data with other data inside the tabular PowerPivot data model.
Recording of querying Hive on YouTube
Load Demo Data
In the cloud you don’t have to load data to Hadoop, you can load data to an Azure Storage Account. Then you point your HDInsight or other WASB compliant Hadoop cluster to the existing data source. There many ways to load data, for the demo we’ll use CloudXplorer.
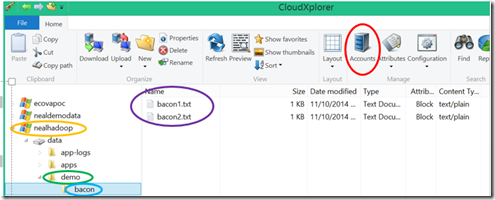
You use the Accounts button to add Azure, S3, or other data/storage accounts you want to manage.
In this example nealhadoop is the Azure storage account, demo is the container, and bacon is a “directory”. The files are bacon1.txt and bacon2.txt. Any Hive tables would point to the bacon directory, not to individual files. Drag and drop files from Windows Explorer to CloudXplorer.
Windows Azure Storage Explorers (2014)
Recording of loading demo data on YouTube
WrapUp
Once you have created the HDInsight cluster you can use it and play with it and try many things. When you are done, simply remove the cluster. If you created an independent metastore in SQL Azure you can use that same metastore and the same Azure storage account(s) the next time you create a cluster. You are charged for the existence of the cluster, not for the usage of it. So make sure you drop the cluster when you aren't using it. You can use automation, such as PowerShell, to spin up a cluster that is configured the same every time and to drop it. Check the website for the most recent information.
Pricing
Automate with PowerShell
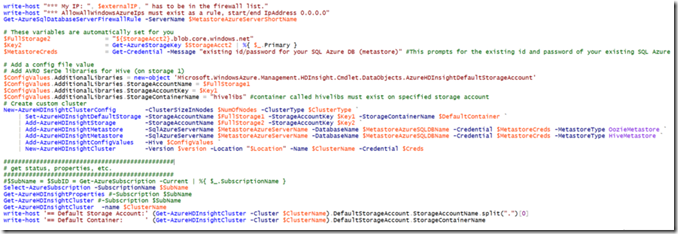
With PowerShell, .NET, or the Cross-Platform cmd line tools you can specify even more configuration settings that aren’t available in the portal. This includes node size, a library store, and changing default configuration settings such as Tez and compression.
Automation allows you to standardize and with version control lets you track your configurations over time.
Sample PowerShell Script: HDInsight Custom Create https://blogs.msdn.com/b/cindygross/archive/2013/12/06/sample-powershell-script-hdinsight-custom-create.aspx. If your HDInsight and/or Azure cmdlets don’t match the current documention or return unexpected errors run Web Platform Installer and check for a new version of “Microsoft Azure PowerShell with Microsoft Azure SDK” or “Microsoft Azure PowerShell (standalone).”
Recording of Pricing, Automation, and Wrapup on YouTube
Summary
- HDInsight is Hadoop on Azure as a service, specifically Hortonworks HDP on either Windows or Linux
- Easy, cost effective, changeable scale out data processing for a lower TCO – easily add/remove/scale
- Separation of storage and compute allows data to exist across clusters via WASB
- Metastore (Hcatalog) exists independently across clusters via SQL DB
- #, size, type of clusters are flexible and can all access the same data
- Instantly access data born in the cloud; Easily, cheaply load, share, and merge public or private data
- Load data now, add schema later (write once, read many)
- Fail fast – iterate through many questions to find the right question
- Faster time from question to insight
- Hadoop is “just another data source” for BI, Analytics, Machine Learning
I hope you enjoyed this Small Bite of Big Data! Happy Hadooping!
Cindy Gross – Neal Analytics: Big Data and Cloud Technical Fellow
@SQLCindy | @NealAnalytics | CindyG@NealAnalytics.com | https://smallbitesofbigdata.com
Technorati Tags: hdinsight,hadoop,windows azure (brand),microsoft azure,small bites of big data,sqlcindy,create hdinsight cluster,neal analytics
