Webhooks for Azure Alerts - Creating a sample ASP.NET receiver application
Microsoft Azure recently announced support for webhooks on Azure Alerts. Now you can provide an https endpoints to receive webhooks while creating an alert in the Azure portal.
Webhooks are user defined HTTP endpoints that are usually triggered by an event. Webhooks allow us to get more out of Azure Alerts. You can specify a HTTP or HTTPS endpoint as a webhook while creating or updating an alert on the Azure Portal.
In this article I will walk you through creating an sample application to receive webhooks from Azure Alerts, configure an Alert to use this endpoint and test the overall flow.
Create a Receiver Application
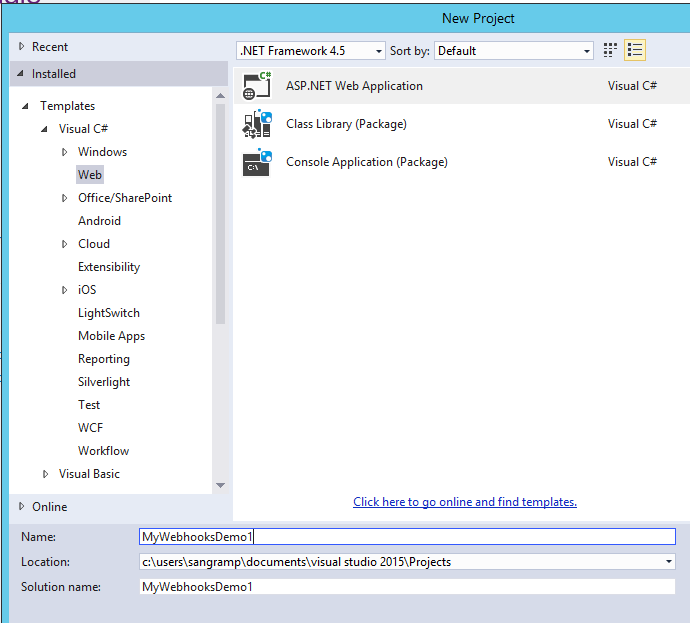
Open Visual Studio 2015 and create a New ASP.Net Web Application
[Figure 1]
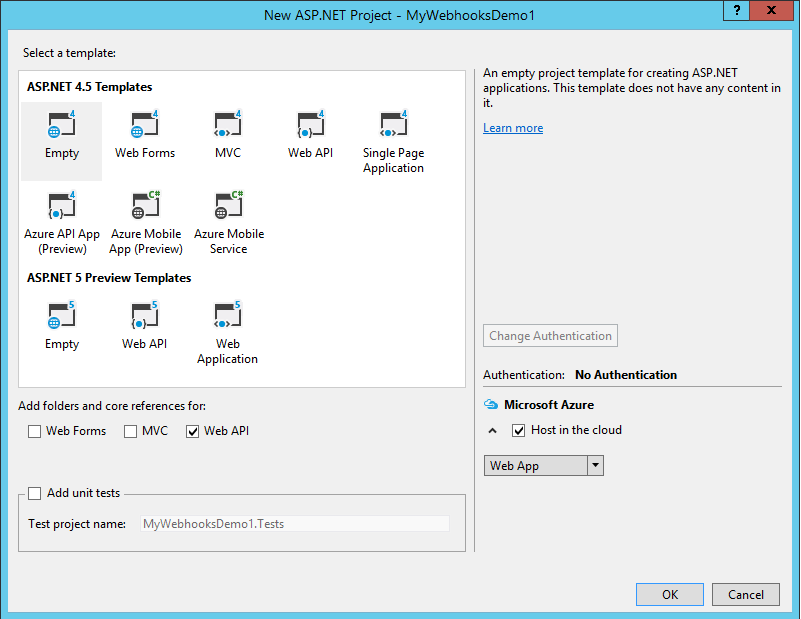
Select the Empty template from the available ASP.Net 4.5 Templates and Check to add the Web API folders an core references as below.
[Figure 2]
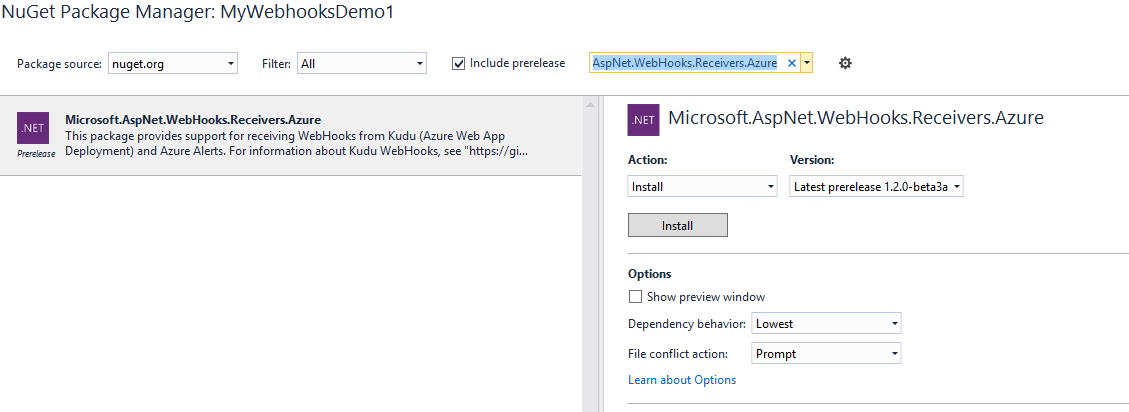
Add the Microsoft.AspNet.WebHooks.Receivers.Azure Nuget package. Don’t forget to check Include prerelease if you can find this package in the search results.
[Figure 3]
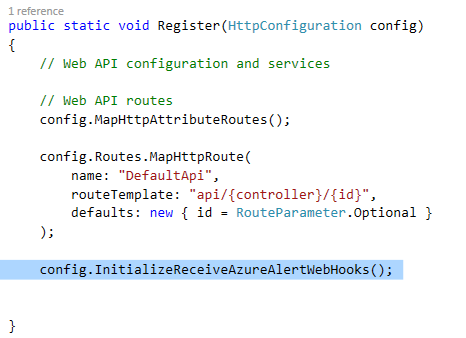
After installing the nuget package add the the below line to the Register method in WebApiConfig class.
config.InitializeReceiveAzureAlertWebHooks();
You can add the above code after the routing code as shown in Figure 4.
[Figure 4]
This code registers your webhooks reciever.
Next step is to add the below application setting to your web.config file. This setting adds the secretkey to validate that the WebHook requests indeed Azure Alerts. It is advisable to use a SHA256 hash or similar value, which you can get from FreeFormatter Online Tools For Developers. This secret key will be part of the Reciever URL provided in the Azure Portal while creating the Azure Alerts.
 <appSettings>
<add key="MS_WebHookReceiverSecret_AzureAlert" value="d3a0f7968f7ded184194f848512c58c7f44cde25" />
</appSettings>
Next we need to add handlers to process the webhooks data sent by Azure Alerts.
Add a new class AzureAlertsWebHooksDataHandler and add the below code to it.
|
This is the most basic handler. In the construct we have initialized the Reciever to handle only Azure Alert webhooks. The ExecuteAsync method is the one which is responsible for processing the data posted and return response back to indicate webhooks was received.
We will now expand this code to actually process the data received in the webhooks. Let's store the data posted by the Azure Alerts webhooks sender in Azure table storage.
To do this first add the WindowsAzure.Storage nuget package and add the below code to import the Windows azure storage namespaces required here.
using Microsoft.WindowsAzure.Storage;
using Microsoft.WindowsAzure.Storage.Auth;
using Microsoft.WindowsAzure.Storage.Table;
using System.Configuration; //To read connectionstring from the config files.
Also add your Azure storage connection string in the application settings as below.
<add key="StorageConnectionString" value="DefaultEndpointsProtocol=https;AccountName=your-account-name;AccountKey=your-account-key" />
And add the a small TableEntity implementation as below to store data in Azure table storage.
public class WHEntity : TableEntity { public WHEntity(string Receiver, string Name) { this.PartitionKey = Receiver; this.RowKey = Name; public WHEntity() { } public string FullData { get; set; } } |
Finally lets modify the ExecuteAsync method to process the data send by the Webhooks sender and store it in Azure Table storage as below.
public override Task ExecuteAsync(string generator, WebHookHandlerContext context) { // Convert to POCO type AzureAlertNotification notification = context.GetDataOrDefault<AzureAlertNotification>(); // Get the notification name string name = notification.Context.Name + " -- " + notification.Context.Timestamp.ToFileTime().ToString(); WHEntity wHEntity1 = new WHEntity(this.Receiver, name); wHEntity1.FullData = context.Data.ToString(); // Retrieve the storage account from the connection string. CloudStorageAccount storageAccount = CloudStorageAccount.Parse( ConfigurationManager.AppSettings["StorageConnectionString"]); // Create the table client. CloudTableClient tableClient = storageAccount.CreateCloudTableClient();
CloudTable table = tableClient.GetTableReference("azurealertdemo"); table.CreateIfNotExists(); TableOperation insertOperation = TableOperation.InsertOrReplace(wHEntity1); table.Execute(insertOperation); return Task.FromResult(true); } |
The data sent in by the WebHooks sender is stored in JSON format, in the Data field of the WebHookHandlerContext object which is passed in as a parameter to the ExecuteAsync method. In the above method, I'm converting it to string and storing in Azure Table storage.
Now publish this code to an Azure Website. After publishing you can use the below URL to configure Azure Alerts to send Webhooks to the receiver we created above.
https://<host>/api/webhooks/incoming/azurealert?code=d3a0f7968f7ded184194f848512c58c7f44cde25
Note:
The Code in the above URL is the same as the secret key we have configured in the application settings.
Configure webhooks for Azure Alerts
Now Log in to the new Azure portal to configure an Azure alert to send Webhooks to the receiver we created above.
Browse and select a resource for which you want to configure the alerts. For simplicity lets create an alert for the above webhooks reciever Azure website we created.
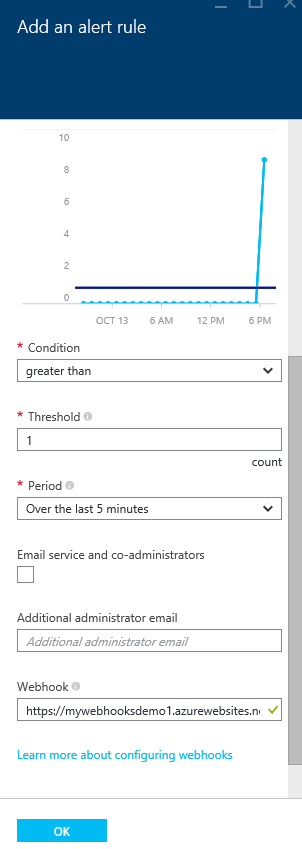
Create a new alert(Webhooks currently supported on metric alerts only), and provide your webhooks reciever URL in the WebHooks field as below.
[Figure 5]
Verify the Results:
Configure the alerts help you verify the results quickly. You can accomplish this by keeping the Threshold and the Period to the minimum. I have set the Period to 5 Minutes in the above example. Hence, after 5 minutes if the threshold is reached, an alert is fired and webhooks posted to our receiver URL. This data is then processed and stored to Azure table storage as below.

[Figure 6]
Sample JSON object posted by the Azure Alerts Webhooks is as below.
{
"status": "Resolved",
"context": {
"id": "/subscriptions/<your-subscriptionId>/resourceGroups/webhooksdemo1/providers/microsoft.insights/alertrules/webhooksdemo",
"name": "webhooksdemo",
"description": "webhooksdemo",
"conditionType": "Metric",
"condition": {
"metricName": "Requests",
"metricUnit": "Count",
"metricValue": "1",
"threshold": "1",
"windowSize": "5",
"timeAggregation": "Total",
"operator": "GreaterThan"
},
"subscriptionId": "<your-subscriptionId>",
"resourceGroupName": "webhooksdemo1",
"timestamp": "2015-10-14T09:43:20.264882Z",
"resourceName": "mywebhooksdemo1",
"resourceType": "microsoft.web/sites",
"resourceId": "/subscriptions/<your-subscriptionId>/resourceGroups/webhooksdemo1/providers/Microsoft.Web/sites/MyWebhooksDemo1",
"resourceRegion": "East US",
"portalLink": "https://portal.azure. com/#resource/subscriptions/ <your-subscriptionId>/resourceGroups/webhooksdemo1/providers/Microsoft.Web/sites/MyWebhooksDemo1"
},
"properties": {}
}
Alternatively you can also use the Fiddler request composer to post to you webhooks Receiver URL and check the response the corresponding updates in the Azure Table storage. Make sure that the content-type is marked as json and the request body has json similar to the above example. A fiddler request should look like the below example.

[Figure 7]
Note:
Webhooks are internally configured to retry a few times until they receive a successful response from the receiver within a short duration. Hence you might see multiple requests hitting an endpoint in the ExecuteAsync method if you are debugging it remotely.
References:
Receive WebHooks from Azure Alerts and Kudu (Azure Web App Deployment) by Henrik F Nielsen
https://blogs.msdn.com/b/webdev/archive/2015/10/04/receive-webhooks-from-azure-alerts-and-kudu-azure-web-app-deployment.aspx
Introducing Microsoft ASP.NET WebHooks Preview by Henrik F Nielsen
https://blogs.msdn.com/b/webdev/archive/2015/09/04/introducing-microsoft-asp-net-webhooks-preview.aspx
Webhooks for Azure Alerts
https://azure.microsoft.com/en-us/blog/webhooks-for-azure-alerts/
How to configure webhooks for alerts
https://azure.microsoft.com/en-us/documentation/articles/insights-webhooks-alerts/