Installing DebugDiag and importing rules thru Azure Cloud Services startup tasks
This article describes the steps for how to install DebugDiag version 2 update 1 on Cloud Services Web and Worker Roles using startup tasks.
Note: In this article, the steps were applied to a Worker Role, but it also works for Web Roles.
Preparing the DebugDiag installer and the configuration file with the files
- Download DebugDiag Debug Diagnostic Tool v2 Update 1 (The procedure was made with version x64 of DebugDiag 2 Update 1, but it was also tested with version 1.2 and it works fine)
- Install DebugDiag on a machine where you can create the rule the way you want, and after created and activated, you can click on the Export button in right bottom side of the tool and Export to file named “DebugDiagRule.ddconfig”. For information about creating rules in DebugDiag, see Configuring DebugDiag to Automatically Capture a Full User Dump on a Managed Function:
Note: For Azure PaaS VMs environment, it’s highly recommended that user files, such as the Dumps in this case, are generated in C: drive which is the “user” drive and not in the D: drive (system) or E drive (Application drive). You can set up the “Userdump Path” to C:\DebugDiagDumps in the rule creation, or you can edit the exported file (see more information on the step 3).

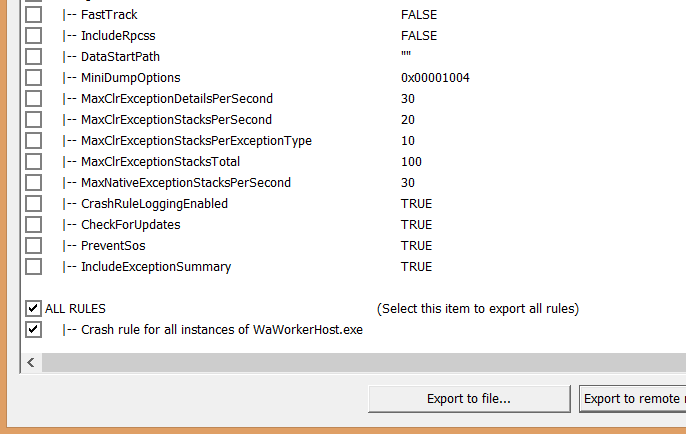
3. In order make sure that the dump will be generated on the C: drive of your Cloud Service instance, using notepad, you can open the “DebugDiagRule.ddconfig” file with that you created in the previous step, and look for “DumpPath” and make sure it’s set to “C:\DebugDiagDumps”. See example:
<DebugDiag MaxClrExceptionDetailsPerSecond="30" MaxClrExceptionStacksPerSecond="20" MaxClrExceptionStacksPerExceptionType="10" MaxClrExceptionStacksTotal="100" MaxNativeExceptionStacksPerSecond="30"><Rules><Rule TargetType="PROCESS" TargetName="WaWorkerHost.exe" UFEActionType="" UFEActionLimit="0" MaxDumpLimit="10" MatchingLeakRuleKey="" PageheapType="" RuleType="CRASH" Active="TRUE" RuleName="Crash rule for all instances of WaWorkerHost.exe" DumpPath="C:\DebugDiagDumps"><Exceptions><Exception ExceptionCode="E0434352" ExceptionName="CLR (.NET) 4.0 Exception - System.NullReferenceException" ExceptionData="System.NullReferenceException" ExceptionData2="" ExceptionDataCheck="FALSE" ActionType="FULLDUMP" ActionLimit="3"/></Exceptions><Events/><Breakpoints/></Rule></Rules></DebugDiag>
Note: If the directory set in the DumpPath does not exist in the machine where the rule will be imported, DebugDiag will create it.
4. For a Role (Web or Worker Role)
-
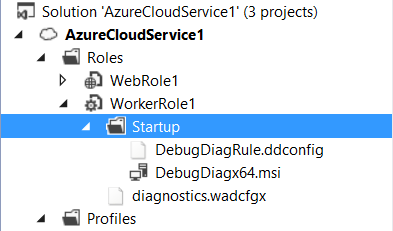
- In Solution Explorer, under Roles in the cloud service project right click on your role and select Add>New Folder. Create a folder named Startup
- Right click on the Startup folder and select Add>Existing Item. Select the DebugDiag installer and the DebugDiag configuration file and add them to the Startup folder.
Define startup tasks for your roles
Startup tasks allow you to perform operations before a role starts. In this case, we will use a startup task for installing DebugDiag and another task for importing the configuration file containing the rule exported previously. For more information on startup tasks see: Run Startup Tasks in Azure.
- Add the following to the ServiceDefinition.csdef file under the WebRole or WorkerRole node for all roles:
 <Startup>
 <Task commandLine="Startup\Installer.cmd" executionContext="elevated" taskType="simple"/>
 <Task commandLine="Startup\ImportDebugConfig.cmd" executionContext="elevated" taskType="simple"/>
</Startup>
The above configuration will run the console command Install.cmd and ImportDebugConfig.cmd with administrator privileges so it can install DebugDiag and right after that import the configuration file containing the rule.
2. Create the Installer.cmd file with the following content:
if not exist "%ProgramFiles%"\DebugDiag\ msiexec /i %~dp0DebugDiagx64.msi /qn
The Installer script will first check if the DebugDiag folder exists, if not, it will install the DebugDiagx64.msi in silent mode.
Note: If you uninstall DebugDiag manually, the DebugDiag Folder will still exist inside Program Files folder, so the Installer will not install DebugDiag since the folder exists. This article is intended to have DebugDiag installed and with the imported rules running and activated again in case of a VM reimage, new instances etc.
3. Create the ImportDebugConfig.cmd file with the following content:
"%ProgramFiles%\DebugDiag\DebugDiag.Collection.exe" /importConfig %~dp0DebugDiagRule.ddconfig –DoNotPrompt
The ImportDebugConfig script will import the configuration file. After that, the rule will be created and activated.
In case DebugDiag already has the rule imported (same name), this command will overwrite it.
NOTE:
Use a simple text editor like notepad to create this file. If you use Visual Studio to create a text file and then rename it to '.cmd' the file may still contain a UTF-8 Byte Order Mark and running the first line of the script will result in an error. If you were to use Visual Studio to create the file leave add a REM (Remark) to the first line of the file so that it is ignored when run.
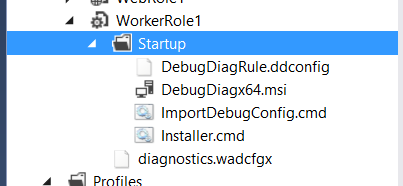
4. Add the Installer.cmd and ImportDebugConfig.cmd files to the roles by right click on the Startup folder inside the role and selecting Add>Existing Item. So the roles should now have the files DebugDiagRule.ddconfig, DebugDiagx64.msi, Installer.cmd and
ImportDebugConfig.cmd:
Deploying your service
When you deploy your service, the startup tasks will run, install DebugDiag and import the config file containing the rule. The installation and configuration of DebugDiag is fast, so after the instance is ready you can RDP to the instance and make sure DebugDiag is installed and have your rule activated.