A Complete Solution for Visio 2010 and Visio Services
For this article I created a simple solution (download link available at the end of this article) to provide complete guidance for Visio solution developers to understand all the tasks for building a VSTO based solution using Visual Studio 2008 for the Visio 2010 client application and deploying that solution to client machines, including publishing content to Visio’s UI (new templates and stencils) using Windows Installer. To make this solution complete I also included new data adapter functionality to support data refresh in Visio Services for SharePoint 2010 for diagrams published from the client add-in to Visio Services. This documents the pattern that I use for all of my Visio VSTO based add-in projects and I hope it helps you to build some great Visio solutions.
IMPORTANT – The code in the client add-in project has a hard coded path to the sample XML file that this solution uses to pull the data into the Visio diagram. You will need to place the sample XML file in a location that is accessible from both the client and the SharePoint server in order for both the client add-in and the and you will need to update this path in the source code.
Client Add-in
To prepare the client add-in I created a VSTO based add-in using the built in VSTO project template in Visual Studio 2008. For an overview and additional information about creating VSTO add-ins for Visio, take a look at this article, VSTO 3.0 and Visio 2007 Essentials.
Ribbon Development
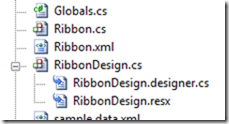
Visio 2010 now includes the popular Fluent UI or Ribbon interface. As a solution developer you can customize the Visio ribbon using either the Ribbon Designer or RibbonX. As you will see in the source code for the add-in project the source files for the ribbon designer exist as well as the files for RibbonX.
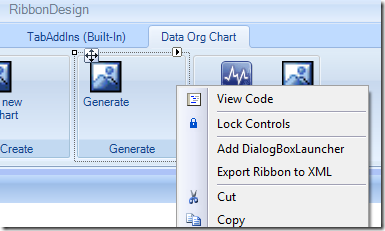
The Ribbon Designer provides a visual interface for designing your ribbon based UI however the Ribbon Designer is not supported in the Visio add-in template for Visual Studio 2008. In order to add the Ribbon Designer files to your Visio add-in project you will need to generate them in a temporary Word add-in or Excel add-in project and simply copy those files to your Visio add-in project. Using the Ribbon Designer method is quick and easy but only provides a single event for your ribbon buttons, the click event. There are many other restrictions using this method which is the reason I recommend using the Designer only for building the layout of your ribbon. Once you are happy with the layout you can generate RibbonX from the Ribbon Designer by right-clicking on your ribbon and choosing the Export to Ribbon XML menu item.
Shared Data Assembly
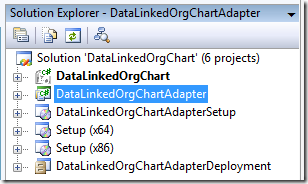
Notice that this project uses code from a separate assembly in the project called DataLinkedOrgChartAdapter which provides support for the data refresh feature on the client side. This same project will also be used on the server side, this way we have a single code base to maintain that is responsible for delivering data to Visio and Visio Services.
Client Deployment
Once you have your VSTO add-in project created and have verified that it is operating, you can then work on the details of your deployment project.
Before you begin you should answer the questions in the following flowchart:
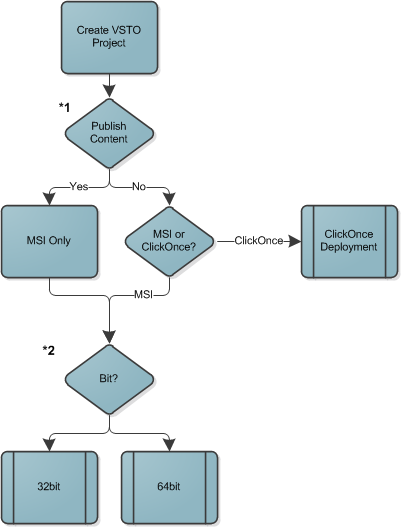
*1 – It is important to determine if you are going to publish content (templates, stencils, or add-ons) during your deployment to the Visio client as this answer will determine the deployment technology you can use for your solution. Publishing content to Visio requires the use of MSI deployment technology (Windows Installer). ClickOnce deployments cannot publish content to the Visio client.
For the purposes of this article and the accompanying solution we will publish content using an MSI based deployment.
*2 – Visio 2010, as well as Office 2010, can now be installed in either 32 bit or 64 bit versions. Luckily the VSTO runtime handles this for you so as an add-in developer using VSTO you do not have to worry about compiling and deploying 32 bit and 64 bit binaries for your add-in. However, you may need to provide specific behavior for both 32 bit and 64 bit within your MSI.VSTO is based on managed code so your code will JIT (just in time compile) based on the machine’s processor and the version of VSTO that the client has installed. If you are building a COM based add-in (Shared add-in / COM add-in) you will need to to build 32bit and 64bit versions of your COM add-in to match the client installation for both Visio 32 or 64 bit.
For the purposes of this article I have included both a 32 bit and 64 bit compatible MSI in the accompanying solution to help you understand both scenarios.
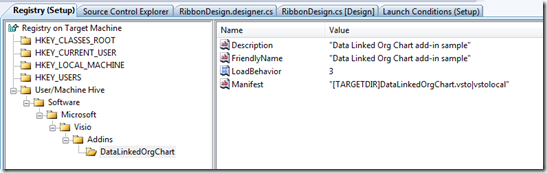
Registry Settings
Nothing has changed regarding the registry entries that you need to create in order for VSTO to recognize and launch your add-in, these settings are the same for both the 32 bit and 64 bit MSIs.
32bit MSI project details
It is important to note that the 32 bit version of your MSI can be run on both a 32bit and 64bit platform. It is also important to note that Visio 2010 32bit or Visio 2010 64bit may be installed. This makes the MSI a little more challenging to create as you have to account for both in the 32bit version of your MSI for any Launch Conditions that attempt to detect which version and edition of Visio 2010 is installed.
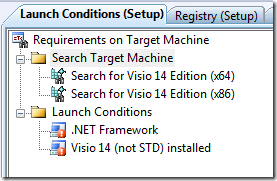
Launch Conditions
To handle both the 32 bit and 64 bit Visio 2010 scenarios you need to do the following as demonstrated in the attached solution:
1. Create a launch condition to search the registry for the 32 bit version of Visio 2010
2. Create a launch condition to search the registry for the 64 bit version of Visio 2010
3. Create a post-build script that updates the 64 bit launch condition’s RegLocator type so that the MSI can look in the 64 bit registry.
If you inspect the two launch conditions that I have created in the attached sample solution you will see that one has a name of LicenseCache32 and the other has a name of LicenseCache64. If you look at the post-build script you will then notice that I used this naming convention so that my script can identify the 64 bit entry and update only it’s RegLocator type, then renaming both the entries to the real “LicenseCache” key that exists in the registry.Note: Visio 2010 uses the following key in the registry to identify the installed edition.
This provides two functions;
1. if this key exists Visio 2010 is installed
2. The value of the key determines the installed edition:
Key = SOFTWARE\Microsoft\Office\14.0\Visio\Application\LicenseCacheValues:
STD – Standard
PRO – Professional
PRM – Premium
64bit MSI project details
In most cases you do not need to go through the effort to create and maintain both a 32bit and 64bit MSI. Because VSTO add-ins are compiled as ‘Any CPU’ in Visual Studio, the VSTO Runtime and the JIT compiler take care of compiling for the target platform. I only created this project to show how it can be done if you need to or just wanted to market your add-in as supporting both the 32 bit and 64 bit platforms.
Set the TargetPlatform property to x64
Setting this property to x64 provides two important features:
1. 32 bit user will get an error message telling them that they cannot install this package as their current platform is not supported.
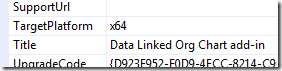
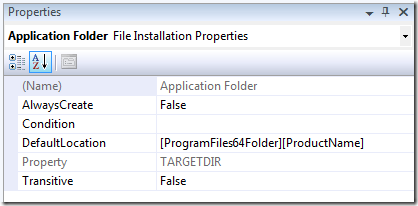
2. Allows you to specify the [ProgramFiles64Folder] variable can be used to target the 64 bit Program Files folder on the target machine. If this is not used the MSI will default to Program Files (x86) [ProgramFilesFolder].
Launch Conditions
In this scenario you really only need a single launch condition because Visio 2010, if it is installed, can only be installed as 64 bit on a 64 bit platform.
You still need to have a post-build script in this case to update the RegLocator type correctly because even though you marked this as a 64 bit installer, MSI is still 32 bit based.
Updated version of VisSolPublish.exe
If you have created MSIs for your Visio add-ins and you have used the VisSolPublish tool you are probably already familiar with the PublishComponents issue when installing to Vista. The script that is added to an MSI by the VisSolPublish tool did not properly update the Type field for the custom action, thus you were forced to update this manually or with a script as shown below:
Example: Set view = database.OpenView("UPDATE CustomAction SET CustomAction.Type = '3622' WHERE CustomAction.Action = 'VisSolPublish_BumpVisioChangeId'")
The good news is for the release of the Visio 2010 SDK this issue has been fixed and works properly on Vista and Win7 machines in both 32bit and 64 bit configurations.
Additional information on building MSIs for 64 bit platforms
I only covered issues for Launch Conditions and post-build scripts that are needed specifically for installing a VSTO add-in to Visio 2010. For more detailed information on building MSIs for 64bit platforms have a look at this article: How to: Create a Windows Installer for a 64-bit Platform
Data module
Visio Services in SharePoint 2010 provides extensibility allowing developers to create and deploy custom data adapters allowing Visio Services to refresh data that originated from a custom data source as determined by the solution developer.
This article does not discuss the details of creating a custom data adapter for Visio Services however it does provide the source code for the sample data adapter that we are deploying in this solution. This article is focused on deployment for the data adapter to the SharePoint farm.
Data module deployment
The pattern that I have been using includes two deployment technologies, MSI and PowerShell.
A Windows Installer project is created to allow the administrator to easily download and unpack the files necessary for deploying the data adapter to the farm. I could have also used .ZIP format however I used the MSI as it provides nice features for managing the install package and it also provides a mechanism to provide a license agreement to the user/administrator.
The PowerShell scripts do the actual work of deploying the data adapter to each machine in the farm.
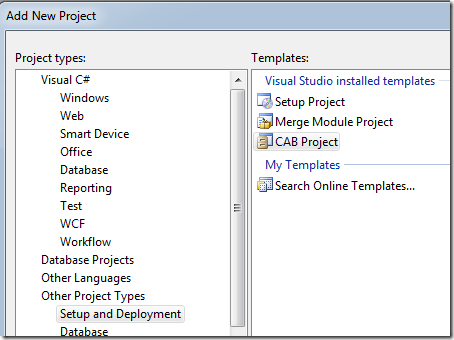
The CAB project
To create a deployment module for SharePoint 2010 in Visual Studio 2008 you need to start by creating a CAB Project. The compiled CAB file will contain the files that are to be deployed to the machines in the farm.
Add a Deployment Manifest
A deployment manifest is required to inform SharePoint of the content you are deploying to the farm. This is a simple XML file that you create and add to the CAB project.
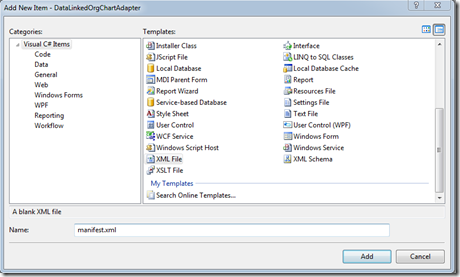
To do this in Visual Studio 2008, choose to Add a New Item to the CAB project and choode the XML File template from the list of available templates.
NOTE: make sure to name the file manifest.xml
This creates a new, blank XML file in your CAB project.
Use this XML for your deployment manifest:
<?xml version="1.0" encoding="utf-8"?>
<Solution xmlns="https://schemas.microsoft.com/sharepoint/"
SolutionId="78E4D54B-A50D-48e8-AE98-923FE77DA45E" >
<Assemblies>
<Assembly DeploymentTarget="GlobalAssemblyCache" Location="DataLinkedOrgChartAdapter.dll"/>
</Assemblies>
</Solution>
IMPORTANT - Replace the GUID with a new one from GUIDGEN.
IMPORTANT – Each file that is to be deployed needs its own <ASSEMBLY …/> node in the XML.
For additional information on deployment manifests, see this article.
Add Files to the CAB project In this sample solution you can see that we have added the Project Output of the data adapter project. You can choose to link directly to the file if you prefer from the build folder.
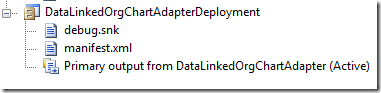
Note: When adding the manifest also include the Strong Name Key file from the data adapter project. You are deploying the data adapter to the GAC so strong naming is a requirement.
Post Build to rename and copy scripts
The last step to configuring our project includes adding a PostBuild script that will rename the compiled CAB file to the WSP extension o that it is recognized by SharePoint as a deployment package.
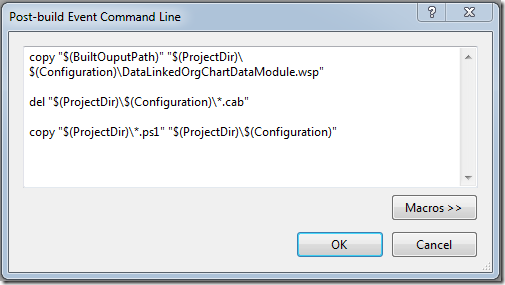
Here is the text that you can copy:
copy "$(BuiltOuputPath)" "$(ProjectDir)\$(Configuration)\DataLinkedOrgChartDataModule.wsp"
del "$(ProjectDir)\$(Configuration)\*.cab"
copy "$(ProjectDir)\*.ps1" "$(ProjectDir)\$(Configuration)"
Deployment MSI
Now that we have the scripts and the deployment package we wrap these up in a nice little MSI. There is nothing special to the MSI in the attached sample solution. This MSI does not have any Launch Conditions or Registry entries. It simply copies the packaged files to the specified location.
PowerShell Scripts
The attached sample solution contains two PowerShell scripts. One is responsible for installing the data module to the farm and the other is responsible for removing the data module from the farm.
Both of these tasks can be performed manually but if you manually deploy you will need to manually deploy to each machine in the farm. The scripts allow SharePoint to handle automatic deployment to each machine in the farm via the solution store.
FYI – click here to review the manual deployment details
Full deployment script – InstallDataModule.ps1
Remove Only script – RemoveDataModule.ps1
Installing and Executing the scripts
After running the MSI to install the deployment package (.wsp) and PowerShell (.p1) scripts we can then run the scripts as an administrator to deploy the data adapter to the farm.
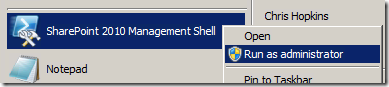
The first step is to log onto one of the machines in the farm as an administrator. Then you need to run the SharePoint 2010 Management Shell with Administrator privileges.
In the shell, change to the directory that was specified in the MSI as the location to install the deployment package and scripts. From this location you can run the InstallDataModule.ps1 PowerShell script to deploy the data module to the farm.

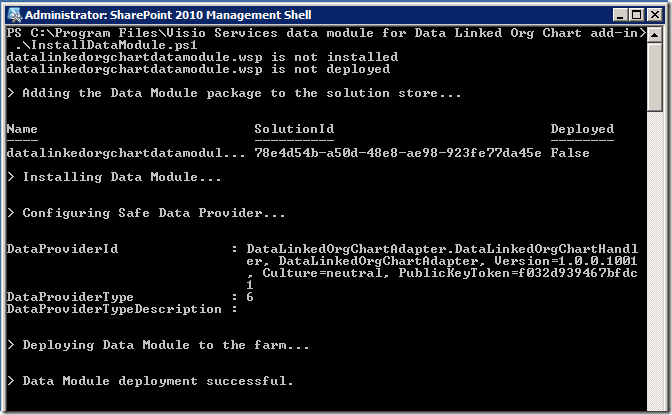
This deployment script allows SharePoint to deploy the data adapter to each machine in the farm so the administrator does not have to manually configure each machine.
NOTE: Included is also a script that uninstalls the data module from the farm.
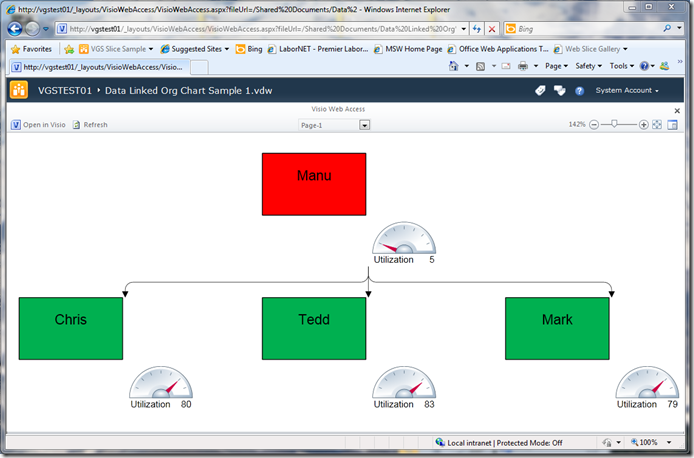
Once the installation script has successfully executed you can see that the data adapter has been installed via the Trusted Data Providers list via the Central Administration site. You can now publish a diagram that is generated from this add-in and Visio Services will automatically refresh the diagram from the XML file.
Click here to download the complete solution.