APS Polybase to Azure Blob Store
With the current growth of Azure and the array of tools available in Azure to perform advanced data analytics the need to move data to Azure has become ever more popular.
One of the simplest methods to do so from the APS Appliance is through Polybase queries, where you can move data to Azure blob store via a CETAS (Create External Table As Select) operation.
Prerequisites
Before you start configuring the appliance and creating objects you need to ensure that the following prerequisites have been completed.
- Network connectivity to *.blob.core.windows.net through Port 80 & Port 443 from the Control Node
- Azure Storage Account has been configured
Configuring Azure Storage Account
To successfully write to the Azure Storage account, the following configuration guidelines should be followed
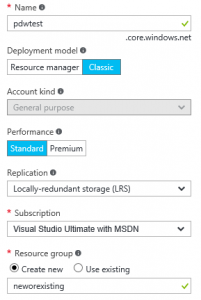
Classic Storage Account Deployment Model
The only requirements when making use of a Classic Storage account is to ensure that either one of the following Replication models is used
- Local Redundant Storage (LRS)
- Geo Redundant Storage (GRS)
Completing the Classic storage account configuration, I made use of pdwtest as my storage account name which creates pdwtest.core.windows.net. The account specified can be any valid storage account name. I opted for LRS and used a new Resource group, you can use existing resource groups within your subscription
Once the storage account has been created, complete the following actions to prepare your storage account for CETAS operation
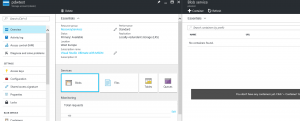
Open the storage account from the Storage Accounts list and Select Blobs under Services
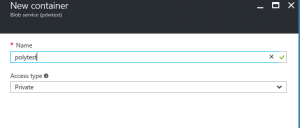
It will state that you don’t have any containers yet, create a container by selecting +Container and provide a valid name for the container, leaving it at Private Access type.
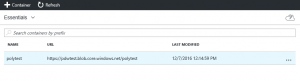
Once created you will have a container within the blob store to which your files will be written to.
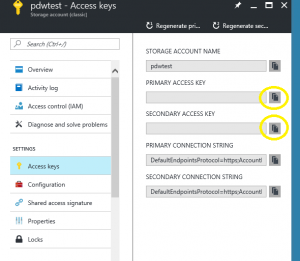
Last step would be to obtain the storage account key which you would require updating the core-site.xml to authenticate to the blob store. This can be found within the Access Keys tab under settings on your storage account. It provides a primary and secondary access key, copy the access key by selecting either one of the yellow highlighted buttons and paste the information in temporary notepad txt file as you would be needing this later.
Resource Manager Deployment Model
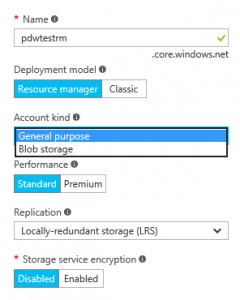
The resource manager deployment is identical to the classic storage account with only one exception, when creating the storage account, it is important to select “General purpose” and NOT “Blob Storage” from the Account kind drop down selection. (The Account kind selection is only available with resource manager based storage accounts.)
Complete the storage account creation as specified in the classic storage account creation and proceed with container creation and obtaining the storage account key from the Account Keys section.
Polybase Configuration
Completing the polybase configuration is detailed within the APS help file however for completion purpose I will provide the steps within the post as well.
Connect to the appliance using a query tool such as SQLCMD or SQL Server Data tools with elevated permissions to ensure that you can perform the following configuration changes
EXEC sp_configure 'hadoop connectivity',4
reconfigure
Option 4 enables connectivity to Microsoft Azure blob storage
For detailed information on the various options refer to APS Help file ‘Configure Polybase Connectivity to External Data’
Once you have made the configuration change modify the following file on the PDW Control Node
C:\Program Files\Microsoft SQL Server Parallel Data Warehouse\100\Hadoop\conf\core-site.xml
Add the following property with name and value attributes to the core-site.xml file
<property>
<name>fs.azure.account.key.<your storage account name>.blob.core.windows.net</name>
<value>your storage account access key</value>
</property>
As per the exercise my settings would be
<property>
<name>fs.azure.account.key.pdwtest.blob.core.windows.net</name>
<value>key value which we copied out in creation process</value>
</property>
Save the change to the core-site.xml
Once you have completed the configuration changes it is required to restart the PDW Region for the changes to take effect. Do so during maintenance time slot to prevent any unexpected outage.
Performing the Polybase Query
Once the region has been restarted and the appliance is configured to perform the CETAS query we must create the external data source and file format which will be used to write the file.
Prerequisites
There are 2 prerequisites for creating an external table once the appliance has been configured
- Creating an External Data source
- Creating an External File format
Create External Data Source
From the User database from where I will be running my CETAS statement I create the External data source to my polytest container in my pdwtest storage account. (I used the AdventureworksPDW2012 database as my data source)
CREATE EXTERNAL DATA SOURCE MyAzureDS
WITH (
TYPE = HADOOP,
LOCATION = 'wasbs://polytest@pdwtest.blob.core.windows.net'
)
Once I have created my external data source I need to define the file format of my target file on the azure blob store.
For detailed information on External Data sources refer to APS Help file “Create External Data source” or MDSN Article https://msdn.microsoft.com/en-us/library/dn935022.aspx
Create External File format
The external file format defines how the data will be stored on the Azure blob store. The file format will define the file format type, field delimiters, field terminators, string delimiters, date format and data compression if required.
For detailed options on the various file formats refer to the APS help file “Create External File Format (SQL Server PDW )” or MSDN Article https://msdn.microsoft.com/en-us/library/dn935026.aspx
For exercise purpose, I have created a Pipe Delimited format
CREATE EXTERNAL FILE FORMAT PipeFormat
WITH (
FORMAT_TYPE = DELIMITEDTEXT
)
Performing CETAS Operation
For details on CETAS operation and syntax refer to (https://msdn.microsoft.com/en-us/library/mt631610.aspx)
Now that all the requirements have been met I am ready to execute my CETAS statement.
From my source user database, I execute the following statement
CREATE EXTERNAL TABLE MyWasbTest
WITH
(
LOCATION='/dimcust', -- Target which I want to write to
DATA_SOURCE = MyAzureDS, -- Specify The External Data source I created
FILE_FORMAT = PipeFormat, -- Specify The File format I created
REJECT_TYPE = VALUE,
REJECT_VALUE = 10
)
AS
SELECT Top 10 *
from dim.Customer
Once my statement has completed successfully the file with its content will be visible from my Azure Dashboard in the target Container

The actual file can be found within the dimcust folder with the executing queryid which performed the CETAS operation.

Conclusion
With little effort, you can move data to Azure blob store for consumption within Azure DW or other services currently available in Azure.
The article did not cover any specific user security requirements within the appliance, for detailed information please refer to following msdn article.
https://msdn.microsoft.com/en-us/library/mt631610.aspx
The APS 2016 Online documentation can be found here
https://msdn.microsoft.com/sql/analytics-platform-system/index
The APS AU5 Help file can be found here
https://www.microsoft.com/en-us/download/details.aspx?id=51610