Publishing an ASP.NET Web Application in IIS
I had a need to publish a Web Application from Visual Studio 2008 into IIS, rather than into the default Visual Studio Development Server. I already had IIS installed, but I wasn’t quite sure what to do next. Here are some notes that I took on what turned out to be a three step process to publish an ASP.NET Web Application to my IIS Web Server:
- Run Visual Studio as an Administrator and go to the Web Page in the Properties for the Web Application. I did that by right clicking on the Properties node in the Solution Explorer. On the Web page in the Properties dialog I switched from “Use Visual Studio Development Server” to “Use IIS Web Server.”
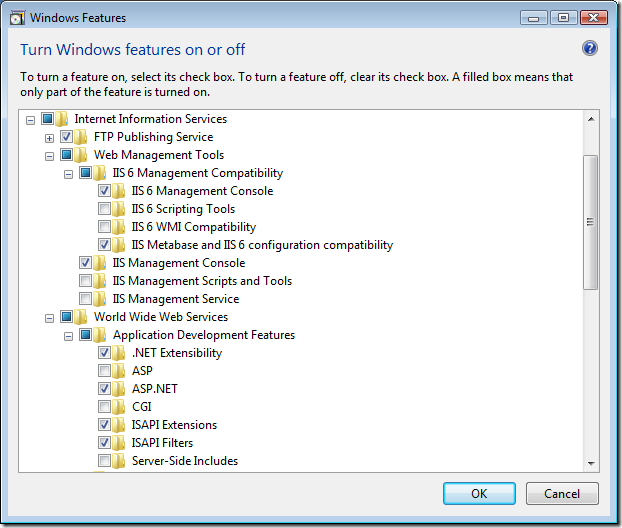
- As shown in Figure 1, I then went to the Control Panel and opened this page Control Panel\Programs\Programs and Features and choose:
- Internet Information Services
- Web Management Tools
- IIS 6 Management Compatibility
- IIS Metabase and IIS 6 configuration compatibility
- IIS 6 Management Compatibility
- Web Management Tools
- Internet Information Services
- Still in the Control, I want to Control Panel\Programs\Programs and Features and choose:
- World Wide Web Services
- Application Development Features
- ASP.NET
- Application Development Features
- World Wide Web Services
Steps 2 and 3 are illustrated in Figure 1. Note that IIS Metabase and IIS 6 configuration compatibility and ASP.NET are both selected. When I selected ASP.NET, a number of other options were turned on automatically.
After taking these steps, the Create Virtual Directory button in the Web Page of the Properties for my Web Application worked. I was then able to reach the application by typing a URL such as the following into IIS:
- https://localhost/WebApplication2/
The actual application with my source code remained in the directory where I did my development. The connection between the Virtual Directory and the directory where the application is actually stored can be viewed and configured with the IIS Manager. You can access the Manager here: Control Panel\System and Maintenance\Administrative Tools. In the Connections window on the left of the Manager, browse to Sites\Default Site and click on one of the IIS options such as Authentication.
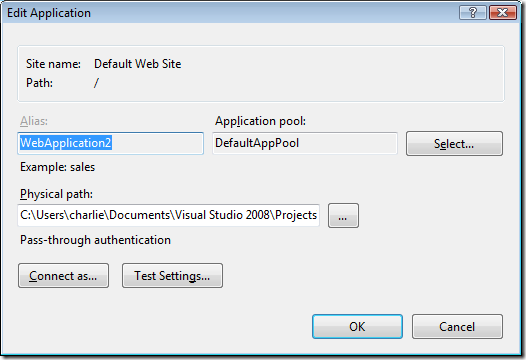
In the Actions window on the right of the Manager, choose View Applications, then right click on your application and choose Basic Settings. The dialog shown in Figure 2 appears. You can use this dialog to modify the path to your application. If you then want to switch back to developing your source code in the original location inside Visual Studio, you may have to use the IIS Manager to remove the application.
Handling IIS security and set up issues is a subject that I sometimes find a bit challenging, but the information I’ve outlined here solved my problems, and allowed my to proceed with my work.

