Creating a New Silverlight Project in Visual Studio 2008
This post is part of a series of articles on Silverlight. The purpose of this post is describe how to start a new Silverlight project or how to add a new or existing Silverlight project to an existing ASP.NET Web Application.
To be able to follow the discussion presented in this post you will need to install Silverlight support to Visual Studio. I will not discuss the details of that install, other than to say that you can download the necessary files from the Get Started page of the Silverlight site. Note that you need Visual Studio 2008 Service Pack 1 or the install will fail. If the various options for creating Silver projects discussed in this post are not available in your copy of Visual Studio 2008, then the likely cause is that you have not yet installed Silverlight support for Visual Studio.
Creating a New Silverlight Project
You have several options when creating a new Silverlight project. In this post, I will focus on creating a Silverlight project embedded in an ASP.NET application, but I will discuss the other options available to you. I’m choosing to embed the Silverlight project in an ASP.NET application because that is the default option, because ASP.NET applications are popular, and because the deployment options for these kinds of projects are simpler for beginners.
You will end up creating a solution that owns two projects. Conceptually, that will look something like this:
- The Solution File, which will own two projects
- The first project is the ASP.NET host application.
- The second is the Silverlight project which will end up being embedded as an interface element inside the ASP.NET application.
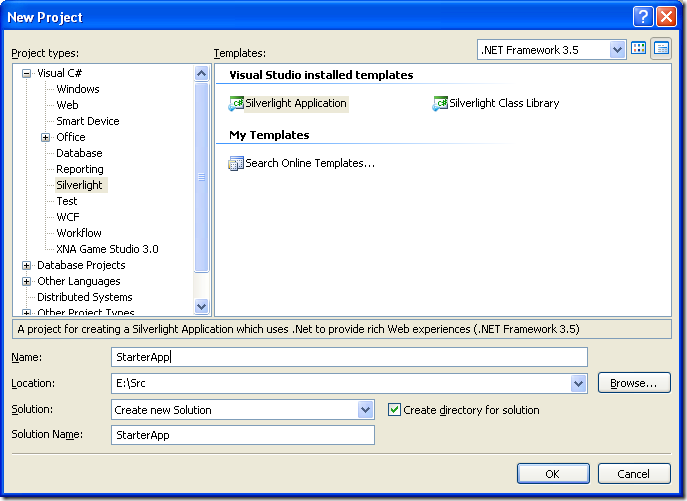
Begin by choosing File | New Project from the Visual Studio menu. The default hotkey is Ctrl + Shift + N. The dialog shown in Figure 1 appears.
In the Project Types window in the upper left section of Figure 1, choose Silverlight. In the Templates window on the upper right of Figure 1 choose Silverlight Application.
The Name field in the New Project dialog lets you specify the name of your Silverlight project, which in our case will be StarterApp. The Solution Name field lets you specify the name for the solution that will own both your Silverlight project and its ASP.NET host. Again, lets call this solution StarterApp. You can now click the OK button.
Figure 1: The New Project Dialog is reached by choosing File | New Project from the Visual Studio menu. Select Silverlight from Project types tree view, and Silverlight Application from the Templates list view control.
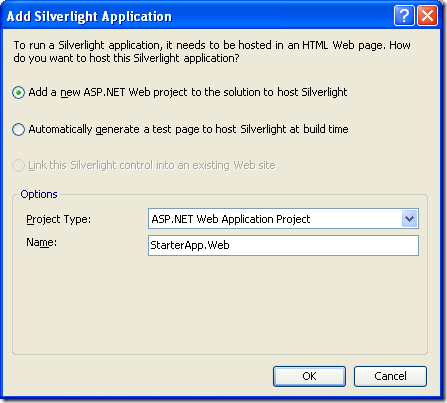
After closing the New Project dialog by pressing the OK button, the dialog shown in Figure 2 appears. This dialog is designed to allow you to create a solution that combines a Silverlight project with a host project, which in our case is an ASP.NET application.
Figure 2: The default selections in the Add Silverlight Application dialog allow you to specify an ASP.NET project type and its name.
There are several different Project Types available when you create an ASP.NET Web project that hosts your Silverlight project. These include the following three options:
- The default ASP.NET Web Application Project shown in Figure 2
- An ASP.NET Web Site
- An ASP.NET MVC Web Project
Since we are focusing on Silverlight, this is not the place to go into a discussion of the relative values of these three options. Lets just keep things simple and assume that you want to create an Application Project. If you want to choose one of the other options, that will not materially effect the design of your Silverlight project. In other words, you can host the same Silverlight project in all three of these types of ASP.NET Web Projects.
If you choose to “Automatically generate a test page to host Silverlight at Build time,” then no host project is created. Hence, there are no options for configuring your solution. In other words, the Options section shown in the bottom half of Figure 2 is empty. When you press the OK button in the Add Silverlight Application dialog, the solution created contains only the one Silverlight project, and no host project. When you run the project, a file called TestPage.html is automatically generated to host the Silverlight project. This file is not included in your project, but you can browse to the Bin\Debug directory for your project to view it. You an also go online and view the official Microsoft description of how to embed a Silverlight project in an HTML page. There you will find a description of the code found in TestPage.html.
Assuming that you chose to embed your Silverlight project in an ASP.NET application, you will end up with a solution that contains two projects, as shown in Figure 3. The first project, called StarterApp, contains the Silverlight code that we will focus on in this series of posts. The second project, called StarterApp.Web, is an ASP.NET application that will host our Silverlight code.
Figure 3: The Solution Explorer shows that a typical default Silverlight solution contains both an ASP.NET Web project and a Silverlight project.
If you look at the bottom half of Figure 3 you see the list of files in StarterApp.Web. You can see that this ASP.NET project has been modified to host a Silverlight project. The code that hosts the Silverlight project is strictly boilerplate code which performs its job without any need for modification on your part.
As an aside, I’ll mention that the file Page.xaml, which is highlighted in Figure 3, contains the key Silverlight code that will focus on in this series of posts. The posts in this series that succeed this one will describe the code in that file, and how you can modify it to create an interface for your Silverlight project.
Adding Silverlight to an Existing ASP.NET Web Project
There are two options to cover when discussing how to add a Silverlight project to an existing ASP.NET Web Application.
- One involves adding a new Silverlight project to your Web Application
- The other involves adding an existing Silverlight project to your Web Application.
Here is a description of both options:
- If you have an ASP.NET Web Project and you want to add a new Silverlight project to it, you can simply right click on the solution file in the Solution Explorer, and choose Add New Project. A dialog appears that allows you to choose to add a Silverlight project to your solution. Select that option and a new Silverlight project will be created and added to the solution. At the same time, code for hosting the Silverlight project will be add to the Web project.
- If you want to add an existing Silverlight project to your existing ASP.NET Web application, then you should first open the Web project. Now right click on the solution file and choose to Add your existing Silverlight project. Finally, open up the Properties for your Web application, and turn to the Silverlight Applications page.
Summary
In this post you have learned a little bit about how to create a new Silverlight project in Visual Studio 2008. Clearly it is possible to go into more detail to cover special cases. However, the material covered here should hopefully satisfy the needs of most newcomers looking for basic information on creating Silverlight projects. The highlights are as follows. You learned:
- That you need to install a special add on to enable Silverlight development in Visual Studio
- How to create a new Silverlight project hosted in a new ASP.NET application.
- How to add a new or existing Silverlight project to an existing ASP.NET application.
You can download the source for the StarterApp from the LINQ Farm in Code Gallery.


