Silverlight Controls and a Touch of LINQ in Orcas Beta 1
In a previous post I took a look at building a simple Silverlight application in Visual Studio Orcas. This post shows how to add a button control that comes with the Silverlight SDK. You can see the button in Figure 1. I will also add a few lines of code to show how to use LINQ inside Silverlight.
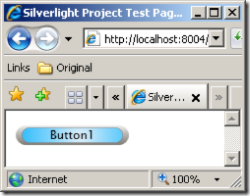
Figure 01: A simple button of the type that comes with the Silverlight SDK.
In this post I'll also show how to handle an event initiated by a click on the button. The event will cause the text in the button to change.
To follow along you will need all the downloads outlined in the previous post, including both Orcas Beta 1 the the Silverlight SDK. There are several controls in the SDK, but in this post I focus on the button control. After you have downloaded and unzipped the Silverlight SDK, you will have a set of files to choose from, as shown in Figure 2. We are interested in the Silverlight controls, which are shown highlighted.
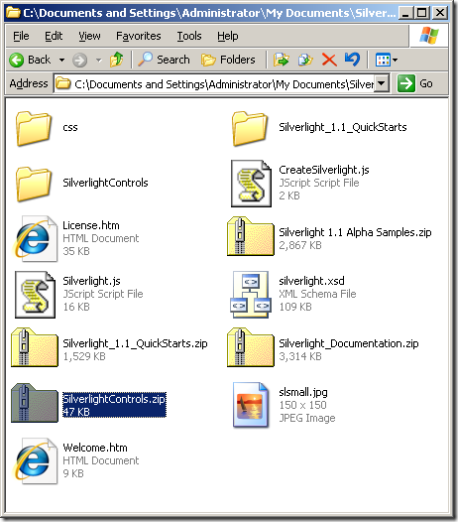
Figure 02: Locating the Silverlight controls.
Please take a moment to examine Figure 2 so you can become familiar with some of the other features found in the SDK. Note the presence of documentation, quick starts and sample applications.
Inside the Silverlight controls zip file you will drill down to find two directories. One is called TestApp, and the other SilverlightUiControls. It is this latter directory that currently interests us. Keep the directory accessible, as we will need it in just a few moments.
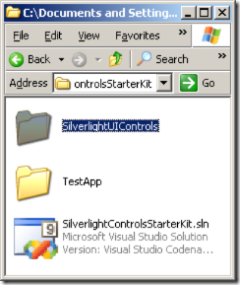
Figure 03: The SilverlightUiControls directory contains the button we will use in our application.
Creating the Application
To get started on this project, you should first create a simple Silverlight project. Press Ctrl-Shift-N to open the New Project dialog in Visual Studio Orcas. Elect to create a new Silverlight project as shown in Figure 4.

Figure 04: Creating a New Silverlight project in Visual Studio Orcas. (Click to show the image full size.)
Now copy the SilverlightUiControls directory into the same directory as your project. If your new project is called SilverlightProject6, then the directory structure on disk should look like the image shown in Figure 5.
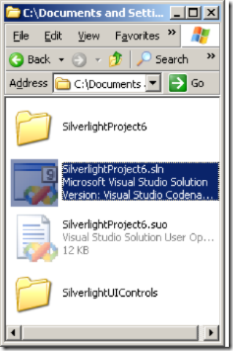
Figure 05: The directory structure of our new Silverlight application. The directory holding the code of our application is on top, and the directory holding the controls is shown at the bottom of the image.
In Visual Studio, right click on the solution, and choose Add Existing Project. Use the browse dialog to find the SilverlightUiControls.csproj file and add it to your project. When you are done, you will have two projects in your solution. The main project is your Silverlight project, the secondary or support project contains the UI controls. When you compile your solution, the assembly created by your UI controls project will be added to the ClientBin directory for your main project. That addition will, in effect, consolidate the two projects into one.
After adding the UI project to your solution, right click on the References section for the Silverlight project in the Solution Explorer and choose Add Reference. Turn to the Projects page and choose SilverlightUiControls. When you are done the Solution Explorer should look as it does in Figure 6.
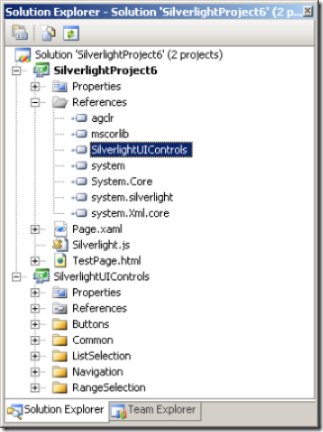
Figure 06: The Solution Explorer as it looks after you have added the SilverlightUiControls project and set up the References section for your Silverlight project.
Setting up the UI
It is now time to write a little code. I'll try to keep it to a minimum. When you are done, the code for Page.xaml should look like the source shown in Listing 1.
Listing 1: The source for Page.xaml The two sections shown in bold have been added to the original code generated by the New project template.
<Canvas x:Name="parentCanvas"
xmlns="https://schemas.microsoft.com/client/2007"
xmlns:x="https://schemas.microsoft.com/winfx/2006/xaml"
Loaded="Page_Loaded"
x:Class="SilverlightProject6.Page;assembly=ClientBin/SilverlightProject6.dll"
xmlns:uicontrol="clr-namespace:Silverlight.Samples.Controls;assembly=ClientBin/Silverlight.Samples.Controls.dll"
Width="640"
Height="480"
Background="White"
>
<Canvas x:Name="standinCanvas" Width="1200" Height="1200">
<uicontrol:Button Canvas.Top="0" Canvas.Left="0" Text="Button1"/>
</Canvas>
</Canvas>
In the ParentCanvas at the top of the source we have added a reference to a new CLR namespace called Silverlight.Samples.Controls. As mentioned earlier, after we compile our project, it will be kept in the ClientBin/Silverlight.Samples.Controls.dll assembly .
At the bottom of Listing 1, you can see that we add a second canvas to the file, and in it we placed a Button control that will appear at the top left of the screen. The name of the control is Button1.
Adding an Event Handler
All that is left to do is add an Event Handler to the project. That might sound a bit difficult since we have no visual tools such as a UI to help with the process. In practice, however, it will turn out to be very simple.
Modify the Button declaration so that it a reference to an OnClick event hander. Note that the text in these XML declarations is case sensitive:
<uicontrol:Button Canvas.Top="0" Canvas.Left="0" Text="Button1" Click="OnClick" />
Now add an OnClick handler to the Page.xaml.cs file in your project as shown in lines 22 through 25 of Listing 1. The method takes two parameters, one of type Object and the other of type EventArgs. You need do nothing else to set up the event handler beside writing the method itself. You should, however, also add Silverlight.Samples.Controls to your using statements at the top of the file. This will allow you to add the Button control reference shown in line 24 of Listing 1.
Listing 1: The Silverlight.Samples.Comtrols using clause is added to the source. An OnClick method is also inserted as an event handler.
1: using System;
2: using System.Windows;
3: using System.Windows.Controls;
4: using System.Windows.Documents;
5: using System.Windows.Ink;
6: using System.Windows.Input;
7: using System.Windows.Media;
8: using System.Windows.Media.Animation;
9: using System.Windows.Shapes;
10: using Silverlight.Samples.Controls;
11:
12: namespace SilverlightProject6
13: {
14: public partial class Page : Canvas
15: {
16: public void Page_Loaded(object o, EventArgs e)
17: {
18: // Required to initialize variables
19: InitializeComponent();
20: }
21:
22: public void OnClick(Object sender, EventArgs args)
23: {
24: (sender as Button).Text = "New Text";
25: }
26: }
27: }
When you run your Silverlight application you will see the button shown above in Figure 1. Click once on the button and the text will change, as shown in Figure 7.
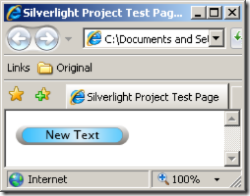
Figure 7: The event handler changes the text in the Button control.
Just a Smidgen of LINQ
To spice things up a bit, you can add in a few lines of LINQ code. This addition illustrates Silverlight's ability to access all the new features in C#.
To add LINQ to this project you will need to include two using statements near the top of Page.xaml.cs.
1: using System.Collections.Generic;
2: using System.Linq;
In side the OnClick event handler, declare an array or list that implements IEnumerable<T> and then select something from it in a LINQ Query Expression:
1: List<int> list = new List<int> {1, 2, 3};
2:
3: var query = from x in list
4: select x;
Add the results of your query to the text you display in the button:
1: string myText = "New Text";
2:
3: foreach (var q in list)
4: {
5: myText += q;
6: }
7:
8: (sender as Button).Text = myText;
When you put it all together, your code appears as it does in Listing 2. The text in the button will now be New Text123, rather than plain old New Text.
Listing 2: Adding a touch of LINQ to your code.
1: using System;
2: using System.Windows;
3: using System.Windows.Controls;
4: using System.Windows.Documents;
5: using System.Windows.Ink;
6: using System.Windows.Input;
7: using System.Windows.Media;
8: using System.Windows.Media.Animation;
9: using System.Windows.Shapes;
10: using Silverlight.Samples.Controls;
11: using System.Collections.Generic;
12: using System.Linq;
13:
14: namespace SilverlightProject6
15: {
16: public partial class Page : Canvas
17: {
18: public void Page_Loaded(object o, EventArgs e)
19: {
20: // Required to initialize variables
21: InitializeComponent();
22: }
23:
24: public void OnClick(Object sender, EventArgs args)
25: {
26: string myText = "New Text";
27: List<int> list = new List<int> {1, 2, 3};
28:
29: var query = from x in list
30: select x;
31:
32: foreach (var q in list)
33: {
34: myText += q;
35: }
36:
37: (sender as Button).Text = myText;
38: }
39: }
40: }
Test Deployment
If you are anxious to see you project inside a browser that is not started by Visual Studio, you will find it easy to set up a test deployment as a proof of concept. Please don't deploy your application like this on a production system. The example shown here is designed to work on the instance of Windows Server 2003 that comes with Orcas Beta 1.
Enter the SilverlightProject6 directory shown in Figure 5. Choose Ctrl-A to select all the files. Copy them in to a directory you will need to create called c:\Inetpub\wwwroot\Test01. Choose Control Panel | Administrative Tools and open the Internet Information Services Manager. Drill down to the node called Web Sites. Right click and choose New Website to bring up the Web Site Creation Wizard and click through its pages. In the description field, enter Test. On the next page, I had to create a unique port number, such as 8006. On the next page, browse for the directory you created that now contains your project. On the next page, make sure Run Scripts is selected. Press the Finish button. Now open a browser and type in your URL: https://localhost:8005/testpage.html. You should see the project we have created, looking much as it appears in Figures 1. In fact, that image contains a similar URL in its address box.
Summary
In this post I've gone over the basic facts you need to know to use the controls that come with the Silverlight SDK. I've gone over the steps necessary to add the controls to your project, to reference them in your source, and to write a few lines of code that allow you to display and interact with the controls.