Connecting to Northwind
This post covers accessing the Northwind database from Visual Studio or SQL Server Management Studio. Connecting to a database from a C# program is not covered. Instead, the focus is on setting up a system to access a database from the tools that programmers typically use during the development process. These tools aid developers by giving them a view of the database, by allowing them to modify the database, and by helping the developer establish connections to the database that they can use in their programs. Most people who want to connect to a database from a C# program will want to complete the steps outlined in this post before they begin developing a database centric application.
The text is divided into several sections.
- Installing the Northwind Database.
- Establishing a Connection to a Database using SQL Server Manager Studio
- Establishing a Connection to a Database using the Server/Database Explorer
SQL Server Management Studio has a rich, powerful, intuitive interface. The Server/Database Explorer has a substantial subset of the functionality of SQL Server Management Studio but the interface is not as rich or as intuitive. It can, however, interact with other tools in Visual Studio in a simple drag and drop manner that is not possible when using Management Studio. Especially while you are learning what each tool provides in the way of services, I recommend installing and using both tools.
Installing the Northwind Database
If it is not already installed on your system, you can download the Northwind database from the Microsoft web site. By default, the install of the Northwind and Pubs sample databases creates a directory called C:\SQL Server 2000 Sample Databases. A copy of the Northwind database and a script to recreate the database are located in this directory.
Viewing Northwind in SQL Server Management Studio
SQL Server Management Studio ships as part of SQL Server and SQL Server Express. Alternatively, the SQL Server Management Studio Express can be downloaded from the web.
After running the install for the Northwind database, you will probably want to attach to the Northwind database from Management Studio. Press F8 to go to the Object Explorer shown on the left in Figure 1. Right click on the Database node and choose Attach. In the Attach Databases dialog choose the Add button. Now browse to the C:\SQL Server 2000 Sample Databases directory and select NORTHWIND.MDB. Click OK twice to install the database. When you are done you should be able to see the database in the Object Explorer, as shown in Figure 1.
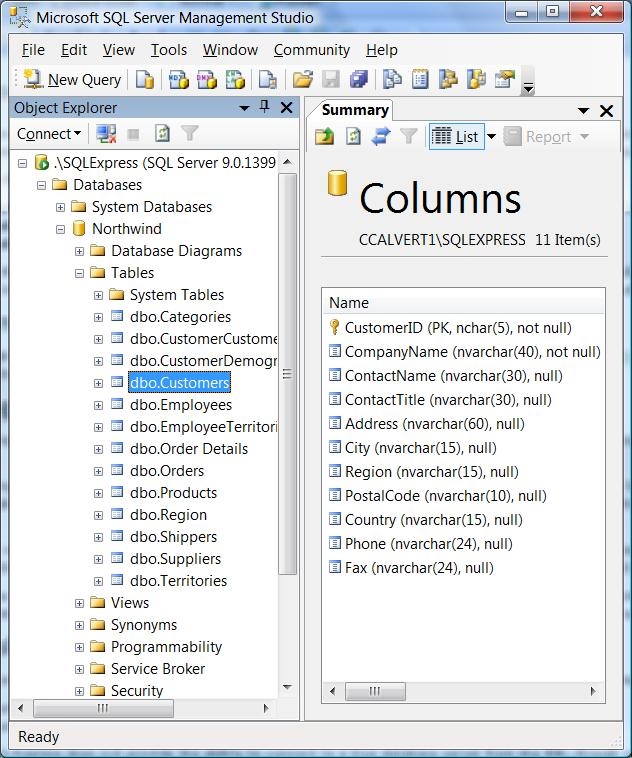
Figure 1: Viewing the Northwind database in SQL Server Management Studio. The Object Explorer is shown on the left, details about the Customers table are shown on the right.
Over time, you might delete or alter important data in the Northwind database. To restore the database, browse to the Northwind install directory and double click on the text file called instwnd.sql. This will open a script in Management Studio. The script is written in something called DDL, which stands for Data Definition Language. This particular script provides a complete description of all the metadata in the Northwind database, and also all the rows of data found in the database. Press the Execute button to run the script and create or recreate the Northwind database.
NOTE: If you are using Vista, you may have to take an extra step to avoid getting errors when running the script. First close any running copies of Management Studio. Select the Vista Start button and right click on Management Studio and choose "Run as Administrator." Use Management Studio to browse to the script and open it. You should now be able to run the script without errors. After running the script, press F5 to refresh the view of your databases in the Object Explorer (F8).
Establishing a Connection to a Database from Visual Studio
There are tools in the Visual Studio IDE that provide functionality similar to that found in SQL Server Management Studio. The name of power of these tools differs depending on your version of Visual Studio.
- Visual Studio Express ships with the Database Explorer.
- Visual Studio Professional and up ship with the Server Explorer
The Database Explorer found in Visual Studio Express does not provide the ability to connect to a true database server from the IDE. The Server Explorer found high end versions of Visual Studio can connect to SQL Server Express, to a local server, or to a remote server. Both Server Explorer and Database Explorer are discussed in this post. Visual Studio Express does not provide any limitations on connecting to database servers from your code at runtime; it is only the Database Explorer which has limitations. Further information can be found on MSDN.
The next two sections of the text describe how to connect to a database from the Database/Server Explorer. The first section describes connecting to a database file. This works in all versions of Visual Studio. The second section describes connecting to a server, and it works only in high end versions of Visual Studio.
Connecting to a Database File
Open up Visual Studio and press Ctrl + W, L to bring up the Database/Server Explorer. Right click on Data Connections and choose Add. The first time you select this option a dialog like that shown in Figure 2 will pop open. You can also access this dialog from the Data Source Change button shown near the top of Figure 3. In the Choose Data Source dialog you can choose to either connect directly to a Database File, or you can select Microsoft SQL Server to connect to the server itself and then connect to a database. In Visual Studio Express, only the first option is available.
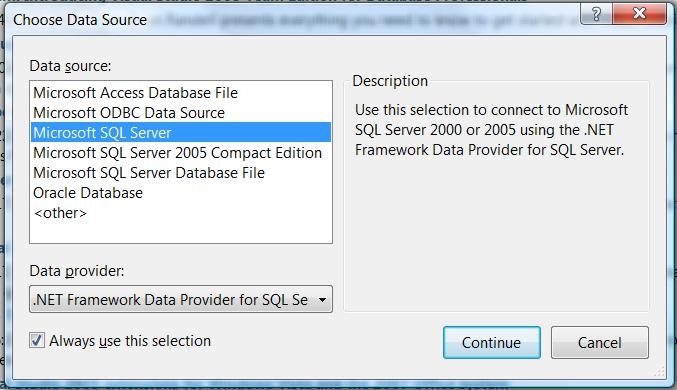
Figure 2: The Choose Data Source dialog as it appears in Visual Studio Team System. In Visual Studio Express only the options to connect to a database file will be visible.
If you choose to connect to a database file, simply click the Browse button in the Add Connection dialog shown in Figure 3. Select the file that contains your database from your hard drive. In our case, the file will be called NORTHWIND.MDF. If you just installed the database, then the path to its location is shown above in the Installing the Northwind Database section of this post.
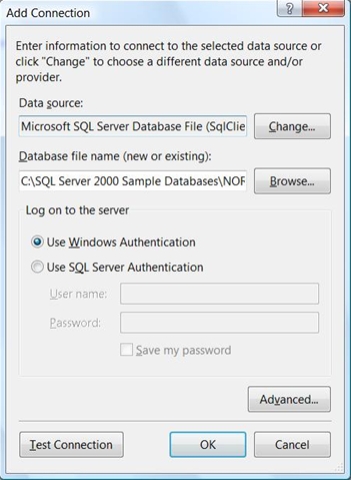
Figure 3: The Add Connection dialog in Visual Studio Express. As shown below in Figure 5, this dialog has more options in high end versions of Visual Studio.
After you click the OK button, the connection to the database will be established, and you will be able to browse the tables of the Northwind database in the Server/Database Explorer, as shown below in Figure 6.
Connecting to a Database via a Server
If you are using one of the high-end versions of Visual Studio, then you can either connect directly to the database file as described above, or else you can first connect to the server, and then connect to the database. The section describes the latter process.
From the Choose Data Source dialog shown in Figure 4 select Microsoft SQL Server. Press the Continue button.

Figure 4: Choose Microsoft SQL Server from the Choose Data Source dialog.
In the Add Connection dialog shown in Figure 5 go to the Server Name field and type in the name of your server.
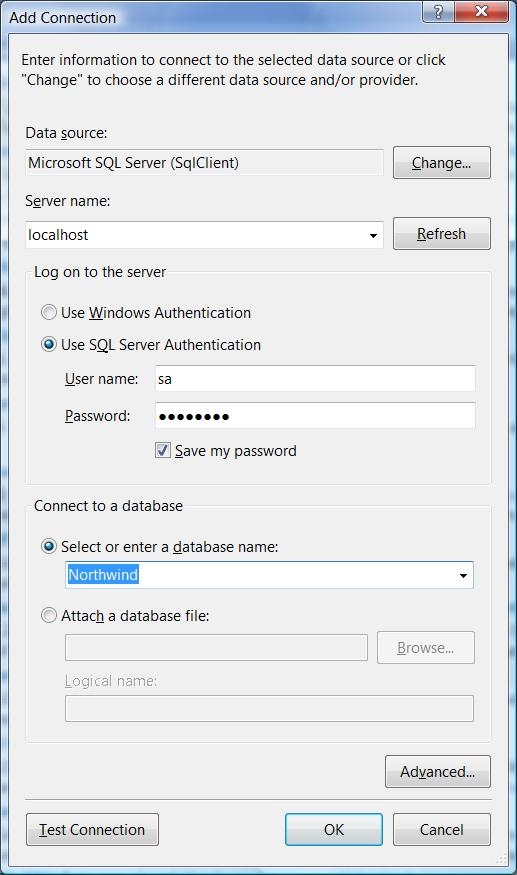
Figure 5: The Add connection dialog in Visual Studio Team System.
You will probably type one of three things in the Server name field:
- If you are using SQL Express, type: .\SQLExpress
- If you are using a local copy of SQL Server, type: localhost
- If you are using a remote SQL Server, type the name of the server or its IP address: MyServer
Choose Test Connection to confirm that you can connect to your database. If you can connect, then use the drop down list in the Connect to a database section of the dialog to choose the name of the database. In this case you will select the name Northwind from the pre-populated list. Choose Test Connection to confirm that you are properly connected. If everything is working properly, then select the OK button to close the dialog.
Viewing the data in the Explorer
The Server/Database Explorer gives you a view of your database. In Figure 6, you can see the tables from the Northwind database. Below that you can see nodes that will allow you to view Stored Procedures, Views, and other metadata.
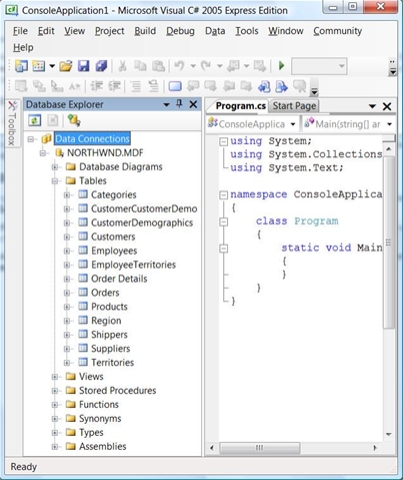
Figure 6: Viewing the Northwind database in the Database Explorer.
This view is very similar to the view you get from the Object Explorer in the Server Management Studio shown in Figure 1. You can, however, drag and drop items from the Server/Database explorer into other Visual Studio tools. You cannot do the same thing from Management Studio.
Summary
In this post you learned how to set up database connectivity on your system so that you are prepared to begin developing database applications in Visual Studio. This knowledge lays the groundwork for performing may tasks in Visual Studio, including using the LINQ To SQL Designer to create a mapping between the objects in your program and the objects in your database. Becoming familiar with the tools outlined in this post is in important step for developers who want to become comfortable developing database applications in Visual Studio.