Understanding Memory Sections in config.bib, boot.bib, and OEMAddressTable in Windows CE 5.0 and 6.0
Understanding Memory Sections in config.bib, boot.bib, and OEMAddressTable in Windows CE 5.0 and 6.0
Introduction
Windows CE uses .bib (binary image builder) files to track, among other things, the memory layout of bootloaders as well as OS images. If you’re writing a new BSP, you’ll definitely need a config.bib file for your OS, and you’ll likely need a boot.bib file for your bootloader.
Let’s take a few minutes to understand how .bib files relate to memory usage. It’s going to be muddy at the beginning, but I promise if you stick with me through the end you’ll be glad that you did. Well, maybe you won’t be glad but you’ll know more about .bib files. Let’s get to it!
OEMAddressTable
Before we look at the .bib files themselves, it’s important to understand the OEMAddressTable. This table defines the mappings between physical and virtual addresses. For MIPS and SH processors, this table is hard coded into the processor. For x86 and ARM, the mapping is defined in a variable called OEMAddressTable. Since .bib files operate largely on virtual addresses, we need to remember to reference the OEMAddressTable to address any confusion about what is happening at a particular physical address.
The table’s layout is quite simple. Each line creates a mapping of virtual addresses to physical addresses. The syntax is: Base virtual address, base physical address, size. Let’s take an example from the Mainstone BSP:
DCD 0x80000000, 0xA0000000, 64 ; MAINSTONEII: SDRAM (64MB).
DCD 0x88000000, 0x5C000000, 1 ; BULVERDE: Internal SRAM (64KB bank 0).
DCD 0x88100000, 0x58000000, 1 ; BULVERDE: Internal memory PM registers.
DCD 0x88200000, 0x4C000000, 1 ; BULVERDE: USB host controller.
So in the first line, we are mapping the 64MB of RAM at physical address 0xA0000000 to the virtual address 0x80000000. Since 64MB = 0x04000000 this means that the physical addresses 0xA000000-0xA4000000 are now mapped to virtual addresses 0x80000000-0x84000000. Likewise, we’ve mapped the USB host controller which resides at physical addresses 0x4C000000-0x4C100000 to virtual addresses 0x88200000-0x8300000.
Inside Windows CE, memory access is virtual by default. So when we access memory at 0x81005000, we’ll be accessing some physical memory in the Mainstone’s 64MB SDRAM bank. If we access memory at 0x88201000, we’ll be accessing the USB host controller, physically. If we access memory at 0x86001000, we’ll get a page fault because this virtual address has no corresponding physical address.
Now that we understand the OEMAddressTable, let’s talk about the .bib files.
Config.bib – this contains a lot of configuration info for a CE OS image. The MEMORY section is what we’ll focus on – it defines the memory blueprint for the CE image. Here are the important terms:
RAMIMAGE – This is the virtual address region that the kernel and any other components you select for your image will be placed in. This can be RAM or linearly addressable flash. Your config.bib file should have exactly one RAMIMAGE section. It needs to be virtually contiguous, and it needs to be large enough to hold whatever components you’ve selected.
RAM – This is the virtual address region of RAM that the kernel can allocate to applications and RAM-based file systems. It needs to be virtually contiguous. (If you need a non-contiguous section, you can allocate another, non-virtually-contiguous section at run-time by implementing the OEMGetExtensionDRAM function, but that’s outside our scope)
RESERVED – These are virtual address regions that are set aside – the kernel won’t allocate memory in these addresses and components won’t be placed in these addresses.
AUTOSIZE - In the CONFIG section, we have the AUTOSIZE=ON (or OFF) variable. If this variable is on, it will treat the RAMIMAGE and RAM regions as a single region, allocating just enough space to hold all of the components to the RAMIMAGE section and making the rest of the space available as RAM. This is a pretty convenient and easy way to make sure you’re getting maximal use out of your RAM. One thing autosize won’t do is interfere with reserved or unallocated regions.
Eboot.bib (sometimes known as boot.bib) – this works identically to config.bib, except we’re building a bootloader image as opposed to one with a full kernel. All of the terminology is exactly the same. The only difference is, in the case where we’re not using an MMU in the bootloader (CEPC is an example of these), the addresses will be physical as opposed to virtual. Otherwise, the layout is identical.
Bringing it together
In almost all cases, the bootloader and OS use the same OEMAddressTable. Thus, they have the same virtual address space.
This is especially useful when it comes to RESERVED regions. Since nothing will be allocated or placed in these addresses, only components that refer directly to the address will have access. That means we can use these regions for special buffers (say, DMA) or passing arguments passed in from the bootloader to the OS. It also means that, if you want, you can leave the bootloader in RAM.
Keep in mind that while RESERVED means that we won’t allocate/place components in those virtual addresses, by default if an area isn’t specified in a .bib file then we won’t allocate/place in it. This means RESERVED is really more of a comment then anything. However, it is useful in our .bib files because it helps us identify the location of special buffers and arguments so that we know not to overwrite them in other modules.
An Example
Let’s take a look at a simplified example in the CEPC BSP:
Here’s our OEMAddressTable (platform\common\src\x86\common\startup\startup.asm):
_OEMAddressTable:
dd 80000000h, 0, 04000000h
This means that we’re mapping physical addresses 0x00000000-0x04000000 to virtual addresses 0x80000000-0x84000000. That’s 64MB of RAM.
Here’s our boot.bib (platform\CEPC\src\bootloader\eboot\boot.bib):
MEMORY
; Name Start Size Type
; ------- -------- -------- ----
EBOOT 00130000 00020000 RAMIMAGE
RAM 00150000 00070000 RAM
ETHDMA 00200000 00020000 RESERVED
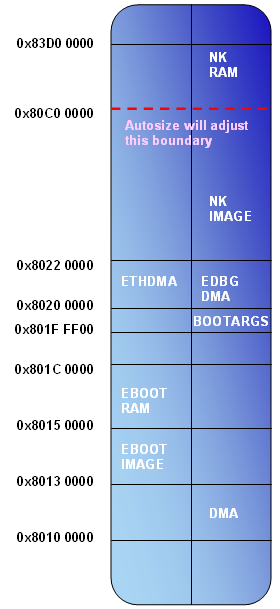
Remember the CEPC bootloader uses physical addresses. So in virtual address terms, our bootloader code is living at 0x80130000-0x80150000, with RAM available from 0x80150000-0x801C0000. We’re reserving a buffer for our Ethernet card from 0x80200000-0x80220000.
And a condensed version of config.bib (platform\CEPC\files\config.bib):
MEMORY
; Name Start Size Type
; ------- -------- -------- ----
; 64 MB of RAM (note: AUTOSIZE will adjust boundary)
NK 80220000 009E0000 RAMIMAGE
RAM 80C00000 03400000 RAM
DMA 80100000 00030000 RESERVED ; Native DMA reserved.
BOOTARGS 801FFF00 00000100 RESERVED ; Boot arguments
EDBG_DMA 80200000 00020000 RESERVED ; EDBG DMA buffer
There are several interesting things going on here:
First, our OS image (NK) starts at 0x80220000, and RAM resides directly above it. That means we’re not allowing any components or allocation to write below 0x80220000, and thus our bootloader code is protected.
Second, note that we have also reserved some regions. The EDBG_DMA corresponds to the same addresses that the bootloader reserved. This way we can make a smooth transition from bootloader to kernel without worrying about the contents of this memory being tampered with.
Another region has been reserved from 0x80100000-0x80130000. This is very close to the start of our bootloader. If we reserved even a byte more, we would not expect our bootloader to continue to be executable after we boot the OS. However, since the bootloader’s address space isn’t referenced by any region in config.bib, we know that it will remain untouched by the OS. This way we can jump back to the bootloader code during a warm reset, if desired.
We’re not required to keep our bootloader in memory, though. We could easily place the bootloader (in boot.bib) at the end of the RAM space (in config.bib). This way after the image was successfully downloaded we could allocate memory over the top of the bootloader and make full use of all of our system RAM. What you don’t want to do is intersect the bootloader with the RAMIMAGE part of config.bib – this means you’ll overwrite the code you’re running to download, during download!
Finally, notice we have a special reserved region called “boot arguments”. If we at the CEPC’s bootloader we will see that it writes explicitly to the (physical) 0x001FFF00-0x002000000. You’ll also notice this isn’t used anywhere in the boot.bib layout. That means we can be assured it will be untouched (unless, of course, something else in the bootloader writes explicitly to that address range).
This is how we pass arguments from the bootloader to the OS – the OS can read directly from 0x801FFF00 and be assured that the kernel won’t tamper with it because it is RESERVED. Technically, we could have indicated that area as RESERVED in the bootloader as well.
Hopefully this has given you some insight into .bib memory layouts.
update: In response to a comment generated by this entry I'd like to point out that the virtual addresses used in both OEMAddressTable and config.bib must fall between 0x80000000 and 0xA0000000 - the kernel virtual memory space reserved for cachable access.