Getting your app ready for submission to the Marketplace.
Get ready for submitting your app with this checklist and instructions. Getting of Icons, images, blurbs and the actual app package ready for deployment worldwide!
This is a series of two blog posts. One for getting ready and one for submitting your app to the marketplace.
Remember to register for the Developer Movement. Each app you publish earns you great rewards!
There are a couple of things you need to do to ensure that your app will pass the certification process. I have created a list and walkthrough of the stuff you need to address before submitting.:
1. Replace the placeholder images in your app.
There are three placeholder images included in your project.
You will need to have your own to be able to submit to the marketplace. Here are the specs:
- ApplicationIcon.png
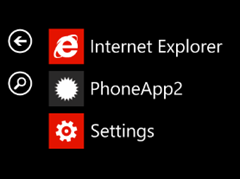
Make sure your app has its own 62x62 image in the PNG format. It is the picture appearing on the left of your app’s name in the App list menu.
- Background.png
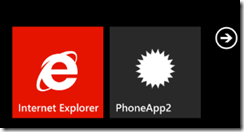
When you pin an app to the start menu, the image appearing will be the Background.png. The name of your app will appear on the left bottom corner of the image. Make sure not to occlude it. Good design principles recommend to keep the logo in the center.
This is a 173x173 PNG image. Once you start playing around with live tiles and push notifications, you will notice that counters can also appear, as well as other text.
One little trick I learned to make your app look native and professional is to have your logo in white and then leave the rest of the image transparent. This will make your tile be the color of the theme chosen by the user. This trick also works on the Application Icon.
- SplashScreenImage.jpg
This is the image that appears when your application is loading. It should be used for displaying your brand and not have much text.
it is a 480x800 JPG image, it cannot have any transparency. and it is not necessary to have, but it does keep the feel of the app in a more professional level.
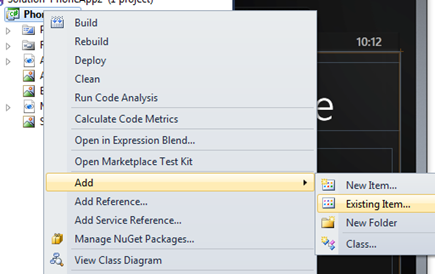
After having created these pictures with your awesome designing skills, go to visual studio, right click on the project and select Add Existing Item
navigate to your images and add them. Make sure to delete the old ones.
Just to double check, right click each image and select properties. make sure that the build action is “Content” and the copy action is “Copy if newer”
However, the names of the images don’t need to be the same as the template (except for the SplashScreenImage.jpg.
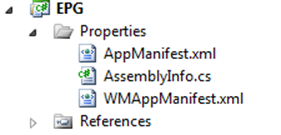
You can also double click on the Properties folder in your project.
The screen that opens up will let you choose the background and the icon from a drop down of the pictures that are included in your project.
2. Match your App’s capabilities in the App Manifest
if you click the expand triangle of the properties folder in your project you will see a file called WMAppManifest.xml. Open it.
Once in there you will be able to change a couple of things, but the only one you need to are the following:
- In the app tag <App> you will find the fields author, description and publisher. Change them to something appropriate.
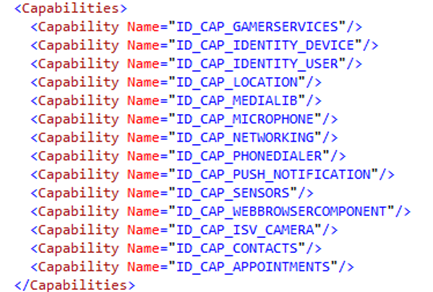
- Take a look at the capabilities:
They are all included by default. In the case that your app doesn’t use a particular, delete it.
Here is a quick description of each one in the list, but you can read more here
- Gameservices = your app uses the Xbox Live API.
- Identity_Device = your app accesses the hardware number of the user’s device.
- Identity_User = your app accesses the user’s id information.
- Location = your app accesses the user’s location or uses the GPS.
- MediaLib = your app accesses the media library of the user (songs, videos, podcasts, etc.)
- Microphone = your app uses the microphone in the device.
- Networking = your app transfers information over the a network (in case data plans are required.)
- PhoneDialer = your app dials phone numbers.
- Push_Notifications = your app uses push notifications.
- Sensors = your app uses the gyroscope, microphone, accelerometer, GPS or any other sensor in the device.
- WebBrowserComponent = your app uses the webbrowser API.
- Camera = your app uses the Camera
- Contacts = your app accesses the user’s contacts on the phone.
- Appointment = your app accesses the user’s calendar.
This is an important. Don’t just leave all of them in there, nor remove the ones you use from the list.
In one hand, If you remove say “sensors” and you use the gyroscope, your app will not pass certification. On the other hand, If you leave everything on your calculator app, then the user will be freaked out that you are going to access his identity, contacts, media library and location for no reason. This information appears when you download any app. Microsoft takes care of securing a user’s security, and as a developer you should care as well for your users.
Once all of this is done, you should build your project for distribution.
3. Building your project for release
This is very simple process. Go to the top bar of visual studio. you should see these two drop down boxes. Choose Windows Phone Device and Release.
then go to to build and click on build solution.
This should have created a release version of your xap file. (this is the file you will upload to the Marketplace).
In the Solution Explorer, right click on your project and select “Open folder in Windows Explorer”; the second to last option.
Navigate to Bin/Release/ and you will find yourapp.xap there.
There are unfortunately, two common mishaps in this part. A couple of people, including myself, have had a hard time to find those two drop down boxes. if after selecting the project and and trying other toolbars to show up you don’t find it, you will have to reinstall visual studio. The problem occurs when installing visual studio, I happened to select a non developer view of the workspace that hides this toolbar. I haven’t found a way to make it show again, so for now you will have to reinstall VS.
The other issue that presents itself is when it tells you that some release libraries can’t be found. Most of the time, you can track them down manually, but if this doesn’t work, try reinstalling the phone tools or visual studio.
your projects should not disappear if you reinstall the programs ![]()
You have now an app ready to be published, the only thing left to do is to get the marketing goodies ready too.
4. Marketing images and blurbs.
You need to create the following PNG Images for the Marketplace:
- 173 x 173 icon.
- 99 x 99 icon.
- 200 x 200 icon.
These three images are for the different locations where your app appears on the Online Marketplace and the Zune software marketplace.
4. 1000 x 800 Wallpaper
This one will be used as the marketplace background on the phone when your app is featured, and sometimes as the background in the Zune software download page for your app.
5. at least one and up to eight screenshots 480 x 800
you have to use the emulator for this.
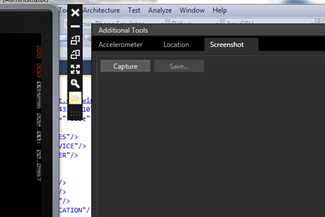
click on the little “ >> " that appears when you place your mouse pointer on the top right outer side of the emulator. Then click the Screenshot tab. Navigate to the different locations in your app. and click capture and then save. Make sure you zoom into a 100% zoom level. otherwise your screenshots won’t be accepted. to do that click on the magnifying glass above the “>>” you just clicked.
Blurbs
Write down the following blurbs:
- Short description (25 characters).
- Detailed description. - This appears in the phone marketplace under the show more space, under the short description.
- keywords that match the theme of your app for SEO.
Doing this will really speed up the process and save you a lot of anger moments in case something goes wrong during submission.
Now you are completely ready to submit your app.
Check my next blog post on the submission process here.

