Introducing XNA: A Tri-Platform Game Development Framework – Part 2
Introducing XNA: A tri-platform game development
framework – Part 2
In part 1 of this series, we set up a tri-platform XNA
solution that can be deployed to three platforms simultaneously. While the cornflower
blue screen we saw in the previous part is a truly breathtaking achievement, in
this part we’ll write a little bit of code to make our game do something.
XNA is a game
development framework. Games often render stuff. Therefore, if A = B and B = C
and Albatrosses feed on both fish and krill, then we must conclude that by the
end of this article we’ll be drawing something!
Be sure to download the space ship model included in this
article. This model was stolen borrowed from the AppHub catalog, where
it is used in numerous XNA samples.
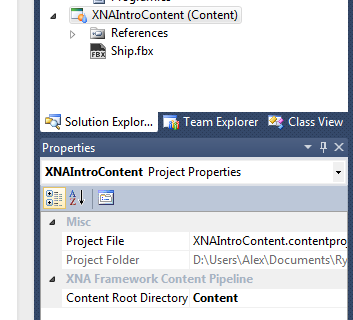
Open up the solution that we created in part 1 and brace
yourself for the extremely complex and time-consuming process of importing the
model into our project. Ready? Drag-and-drop Ship.fbx and ShipDiffuse.tga
directly into the XNAIntroContent
project in Visual Studio. Right-click
on ShipDiffuse.tga and click Exclude From Project. You’re done! While
you might be relieved to know how quick and simple the process really is, you
are probably wondering why we excluded the texture from the Content project.
ShipDiffuse.tga
is Ship.fbx’s UV map – a texture
that is mapped on to the model when it is rendered in 3D. It is referenced
directly by the model file, which means that the Content Pipeline will be aware of its physical location on disk during
build time. When we drag-and-dropped the two files into the Content project,
they were physically copied to the project’s folder, where they are expected to
be. Since the texture is used by the model, we don’t need to load or use it
explicitly in our project, hence its exclusion.
Inclusion of the texture in the project would not cause any technical
issues, but it will be built twice (once by the model’s processor and once by
the default texture processor) resulting in a warning, “Asset was built 2 times
with different settings”.
Now that we have the model in our content project, let’s
write some code to load it and draw it on the screen. We’ll begin by declaring
a field for it:
public class Game1 : Microsoft.Xna.Framework.Game
{
Model ship;
...
public Game1()
{
graphics
= new GraphicsDeviceManager(this);
Content.RootDirectory
= "Content";
}
...
}
You’ll notice that the ContentManager’s RootDirectory
property is set to “Content”. This is to reference the name of the Content
project set in the Content project’s properties under Content Root Directory.
This means that if you have two or more Content projects
in one solution, the ContentManager
of each game project could have its RootDirectory
property set to the desired Content project name.
Let’s use the ContentManager
to load our model. In the LoadContent() method add:
ship = Content.Load<Model>("Ship");
The string Ship
is the relative path to the asset in the Content project (our model in this
case) minus the extension. There is no need to add Content in the path. Note that ContentManager’s
Load method is generic and can therefore be used to load any type of an asset,
including models, sounds, textures, XML files and custom types.
Now that we loaded our 3D model, we want to draw it. In
the perfect world, this would be done by simply calling a Model.Draw() method
that would somehow magically read our minds and draw the model just as we want
it. In the real world, things are not quite as simple.
First, we need to use a number of Matrices to define various properties needed to draw a 3D scene.
Add the following matrix declarations after your model.
Matrix world;
Matrix view;
Matrix
projection;
Before we do anything else, a quick rundown of what each
Matrix is and what it does:
- The world
matrix defines the positioning of the 3D model in world space. Multiplication
by the world matrix achieves the effect of transforming the model from its own
space (object space) to our scene (world space). - The view matrix
defines the view parameters of the virtual scene camera. This matrix often
determines the view direction as well as the orientation of the camera about
the Up Vector (the vector that specifies which way is “up”) - The projection
matrix specifies how the 3D scene is projected on to the final frame that
eventually makes it to our screen. In the – more common – perspective view,
this often means specifying the field of view, aspect ratio of the
frame/viewport, and the near/far planes, which will result in a view frustum.
We’ll set these parameters in the LoadContent() method. Right
after loading our model, add the following:
world = Matrix.Identity;
view = Matrix.CreateLookAt(Vector3.Backward * 5000.0f, Vector3.Zero, Vector3.Up);
projection = Matrix.CreatePerspectiveFieldOfView(MathHelper.PiOver4,
GraphicsDevice.Viewport.AspectRatio, 1.0f, 10000.0f);
We set the world matrix to identity, which essentially
translates to the world’s “origin”. We specify the “3D origin” (Vector3.Zero) as the target (this is
where our model will be), place the camera an arbitrary distance backwards (Vector3.Backward
* 5000.0f) and specify the positive Y-Axis as the camera’s “Up” direction (Vector3.Up).
Our projection matrix will have the aspect ratio of the viewport (GraphicsDevice.Viewport.AspectRatio),
Pi over 4 radians (or 45 degrees) field of view, and fairly arbitrary value for
the near and far planes.
The reason for so many arbitrary values is due to the
limited scope of this article. Their exact meaning is simply not important
here.
We are ready to draw our model. Add the following private
method in the Game1 class:
private void DrawModel(Model
model)
{
foreach
(ModelMesh mesh in
model.Meshes)
{
foreach
(BasicEffect effect in
mesh.Effects)
{
effect.World = world;
effect.View = view;
effect.Projection =
projection;
effect.EnableDefaultLighting();
}
mesh.Draw();
}
}
This method does three simple things. The first foreach loop iterates over all of the
meshes in the model. The second loop iterates over each effect; where the all of the mandatory and optional parameters are
set. In actual fact, foreach Effect in
ModelMesh.Effects is a shortcut for iterating over each MeshPart and setting each MeshPart Effect individually. Needless
to say, this is definitely not within the scope of this article.
The third and last step
is drawing the mesh with mesh.Draw() .
Notice that we make use of our three key matrices – world, view and projection
– to set the three properties required to correctly draw the geometry (but not
necessarily the color and lighting) of the model. We also use EnableDefaultLighting() method to light
our model using the Three-point lighting method
(https://en.wikipedia.org/wiki/Three-point_lighting).
We’re almost ready to
draw, but there is one last piece of the puzzle missing in our drawing code. We
need to account for transforms that
were applied to each mesh when the model was created. The transforms are specified in each Bone of the model. The collection of Bones defines the mesh hierarchy where each mesh has a relation to
its parent, and the transform
specifies the mesh’s transformation relative to its parent. For example, if a
tree model has a mesh for each of its branches, then each branch (and
ultimately the leaves) will be positioned relative to a parent branch.
We look up the transforms with two simple lines of
code:
Matrix[] transforms = new
Matrix[ship.Bones.Count];
ship.CopyAbsoluteBoneTransformsTo(transforms);
And then account for
each transform when multiplying by
the world matrix:
World = transforms[mesh.ParentBone.Index] * world;
Our final drawing code
now looks like this:
private void DrawModel(Model
model)
{
Matrix[]
transforms = new Matrix[ship.Bones.Count];
ship.CopyAbsoluteBoneTransformsTo(transforms);
foreach
(ModelMesh mesh in
model.Meshes)
{
foreach
(BasicEffect effect in
mesh.Effects)
{
effect.World =
transforms[mesh.ParentBone.Index] * world;
effect.View = view;
effect.Projection =
projection;
effect.EnableDefaultLighting();
}
mesh.Draw();
}
}
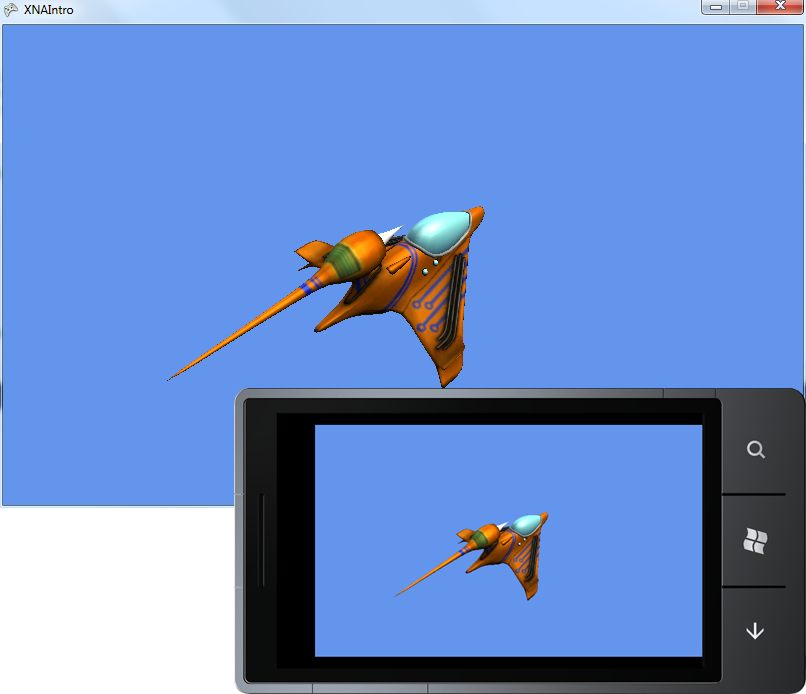
Let’s draw our ship by
calling the DrawModel(ship) in the
Draw() method of the Game1 class:
protected override void Draw(GameTime gameTime)
{
GraphicsDevice.Clear(Color.CornflowerBlue);
// TODO: Add
your drawing code here
DrawModel(ship);
base.Draw(gameTime);
}
By this point, you might
be wondering which platform this code was meant for. After all, we have three
separate projects, which will be built for three separate and architecturally
unique hardware platforms. You might even be convinced that at least some
conditions must be placed in code to ensure that it runs on three different
CPUs and is rendered by three different GPUs.
Oddly enough, it is with
this concern that I would like to formally welcome you to the wonderful world
of XNA – a true, tri-platform game development framework.
Stay tuned for part 3!