Managing your projects with SharePoint Workspace
With march break over and school starting (again), we will soon be overwhelmed with homework assignments, essays, quizzes, tests and everything else in between. However, while we might think that this sound horrible, we often forget the dreaded project, where not only do we need to work, but we also need to manage our time in such a way that accommodates others as well. This is when the true nightmare begins. Unreceived e-mails, forgotten deadlines, without forgetting the printer exploding when we most need it (and it does happen, contrarily to popular teacher beliefs) are few of the many problems that affect the project that was once destined to be “the best project of the class”. That’s when SharePoint Workspace 2010 comes in.
Setting up your SharePoint project
With SharePoint Workspace (formerly known as Groove 2007), you can solve most of your team communication problems with relative ease. SharePoint Workspace allows you to share documents, chat with colleagues, share pictures, start a discussion and even play Chess (in your free time, of course).
Creating a workspace is fairly easy. All one has to do is start the application, and from the ribbon, select “New”, then “Groove Workspace”.
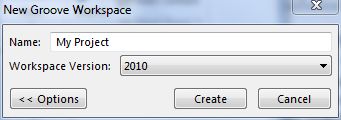
Once the dialog box appears, you can name your workspace (here, I called it “My Project”) and select the version that you want. (The 2010 version is not compatible with Groove 2007, so if you have someone on your team who has Office 2007 with Groove, you might want to change 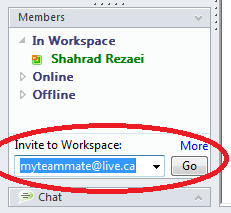 the default settings).
Once you are done, you can select “Create”, and start grooving!
Once your workspace created, you are presented with the workspace, in the Document tool. But before we start anything, we might want to invite a teammate first. SharePoint Workspace simplifies this with an “Invite to Workspace” field, right in the “Members” pane. So I will go ahead and enter my teammate’s e-mail there. As soon as I do this, a dialog box appears where I can choose his role (“Participant”, “Manager” or “Guest”) as well as a little message to go with the automatic e-mail. Once the e-mail is sent, all I have to do is wait. One of the great things with this is that my teammate does not need to have Office 2010 in order to join the workspace. The e-mail contains a link to a 120 day trial, which can be used to access the workspace, so that even if the other person does not have Office, he or she can still access the workspace.
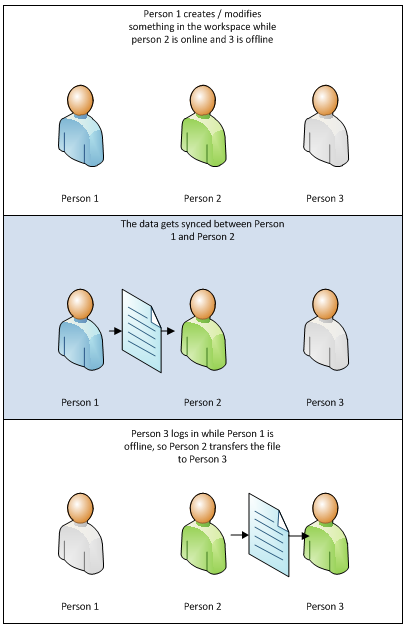
Also, I should point out is that there is no server here. So, when someone modifies something within the workspace, it is not immediately syncronized. The application will send the modifications to the other users when the other users and you are online simultaneously. If one person is offline, the other users who have received the new information can also serve as a relay for the file in the event that the person who originally transmitted the file is offline at the time. This can be a difficult concept to understand, but it is an important one, so I’ve illustrated the final case here, with 3 people in a workspace.
Main user interface
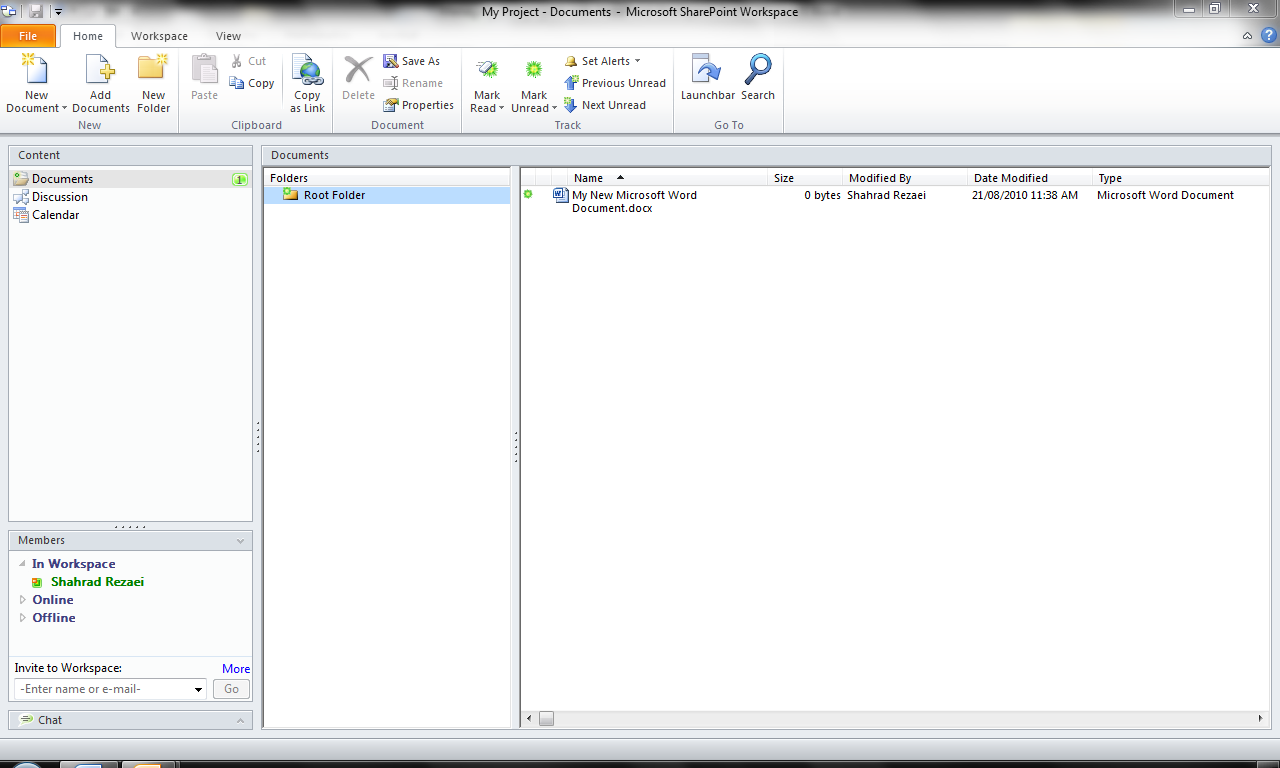
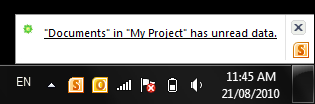 Once your friend has joined, it’s all systems go! The first thing you will notice is that, as all Office applications, it retains the same look and feel, with the ribbon and the “File” menu, so that first time users will already feel at home here. When your workplace is first fired up, you will be presented with is the main section of the page, which will be in the “Documents” view by default. Here, you will add your documents and files that you want to share with your teammates. It acts just like when you browse your documents on Windows. This is a very nice alternative to sending fifty e-mails back and forth just for documents. Groove automatically updates files as they are modified and indicates when someone has changed or added a document via a notification on the bottom right side of your screen.
The right panel
The right pane is very important. There are 3 elements worth our attention: the Content pane, the Members pane and the Chat box.
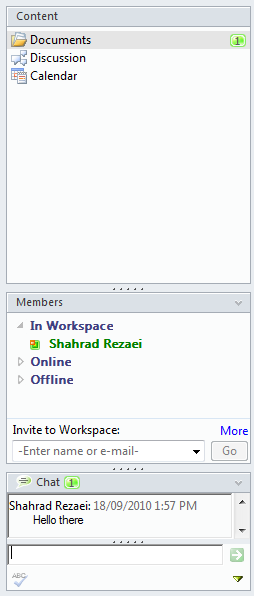 The Content pane
The content pane is where you will find the different tools you can use. By default, you have the Documents too, which we discussed earlier, the Discussion tool, which acts as a mini forum and the Calendar tool, where you can set important dates for everyone to see. You might notice the little green bubble next to the Documents line. This indicates that someone is viewing that tool right now (in this case, me). This can be useful to track down where everyone else in your team is, but it is important to note that these tools are not meant to instate a dictatorship. Don’t go overboard. You want to complete a project, not make enemies.
The Members pane
The Members pane is where you can see the status of everyone in your project. The members are separated in three groups:
<!--[if !supportLists]-->· <!--[endif]-->“In Workspace” means that they are currently in the workspace;
<!--[if !supportLists]-->· <!--[endif]-->“Online” means that they are logged in, but not in the workspace. (i.e.: Groove is minimized in their taskbar.) They can still receive notifications;
<!--[if !supportLists]-->· <!--[endif]-->“Offline” means that they are not logged into SharePoint Workspace. They cannot receive any notifications.
You can also right-click on anyone’s name to bring out a context menu (a context menu is the menu that appears when you right click on something, just in case you were wondering…) with interaction options with that person, such as sending a message, changing their roles or viewing contact information.
Chat pane
The chat pane, on the bottom right, allows you to chat in real time with your collegues. It’s very simplistic in nature and doesn’t allow you to do fancy stuff like Messenger or other dedicated IM applications do, but it does its job very well. You can also click on the arrow on the bottom right of the pane to access additional options, such as save a transcript of the chat pane, clear the chat pane, etc. Additionally, you can apply the basic stylistic effects by using the following shortcut keys:
Internal Messaging
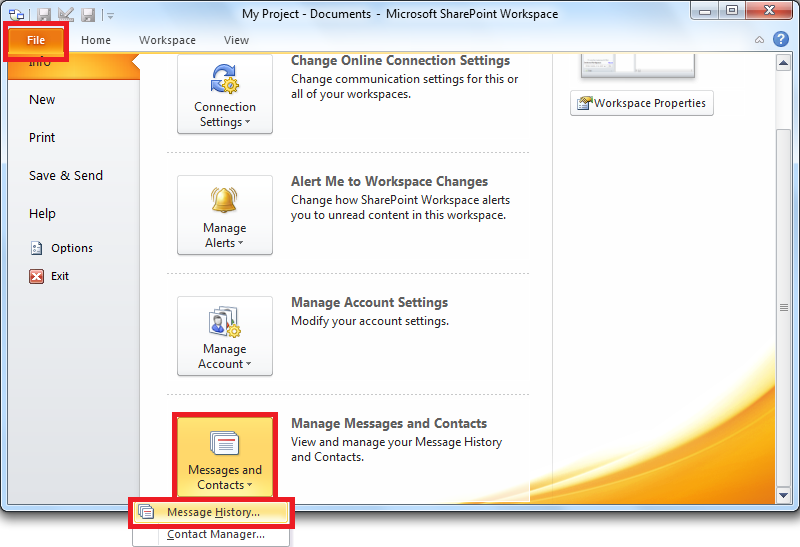
SharePoint Workspace has an internal messaging system, which allows you to send messages in the same way you would send e-mails to people. What’s nice is that since it’s internal, you don’t need to clutter your inboxes. All e-mails pertaining to the project are within Groove itself. While sending them is easy as pie, viewing your messages isn’t that straightforward. To send messages, you simply need to click on “Send Member Message” in the Ribbon, under “Workspace”. To view the messages you’ve received, select “File”. Once in Backstage View, under “Info”, select “Messages and Contacts, then “Message History”.
The Tools
Groove works with something called tools. Tools are like mini-apps within Groove that allow you to accomplish specific tasks. They are actually so important that you cannot have a (useful) workspace without them.
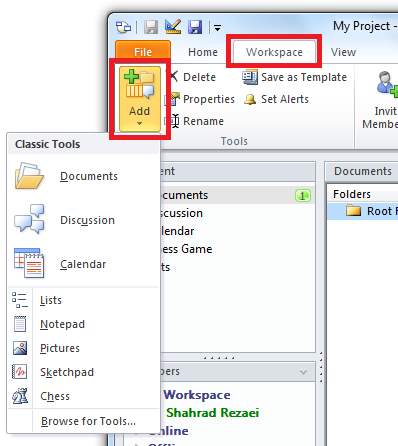
When you create a new workspace, you have by default three tools: the Documents tool, the Discussion tool and the Calendar tool. There are more, which you can add as you can go. To do so, you go to the “Workspace” tab in the Ribbon, select “Add”, then select the tool you want to add.
For the purposes of this post, I’ll go over the basic ones: the Documents tool, the Discussion tool and the Calendar tool.
The Documents tool
The documents tool serves as a place to store and share your files. It works similarly to a basic file system. To the left, you have your folder tree, and on the right, the documents within the selected folder.
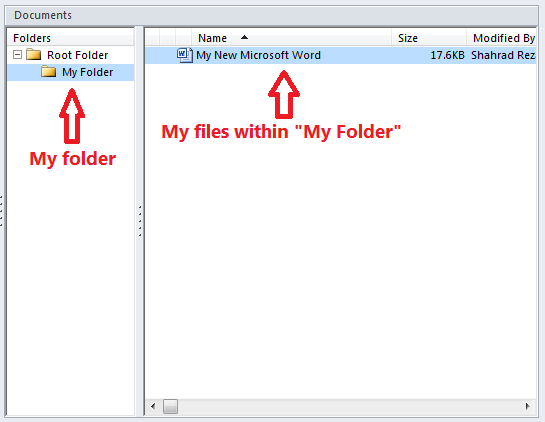
You can add new files or folders within the selected folder by right clicking in the selected area by right clicking in the white area in the right area and selecting the appropriate file or folder under “New” in the context menu.
Otherwise, you can add new files or folders in the workspace through the ribbon. In the “Home” tab, under the “New” section, you have three options: “New Document”, “Add Document” and “New Folder”.
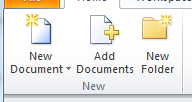
<!--[if !supportLists]-->· <!--[endif]-->New Document allows you to create a new document. The options shown in the menu that appears correspond to the ones that appear in the Windows context menu under “New”. Note however that you can add any kind of document in Groove, but you need to make sure that everyone has the appropriate application to view the document.
<!--[if !supportLineBreakNewLine]-->
<!--[endif]-->
<!--[if !supportLists]-->· <!--[endif]-->Add Documents allows you to select an existing document on your hard drive and add it in the tool.
<!--[if !supportLineBreakNewLine]-->
<!--[endif]-->
<!--[if !supportLists]-->· <!--[endif]-->New Folder creates a new folder.
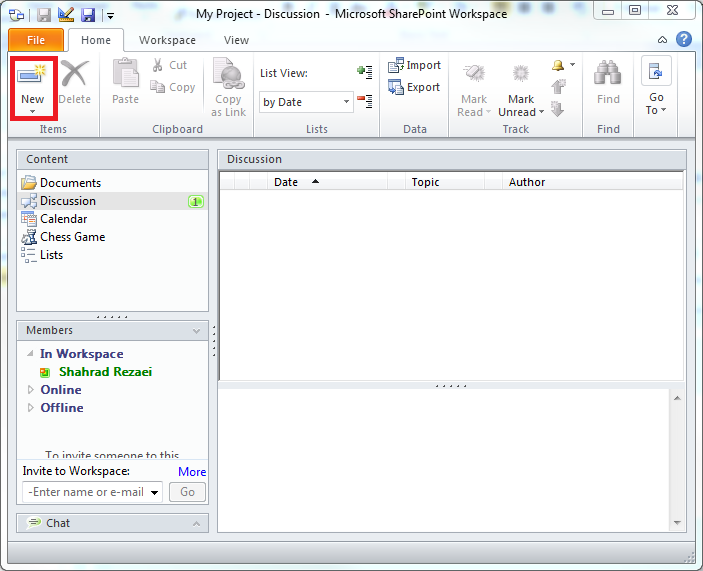
The Discussion Tool
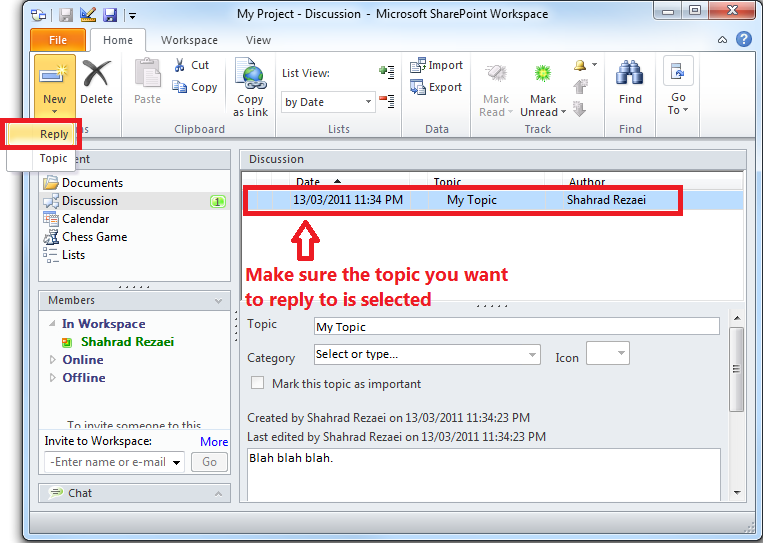
The Discussion tool acts as a forum within the workspace. People can post topics within the tool and others can reply. You can do so again through the Ribbon by selecting “New”, then “Topic” to create a new topic or “Response” to reply to a selected topic.
By selecting “New Topic”, you are presented with the following window:
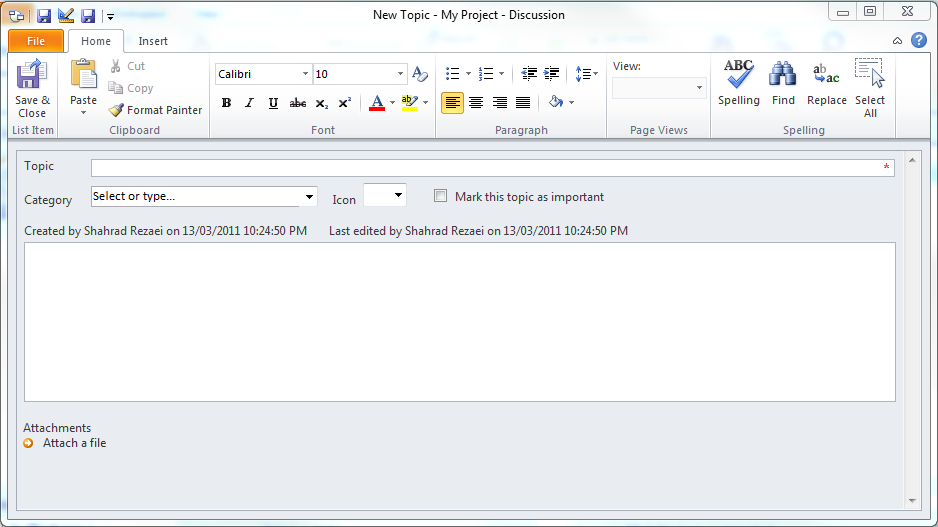
This is pretty straightforward, so I won’t go in depth for the explanations. Note that you can add attachments to the topic, which is a pretty nifty feature.
In order to reply to the topic, you need to select it within the tool and select “New” → “Reply”. Make sure the topic or response you want to reply to is selected before you select Reply. Otherwise, the option will be greyed out.
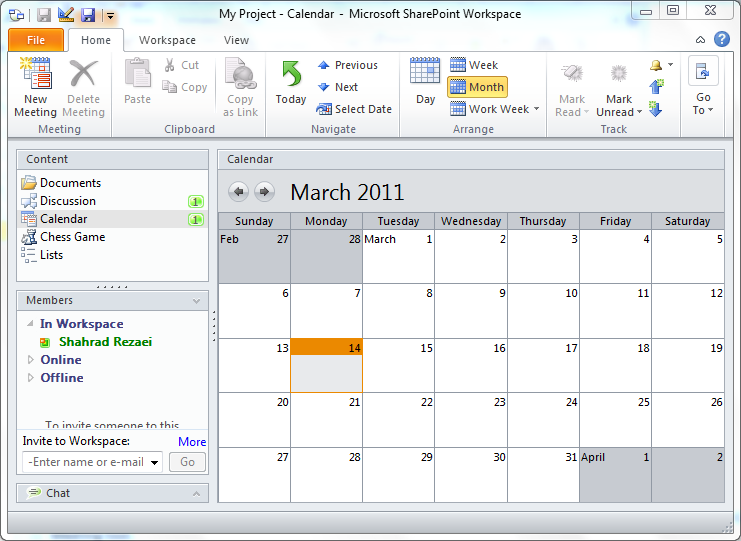
The Calendar Tool
The Calendar tool is used to schedule meetings. Those of you who’ve used Groove 2007 will notice that this new Calendar tool is a mix of the old Calendar tool and Meeting tool.
If you create a new meeting by selecting “New Meeting” in the Ribbon, you will be presented with a straightforward form to fill up. However, on the Ribbon, you will notice four icons: “Meeting”, the view you get at the beginning, “Agenda”, “Notes” and “Summary”.
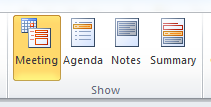
Using these, you can go into more detail, putting the items to be discussed in the Agenda view, or adding notes in the Notes view, and viewing a summary of the meeting in the Summary view. (Note that the summary must be generated by selecting “New Summary” in the Ribbon.
In conclusion, I hope this post helps you all get a head start on SharePoint Workspace 2010. As usual, if you have any questions, feel free to leave comments, and I’ll do my best to answer them as best I can. Now all we need is Microsoft to find a way to stop the printers from exploding at the last minute…