Introducing XNA: A tri-platform game development framework – Part 1 By Alexander Yakobovich - MSP
If you do a quick search for XNA tutorials, you’ll notice that the majority of articles introduce XNA as either a platform-specific (PC, Xbox or Windows Phone 7) tool or a completely generic (platform independent) game development framework. Introduction of the framework on all three platforms simultaneously is rare perhaps due to the – supposed – complexity that it will add to a “beginner level” tutorial.
In reality, getting started with XNA on all three platforms at the same time is fairly simple.
This is the first part of a series of articles that introduces XNA as a true tri-platform framework. Using the same codebase we will create and deploy a simple 3D XNA game to all three platforms simultaneously. To keep the introduction as elementary as possible, I’ll walk you through the differences in syntax and solution organization, omitting advanced fundamental differences between the three platforms such as performance considerations.
If you haven’t already done so, head over to create.msdn.com and grab XNA Game Studio 4.0. Visual Studio 2010 Express is included with the full XNA package. Although, the distribution is branded as “Windows Phone Developer Tools”, it includes everything needed to develop for PC, Xbox 360 and Windows Phone 7 devices. If you’re a student, be sure to grab Visual Studio 2010 Professional from DreamSpark (www.dreamspark.com). Professional edition of Visual Studio is not strictly required for XNA development. It is, however, highly recommended given that it allows you to install useful third-party tools and add-ons.
Getting started:
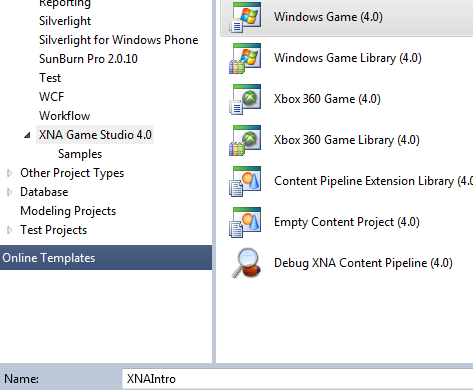
Let’s begin by creating an XNA project. In Visual Studio, go to File -> New -> Project…

Select Windows Game under Visual C# -> XNA Game Studio 4.0. Alternatively you could select either Xbox 360 Game or Windows Phone Game, but for this tutorial I’ll use a Windows Game as the base project. To stay consistent with this tutorial name your project XNAIntro.
In the Solution Explorer (View -> Solution Explorer if you don’t see it), you’ll notice the solution, having the same name as the base project, is at the very top of the hierarchy. This is standard Visual Studio solution organization, and much like any other .NET project, XNA application structure adheres to it. Inside the solution, we already have two projects, XNAIntro and XNAIntroContent. XNAIntro is the main game project where your game code goes. Its name is bolded to indicate that it is the start-up project; the project that will launch when you start a debugging session. XNAIntroContent is the content project; its type is also known as the Content Pipeline. All your game assets (models, textures, sounds, etc) go into this project. We’ll look at the Content Pipeline in a little more detail later.
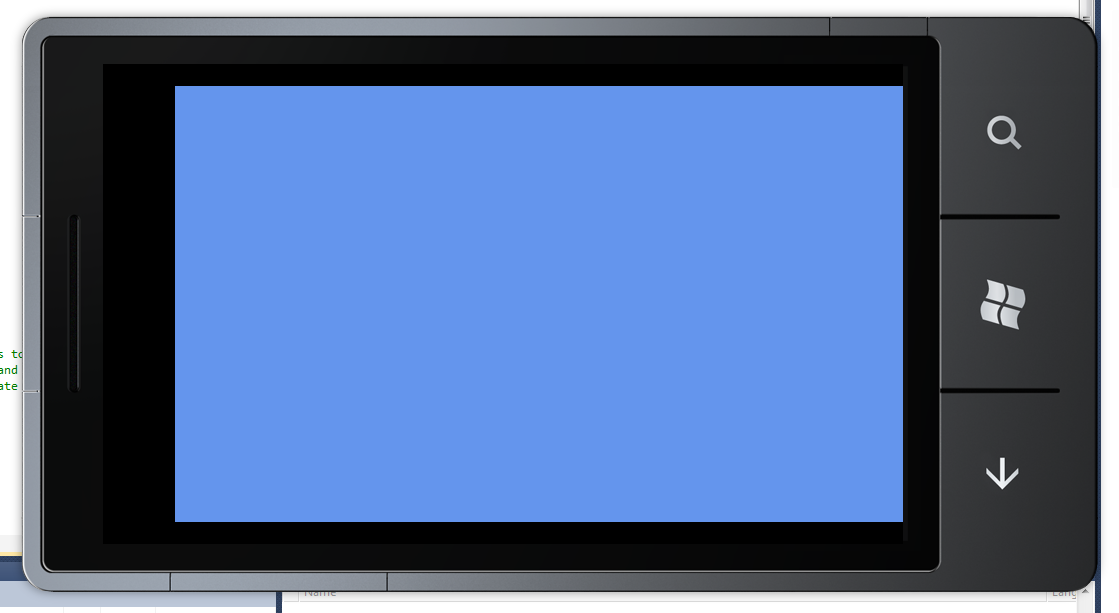
At this point, your project is ready to be launched. You can go ahead and start debugging (F5). You should be greeted with a blue (better yet, Cornflower Blue) window.
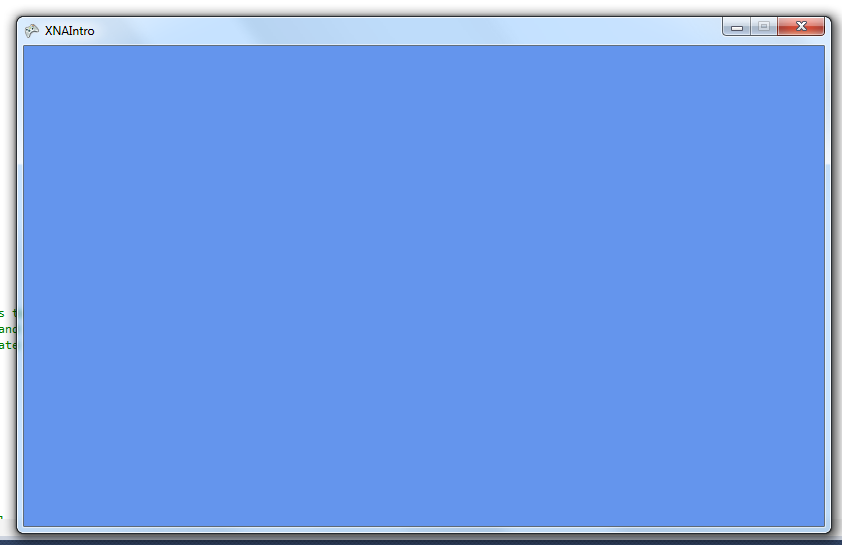
You can think of this screen as the “Hello, World!” of XNA. It indicates that XNA is properly running and you’re all set to begin development.
Expanding to multiple platforms
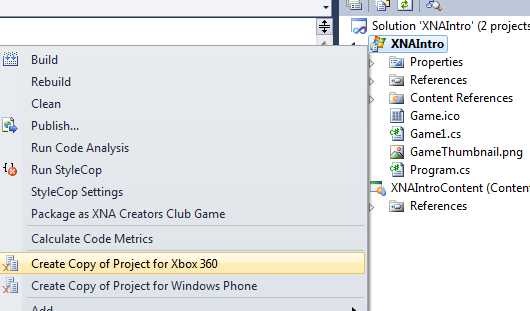
Before we write a single line of code, we can already create projects for other platforms. Let’s create an Xbox version of our project and deploy it to an Xbox. Right-click on XNAIntro project and select “Create Copy of Project for Xbox 360”.
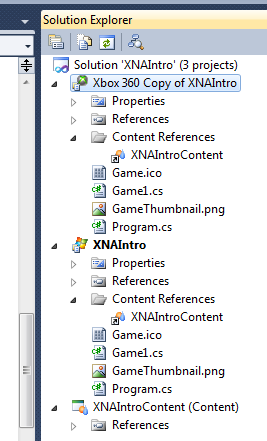
The new Xbox version of the project will reference the same files found in the Windows version.
Files that are not needed on other platforms, can be excluded (Right-click a file -> Exclude From Project) from the perspective projects. For example, if you have a class that is exclusive to mouse input, it can only be used in the Windows version of the application, so it can be excluded from the Xbox project. However, exclusion of assets and code files that are used elsewhere in the project will result in build errors. For such cases, we’ll use selective inclusion/exclusion within code. More on this in part 2.
Since the new project is in the same solution as the base project, it can reference the same Content Project that our Windows project references right now.
In fact, any project can reference any other project within the same solution. This is both convenient and important for reusable components and complex solutions such as game engines. A project that is referenced by another project is a dependency and will be built by Visual Studio before the project that references it. Two projects cannot reference each other, as this would create a circular dependency. Generally speaking, a project of one platform should not reference a project of another platform. There are a few exceptions to this rule, particularly when dealing with the Content Pipeline.
In our case, the new Xbox project automatically referenced the Content project that was created along with our Windows project.
Go ahead and create the Windows Phone project the same way you created the Xbox project (Right-click on either XNAIntro or Xbox 360 Copy of XNAIntro and select “Create Copy of Project for Windows Phone”).
Deploying
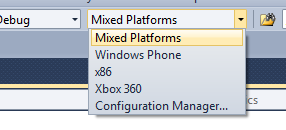
Under Solution Platforms (Right-click on any toolbar -> Standard if you don’t see it), the three platforms that we are targeting can be selected individually. By default, Mixed Platforms option is selected and will target all platforms in our solution.
Go ahead and build the solution (F6). You’ll right away notice that we have a number of warnings.
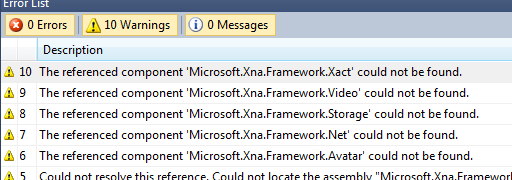
No need to panic! The problem is really simple and the solution is even simpler. Visual Studio is simply letting you know that the assemblies in question are not available on the platform you’re targeting. In our case Avatars, XACT, and a number of other XNA features are not available on the Windows Phone. Therefore, we will simply remove them. Note that the project that is the source of the warning (or error) is shown in the Project column.
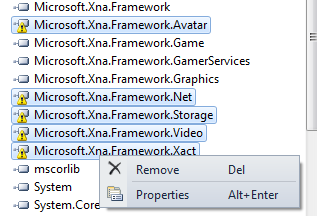
Expand the References folder in the Windows Phone project and select all of the references to be removed. Visual Studio already marked them for you with a yellow exclamation mark. Simply right-click on any of the selected and select Remove.
Rebuild the project and the warnings will disappear. We can now deploy our application to the three platforms. Only the start-up project will be launched for a debugging session. You can change the start-up project by right-clicking on any project and selecting Set as StartUp Project. As with other applications, the project must have a static main method in one of its classes in order to start. For the Windows phone project, the class that derives XNA’s Game class will automatically become the start point. More on this in part 2.
We can now go ahead and start debugging. With Mixed Platforms selected, Visual Studio will automatically deploy to all three platforms. On the PC the process of “deploying” is nothing more than outputting the game executable, its dependencies and content to the bin folder in the project directory. For Windows Phone, Visual Studio will package all of the aforementioned things into a XAP package. After packaging it will deploy the XAP to a Windows Phone device or emulator. In our case, Visual Studio will automatically launch the Windows Phone 7 Emulator. Note that the emulator requires a DirectX 10 or higher video card.
Since there is no Xbox emulator, the project must be deployed to an actual Xbox 360, which at this point will result in the following error.

You will need to setup XNA Game Studio Connect in order to deploy to an Xbox 360. Up-to-date instructions for doing this are available here: https://msdn.microsoft.com/en-us/library/bb203929.aspx. Note that the Xbox must be on the same subnet as the PC deploying to it, which is often the case if both the PC and the Xbox are connected to the same router. Internet connection is also required in order to deploy.
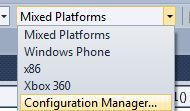
If you do not have an Xbox, you can still build the Xbox project but need to skip the deployment process. To do this, select Configuration Manager… under Solution Platforms.
Under Deploy uncheck the box for the Xbox 360 copy of the project.
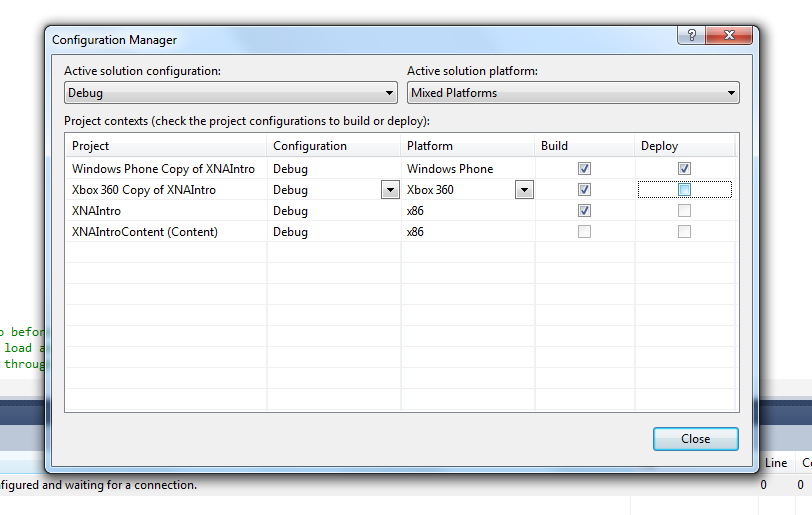
You project will still build and all corresponding warnings and errors will be exposed, but Visual Studio won’t attempt to deploy to the Xbox. This means that you won’t be able to debug the project.
Since we already launched the application on the PC, let’s launch it on the phone emulator this time. Select the Windows Phone project as the start-up project and start debugging. You’ll be greeted with the same Cornflower Blue screen that you already saw with the Windows version.
If you did setup XNA Game Studio Connect on the Xbox, be sure it is running. Select the Xbox project as the start-up project and start debugging. While the size of this project is small, a large project might take a while to deploy for the first time. Subsequent (incremental) builds will be significantly faster, since only the changes will be deployed.
And that’s all there is to it! In just a few easy steps you created an XNA game and deployed it to three platforms. It’s not much of a game, in fact it’s nothing more than a solid color screen but it is a start. In part 2, get ready for a bit of code.