How to use Visual Studio Online to Streamline Your Application Development with Agile Methodology
Have you ever worked on a personal project with some cool people you met in class and then 6 months later you ended up with a half-boiled mess of a codebase and feature-set that was nigh unusable? More than likely, what your project was missing was direction. In a project with no form of work tracking and organization, it can be easy put essential work off and focus on what seems easy or interesting.
Using Visual Studio Online’s Agile collaboration tools, you can keep your team on track to finish the features that are most essential. VSO organizes your tasks and workloads based on Agile methodology, allowing your team to plan and focus on completing your software project as opposed to having each team member complete functionality at their own discretion.
Prerequisites
- You will need an Azure subscription
- Students are eligible to obtain certain Azure benefits for free through a student Azure account. To access it, they first need to first activate their DreamSpark subscription, which is also free. No credit card is required.
- Anyone can access a free one month trial of Azure here. A credit card is required, but it will not be debited.
- Best suited for use with Visual Studio (the IDE)
Creating your Visual Studio Online resource
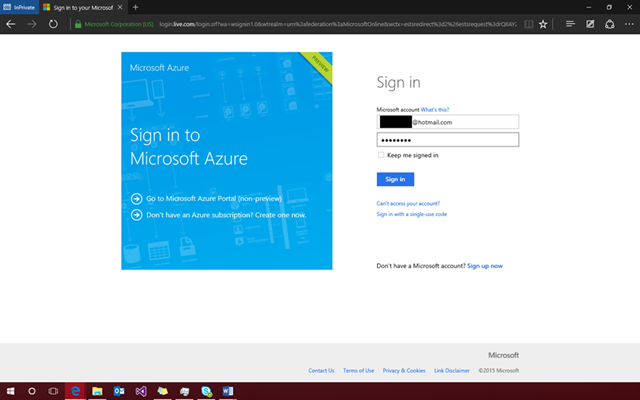
Open your browser and visit portal.azure.com and sign in using your DreamSpark Azure enabled email. You will be redirected to complete the sign-in process.
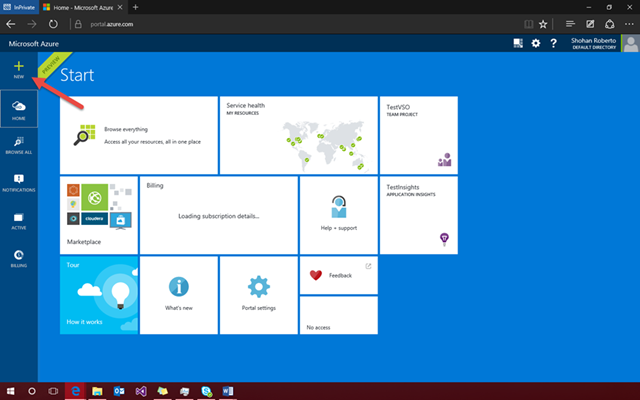
Once logged in, you will be brought to the Azure portal page, which is the starting point for any Azure adventure. Go to the top left corner and click NEW.
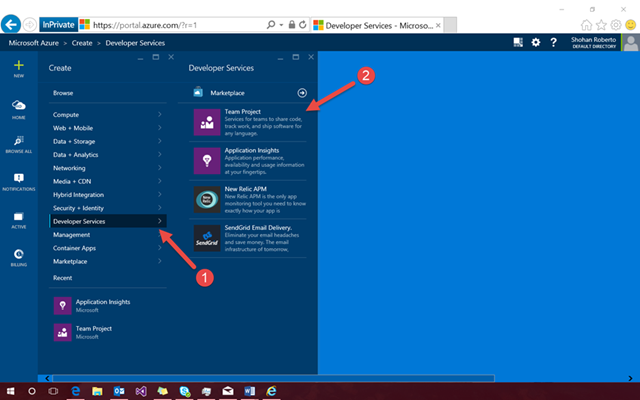
Then click on Developer Services followed by Team Project
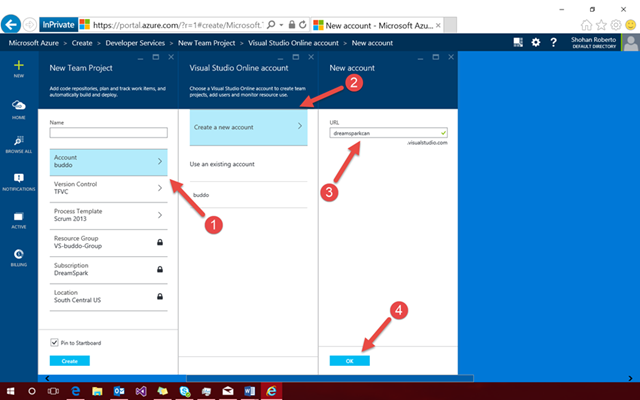
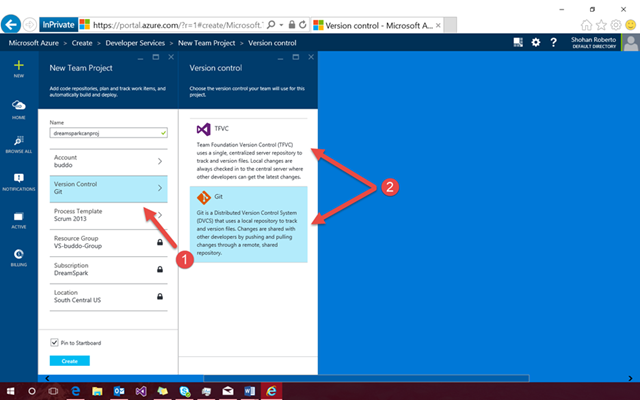
The setup should be straightforward. Give a name for your Team Project resource. There’s nothing particular you need to do when you name it. It’s purely for your convenience when browsing your various Azure services and will be the project name for your Visual Studio project.
You will also have to create a Visual Studio Online domain, where your project will be hosted. You may already have an account, but for the purposes of this demo I will demonstrate how to create a new one. Click on Account, followed by Create a new account and then choose a relevant domain name and enter it in the URL box. If you visit this URL later, you can get an overview of your Visual Studio Online services. Remember to click the OK button to save the domain name.
For Version Control, you can choose your preferred implementation. The primary difference is that TFVC has a centralized server where everyone makes commits whereas git uses a distributed system where everyone has a local repository which is eventually merged into the master shared repository. For most of your projects, the difference won’t be critical.
It suffices to leave Process Template in its default settings. Scrum 2013 is a popular implementation of the Agile methodology and a good choice for learning how to use Visual Studio Online.
Once you are done, click Create. After a few moments, you should be navigated to the Team Project resource page.
Using Visual Studio Online to collaborate
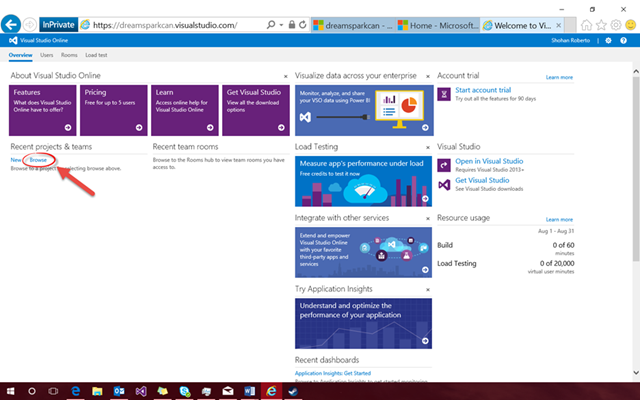
Head over to the web address of the account domain you just created. For example, we created the address dreamsparkcan.visualstudio.com earlier in the demo, we will now visit this address.
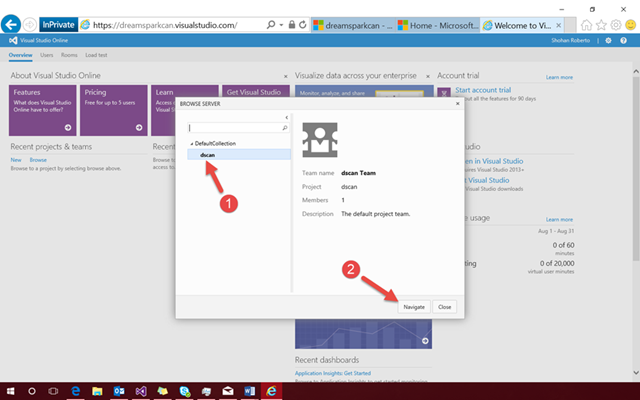
This is the entry page to your Visual Studio Online account. You can go here to access all your team projects. Click on Brows under Recent projects & teams to find the team project you just created.
Select the project under DefaultCollection then click on Navigate.
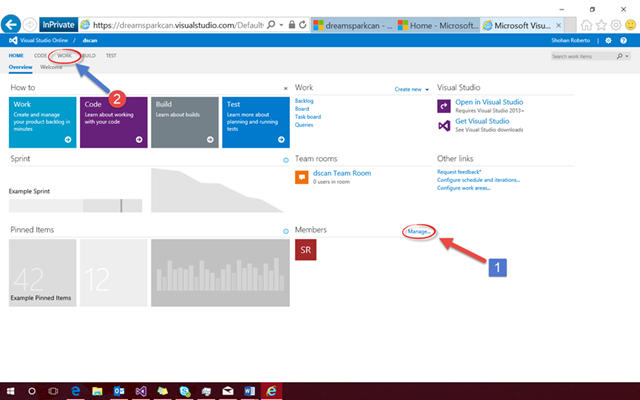
This page is your project portal. You can manage various aspects of your project through the portal, but for the purpose of this demo, we will focus on the collaboration tools. Before we can collaborate on a project, we need to add other members to our project. Click the Manage link next to the Members title (Follow only step 1 in the below picture). 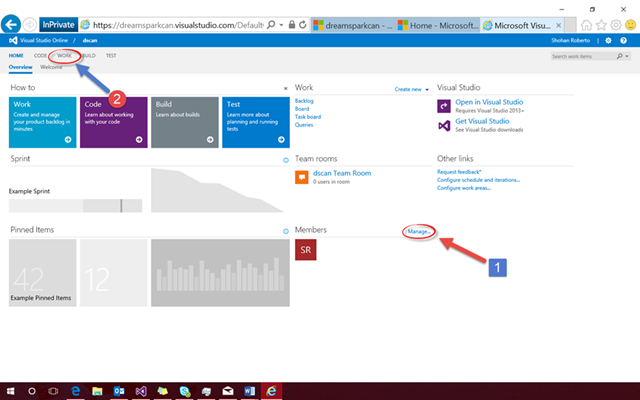
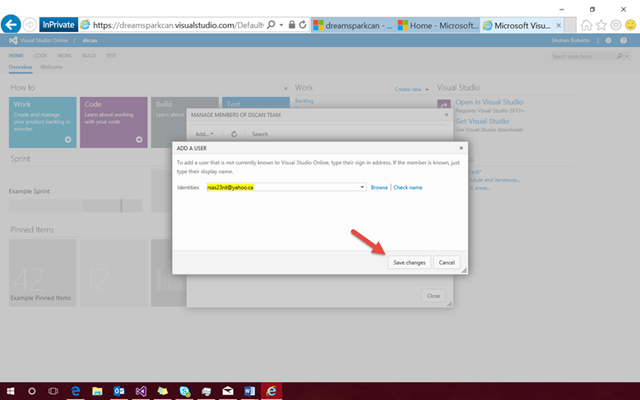
You can enter the email address of a team member you want to include in your project and then click on Save Changes to confirm. Note: the student version of Visual Studio Online only permits for 5 team members including the project owner
Going back to the portal, we can now click the Work tab to enter the collaboration view (Step 2 in this picture).
We start of in the backlog view. The Backlog is where we organize our work items. It is a sort of enhanced to-do list geared towards managing tasks necessary to progress on a project. The backlog will help us keep track of where we are in our project and is applicable at any stage of the project development, from ideation to shipping.
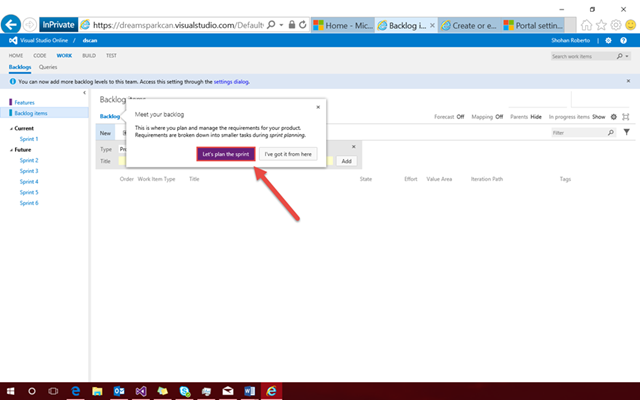
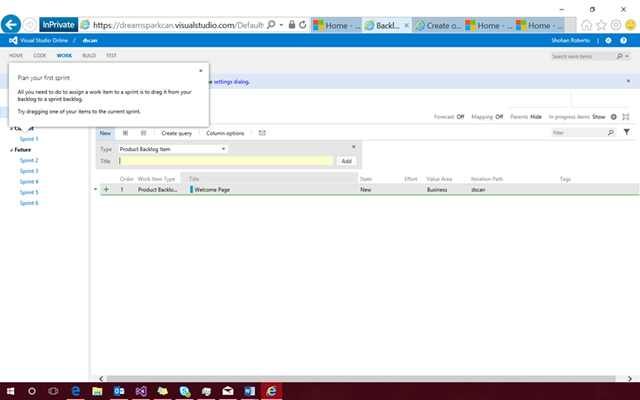
The first time you use it, you will likely be greeted with the quickstart tutorial. Click Let’s plan the sprint to get started.
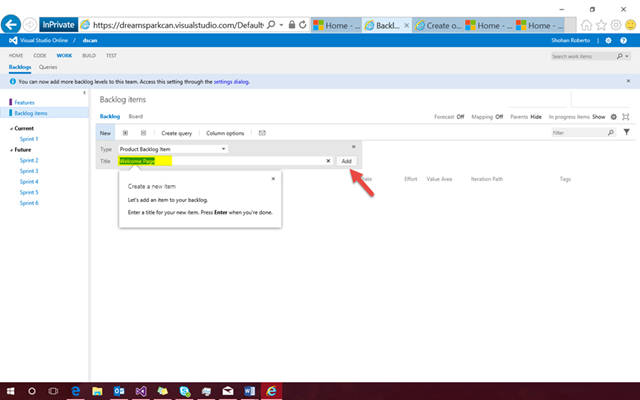
In the backlog we add things that we need to work on or create in our software. An example of such can be creating an about page for our website development project, a ‘Like’ feature for our social network, or updating a certain aspect of a game’s graphical engine. In our demo, we will some sample work items for a fictional website. It suffices to write the name of the item next to Title and then click add.
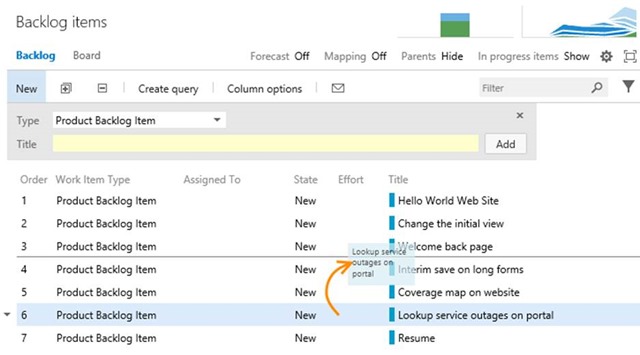
We can organize the backlog items by priority. Just move one item on top of another.
You’ll be asked to move your move your work item on Sprint 1, which you should do. A Sprint is a subset of work items you’ll be handling in a given duration of time. This duration of time is to your team’s choosing, but is typically about 2 weeks. During a sprint, all work items must be completed, such that the end product is a stable release. This encourages a team to only incorporate the most essential functionalities into a product.
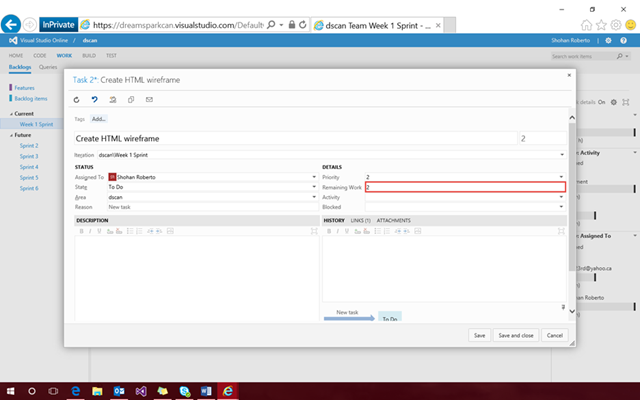
Once in the sprint, you’ll be asked to add Tasks to your work item. Tasks allow you to break down your work item into more concrete steps. Use this to separate something like create a ‘Welcome Page’ into sizeable technical goals such as ‘Add header-menu’, ‘localize into French’ and ‘standardize across form factors’.
In the task editor, you’ll also have the option of adding various details such as a description and who the task is assigned to. For now, of particular interest is the Work textbox. Work represents the number of estimated hours to complete a task. This estimate should be updated regularly to help your team plan the amount of free time it has to complete additional tasks.
For our demo task, it suffices to add a Name, an amount of Work and then click Save and Close.
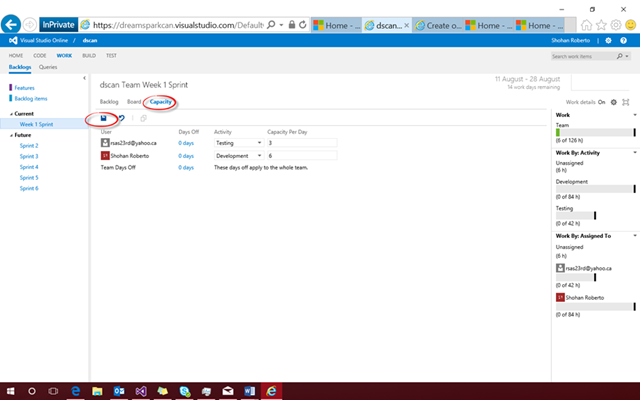
In the Sprint page, there’s a Capacity tab that allows us to set us the hours per day that each team member will be willing to commit on the project. This allows us to designate the total amount of hours we have in a week. After settings in Capacity Per Day, remember to click save (the floppy disk icon).
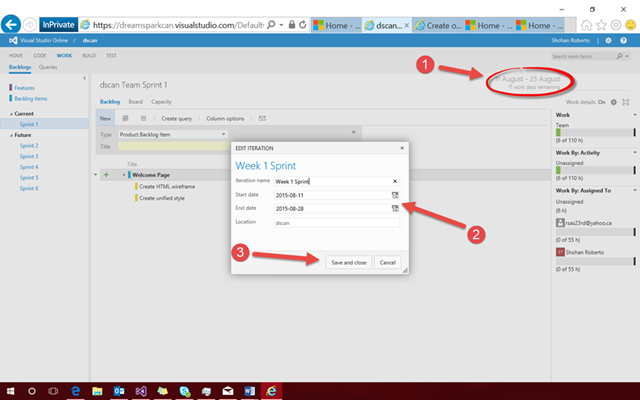
Now going back to the Backlog tab of your current sprint, we can click on the sprint target dates in the top right to modify our sprint duration. Do so if you’d like a sprint duration other than 2 weeks. Set the start and end dates for the current sprint then click Save and close.
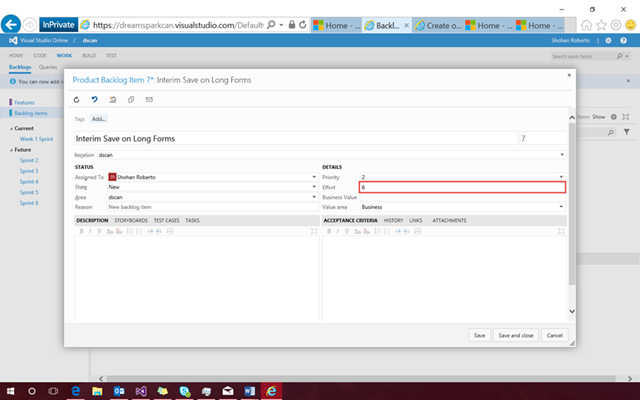
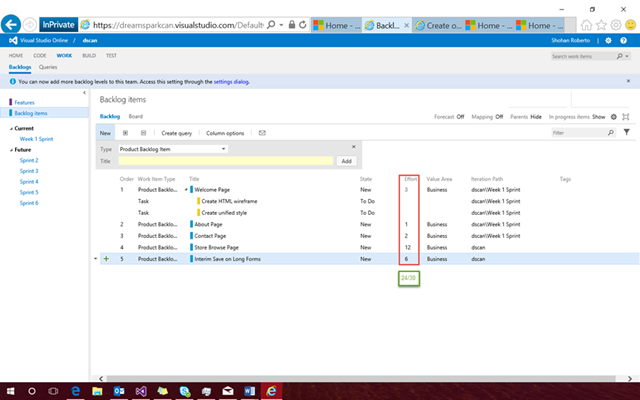
Clicking on a work item, we see that we can also detail them similarly to tasks. Of particular interest to us is the Effort textbox. Effort sometimes known as Story Points is a measure of how difficult it will be to finish a certain work item. A work item of choice is usually given a reference effort value and then we can compare other work items to it in order to determine their necessary effort.
A team typically decides on a set amount of effort points to allocate in a sprint, otherwise known as your team’s Velocity. If the total amount of effort points exceed the velocity, just drag back work items to the backlog.
Once the planning of your sprint is finish, you can go to the Board tab of your Sprint page, where you can start to burn down the work (an expression in Scrum methodology). Use the board to track and discuss the progression of your features. Take Task cards (in yellow) from the To do column and set them in the In Progress column when you’re working on them and finally in the Done column when you are finished. This moves the work item of your backlog as well. The hours on top of each column will give you an idea of how much work you have left in your current sprint.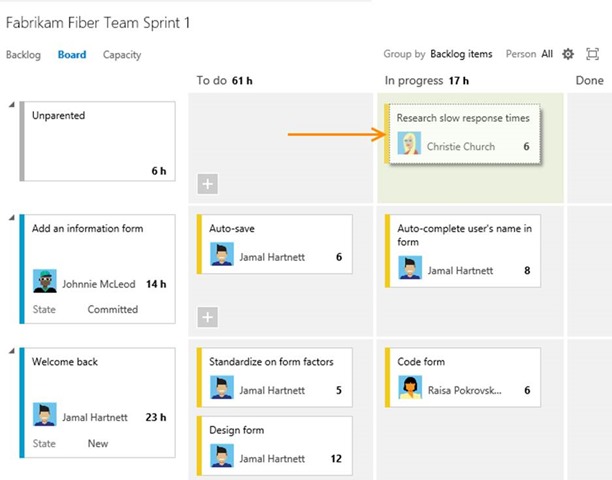
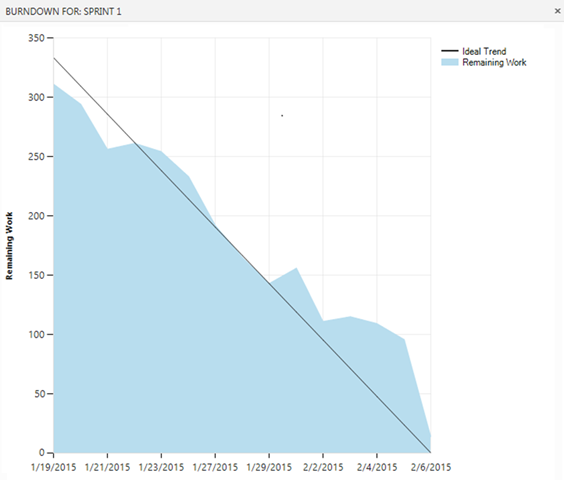
Another useful future in tracking down the progression of your sprint is the burn down chart. Click on the chart next to the sprint target dates on the top right of the Sprint page (the chart icon likely looks like a blue bar at the moment)
The chart shows an ideal trend for the amount of work you should have done over time. The blue area represents the amount of work you have left over time. Ideally, you should strive to keep it under the black line indicating the ideal trend.
