Visual Studio Code for Mac developers: Git
Version Control is a “must” even for simple projects. That’s why in the next posts I am going to discuss how to integrate Visual Studio Code with Git and use github and Visual Studio Online as a remote provider for Git.
Visual Studio Code supports local and remote Git repositories but right now we will discuss local Git repositories only. And first of all we need to install Git on our Mac (if you still don’t have it).
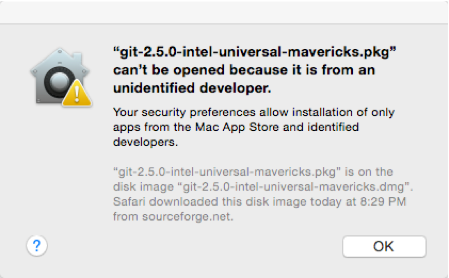
I know at least two ways to install Git: using the following link or from Terminal window. If you decide to install Git directly from git-scm.com, you need to simply download the package and run the pkg file from there. But if you don’t change security settings, probably you will get the following window:
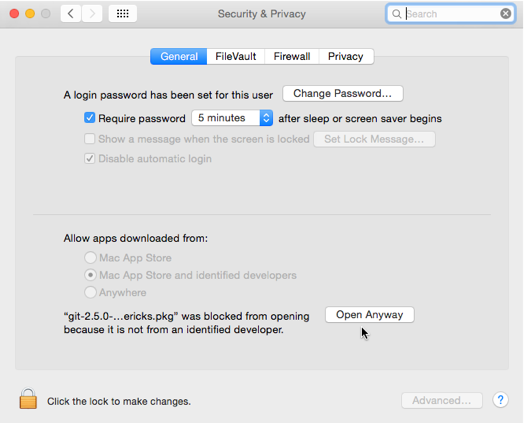
In order to fix the problem you should open System Preferences -> Security & Privacy and allow to run the package. You should not change any parameters there because Mac OS will notify you about the latest blocked package and you can simply click Open Anyway button there:
The second way allows using Terminal window to install Xcode command line developer tools. Simply open the Terminal from Visual Studio Code by activating context menu there for any file and calling Open in Console menu item.
In the Terminal type Git and click Enter. You will get the message that Xcode tools are not installed and suggestion to install them. In this case you will not have any problems with security. Git tools will be installed directly from Apple. It’s not always the latest version of Git but it will successfully work with Code.
Pay special attention that once you install Git you need to restart Visual Studio Code.
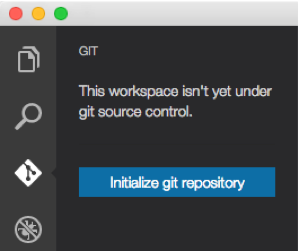
Once Git is installed and Code is restarted you will be able to activate Git for current workspace (folder) by clicking Initialize Git repository in GIT view.
And that’s all. Now you can work with Git locally. Using GIT view you can see what files are changed. After clicking them you can review the current and the previous versions of the file:
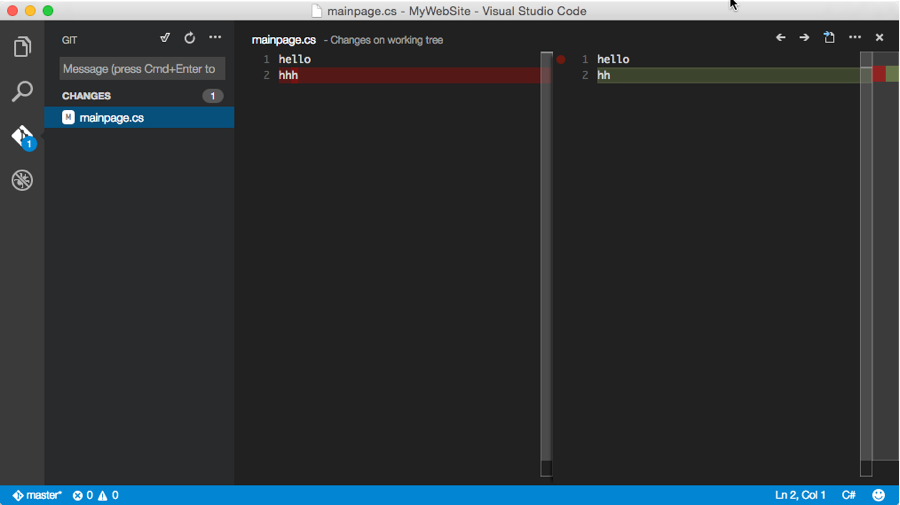
Code editor is smart enough to highlight all changes.
Working with files locally you have access to the standard commands. By clicking any file and activating the context menu you can put the file on stage:

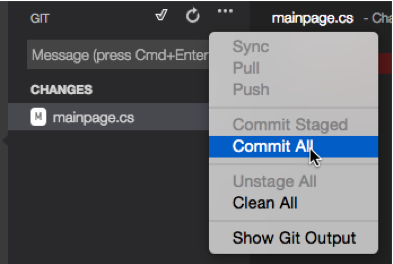
And using the menu at the top of the GIT view you can commit changes or get access to Git output:
Finally, clicking the branch name in the status bar you can open command line for git tool.

Using the command line you can execute only two commands: git checkout and git brach.

Both commands have only one parameter, that is the name of a branch. The first command allows to checkout files to a new or an existing branch and the second one allows to switch Code to an already existing or a new branch.
That’s all for today. In the next topic we will discuss how to use Visual Studio Online as a remote repository for Git.