UWP: Application services
In this post I am going to talk about one more way to establish communication between different applications – that is, Application Services. Implementing Application Services Microsoft combines two ideas, such as background tasks and web services, making it possible to use background tasks as services for other applications on the same PC.
I prefer to think about this feature as about something for enterprise companies, which use lots of different applications for different tasks, and I know many scenarios when common tasks can be moved to separate background tasks and published for other applications. For example, IT department of a bank can develop an application for offline work which can reserve some contact IDs in advance and will share these IDs with other application on the same PC and collect information about their usage and sync data from its own interface. At the same time the bank can ask vendors to develop other applications which will not communicate with the bank’s server directly but will use bank’s application as a way to get contact IDs and to send data for sync. Additionally, Application Services can be used for standard Windows applications but I have less faith in public applications with Application Services inside. In any case let’s see how to implement Application Services, and then we will see how developers decide to use it.
I am going to implement two applications. The first one will have a background task as a service and it will get information about the user from the second application and return a new contract id. The second app will work as a consumer of the service. I am not going to implement any interface – just code which shows Application Services feature.
Pay special attention that Application Services can be implemented inside a standard Universal Windows Platform application. So even you don’t need a user interface and only want to create some services, you need to create a standard UWP application. In order to activate an application service, users should not launch your application but you still need to implement a main screen of your application, just in case. So to start implementing and testing Application Services you need to create two blank UWP projects.
Right after you create two projects, you can start with the project, which will host the service. Let’s start with background task and declare the following class:
 class ContractIDService : IBackgroundTask
{
 public void Run(IBackgroundTaskInstance taskInstance)
 {
 throw new NotImplementedException();
 }
}
It’s a typical template for a background task but in order to make it the service we need to make some changes inside the manifest file of the application:
 <Application Id="App"
 . . . . .
 <Extensions>
 <uap:Extension Category="windows.appService" EntryPoint="AppService.ContractIDService">
 <uap:AppService Name="GetContractIDService"/>
 </uap:Extension>
 </Extensions>
</Application>
We used the name of the class (including namespace) as an entry point for the service and using AppService element we declared the name of the service which should be used in client application. You can select any name.
Ok. Let’s start to implement ContractIDService class. First of all we need to implement Run method:
 private static BackgroundTaskDeferral taskDeferal;

public void Run(IBackgroundTaskInstance taskInstance)
{
 taskDeferal = taskInstance.GetDeferral();

 var appService = taskInstance.TriggerDetails as AppServiceTriggerDetails;
 if (appService.Name== "GetContractIDService")
 {
 appService.AppServiceConnection.RequestReceived +=
 AppServiceConnection_RequestReceived;
 }
 else
 {
 taskDeferal.Complete();
 }
}
This code just creates a deferral object and checks the service name. If you don’t create a deferral in this method, it finishes the work and the service will be destroyed. Additionally you can have several services with the same entry point, so it’s better to check the name. In order to get data we need to assign event handler for RequestReceived event as we made in our code.
Let’s see a sample of implementation of RequestReceived event handler:
 private async void AppServiceConnection_RequestReceived(
 AppServiceConnection sender, AppServiceRequestReceivedEventArgs args)
{
 var messageDeferal = args.GetDeferral();
 var message = args.Request.Message;
 string name = message["Name"].ToString();

 ValueSet returnMessage = new ValueSet();
 returnMessage.Add("contractID", $"{Guid.NewGuid().ToString()}{name}");
 var responseStatus=await args.Request.SendResponseAsync(returnMessage);

 messageDeferal.Complete();
 taskDeferal.Complete();
}
Of course it’s a fake implementation and in real life your application will open storage to get new ID and save the incoming data. Additionally, you can check permissions and implement many different things but you can use this template as a starting point.
You can see that our event handler was declared with async keyword and we get one more deferral to guarantee that all awaitable calls will be finished and an incoming message will not be destroyed. Using Message properties we can easily get access to the object of ValueSet class. We will use this class in order to pack data. Thanks to this dictionary you can pack any serializable objects, and ValueSet is used by many UWP classes like Launcher. Additionally we use the same class to create a storage for outgoing data and use SendResponseAsync method to send data back to client.
Pay special attention that I ask the deferral from Run method to leave the process. It means that next time when the client will send the data to the same service, the system will create it once again and call Run method. So if you know that you will use the service from time to time, you can leave the deferral alive and simply implement “dispose” command for it. If you do this, developers can optimize performance of their client applications:
 private async void AppServiceConnection_RequestReceived(AppServiceConnection sender, AppServiceRequestReceivedEventArgs args)
{
 var messageDeferal = args.GetDeferral();
 var message = args.Request.Message;
 string command = message["Command"].ToString();

 switch (command)
 {
 case "getID":
 string name = message["Name"].ToString();

 ValueSet returnMessage = new ValueSet();
 returnMessage.Add("contractID", $"{Guid.NewGuid().ToString()}{name}");
 var responseStatus = await args.Request.SendResponseAsync(returnMessage);

 messageDeferal.Complete();
 break;
 case "exit":
 taskDeferal.Complete();
 break;
 }
}
At the next step we need to implement the client application. Let’s look at the following code:
 AppServiceConnection app = new AppServiceConnection();
app.AppServiceName = "GetContractIDService";
app.PackageFamilyName = "ad5ff53a-7ccc-4f70-b0c2-6b909bba77a0_kj4a6z6kv5v3p";

AppServiceConnectionStatus status = await app.OpenAsync();

if (status == AppServiceConnectionStatus.Success)
{
 ValueSet message = new ValueSet();
 message.Add("command", "getID");
 message.Add("Name", "Sergii");
 AppServiceResponse response = await app.SendMessageAsync(message);
 if (response.Status == AppServiceResponseStatus.Success)
 {
 //doing something
 }
}
We simply create AppServiceConnection object and make a connection to the service using OpenAsync method. Pay special attention that you need to know the package family name property. You can get it from the Store if you have already published your application but for testing purpose you can use one of the two approaches:
When you deploy your service, Visual Studio prints something like this to the output window: Deployment complete (113ms). Full package name: "ad5ff53a-7ccc-4f70-b0c2-6b909bba77a0_1.0.0.0_x86__kj4a6z6kv5v3p". Just remove the version and platform from this message (_1.0.0.0_x86_) and you will get your package family name;
You can use this string to get package family name directly in your application
string name = Package.Current.Id.FamilyName;Just use a breakpoint and get the name in the debug mode
Once you make a connection you can use it to send a message using SendMessageAsync method.
Pay special attention that AppServiceConnection class has RequestReceived event. So, your application can receive requests from the service as well. So using these classes you can establish two-ways communication.
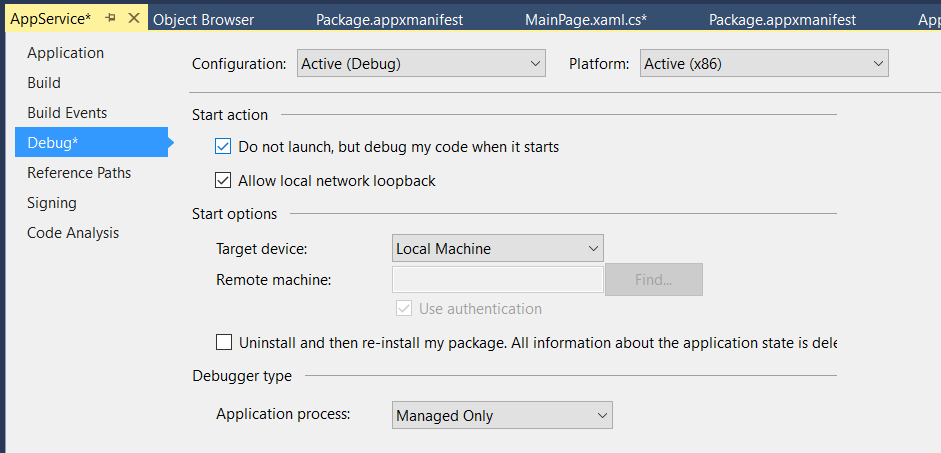
Finally, if you need to debug the service, I would recommend to use Do not launch but debug my code when it starts feature. It allows to see what happens when the client activates your service.