Docker: Containerize your Startup–Part 2
In the recent past how many times have you heard the buzz around DevOps and Docker? Ever wondered why containerization suddenly gained popularity? I have been wondering this for a while and have finally decided to dig in. In my attempt to educate myself I thought of looking at it through the lens of a startup and trying to figure out how it may be relevant. Stay tuned to this tutorial series to learn more!

Docker: Containerize your startup!
In the previous post, I covered why is DevOps inherent in Startups and proceeded to discuss why a good containerization strategy could help save resources, time and effort. It basically described the ‘why’ you should be considering a containerization strategy without actually giving you a feel of ‘how’. Through this post, I will be digging into the basics and will try to show you the ‘how’.
Lets discuss concepts first, the basic components:
- The Docker Engine: This is the lightweight runtime that builds and runs the Docker Containers.
- The Docker Machine: The Docker machine sets up the Docker Engine. It provisions the hosts, installs Docker Engine on them, and then configures the Docker client to talk to the Docker Engines.
- The Docker Hub: This is the collaboration platform , a public & private repository of Docker images. You can use (or reuse) images stored in the Hub which are contributed by others. You can also contribute to the repository with your own custom image.
Consider this scenario:
You have a single Ubunto VM. You want to test your app on a CentOs and probably test with different version of Java. Using Docker, this is how you will be using it:
- Install the Docker Engine on Ubuntu. This will act as a the Docker Machine
- Pull images from the Hub which will simulate the dependencies, image for your application. For eg: you will pull the CentOs image from the Hub, run the image of CentOs – this will be your container. Now run your app in this container.
Note what happened here: You are essentially running a CentOs ( an operating system) on top of the Ubuntu operating system without changing context, without using additional resources but using just a stripped down version to just suffice the need of running your app.
Lets see this in action:
1. Setup a Docker Machine
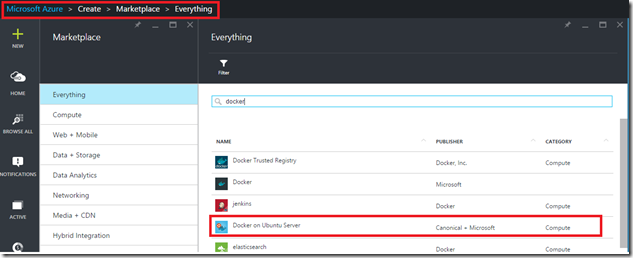
The easiest way to setup a Docker Machine is to spin up an Ubuntu VM on Azure which has the Docker extension installed, which ensures that the Docker Engine is up and running along with the VM. You can find this image in the Azure Market Place.
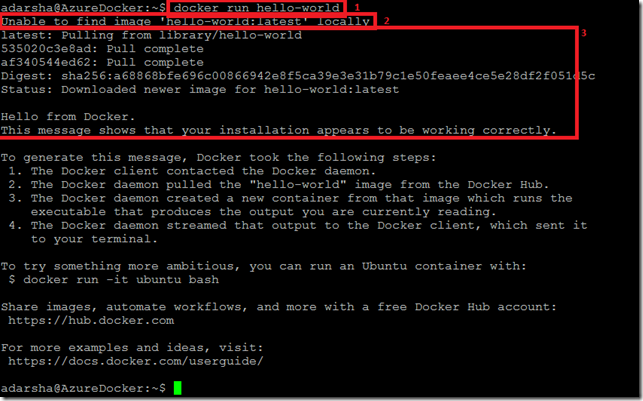
Once the server is up and running, I logged in using Putty and the first test is to check the installation of Docker:
Notice that I have specifically boxed 3 sections to show what is happening here:
1. docker run hello-world: This is the basic command execution.
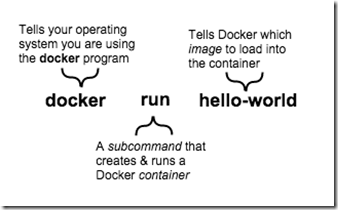
This image is taken from here. This is crucial to understanding how Docker functions. The basic format being (a ) You invoke Docker (b ) Subcommand (c ) Image name to load on the container.
2. The Second part says that the image for ‘hello-world’ is not there locally
3. This third part fetches this image from the Hub and executes it in the container
Hence, what is happening is that you fetch and create environments (called containers), execute your application and boom – You are done!
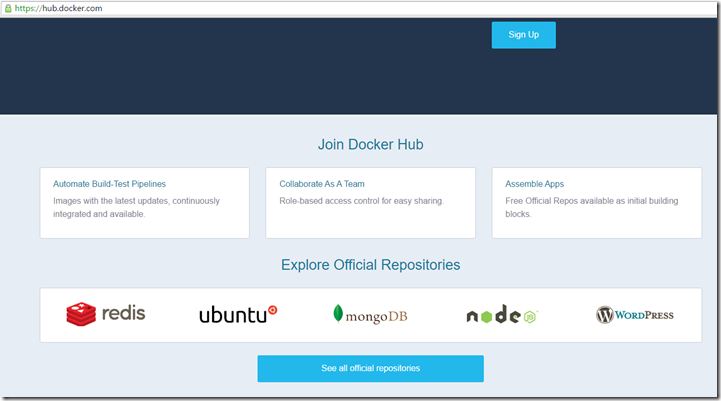
Lets play around a little more to get a better feel of it. Lets see the Hub page to see what all images exist in https://hub.docker.com
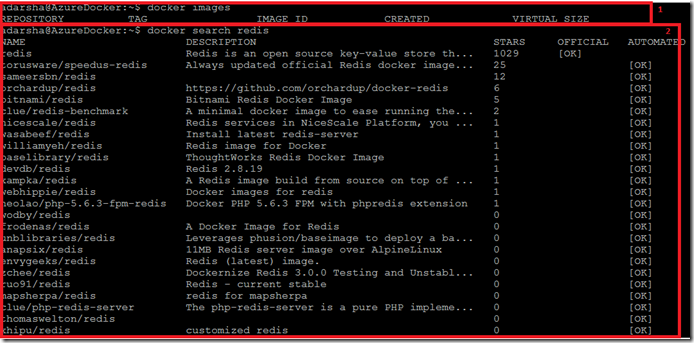
As you can see Redis here, now let us try and add redis on our docker machine as an image:
Again, I ve added 2 boxes just to show (1) There are no images on the Docker machine (2) using subcommand ‘search’ I am searching for ‘Redis’ in the hub and returns me the same results as we see in the above web page of the hub.
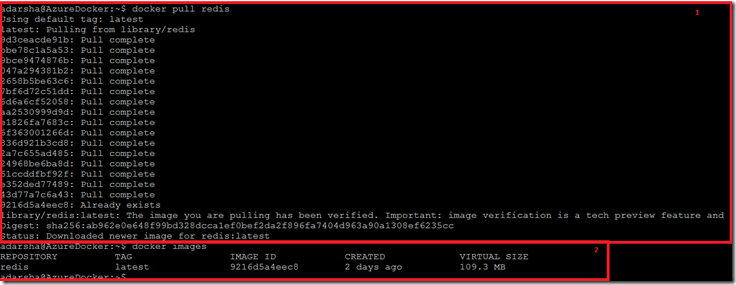
Now that I ve found the redis in the Hub, we need to pull it in our system. (1) Using the ‘pull’ subcommand we pull the image of redis on our docker machine. (2) Now when we list out images on our machine we are able to see Redis.
Lets actually get an image and use it execute a container. Lets use a container to run an image of Centos:
1. Pull the image of Centos
2. As we saw in the previous example of running the ‘hello-world’ image using the ‘run’ subcommand, we will be running the CentOs image too.
I have broken it down into 3 different sections just to give the clarity. (1) We are still in the docker machine – Ubuntu (2) We execute the run sub command to start the centos container and execute a bash shell in that container (3) Now we are in the bash container which is showed by listing out /etc/redhat-release
Hence we seamlessly and in minimal time switched to the CentOs bash environment.
The above is again a final depiction of the fact that we are still in the container, when we execute ‘docker ps’ – it does not find the command as we are in the bash shell of the Centos which is not the Docker Engine. Once we exit from the container, then we are back in the docker engine, hence now if we execute ‘docker ps –a’ it tells us the various processes that have been executed in docker.
In conclusion, I hope I was able to clearly give an introduction to the 3 main components of Docker: namely the engine, the machine and the hub. After that I showed how to use containers through basic examples. Essentially, think of Docker as an additional layer of abstraction or an additional layer of virtualisation. Docker as a tool is really powerful if used properly. I will cover several other key topics for Docker in future posts. Stay tuned!
