Python and Data: SQL Database on Azure as a data source for Python applications
 This post will show you how to use Python to connect to a SQL database on Azure in the cloud, as well as how to save and retrieve data.
 I ( @HockeyGeekGirl ) recently recorded some courses with Christopher Harrison ( @GeekTrainer ) on Microsoft Virtual Academy about coding with Python. During that series of courses we explored several different data sources. Sometimes it was difficult to find good code examples and documentation on how to connect to those data sources with Python. So I have put together this series on Python and Data to help others who may be trying to work with different data sources using Python.
This post is the second in a series. The first post shows you how to connect to local SQL Server database from Python.
This blog post will explain
- What Python package should I use?
- Creating a SQL database on Azure
- Connecting to your SQL database on Azure
- Inserting a row
- Retrieving a single row
- Retrieving multiple rows
- Additional Python resources
The examples in this post are written using CPython 3.4 in Visual Studio and Python Tools for Visual Studio. If you want to use the same tools:
- You can download Visual Studio Community for free.
- Python Tools For Visual Studio (PTVS) is a free add on for Visual Studio
- Instructions for how to install PTVS and a Python interpreter in Visual Studio so you can code Python in Visual Studio can be found here
- You will need an Azure account. You can get a free trial here.
- If you are a startup company, check out BizSpark to see if you qualify for a free MSDN subscription which includes monthly Azure credits.
- If you want to connect to your SQL Azure database from a client tool to create tables, or execute queries from outside your Python code, install SQL Server Management Studio. You can get SQL Server express for free.
What Python package should I use?
Connecting to a SQL database on Azure requires installing a Python package in your code that supports connections to SQL databases on Azure. In this post we use pypyodbc.
pypyodbc runs on runs on PyPy / CPython / Iron Python , Python 3.4 / 3.3 / 3.2 / 2.4 / 2.5 / 2.6 / 2.7 , Win / Linux / Mac , 32 / 64 bit
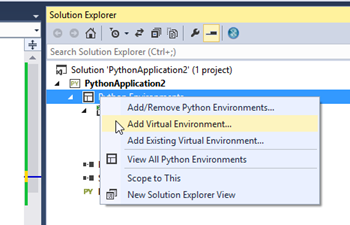
To install this package in a Visual Studio Python project, create a virtual environment in your solution in Solution Explorer for one of the supported versions of Python
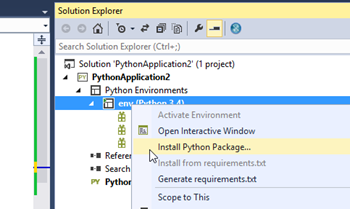
Right click your Virtual Environment and select Install Python Package
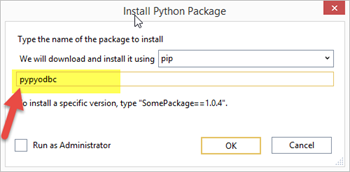
Enter the package name pypyodbc and Select OK.
Creating a SQL Server Azure database
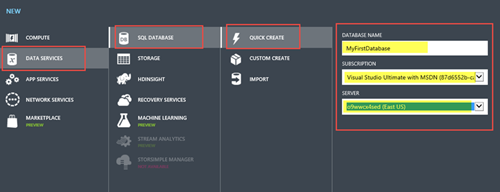
To create your SQL Database on Azure, you need to visit manage.windowsazure.com, log in with your Azure account and select +NEW | DATABASE | QUICK CREATE to create a new database
Connecting to your SQL Azure database
If you want to connect to a SQL database on Azure from your code, or from a client database tool such as SQL Server management studio you must complete the following two steps
- Tell Azure to allow your IP Address to connect to the database
- Find out the server name and user name to connect to the database
1. Tell Azure to allow your IP address to connect to the database
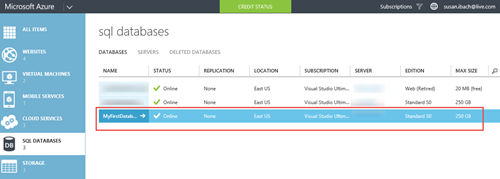
Select your database in the Azure portal
Add your IP address to the firewall rules.
Select MANAGE from the toolbar
Add your IP address to the existing firewall rules
2. Find out the server name and user name to connect to the database
Bring up the DASHBOARD for your database
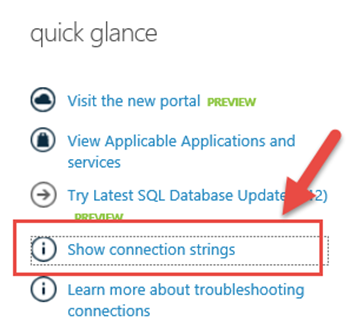
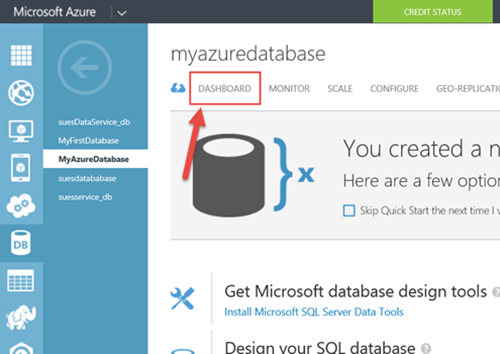 Under the quick glance menu select Show connection strings
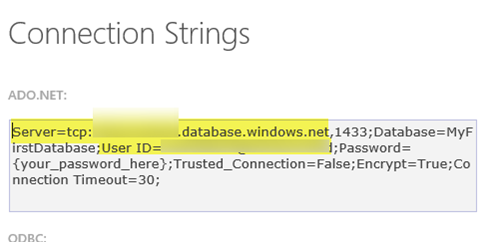
Note the server name and user name in the Connection string
By default the password is your Azure password, you can change this by going to the DASHBOARD for your database server and choosing Reset Administrator Password to change the password for your server.
Connecting to the database
Connecting from SQL Server Management Studio
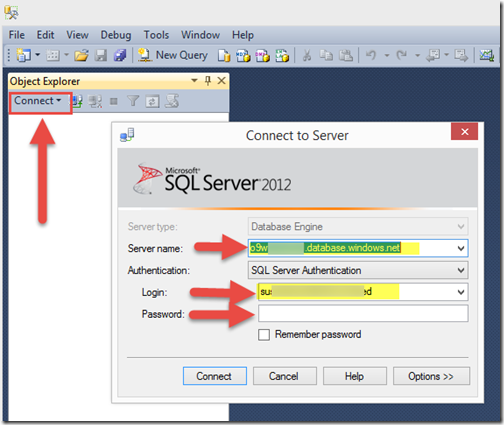
If you want to connect to your SQL Database on Azure from SQL Server Management studio so you can create tables and execute queries, launch SQL Server Management Studio and enter
- Server name: specify the server name you looked up in the Management portal (without the “tcp:” prefix)
- Authentication: SQL Server Authentication
- Login: the username you looked up in the Management portal
- Password: the password for the Azure server that hosts your SQL Server database in Azure
Connecting from Python Code
In order to connect to the database from your code you use the connect method of the Connection object.
You will need your database name. You can look this up in the Azure portal.
pypyodbc.connect(‘Driver = {drivername};Server=servername; Database=databaseName; uid=username;pwd=password)
- Driver - identifies the driver you wish to use to connect to the database, the correct driver to use will depend on which database product you are using. When you connect to a SQL database on Azure, you specify ‘SQL Server’ as the driver.
- Server - identifies the server where your SQL database on Azure is running. Specify the server name you looked up in the Management portal (with the “tcp:” prefix and the port number)
- Database - is the name of the database you created on Azure. I have created a database called QuizDB
- uid - the username you looked up in the Management portal
- pwd - the password for the Azure server that hosts your SQL Server database on Azure
Here is what that call looks like in my code
import pypyodbc
Connection = pypyodbc.connect('Driver={SQL Server};'
'Server=tcp:123fgt7.database.windows.net,1433;'
'Database=QuizDB;'
<'Uid=susan@123456;Pwd=P@ssw0rd;'> )
connection.close()
Inserting a record
In order to insert a record you need to
- declare a cursor.
- pass the SQL Statement you wish to execute to the cursor using the execute method.
- save your changes using the commit method of the connection or cursor
If you need to pass any values to your SQL statement, you can represent those in your SQL statement using a ? then pass in an array containing the values to use for the parameters when you call the execute method of your cursor
In SQL we insert a row into a database with the INSERT statement
INSERT INTO tablename
(columnName1, columndName2, columndName3, …)
VALUES
(value1, value2, value3, …)
For example. If I have a table called customers with the columns customerid, firstname, lastname, city. On my customers table customerid is an IDENTITY column that assigns an id to any new record inserted automatically. Therefore, when I insert a new customer record I don’t need to specify a value for customerid.
INSERT INTO customers
( lastname, firstname, city)
VALUES
(‘Susan’,’Ibach’,’Toronto’)
Here’s a code example that will insert that record into our customers table using Python
import pypyodbc
connection = pypyodbc.connect('Driver={SQL Server};'
'Server=tcp:123fgt7.database.windows.net,1433;'
'Database=QuizDB;'
<'Uid=susan@123456;Pwd=P@ssw0rd;'> )
cursor = connection.cursor()<br>SQLCommand = ("INSERT INTO Customers "
"(firstName, lastName, city) "
"VALUES (?,?,?)")
Values = ['Susan','Ibach','Toronto']<br>cursor.execute(SQLCommand,Values)<br>connection.commit()<br>connection.close()
Retrieving a single row
If you want to retrieve a single row from a database table you use the SQL SELECT command.
SELECT columnname1, columnname2, columndname3, …
FROM tablename
WHERE columnnamex = specifiedvalue
for example if I want to retrieve the firstname, lastname and city information for the customer with a customer id of 2 you would use the following SELECT statement
SELECT firstname, lastname, city
FROM customers
WHERE customerid = 2
To execute that command with Python I use a cursor and the execute statement the same way I executed the insert command. After I execute the command I need to call the fetchone() method of the cursor to populate an array with the values returned by the SELECT statement. The first row of the array will contain the first column specified in the select statement. The second row of the array will contain the second column specified in the select statement and so on.
import pypyodbc
connection = pypyodbc.connect('Driver={SQL Server};'
'Server=tcp:123fgt7.database.windows.net,1433;'
'Database=QuizDB;'
<'Uid=susan@123456;Pwd=P@ssw0rd;'> )
cursor = connection.cursor()<br>SQLCommand = ("SELECT firstname, lastname, city "
"FROM customers "
"WHERE customerid = ?")<br>Values = [2] cursor.execute(SQLCommand,Values) results = cursor.fetchone() print("Your customer " + results[0] + " " + results[1] + " lives in " + results[2]) connection.close()
Retrieving multiple rows
If your select statement will retrieve multiple rows, you can simply move your fetchone() method call into a loop to retrieve all the rows from the command.
import pypyodbc
connection = pypyodbc.connect('Driver={SQL Server};'
'Server=tcp:123fgt7.database.windows.net,1433;'
'Database=QuizDB;'
<'Uid=susan@123456;Pwd=P@ssw0rd;'> )
cursor = connection.cursor()
SQLCommand = ("SELECT customerid, firstname, lastname, city "
"FROM customers") cursor.execute(SQLCommand) results = cursor.fetchone() while results:
print ("Your customer " + str(results[0]) + " " + results[1] + " lives in " + results[2])
results = cursor.fetchone() connection.close()
Additional Python resources
If you want to learn more about Python check out the learning to code with Python series on Microsoft Virtual Academy
Part 1 - Introduction to Coding with Python
- Displaying Text
- String Variables
- Storing Numbers
- Working with Dates and Times
- Making Decisions with Code
- Complex Decisions with Code
- Repeating Events
- Remembering Lists
- How to Save Information in Files
- Functions
- Handling Errors
Part 2 – Introduction to Creating Websites Using Python and Flask
- Introduction to Flask
- Creating a Web Interface
- Data Storage Locations
- Using Redis
- Using Redis and Flask on Azure
Part 3 – SQL, Python and Flask
- Design of a Flask Application
- Designing Python Classes
- Introduction to Relational Databases
- Connecting to Relational Databases
- Layouts Using Jinja
- Introduction to Bootstrap
QuickStart Python and MongoLab
Coming soon … Python and Django
