Azure Powershell: Azure Websites for the command line junkies! – Part 1
Web UI looks good and pretty but if you really want to get work done at scale, manage, automate and administer: command line is your way. As a command line junkie from the UNIX world I thought of exploring what Azure PowerShell had to offer. And boy, I was quite blown by the ease of use, functionality and flexibility it comes with. Through this tutorial series, I will take you through various scenarios and functionality on Azure that is made easy using Azure Power Shell.
Getting Started
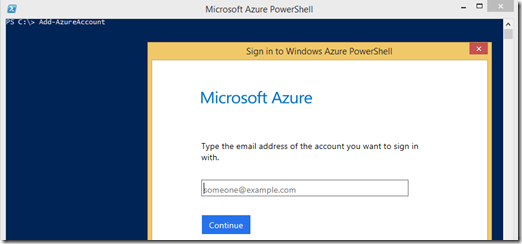
First things first, get Azure PowerShell installed on your system by running the Microsoft Web Platform Installer. Few things you have to keep in mind every time you use PowerShell. It is subscription based and at any given time, you have to be associated with an account. Lets see how you do that:
1: Add-AzureAccount
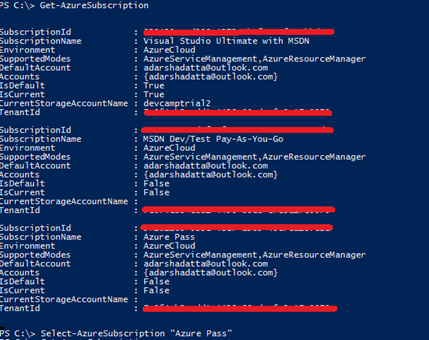
Once you add your Azure account, you get to see all the subscriptions available to with your account:
Now you need to select a subscription. If you know which subscription to use, go ahead and select that one but if you want a verbose output to see which subscriptions, you could use the following to see and then select the subscription:
    1: PS C:\> Get-AzureSubscription
    2: PS C:\> Select-AzureSubscription "Azure Pass"
Now that we have the environment setup. Let us proceed to see how you create, manage, configure and run diagnostics for your website from PowerShell.
Deploy Website
The basic steps would be to select the location, find a name for your website that exists and then simply create your website.
    1: PS C:\> Get-AzureWebsiteLocation
    2: PS C:\> $WebSiteLoc="East US"
    3: PS C:\> $WebSiteName = "PowershellTrial"
    4: PS C:\> Test-AzureName -Website $WebSiteName    #if False, then the name does not exist and can be used, else if it is TRUE, the name is used
    5: PS C:\> New-AzureWebsite -Location $WebSiteLoc -Name $WebSiteName
The Azure Website is created in the “azurewebsites.net” domain. Hence the above website will be: PowershellTrial.azurewebsites.net. We can see the website using “Show-AzureWebsite $WebSiteName” which will open the website on the default browser.
By default, the website gets deployed on the default production deployment slot. However, there is an option to have upto four additional deployment slots. For example, you can have a deployment slot each for Dev, Test, QA, Staging and Production. The advantage of having multiple deployment slot is that you can switch or swap deployment slot. One useful scenario in this case can be: All your development is pushed on the staging slot. You expose this URL to your test audience, once you think this is ready for going live, you swap the current production slot and the staging slot which makes sure that your new website (staged) is the live production website.
It is important to understand that each deployment slot should be thought of as independent websites along with its management. The name of the deployment slot gets appended with a ‘-‘ to the website. The following commands can be used to manipulate multiple deployment slots:
    1: PS C:\> $WebSiteSlotName="Staging"
    2: PS C:\> New-AzureWebsite -Location $WebSiteLoc -Name $WebSiteName -Slot $WebSiteSlotName
(Note: Additional deployment slots only work in the standard mode of the pricing tier. You can either change the mode in the web portal or you can find instructions here about how you can do this on the command line itself. )
When switching the slots, the following commands can be used to do so:
    1: PS C:\> Switch-AzureWebsiteSlot -Name $WebSiteName -Slot1 $WebSiteSlotName
    2:
Now that we have covered deploying a website, let us look into how do we publish our website. The idea is simple:
- We create a website on Azure as shown above
- We publish our website on this
If you have the website project ready in the form of a Web Deployment Package as a zip file, you can use the following command to publish the website on the Azure Website which was created:
    1: $pkgPath = "E:\PowerShellTrial.zip"
    2: Publish-AzureWebsiteProject -Name $WebSiteName -Slot $wsStaging -Package $pkgPath
You can also use (in fact you should be using) source control for continuous delivery. You can either be using a local repository such as a Git or a remote repo such as Github or BitBucket or VSO or Dropbox. If you use Git, then you can use the following commands to deploy your website:
    1: git init
    2: git add .
    3: git commit -am "initial commit"
    4:
    5: git remote add azure <<GIT URL for Azure Website, eg: https://adarshadatta@powershelltrial.scm.azurewebsites.net:443/PowershellTrial.git>>
    6: git push azure master
If you want to run any background tasks using Webjobs, you can use the following commands:
    1: $WebJobPath = "<<Fully qualified path of the job>>"
    2: $WebJobName = "Contoso-WebJob"
    3: New-AzureWebsiteJob -Name $WebSiteName -JobName $WebJobName -JobType Triggered -Slot $WebSiteStaging
    4: -JobFile $WebJobPath
Using the powershell, you can only have Jobs of type Triggered(same as On-Demand) and Continuous. “Scheduled jobs” are not supported as a parameter.
Configuration
There are lot of configurations that can be done using PowerShell. The ‘’Set-AzureWebsite” cmdlet has a variety of parameters using which one can configure the website. Below is a small subset of the parameters that can be configured:
    1: #To enable websockets
    2: Set-AzureWebsite $WebsiteName -WebSocketEnabled "<valuue>"
    3:
    4: #set application settings
    5: $settings = New-Object Hashtable
    6: $settings["Website_sub_URL"] = "https://powershelltrial/sub"
    7: Set-AzureWebsite $WebSiteName -AppSettings $settings
    8:
    9: #Connection String
   10: Set-AzureWebsite -Name $WebSitsName -ConnectionStrings $connStrs
   11:
   12: #Associating custom domain names after verification of CNAME/A Record
   13: Set-AzureWebsite -Name $WebSiteName -HostNames @(<website url>,"<websiteURL>")
   14:
   15: #Handler Mappings
   16: $handlerMapping = New-Object Microsoft.WindowsAzure.Commands.Utilities.Websites.Services.WebEntities.HandlerMapping
   17: $handlerMapping.Extension = "*.php"
   18: $handlerMapping.ScriptProcessor = "d:\home\site\wwwroot\bin\php54\php-cgi.exe"
   19: Set-AzureWebsite -Name $WebSiteName -HandlerMappings $handlerMapping
Diagnostics
Diagnostics are one of the most important functions in any environment. This allows us to keep the health of the website in check. Collecting diagnostics is not enabled by default and hence has to be enabled and then the diagnostics need to be collected explicitly.
    1: #Enable Diagnostics
    2: Set-AzureWebsite -Name $WebSiteName -RequestTracingEnabled $true -HttpLoggingEnabled $true
    3:
    4: #Retrieve Logs
    5: Save-AzureWebsiteLog -Name $WebSiteName -Output e:\weblogs.zip
    6:
    7: #Viewing Streaming Logs
    8: Get-AzureWebsiteLog -name $WebSiteName -Tail -Path http
    9:
   10: #Filter your Streaming Logs with specific outputs such as Errors
   11: Get-AzureWebsiteLog -Name $WebSiteName -Tail -Message Error
   12:
Delete
And finally, if you want to remove your website:
1: Remove-AzureWebsite –Name $WebSiteName
Conclusion
I tried to cover quite a few functionalities that can be accomplished using the PowerShell for Azure Website. This by no means is a holistic set of functionalities. There are a lot of other topics that I could not cover such as managing custom domains, traffic management and more that can be handled using the PowerShell. Please feel free to explore more Azure Poweshell Cmdlets. You can also refer to this ebook which covers Implementing Azure Infrastructure Solutions which covers such topics.
In the next part, I will be covering PowerShell for Azure Virtual Machines. Stay tuned and reach out to me @AdarshaDatta.
Technorati Tags: CommandLine,CLI,PowerShell,Azure,DevOps,Cloud,Automate


