Your one-stop shop to manage APIs
Application Programming Interfaces (APIs) are quickly becoming the ‘digital glue’ in this digital economy that fosters new revenue streams, internal innovation, new products, reach new customers and even extend partnerships to create a vibrant partner ecosystems. In this post, I will show you how to manage your APIs that allow for this shift in individual organizations and global commerce which has given rise to this new channel: Business-To-Developers.

Why should you care about API Management?
Application Programming Interfaces (API) are essential in this connected world. Twitter processes 13 billion transactions a day through its APIs, Google does around 5 billion where as Amazon does close to a trillion according to a 2012 Forbes article on the API Economy. Also, in the world of Internet of Things, communication and connection between different services and products can be interfaced through APIs. Just from an opportunity perspective API Management and Economy has tremendous potential. The idea being the your digital assets is the currency in this economy and API management is a key driver to leverage this asset.
Lets set the scenario right by showing you how APIs can help you and your organization:
- Direct and Indirect Monetization: You can charge your customers for the number of times your API is called which can either deliver a service (such as a text message as what Twilio does, or authentication by a FB, Google or a Twitter account) or deliver some form of your data by giving your customer/partner select and controlled access. Extending your business through API can indirectly impact revenue by allowing some part of your data to be accessed by partners which either builds your brand or allows others to use your data for their business. Eg: Airlines may expose flight details through APIs for flight aggregators which in turn adds revenue for the airline companies.
- Private vs Public Access: You can either extend your platform using APIs to the public and give everyone controlled access OR you allow only select partners or units from within your organization controlled access through APIs.
Basically you extend your platform (or re-platform) using APIs for the benefit of your business to have direct or indirect monetary gains.
What are the challenges?
To fully appreciate the power of API management, you must understand the challenges involved in managing your API:
- Engaging with developers by having a thorough documentation of how your API functions, its parameters, constraints, controls is very important. A portal conveying this information as well as allowing the developers to interact and see how the API works is key to the success of your API.
- Total Time to First Successful Call is a metric which signifies the success of the API. The shorter the time the better is the API. Hence it is essential to provide a platform which allows the developer to reduce the time to first successful call to the API
- Enforcing business policies and controls on the use of the API is yet again a challenge. This may be related to maximum number of calls to the API in a minute or may be some kind of authentication or may be some kind of transformation from JSON to XML or vice versa. There are many controls or policies which need to be enforced during the API call which can be negotiated during the usage of the call.
- Monitoring the usage of the API is essential to study its usage patterns to determine success of the API or even determine modifications, future improvements.
- Make your legacy API modern
Now that we have discussed the various challenges associated with API management, let us see how Azure API Management addressed these challenges by providing a platform to manage your APIs.
How does it work?
In a previous article, I had discussed RESTful and Custom APIs in Azure mobile services. We can extend the same article to show how we manage APIs. Note, I am using these APIs only as an example to show how API can be manage in Azure. Your API irrespective of platform can easily be managed on Azure. Lets focus on the following API:
https://azuredevcampams.azure-mobile.net/tables/todoitem?$filter=(complete%20eq%20false)
When we execute this GET request, this is how the output looks:
Note: The above is a REST API. It looks primitive and not very clean. The output likewise is not formatted but is in JSON.
Let us see how we can manage this API to make it look cleaner, give a better experience to our developers who would want to use it and finally monitor the usage patterns of this API.
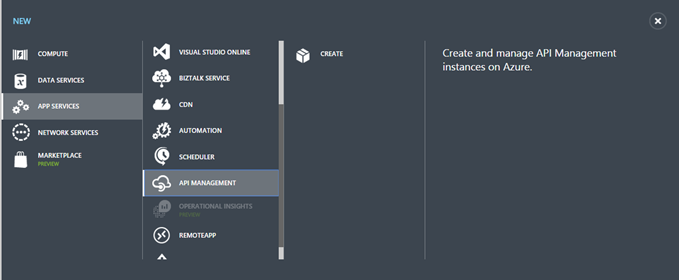
Step 1: Lets create an API management Service:
Once you click on Create and create your API Management Service it takes about 20 minutes to create your Service because in the backend what it essentially does is it creates:
- A Publisher Portal: This is the administrator or the management portal through which you manage and customize your API
- The Developer Portal: The portal that is exposed to the developer who will be using your API
- The Proxy: This is where the magic happens. All the functions such as calling the actual API, allowing controls and policies that guide the functionality of the API is done in the API
Step 2: The Publisher Portal
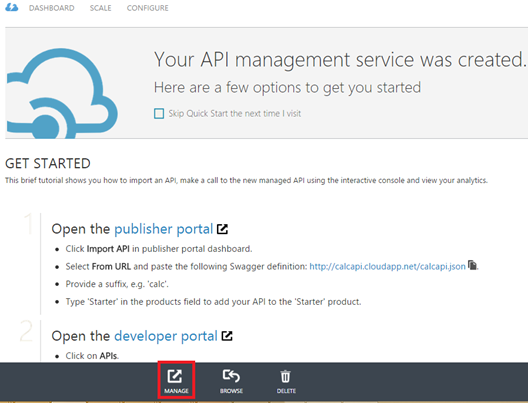
Once the API service is created, you can click on Manage to define the management of the API:
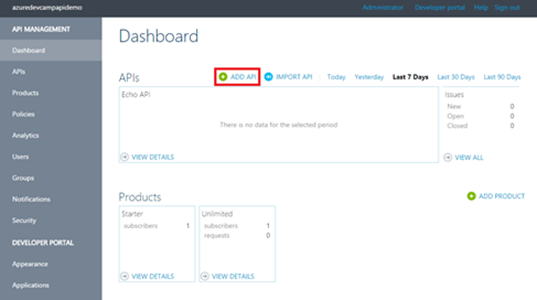
In the publisher portal, let us see how do we define the management. As you can see the first thing you notice is the Dashboard:
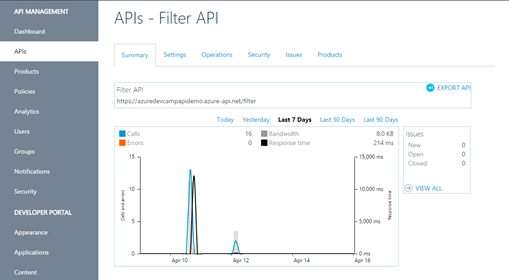
Here, you can monitor all your APIs and how they function, their usage patterns,etc. Let us start with adding an API for management:
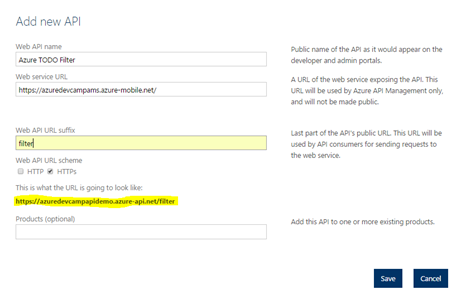
As you can see, you enter the base URL of your API and enter the name of your API to simplify the call. You will notice the highlighted portion that shows how a developer will be using the API.
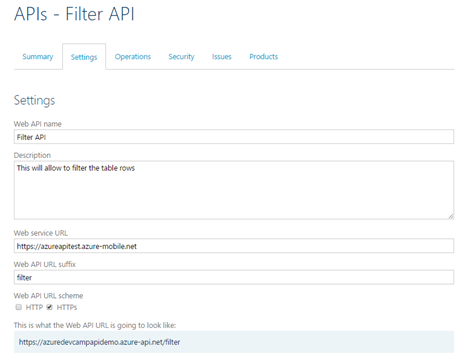
Once your API is created, you can click on the Settings tab to enter all the meta data, documentation that will allow a Developer using your API completely understand how to use your API.
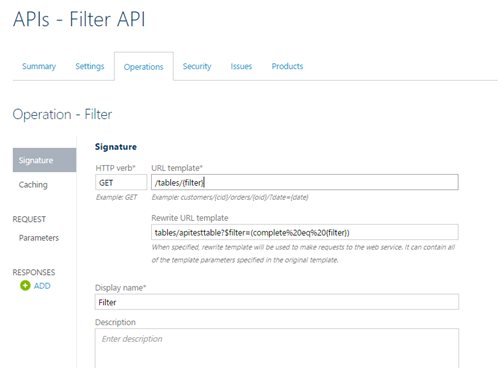
The operations tab is where the magic happens. You define the HTTP verb which can be GET, POST, PATCH, DELETE, etc as per your API. The URL template is the suffix of how your API will look like to the developer. The rewrite URL template is how it actually looks. This is the way you can modernize your API. As you can also notice that we have added a parameter here ‘{filter}’ which gets recognized and the ‘Parameter’ section on the left ribbon allows you to document and define it.
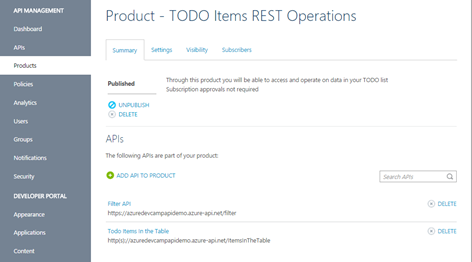
Once your API has been defined, you should add it to a product. The idea being, you may have several APIs related to a product and all subscriptions can be related to a product. Makes the management of the APIs easier and more logical.
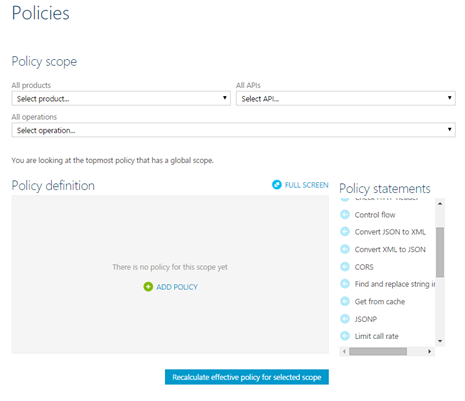
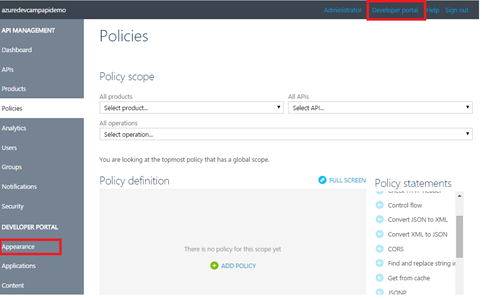
That's it, you can either create a new product or add your API to an existing product. Now if you want to add controls or policies around your API or product, you can do so using the Policy Tab on the left ribbon:
As you can see, you can add several kinds of policies such as convert the output of your API to XML or JSON, you can limit the call rate of your API, etc. The policy can be set at a product level, a API level or an operation level. This is very crucial and important to regulate and manage the usage of your API. Once you are done with these basic steps, your developer portal is ready to be accessed by your developer.
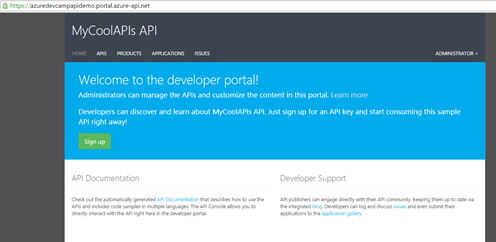
Before you want to see how the developer portal looks like, you can click on Appearance on the left pane and customize the way you want to your external facing portal for developers with a branding of your organization, etc. Now click on Developer Portal to see how that experience is.
Step 3: The Developer Portal
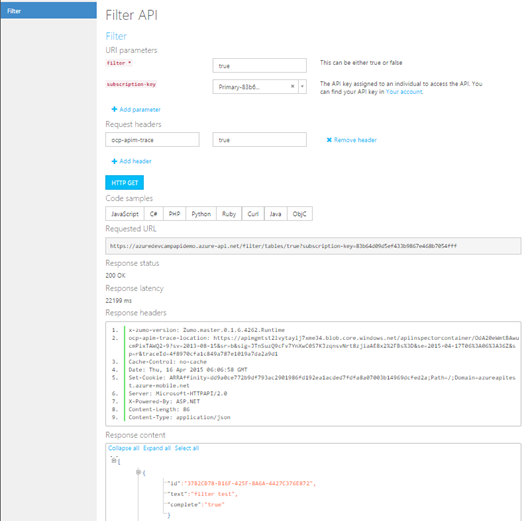
This is how the Developer Portal looks like. Click on API to see the APIs or click on products to see the various products that have been published for use. Developers can sign up for subscriptions on this portal.
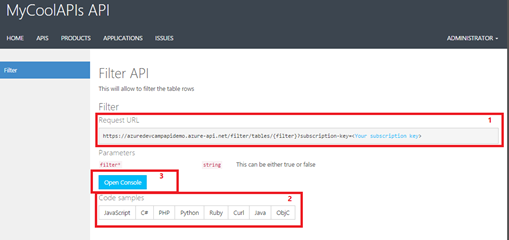
Once you click on API, you can see the various APIs that are hosted on this portal. As a developer you can select the API that you want to use to see the documentation and understand how it works.
Note:
1. That is the requested URL that will be used and not the primitive one
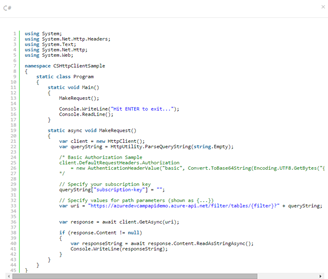
2. These are the Code Samples that you can directly include in your script. For example, if I am coding in C#, this is the code that I will have to include:
3. This is the interactive interface provided to show you exactly how will the execution of your API look
That's it, this how you reduce the TTFSC. As you can see in a matter of minutes I was able to get the First Successful Call of the API. Now if we want to monitor the usage of this API, I can log into the Developer Portal and monitor in the dashboard:
Conclusion
Azure API Management is a very powerful tool and shows how easily you can manage your APIs using this tool In this article I have stuck to the basics just to show you how it really works. In future articles I will touch upon authentication and policies in detail. In the meantime you can refer to the videos in Chanel 9 or refer to the Azure API Management Documentation to learn this service in detail. Till next time, stay tuned for more on Azure and share your stories with me @AdarshaDatta.
Technorati Tags: API,Cloud,API Management,REST,Azure

