Azure Mobile Services and APIs – RESTful and Custom
I covered Azure Mobile Services in a previous tutorial series but I had missed out one of the key topics there: Restful and Custom APIs. Through this post I am going to add to that tutorial series and talk about how to use and the benefits of using REST APIs and Custom APIs in Azure Mobile Services.

RESTful APIs
There are a couple of ways that you can access your data in Azure. Using RESTful APIs is one of the easiest ways to do so. Azure Mobile Services REST API Reference covers this holistically. However, I thought of playing with it a little to show how easy it is. The basic idea is that regardless of what platform you are targeting, Azure can be used as your universal cloud backend: the true Mobile Backend As-A-Service!
REST API end points are created for you to simply access your data through CRUD (Create, Read, Update, Delete) operations on the table data. Once you store data in the table you can easily access it using the base url of your mobile service: https:// <service_name> .azure-mobile.net/tables/ <table_name> .
Let me start from scratch and show you how easy it is. (Keep in mind, this is just a representation to show you how easy it is to access your app’s backend using REST in Azure Mobile Services)
1. Create Mobile Service
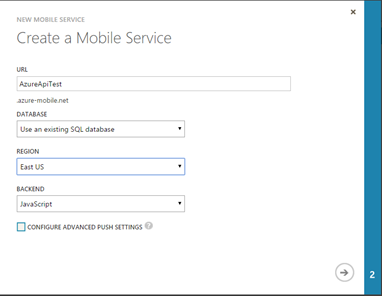
Lets login to manage.windowsazure.com and create a New Mobile Service. New –> Compute –>Mobile Service –> Create.
2. Create a table
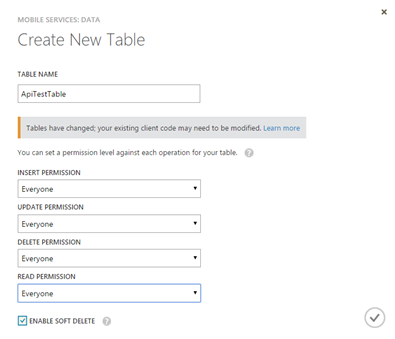
Once you have created the AMS, you can get into the mobile service and select the DATA tab and click on “Add a table” or “Create’' depending on if you have already created a table or not.
Fill in the details as shown above and click on the ‘tick’. Please note here permissions are set to everyone only for simplicity purposes and is by no means a recommended practice.
3. Insert records using REST
There are several ways that you can accomplish this. Either use a simple webform to create a HTTP POST request or use jquery in order to do the same. Let us see first create a simple webform in HTML to show how easy it is to insert data:
    1: <html>
    2: <body>
    3: <form action="https://azureapitest.azure-mobile.net/tables/apitesttable" method="post">
    4:  <input type="text" name="text" value="Complete the tutorial">
    5:  <input type="text" name="complete" value=true>
    6:  <input type="submit" value="Submit">
    7: </form>
    8: </body>
    9: </html>
Note: Here I have used the URL as “https://azureapitest.azure-mobile.net/tables/apitesttable” since ‘azurepitest’ is the mobile service created and the table is ‘apitesttable’. Once I execute this simple webform locally, it looks like:
 Once I click on submit, this data gets updated on the table in the cloud. This can be seen in the portal:
 Instead of using a webform, I can use Curl on the command prompt to send a POST request to insert the data
    1: c:\Program Files\cURL\bin>curl -H "Content-Type: application/json" -X POST -d "{\"text\":\"Lets curl it\",\"complete\":false}" https://azureapitest.azure-mobile.net/tables/apitesttable
    2: {"text":"Lets curl it","complete":false,"id":"150C76E5-3881-4882-BE57-17BC3291A469"}
    3: c:\Program Files\cURL\bin>
Once this is done, we can see this data is updated in the portal:
In all POST requests as long as the data is send in JSON, the table will get updated.
4. Querying Records using REST
One can simply read the records using GET requests directly in the URL of the browser by using the base url and table name as above: .azure-mobile.net/tables/https:// <service_name> .azure-mobile.net/tables/ <table_name>
You can use Query strings in order to filter such as: https://azureapitest.azure-mobile.net/tables/apitesttable?$filter=(complete%20eq%20true )
As seen in the insert operation, similar construct can be used to update. Only difference being that you need to additionally use the ID of the record and instead of using POST, we will be using PATCH: https:// <service_name> .azure-mobile.net/tables/ <table_name> / <item_id>
This is how the table is initially, focus on the highlighted record:
Now, again we use CURL to execute the PATCH operation using the ID of the record using the following statement:
    1: c:\Program Files\cURL\bin>curl -H "Content-Type: application/json" -X PATCH -d "{\"complete\":\"true\"}" https://azureapitest.azure-mobile.net/tables/apitesttable\55E83256-B2D6-4AB8-B445-3FAE4077A19F
    2: {"complete":"true","id":"55E83256-B2D6-4AB8-B445-3FAE4077A19F"}
    3: c:\Program Files\cURL\bin>
As you can see below, the value of Complete has been updated to ‘True’ from ‘False’ after the execution of the above statement.
As in the case of Insert, we will be using DELETE request and will append the ID to the URL as: https:// <service_name> .azure-mobile.net/tables/ <table_name> / <item_id>
Since this is a delete operation, we do not need to use a JSON in the body of the message. Let us simply use CURL to execute the DELETE request with the URL appending the ID:
    1: c:\Program Files\cURL\bin>curl -H "Content-Type: application/json" -X DELETE https://azureapitest.azure-mobile.net/tables/apitesttable\55E83256-B2D6-4AB8-B445-3FAE4077A19F
    2:
    3: c:\Program Files\cURL\bin>
As you can see in the snapshot below that the item with the ID has been deleted. The ‘cross’ on the record shows that it has been deleted:
That's it, the CRUD operations using REST API. In the next section we see another feature which allows us to create CUSTOM Apis for our data which can be of interest.
CUSTOM API
In case, you want something more complex than what RESTfull APIs can do, Azure Mobile Services also gives you the provision to define your Custom API. Custom APIs are implemented as node.js modules and the requests they respond to are defined as exports to the API module.
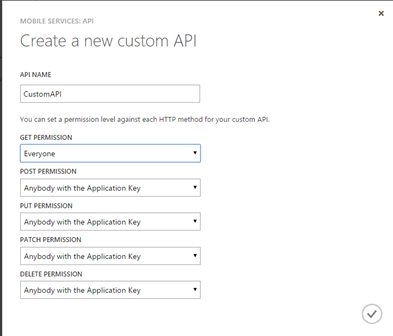
 In the mobile service that you created, click on the API tab and let us see how you can define your API:
 As you can see, in this case I am only giving permission for a GET operation. Once the it is created, you can see all the Custom APIs that you have created like this:
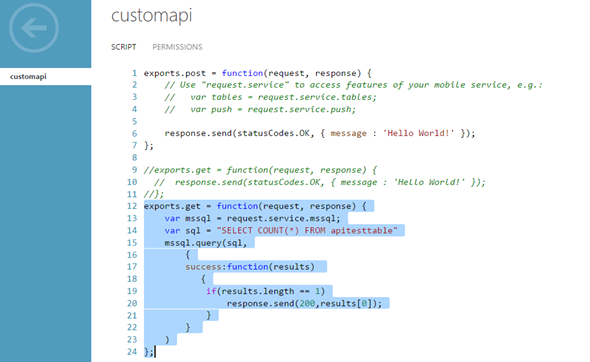
Once you enter the API, you have 2 options, SCRIPT and Permissions. The SCRIPT option allows you to define your action based on what you want your API to do. In this case, I will be writing a simple GET request to count the number of rows in my table. I will replace the existing exports.get script with the following:
    1: exports.get = function(request, response) {
    2:     var mssql = request.service.mssql;
    3:     var sql = "SELECT COUNT(*) FROM apitesttable"
    4:     mssql.query(sql,
    5:         {
    6:         success:function(results)
    7:            {
    8:             if(results.length == 1)
    9:                 response.send(200,results[0]);
   10:             }
   11:         }
   12:     )
   13: };
Once this is done and I have clicked on SAVE, I will be able to access this API from any browser using the following URL as it is a GET request: https://<service_name>.azure-mobile.net/api/<api_name> :
 Note that this only an example to show how we can define our Custom API. Custom APIs in Azure Mobile Services goes into much more detail about how you can define your Custom API.
In the next article I will be covering Azure API Management Services which can be thought of as an extension to defining Custom APIs for your app. Do tune in to find out how it is relevant for you as a developer or even as a startup if you want to define custom APIs for your product. Reach out to me @AdarshaDatta to share your experience with me.
Technorati Tags: Cloud,Azure,API,REST,Mobile Backend As A Service,Mobile Services,Developers


