IoT: Visual Studio and Arduino boards
Two days ago I decided to start video training about micro boards and Microsoft technologies there. I already have Galileo, Netduino and Raspberry but in order to have the complete line I bought Arduino Uno R3 board. This board is not very powerful but it’s very popular and you can find lots of stuff for Arduino in the market. So I cannot ignore this board.
Once I bought it I decided to create several examples. Of course, I knew that Arduino boards require Arduino IDE but if you have experience with Visual Studio you can see that the difference between Arduino IDE and Visual Studio is the same as the difference between Visual Studio and Notepad. So, I spent some time to understand if there is a way to develop Arduino software using Visual Studio. And, finally, I found Visual Micro plug-in.
This plug-in exists in two versions: free and paid version. The paid version promises a better debugger and many additional features. But if you just started to work with Arduino you can use the free version, which extends Visual Studio and supports IntelliSense, basic debugging, settings, samples and so on. Of course it’s not ideal but I was excited to use many cool features for free. And if you are going to develop lots of Arduino applications you can spend 29 dollars and get all paid features on your development machine.
So, in order to install the plug-in you need to install Arduino IDE first. Visual Micro supports Arduino 1.6.1 at this time but it’s changing quickly, so check the latest version installation guide to find the right Arduino IDE version. Once you installed Arduino IDE you may install Visual Micro plug-in for Visual Studio but check version of your Visual Studio because Visual Micro doesn’t support Express versions though you may use Community edition which is free as well.
Once you launch Visual Studio for the first time after installation of plug-in you will get a window which asks to setup Arduino IDE directory and offers to buy the plug-in. Arduino IDE directory is needed to have the same storage place for your sketches.
I don’t know why but to start new project in Visual Studio you need to select not New->Project but New->Sketch Project. It took 30 seconds to find where I can create a project but it’s not a very big problem.
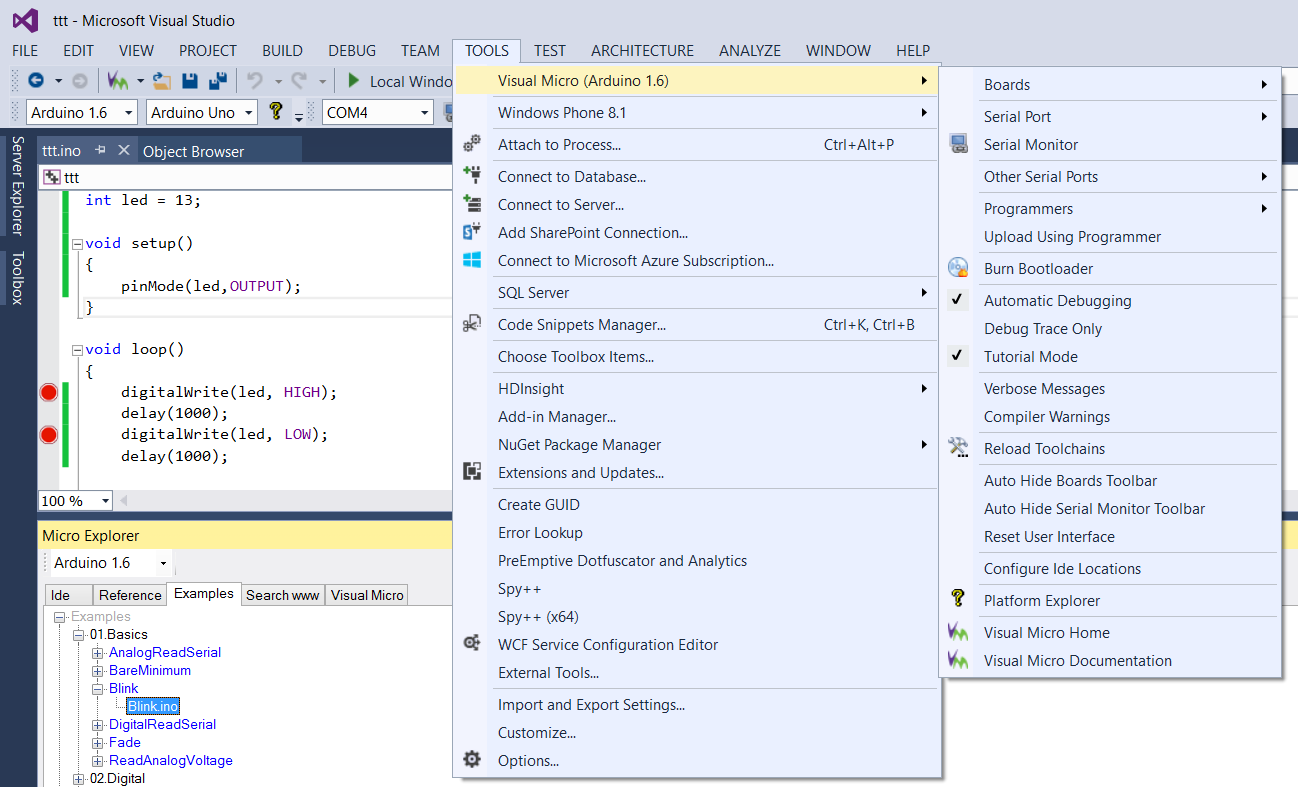
So, once you create a project you are ready to start coding. Visual Studio has several combo boxes which allows to select Arduino SDK version, type of your boards and the port which you are using to connect your board. Additionally, there is access to examples, property window and many other tools which you can find in Tools->Visual Micro menu item.
Debug mode is not as powerful as debug mode for Galileo or Netduino but it’s still useful. Pay attention that there is no strong integration with Debug menu item and sometimes it’s not easy to understand if your application is still in Debug mode. But you can adapt your experience in 3-5 minutes and it’s better than no debugger at all. Free version of plug-in allows to navigate through your breakpoints only. You can check output window to understand if your application is in pause mode and you can use F5 button in order to run your code up to next breakpoint.
Finally, I found that Visual Micro can be very useful and really help me to develop using my favorite tool. And if you are developing not just Arduino code but some services and external applications you can do it inside the single solution.