The Power of Speech in Your Windows Phone 8.1 Apps
I had the opportunity to present a session on Speech Recognition for Windows Phone while at That Conference in Wisconsin Dells in early August. The session was well received and there was a lot of excitement among those that attended, so I promised them that I would provide an online walk through of the session, along with the sample code that was used for demo purposes. The slides are available on my Slideshare account, and the demo project is available in Git.
Why?
Before digging into the “how-to”, I wanted to touch on why it would be ideal to integrate speech into your mobile apps, regardless of platform. When posed with this question, the three main reasons that my fellow developers mentioned were:
- Safety (ex: prevent distracted driving),
- Accessibility (ex: to accommodate those with visual impairments or reading disabilities), and
- Ease of use
And as one very bright young lady mentioned during my presentation, speech makes your apps seem really, really cool! I wholeheartedly agree with that! Developing an app that users can “talk” to will keep them engaged because your app is easy to use. And with the popularity of Cortana on Windows Phone devices, users are now expecting to have voice commands integrated into their apps. Period. No ifs, ands, or buts about it!
How?
In Windows Phone apps, speech recognition is extremely easy to implement, and to prove it, I am going to walk through the steps on how you can incorporate speech into your app quickly and easily!
There are 3 ways to incorporate speech in a Windows Phone 8.1 app:
- Voice Commands
- Text-To-Speech
- Speech Recognition
Today, we will dig into voice commands - what they are and how you can create an app that leverages voice commands with some configuration and very little code on your part.
Voice Commands
Voice commands enable a user to launch your app, and/or navigate directly to a page within your app using a word or phrase.
In Windows Phone 8.1 (XAML based or Silverlight), this requires the following 4 steps:
- Add the Microphone capability
- Add a Voice Command Definition file
- Install the Voice Command Sets
- Handle navigation accordingly
Step 1 - Add the Microphone capability
In order to use device features or user resources within your app, you must include the appropriate capabilities. Failing to do so will result in an exception being thrown at run-time when the app attempts to access them.
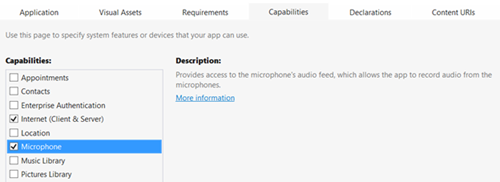
Voice commands require the use of the device’s microphone. To add this capability in your app, simply double-click on the application manifest file, Package.appxmanifest, in the Solution Explorer. Click on the Capabilities tab, and ensure that Microphone is checked within the list, as shown below.
To learn more about Windows Runtime capabilities, check out Microsoft’s Windows Dev Center article, App capability declarations (Windows Runtime apps).
Step 2- Add the Voice Command Definition file
The next step is to define the types of commands your app will recognize. This is accomplished using a Voice Command Definition (VCD) File. The VCD file is simply an XML file.
 Voice commands allow you to launch your app by speaking the app name followed by a pre-defined command (ex: “Dear Diary, add a new entry”).
By default, all apps installed on a Windows Phone device recognize a single voice command whether the app is configured to recognize voice commands or not. You can launch an app on Windows Phone 8.1 device by telling Cortana to “open” or “start” an app by name (ex: “open Facebook”).
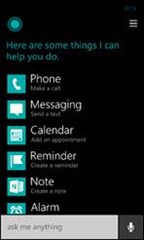
To view which apps support voice commands, you can simply ask Cortana, “What can I say?”, and she will provide a list of apps and sample commands that are available.
Now let’s talk about how you can get Cortana to recognize voice commands for your Windows Phone app!
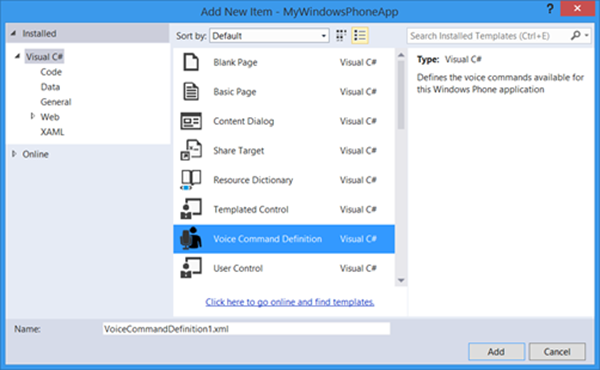
In your Windows Phone project, add a new item and select the Voice Command Definition template from the list, as shown below.
This will add a VCD file in your project, pre-populated with sample commands. Take the time to review the format of this file, because it gives great examples on the formatting you need to follow when configuring your own commands.
The VCD file allows you to define which commands your app will recognize in a specific language, supporting up to 15 languages in a single VCD file. In each CommandSet, you can provide a user-friendly name for your app. This is a way to provide a speech-friendly word or phrase that the user can easily say out loud for those apps that have strange characters in the name. You will also provide example text that will be displayed beneath your app’s name when someone asks Cortana the special “What can I say?” phrase.
 <?xml version="1.0" encoding="utf-8"?>
<!-- Root element - required. Contains 1 to 15 CommandSet elements.-->
<VoiceCommands xmlns="https://schemas.microsoft.com/voicecommands/1.1">
  <!-- Required (at least 1).  -->
  <!-- Contains the language elements for a specific language that the app will recognize. -->
  <CommandSet xml:lang="en-US" Name="englishCommands">
    <!-- Optional. Specifies a user friendly name, or nickname, for the app. -->
    <CommandPrefix>Diary</CommandPrefix>
    <!-- Required. Text that displays in the "What can I say?" screen. -->
    <Example> new entry </Example>
    <!-- Required (1 to 100). The app action that users initiate through speech. -->
    <Command Name="ViewEntry">
      ...
    </Command>
    ...
  </CommandSet>
</VoiceCommands>
Next, you will then include the commands you want to define that will launch your app. A single Command will also include example text for the user, as well as phrases that Cortana will listen for, and the feedback that will be displayed on-screen and read aloud by Cortana when the command is recognized. You can also dynamically populate a common phrase with a list of words or phrases, using a PhraseList.
 <Command Name="ViewEntry">
   <!-- Required. Help text for the user -->
   <Example>view yesterday's entry</Example>
   <!-- Required (1 to 10). A word or phrase that the app will recognize -->
   <ListenFor>view entry from {timeOfEntry}</ListenFor>
   <ListenFor>view {timeOfEntry} entry</ListenFor>
   <!-- Required (only 1). The response that the device will display or read aloud when the command is recognized -->
   <Feedback>Searching for your diary entry...</Feedback>
   <!-- Required (only 1). Target is optional and used in WP Silverlight apps. -->
   <Navigate />
</Command>

<PhraseList Label="timeOfEntry">
  <Item>yesterday</Item>
  <Item>last week</Item>
  <Item>first</Item>
  <Item>last</Item>
</PhraseList>
Finally, you can use a PhraseTopic to allow the user to dictate whatever message they so desire to your application.
 <Command Name="EagerEntry">
   <Example>Dear Diary, my day started off great</Example>
   <ListenFor>{dictatedVoiceCommandText}</ListenFor>
   <Feedback>Hold on a second, I want to get this down...</Feedback>
   <Navigate />
</Command>

<PhraseTopic Label="dictatedVoiceCommandText" Scenario="Dictation">
   <Subject>Diary Entry</Subject>
</PhraseTopic>
For more information on the anatomy of a Voice Command Definition file, refer to the MSDN article, Voice Command Definition Elements and Attributes.
Step 3 - Install the Command Sets on the Device
Once a Voice Command Definition file has been created and configured for your app, you will need to ensure that the voice command sets are installed on the device.
The Speech API for Windows Phone simplifies this for you, by providing a helper class called VoiceCommandManager. This class contains methods that allow you to install command sets from a VCD file, and retrieve installed command sets.
When the app is launched, you will need to load your VCD file into your app as a StorageFile, and pass it into the InstallCommandSetsFromStorageFileAsync method on the VoiceCommandManager object. Note that only the command sets for the language that the device is currently set to will be installed. If the user changes the language settings on his device, it is important that this method is called on application launch to install command sets corresponding with the current language setting.
 using Windows.Media.SpeechRecognition;
using Windows.Storage;

...

private async Task<bool> InitializeVoiceCommands()
{
    bool commandSetsInstalled = true;

    try
    {
        Uri vcdUri = new Uri("ms-appx:///MyVoiceCommands.xml", UriKind.Absolute);

        //load the VCD file from local storage
        StorageFile file = await StorageFile.GetFileFromApplicationUriAsync(vcdUri);

        //register the voice command definitions
        await VoiceCommandManager.InstallCommandSetsFromStorageFileAsync(file);

    }
    catch (Exception ex)
    {
        //voice command file not found or language not supported or file is
        //invalid format (missing stuff), or capabilities not selected, etc etc
        commandSetsInstalled  = false;
    }


    return commandSetsInstalled;
}
PRO TIP
If the Microphone capability was not added to your application manifest (Package.appxmanifest) then an UnauthorizedAccess exception will be thrown when calling the InstallCommandSetsFromStorageFileAsync method, with an error message indicating that the ID_SPEECH_RECOGNITION capability is required.
Step 4 - Handle navigation
Last but not least, you will need to perform a check in the application’s OnActivated event to determine:
a) if the app was launched by voice command, and
b) which command triggered the launch
The OnActivated event receives a parameter, IActivatedEventArgs, which allows you to check which action launched your app. In this case, we only care if the app was launched by voice commands.
If the app was in fact launched by voice commands, we can cast the parameter as a type of VoiceCommandActivatedEventArgs, and check its Result to determine the hierarchy of commands (Result.RulePath) that triggered the app to launch and what the user actually said to launch the app (Result.Text). With that information, we can decide where to navigate to (ex. Default view, search page, add new entry, etc).
 protected override void OnActivated(IActivatedEventArgs args)
{
    if (args.Kind == ActivationKind.VoiceCommand)
    {

        Frame rootFrame = Window.Current.Content as Frame;
        VoiceCommandActivatedEventArgs vcArgs = (VoiceCommandActivatedEventArgs)args;

        //check for the command name that launched the app
        string voiceCommandName = vcArgs.Result.RulePath.FirstOrDefault();

        switch (voiceCommandName)
        {
            case "ViewEntry":
                rootFrame.Navigate(typeof(ViewDiaryEntry), vcArgs.Result.Text);
                break;
            case "AddEntry":
            case "EagerEntry":
                rootFrame.Navigate(typeof(AddDiaryEntry), vcArgs.Result.Text);
                break;
        }

    }
}
As you can see, most of the work in this post included configuring your voice command definitions. With that in place, and a few lines of code, you’ve empowered your users with the ability to launch and/or deep-link into your app using voice commands!
To Be Continued…
In this post, we covered how you can enable your users to launch your app, and navigate to a specific page, using simple words or phrases. In the next post, we will discuss how to incorporate text-to-speech within your app to enable valuable information to be read aloud to the user.
In the meantime, I challenge you to experiment with the following while incorporating Voice Commands within your Windows Phone app:
a) Create a simple set of Voice Commands in 2 languages.
b) Test out your voice commands for each of the supported languages.
c) Test out your voice commands while the device is set to a language that is not supported. What did you observe?
d) Remove the Navigate element from one or more of the commands in your VCD file and run. What happens?
e) Remove the Microphone capability from the package manifest and run. What did you notice?
If you’re going to take me up on my challenge, take a moment to check out and register for the new Developer Movement, You can submit your app as part of a challenge, earn points, and get rewards.

