Save Time, Money, and Your Sanity: Coded UI Testing for the Windows Phone–Adding Assertions
This post is the continuation of my Save Time, Money, and Your Sanity: Coded UI Testing for Windows Phone series:
Part 1: Minimum Requirements and Setup
Part 2: Preparing the Coded UI Project
Thus far, you’ve setup your machine. Then, in the process of preparing the Coded UI project, you’ve added the Coded UI project and created the UI Map. Now it’s time to make it actually do something!
Step 3 – Adding Assertions
Once you have finished adding the controls under test to the UIMap, you will want to add assertions. An assertion is a conditional check that is configured against a specific property of a control. For example, checking to see if a control exists in the UI, or checking the value of a control’s display text.
To add an assertion from within the Add Assertions dialog:
- Select a control from the UIMap hierarchy.
- Highlight the property of the control you wish to perform a check against.
- Click the Add Assertion button
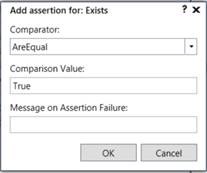
Clicking the Add Assertion button will display the Add Assertion For dialog, with the control’s selected property information, as shown below.
Next, you must select the type of comparison you wish to perform (for example: AreEqual, AreNotEqual, Contains, StartsWith, IsNull, etc.), enter the value that will be used in the comparison, and optionally enter a special message that will be displayed on assertion failure. Click OK to add the assertion.
You can continue to add more assertions at this point, or you can simply generate an Assert method based on what you have already created.
Step 4 – Generating Assert Methods
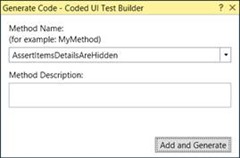
Once you have finished adding the necessary assertions, you can generate an Assert method, which will automatically generate code including the defined assertions. Simply click the Generate Code button  on the Coded UI Test Builder toolbar. The Generate Code dialog will display, as shown below.
Enter a unique name for your Assert method, then click the Add and Generate button.
Close the Coded UI Test Builder, and double-click on UIMap.uitest in the Coded UI Test project to display the list of Assert action methods that have been created along with their associated assertions, as shown below.
To view the actual code that was generated for your Assert method, double-click on the UIMap.designer.cs file, located below the UIMap.uitest node in the project.
Important Note
Do not make changes to the code within the UIMap.designer.cs file. Whenever the UIMap is changed through the Coded UI Test Builder, the designer file is regenerated, and any custom code changes you made will be lost. In order to make changes to anything within your UIMap, always make those modifications through the Coded UI Test Builder.
So far so good?
Are we still good? Have any questions? Please feel free to ask! Either post in the comments below, tweet me at @LoriBLalonde, or comment on the Facebook post on the Microsoft Developer Canada page. Try using Twitter (and make sure to use the #msdev hashtag) or Facebook – you never know, there may be others will want to join in the conversation as well.


