Publishing Your App – It’s Not The Last Thing You’ll Do
What an exciting journey the past few weeks have been. All of your hard work has culminated to this very moment - publishing your app to the Windows Phone Store. This is definitely the most thrilling and frightening part for any app developer. On the one hand, you have a huge sense of empowerment having designed, developed and tested your own product which you will now turn over to the general public. On the other hand, you’re nervous.
“What if nobody downloads my app?”
“What if I get bad reviews?”
“Maybe I should just wait and add in one more feature, or tweak the experience, or (insert 100 other excuses here)?”
“I should publish it but I know I can make it better.”
No More Excuses
Now is the time to publish your app. You can easily get bogged down with the details. The next thing you know, 6 months have passed and another developer or two has published an app similar to yours. All of sudden you’ve given up, lost hope, and trashed all of your hard work. Their apps are “better”…or are they? You didn’t even give your app a chance.
The best advice I can give you: do not delay the launch of your app. Trust your initial instinct and get it into the Store as soon as it’s ready. As long as your app serves a single purpose, and serves it well, users will embrace your app. It may not be jam packed with features, but let the users decide what additional functionality they would like to see. Trust me, they will not be shy to tell you what they think, whether it is through emails to your support inbox or through public user reviews. Don’t waste your time adding in features users may not even care about. Once you receive that feedback, make the changes within your app and then re-publish. We’ll touch on this topic later. For now, let’s go over the things you need to do to prepare your app for certification in the Windows Phone Store.
Publishing Your App – The To-Do List
The Windows Phone Store has certain requirements that you must pass in order for it to be certified and published. Along with that, you will also want to ensure that your app’s first impression to the general public is a good one. Below is a checklist you can use, to ensure you cover your bases, which addresses both of these points:
Completed? |
Pre-requisites |
Details |
. |
Include an About page in your application. |
Review Sebastien Lachance’s recent post, where he provides excellent advice on what to include in your application’s About page, and how you can use it to provide a polished, professional look to your application. |
Set up a support inbox for your application |
This is as simple as creating an Outlook account dedicated to your app. For example: [appname]_support@outlook.com Monitor this account regularly for user feedback once your app is published. |
|
Include a link to your privacy policy. |
If you do not yet have a hosted site where you can store your privacy policy page within to link to, then set up a Web Site on Windows Azure. It’s free to set up your first 10 sites, so use this as an opportunity not only to provide a link to your privacy policy, but to establish your online presence. |
|
In order to pass certification in the Windows Phone Store, you will need to be sure that you meet app and content policies, technical requirements, and application submission requirements. Bookmark this page, because it is a reference you will use each time you publish a new app to the Store. |
||
Be sure to have your assets in order (ie. application icon, tiles, screen captures, XAP file(s), etc) |
Ensure that you have all of the assets that you will need for both your app and the Store, as discussed in the App Submission Requirements. |
|
Submit your app to the Windows Phone Store |
Read on for more details! |
Now that you’ve completed the checklist, it is time to publish that app!
The Windows Phone Developer Center
You have all of your ducks in a row, and now it’s time to submit your app to the Store. You will need to log into your Windows Phone Developer Center account. As I mentioned in the previous posts, if you haven’t registered for this account just yet, you will have to register for it now! If you are a student with a DreamSpark account, or are an MSDN subscriber, you can get your account free for the first 12 months!
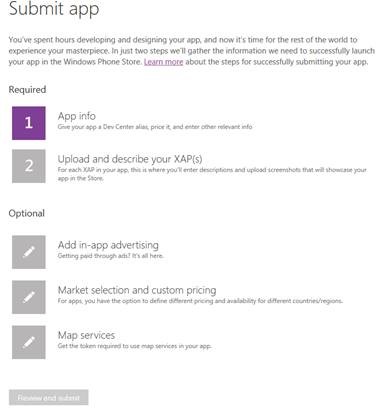
Once you are logged into your Developer Centre account, from the Dashboard, you will need to click on the Submit App link, which will take you to the following page:
At a minimum, you are required to list your basic app information, upload your XAP and related assets.
If you wish to include in-app advertising, revisit my last post, Making Money From Your Windows Phone Apps, where this step in the submission process is discussed in detail.
Market selection allows you to exclude your app from specific markets. You may want to do this if your app contains content that may be restricted in certain regions. Review section 3.10 – Country/Region Specific Requirements within Content Policies for Windows Phone. You may be able to set different prices for each region within this section as well.
If your app incorporates map services, you must generate a token here and use it within your app. This requires code changes within your app as well, to use the generated token, just as we had done for in-app advertising.
Once all of your information is set within your submission page, and your XAP and assets are uploaded, you can hit the “Review and submit” button to complete the process. At this point, your app will go through various stages. You will receive an email to let you know if your app has passed or failed the certification process.
If it has failed the certification process, there’s no need to panic. Simply correct the errors that were noted in the email, then re-submit your app.
If you would like a detailed, step-by-step breakdown of the app submission process, make sure to read though Chapter 14 – Publishing Your App in the Apress book Windows Phone 8 Recipes!
Market Your App
Once you’ve received the “Congratulations! Your app has passed certification to be included in the Windows Phone Store!” email, and your app is publicly available in the Store, you will need to spread the good news and market your app. You can do this in the following ways:
Social media – advertise your app through your social media channels: Twitter, Facebook, LinkedIn.
Review sites – submit your app to one of the many review sites that are out there. Many will post your app information for free. A couple of sites you may want to try are:
WPCentral – use the contact form to suggest your app for review. You may get lucky, and be selected.
WMPoweruser – submit your app information, QR Code which links to your app in the Store, and a couple of screen shots to this site. Your app will be posted within a few days providing you follow the requirements listed in the “Note to developers” section here.Blog post – if there was a technical challenge, or feature integration that you would like to share with the developer community, submit a blog post to a high traffic site, such as GeekChamp. You will be sharing your knowledge with your fellow peers while raising awareness of your app all at the same time. The two birds, one stone analogy comes to mind.
Monitor App Performance
Visit your Dev Centre account regularly to monitor your app’s performance in the Store, including daily downloads, overall downloads, app crash reports, in-app purchase totals, and user reviews.
Alternatively, you can download the Dev Centre app for Windows Phone, which delivers this information to your device. Pin the app’s tile to your Start screen to receive a total count of your apps downloads for the day. I find this app invaluable for monitoring my apps on a regular basis.
It Doesn’t End Here
Publishing your app is not a fire-and-forget event. It requires interaction with your user base, taking their feedback into consideration, and making the necessary changes that are most popular among your users. New features, bug fixes, performance optimizations – the list can go on and on.
Pace your updates. Set up your own project cycle and prioritize what you will handle in each phase. Do not try to do it all in one update. The more you maintain your app, respond to user feedback, and provide regular updates, then the more appealing your app will be. Users tend to download many apps, use them once, and forget about them. Providing regular updates will draw user attention, increasing the likelihood that they will use your app again…and again…and again.
Good luck with your app adventures! Both myself and the team here at the Canadian Developer Connection would love to know about your apps. Remember earlier when I said use social media to market your app? Well make sure that you tweet @cdndevs with your app name and URL so that we can check it out. Remember how I said submit blog posts to sites? Well this would be one of them as well. Send your blog post to cdndevs@microsoft.com for consideration. Just saying!

