Easy Background Processing with WebAPI and Windows Azure
The Problem
Assume, for example, that you are developing your own mobile app (or apps, in my case) and want to be able to send push notifications to these apps every once in a while.
You would require a server that will run somewhere in the background, collect new information every given interval and send relevant notifications to the client apps. You would also need to allow the mobile apps to register and unregister from that server, and supply a simple management console user interface for operations such as browsing though your logs, changing intervals and behaviors and so on.
Thinking it through you realize that you also require a SQL database, that the server has to be fully secured (you would not like anyone hacking in and pushing messages in your behalf into your mobile app, used by unknown users..), and that it has to be reliable and always ready.
Now, you could start by trying to locate a suitable and available server(s) and get it allocated for your purposes, or go out and purchase one. You would also have to make sure that the server (or servers) is licensed and installed with all that is required, from operating system through database engines, all the way to the web-server and other packages with the latest version. Your server should also be exposed to the internet but yet secured.
But even when you finally have that server running, who is going to make sure that the server is always up, operational and taken care of? What about variable bandwidth and storage capacities?
A simple and great solution for your background processing - Windows Azure.
The Solution
For my server, I start off by creating a Windows Azure SQL Database (No need to put up a fully secured, reliable, always ready SQL Server – CHECK!).
Back in my Visual Studio 2012, I use the “Server Explorer” tab to further create the tables, relations, keys etc., as Windows Azure SQL Databases act as any standard remote SQL server databases, just in the cloud. (No special tools – CHECK!)
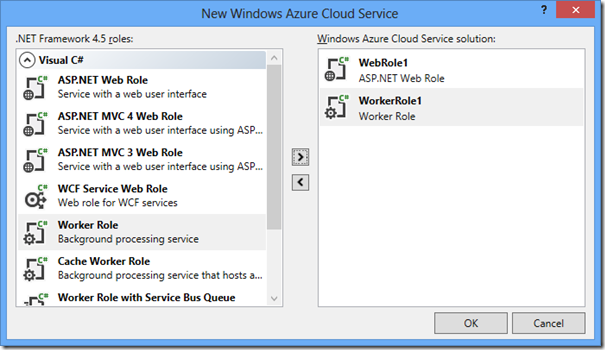
Two pieces were still missing from the puzzle: the background service and a management console. Simple solution there – I create a Windows Azure Cloud Service composed of a Worker role and Web role. The Worker role would be used for background processing and the Web role would serve as the management console and Web-API host.
NOTE
A Windows Azure Web Site would not be a good enough solution for these purposes as it becomes dormant after a short timeout of not receiving new calls, thus any background service will stop working.
You have two options: create both elements through the Windows Azure console and download a ready-made Visual Studio project, or create what you need in Visual Studio using wizards and have Visual Studio take care of creating whatever is required on Azure for you.
I usually choose the latter as it is easier for me to do it all from the Visual Studio environment, where I have everything I need. You would need to install the Windows Azure SDK in order to have the cloud options in your Visual Studio.
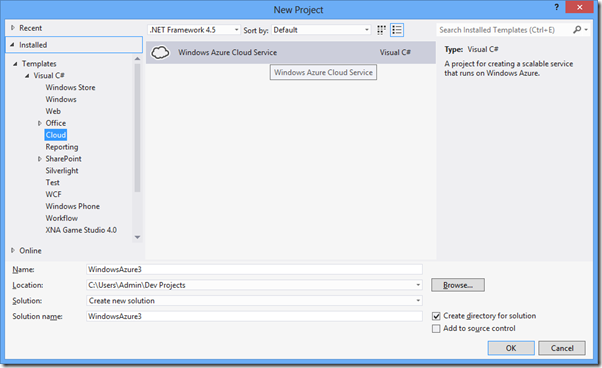
Creating a cloud service is as simple as “File/New/Cloud/Windows Azure Cloud Service” (assuming you already have the required live account):
and selecting the desired roles:
The wizard creates ready-made solution and projects for the selected roles, already set to work with Entity Framework 5. The Worker role project already contains stubs for the “Run” and “OnStart” method overrides, allowing you to inject your business logic into the background service, while the Web role (if the preferred MVC 4 pattern selected) is already a full-blown website, with REST support, controllers, models, and everything that you need to form a secured websites, including pre-defined ASP.NET membership.
At this stage, both projects can already be published to Windows Azure. You only have to worry about your specific code. You can also debug both projects using the Visual Studio and the “Windows Azure Compute Emulator” and “IIS Express”, that are installed as part of the Windows Azure SDK install.
So, what do we have here?
We just setup a WebAPI server, a website and a background service running against a SQL server in record time and with minimal effort. Having all of them running on Windows Azure, we also ensured reliability, manageability and consistency for our services.
Using the above steps, it took me less than a day to complete the rest of the code logic and get a push notifications server up and running. Want to see it in action? Check out the Toronto Events and Festivals Windows 8 and Windows Phone 8 apps as well as the Trashswag Windows 8 and Windows Phone 8 apps. Both use this background processing cloud service architecture to collect new information and send notifications to the apps.
If you’d like to go deeper into this concept, I’ve put some demo code on my SkyDrive. Going through the examples, you’ll see that there was very little code required in order to get Windows 8/Windows Phone 8 apps connected to the WebAPI based Windows Azure app. Please note that the WebAPI MVC 4 project uses a bunch of NuGet packages, automatically installed by the wizard within my project. Write me or comment below if you have any questions or need some help.

