Azure Batch 云的大计算服务 以Monte-Carlo实验为例
很多使用者在谈到云的时候,都会想到使用云来弥补自己数据中心的不足。有些客户会把自己的活动网站放在云上以应付短期而大量的需求,有些客户使用现成的PaaS服务(如HDInsight)以减少准备及维护的时间。
回想看看,平常工作中是否有下列特性的作业:
- 此项作业耗费大量时间
- 此项作业耗费大量处理器的资源
- 结果取决于运算的效率与品质
在这个时候,Azure Batch很大程度上能够帮助你最佳化运算的效率并且节省你的成本。想像你原本只有一台服务器每周需要花十个小时的时间完成运算取出结果(当然你需要负担一周的成本),现在你只需要十分钟就能运用60台服务器取出结果(你只需要负担大约10服务器/小时的成本,是原本的1/24)。
下面是一些Azure Batch的典型场景:
- 财务模型
- 影片与动画制作
- 基因工程
- 其他的软件工程运算
在本文中将会介绍Azure Batch的运作原理,并以财务模型为例,介绍如何开发应用在Azure Batch上及相关的注意事项。
首先,Azure Batch的基本原则是平行计算,也就是我把一件大事情拆分成许多小事情,分给不同的服务器去做,所有人完成了,再把结果集成起来。因此,一个重要的先决条件在于应用程序是否能够很好的进行任务拆分,而拆分的结果是否存在critical path(其中的某个任务需要执行特别长的时间),都会影响到最后的表现。
下图首先说明Azure Batch的运作流程:

- 首先需要上传所需的参考文件或来源文档(如.txt)。
- 接着上传执行用的应用程序(如.exe及.dll)。
- Azure Batch会将这些数据放到资源池中的机器。
- 接着,Azure Batch将会根据收到的任务,分配给资源池中的机器。
- 过程中,Azure Batch或监控执行的状态决定是否分配新任务或结束工作。
- 当所有任务完成时,回传结果。
在此我将会演示一个使用Monte-Carlo的财务模型,如何透过Azure Batch改善其表现。
Monto-Carlo是一种模拟的方式,透过产生大量的乱数样本去对模型进行验证,最终产生一个预测或结果。理论上,越多样本的情况下,产生的预测越准确。在复杂的财务模型中,将耗费很长的时间。
本次验证的范例来自QLNET(https://github.com/amaggiulli/qlnet),一个基于.Net开发的财务模型库,而我基于其中的范例进行修改使其可运用Azure Batch所提供的运算资源。
本地运行结果如下,耗费了约8分钟的时间
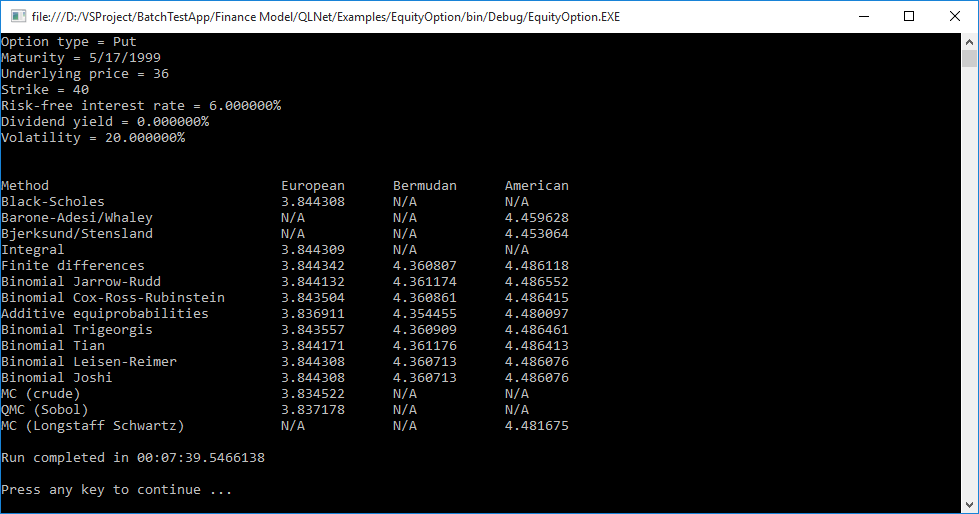
检视其原始码,其中可发现一段基于Monto-Carlo的运算,占据大部分所耗费的时间:
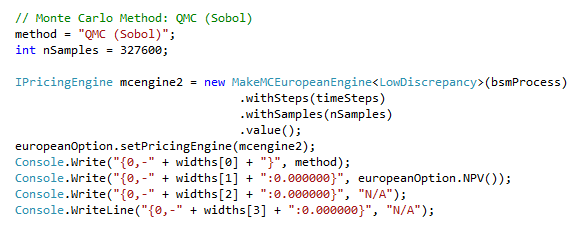
这段程序主要做的事情在于透过Monte-Carlo将产生的327600个样本输入模型并进行处理得到最终的值。
这里我们的目的为在Azure Batch上产生20个Node(小型VM 1 core 1.7GB)帮助我们进行运算,拆分步骤如下:
- 将程序进行拆分:在这边简单的将原先需要的327600个样本透过20个node来产生,也就是每个node各产生16380个样本。
- 创建Azure Batch资源池:
首先,需要先定义所需要使用的参数(当然你必须在Azure上先创建好Azure Batch及Blob Storage)
private const string BatchAccount = "";
private const string BatchKey = "";
private const string BatchRegion = "";
private const string BatchUrl = "";
private const string PoolId = "";
private const string StorageAccount = "";
private const string StorageKey = "";
private const string StorageBlobEndpoint = "";
private const int PoolNumber = 20;
private const int TaskNumber = 20;
下面的程序码用于创建Azure Batch资源池,这边会先做一个检查是否已经有相同名称的资源池,同时加上一个重试的机制
BatchSharedKeyCredentials cred = new BatchSharedKeyCredentials(BatchUrl, BatchAccount, BatchKey);
using (BatchClient client = BatchClient.Open(cred))
{
client.CustomBehaviors.Add(RetryPolicyProvider.LinearRetryProvider(TimeSpan.FromSeconds(10), 3));
bool found = false;
foreach (CloudPool p in client.PoolOperations.ListPools(new ODATADetailLevel(selectClause: "id,currentDedicated")))
{
if (string.Equals(p.Id, PoolId))
{
found = true;
if (p.CurrentDedicated == 0)
{
Console.WriteLine("There are no compute nodes in this pool. No tasks will be run until at least one node has been added via resizing.");
Console.WriteLine("Resizing pool to add 3 nodes. This might take a while...");
p.Resize(3);
}
break;
}
}
if (!found)
{
CloudPool pool = client.PoolOperations.CreatePool(PoolId, targetDedicated: PoolNumber, virtualMachineSize: "small", osFamily: "2");
pool.Commit();
}
3. 上传所需的应用程序,文件及相依元件:Azure Batch在这边的作法是把所需要的文件放在一个Blob Storage里面,然后再放到资源池中。
StagingStorageAccount stagingStorageAccount = new StagingStorageAccount( StorageAccount, StorageKey, StorageBlobEndpoint);
string PMCexeName = "MCQMC45.exe";
FileToStage batchExe = new FileToStage(PMCexeName, stagingStorageAccount);
FileToStage batchDll = new FileToStage("QLNet.dll", stagingStorageAccount);
值得注意的是,这边的MCQMC45.exe是将之前的程序改写产生的.exe档案。
4. 递交工作及任务给Azure Batch:首先计算每个node需要产生的sample数目,接着产生工作并将任务递交给Azure Batch,在任务中同时传递了执行的指令与参数。最后的部分则是一个等待的机制(包含20分钟的timeout设置),等待所有的任务执行完成后,再进行接下来的部分。
int sampleremainder = nSamples % TaskNumber;
int samplepertask = (nSamples - sampleremainder) / TaskNumber;
string JobID = "EquityOptionPMCCompute";
CloudJob unboundJob = client.JobOperations.CreateJob();
unboundJob.Id = JobID;
unboundJob.PoolInformation = new PoolInformation() { PoolId = PoolId};
unboundJob.Commit();
List<CloudTask> tasksToRun = new List<CloudTask>(TaskNumber);
for (int i = 1; i <= TaskNumber; i++)
{
CloudTask task = new CloudTask("task_no_" + i, String.Format("{0} -task {1} ",
PMCexeName,
samplepertask));
task.FilesToStage = new List<IFileStagingProvider>
{ batchExe,
batchDll
};
tasksToRun.Add(task);
}
ConcurrentBag<ConcurrentDictionary<Type, IFileStagingArtifact>> fsArtifactBag = new ConcurrentBag<ConcurrentDictionary<Type, IFileStagingArtifact>>();
client.JobOperations.AddTask(JobID, tasksToRun, fileStagingArtifacts: fsArtifactBag);
CloudJob job = client.JobOperations.GetJob(JobID);
IPagedEnumerable<CloudTask> ourTasks = job.ListTasks(new ODATADetailLevel(selectClause: "id"));
client.Utilities.CreateTaskStateMonitor().WaitAll(ourTasks, TaskState.Completed, TimeSpan.FromMinutes(20));
5. 本地数据处理与分析:当所有任务都完成后,可以开始进行本地的数据分析处理。这里我简化了模型,简单的将数据加总后平均
foreach (CloudTask task in ourTasks)
{
String Result = task.GetNodeFile(Constants.StandardOutFileName).ReadAsString();
ComputerResult += Convert.ToDecimal(Result);
}
Decimal PMCResult = ComputerResult / TaskNumber;
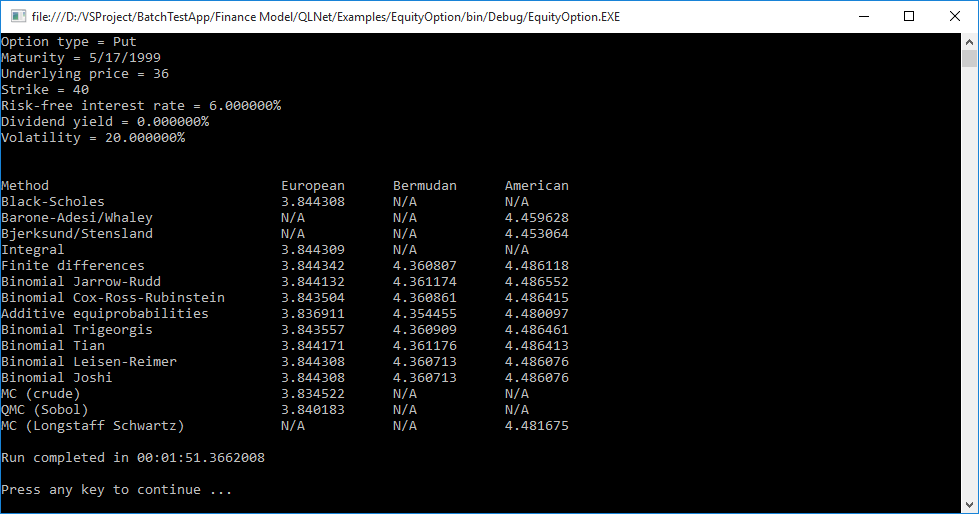
在上述步骤完成后,就可以透过Azure Batch在较少的时间内完成原本的工作了。
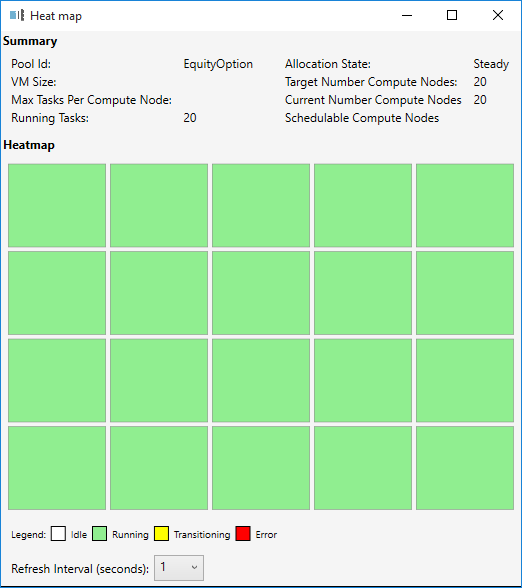
另外,也可以透过Batch Explorer(https://blogs.technet.com/b/windowshpc/archive/2015/01/20/azure-batch-explorer-sample-walkthrough.aspx)来监控执行的状况。这个工具将对Azure Batch进行监控,能让你随时掌握目前工作执行的状态及资源池的情况,同时可删除闲置的工作与资源池,是相当实用的工具。
小结
Azure Batch是基于以前HPC (High Performance Compute)的基础上进行开发,已经是相当成熟的技术。透过Azure
Batch能够充分利用Azure上的资源,节省本地的运算及营运成本,同时提升运算的效率。在本文中做了一个基本的改写范例,希望透过这样的方式让大家能更熟悉对Azure
Batch的操作。
参考文献
Azure Batch Documents: https://azure.microsoft.com/en-us/documentation/articles/batch-technical-overview/
QLNET: https://github.com/amaggiulli/qlnet
Azure Batch Sample: https://github.com/Azure/azure-batch-samples