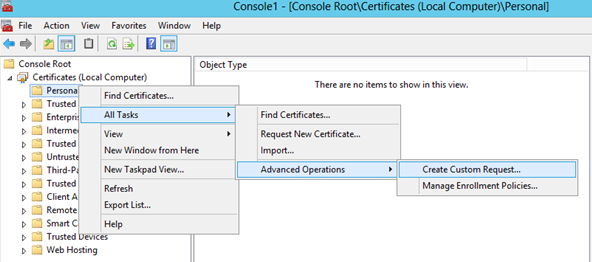
Setting up a Office Web App Farm for Lync Server 2013
Hi All
I have been recently playing around with an Office Web App Server deployment to support a Lync Server 2013 environment. I thought I'd share my learning's regarding the web farm deployment I did in my lab to test my production build process. On the whole the experience was very good and it was reasonably easy to get up and running, but to make it even easier I thought I'd put together a step by step blog of what I did. When I looked at how I would get a multi server Office Web Servers farm running I decided I would deploy two Office Web App Servers to serve up conferencing content, load balanced using a Kemp Load Balancer. I mainly elected to use a Kemp Load Balancer as I play around quite a bit with a Hyper-V Kemp virtual machine I have on my laptop, so it was the logical choice. The Kemp Load Balancer is easy to use and is great for lab scenarios (and I am sure production scenarios too). I am sure the key Hardware Load Balancer configurations I have used can be redeployed to other HLBs on the Infrastructure qualified for Lync Server 2013 program. Anyway back to how to do it.
BTW, I am going to call my servers WAS servers, shortening Office Web App Server to WAS. You will see me often say WAS server so my apologies I know an ATM machine is not the correct thing to say, but I am not much of a grammatical scholar (stuff like this really bugs my wife so I better not let her read this! :))
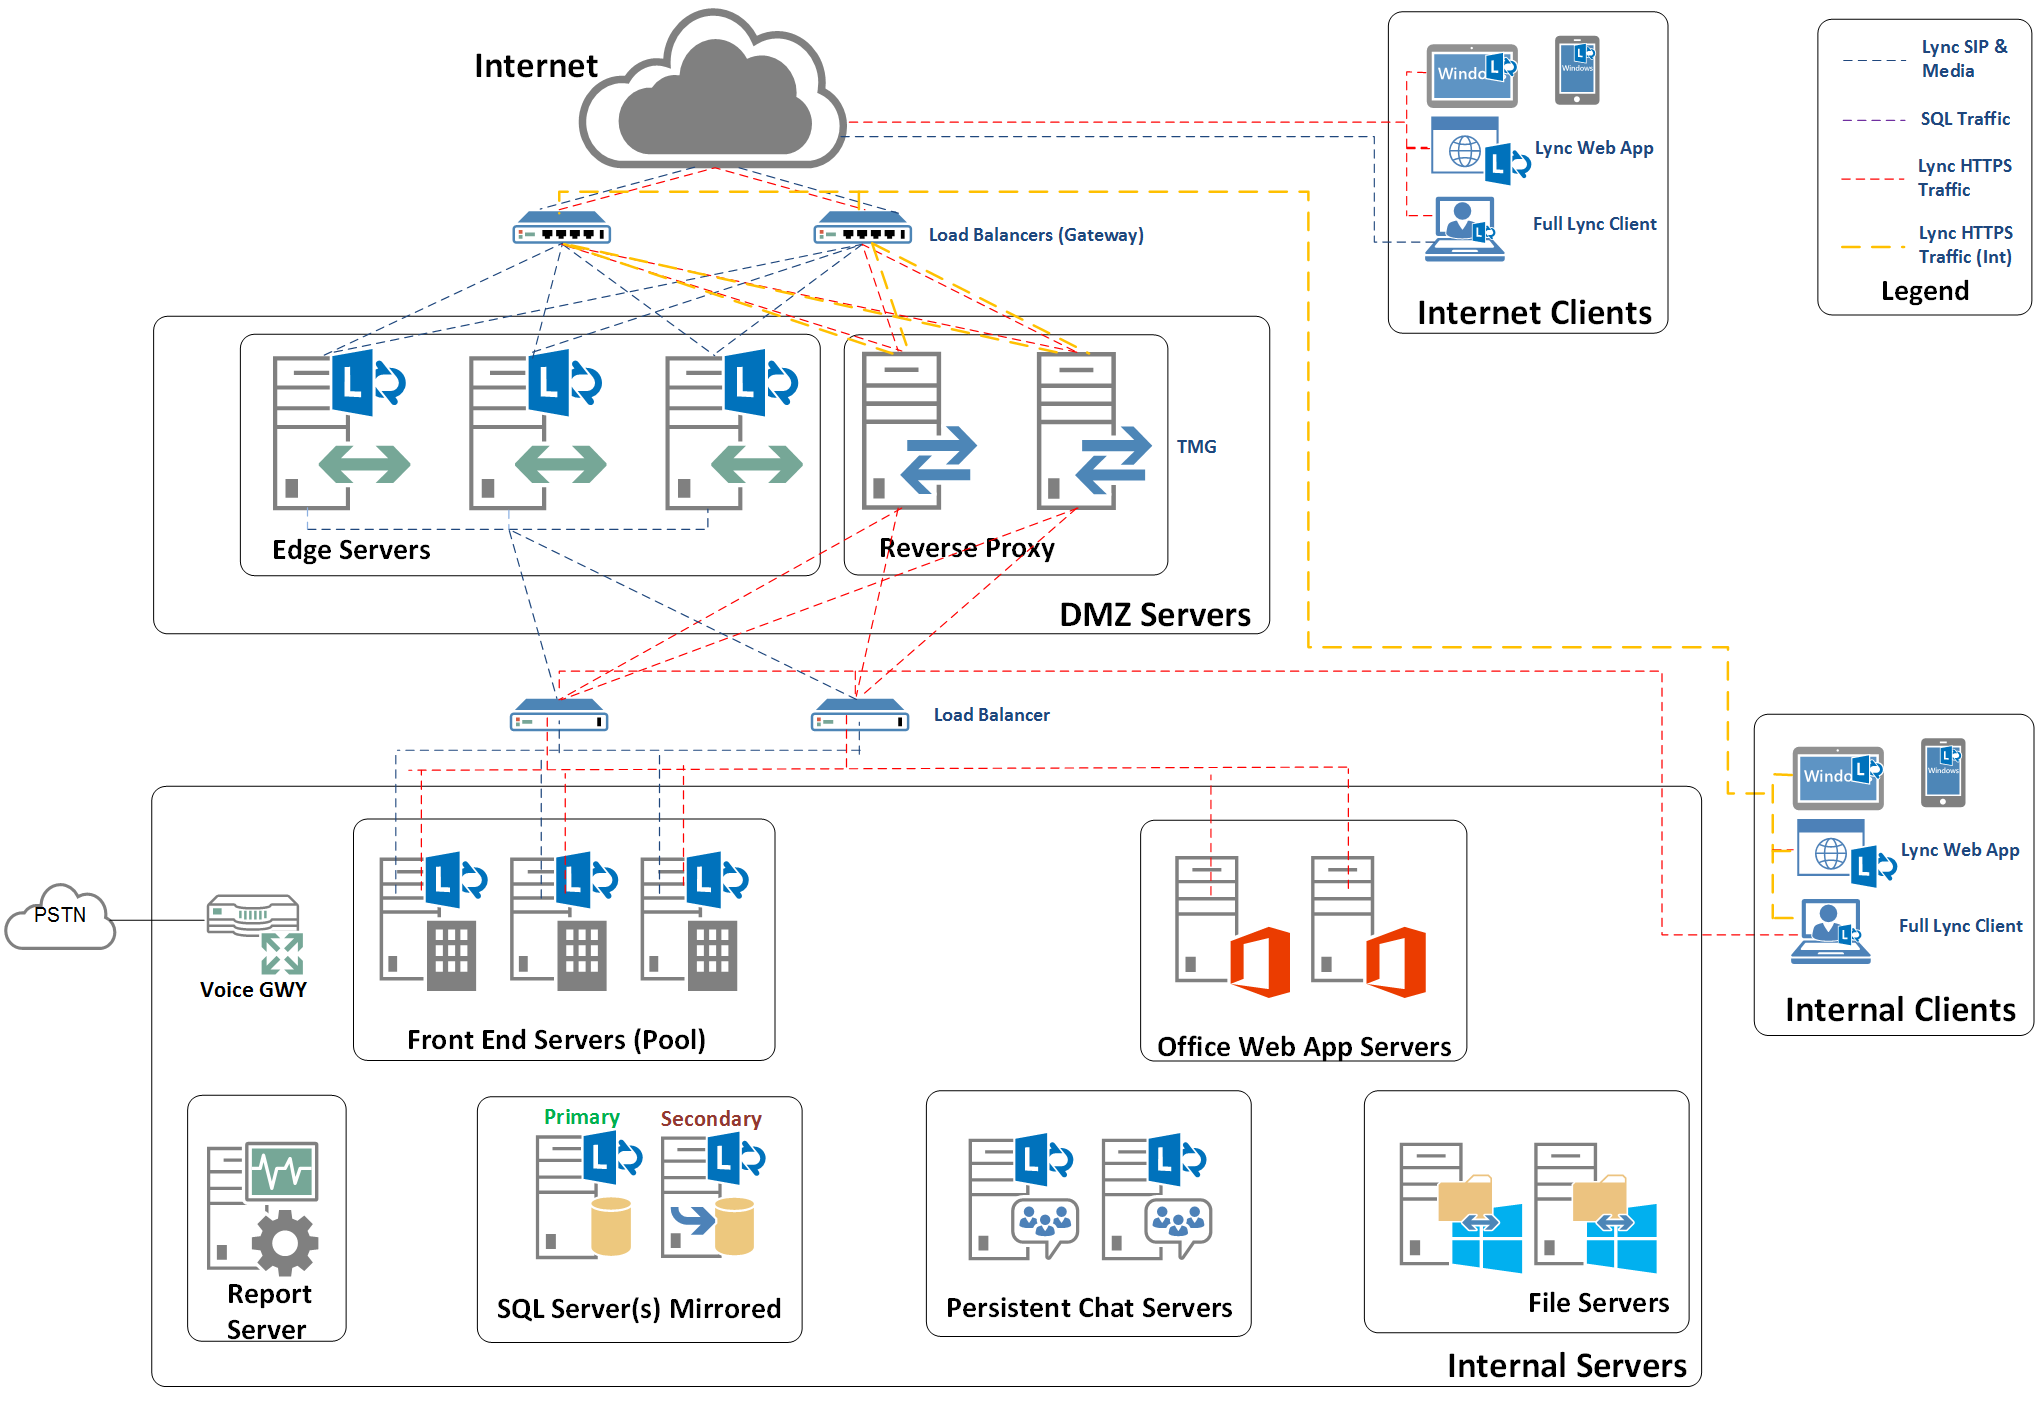
Figure 1 - My plan for the lab build (although I didn't end up building all of this ::)
Funky diagram hey! I love the new Lync Server 2013 Visio stencil, which you can get from here https://www.microsoft.com/en-us/download/details.aspx?id=35772
What's the high level process?
The overall farm deployment process is :
- Install the WIndows Server 2012 Operating System on each machine;
- Deploy the Windows pre-requisites required for the Office Web App Server role.
- Create the Web Farm certificate
- Install Office Web App on each WAS server (including the KB2760445)
- Configure the Office Web App Farm in Powershell (on first Web App Server)
- Add additional servers to the Farm;
- Configure Load Balancing of your Web Farm;
- Test the Office Web App Farm Discovery URLs;
- Add the Office Web App Farm to your Lync Topology
- Publish Web App Farm URL via Reverse Proxy (I am not going to cover this in this blog).
Well the first thing I needed to do was to get my Lync Server 2013 Front Ends built and configured. I am going to assume that you would like to see how you add a Office Web App Server farm in Topology Builder although this is a no brainer (I'm really including for completeness).
The next stage is to deploy your two Office Web App Servers. My two Office Web App Servers are called was01.contoso.org and was02.contoso.org.
Deploy the Office Web App Pre-Requisites (on each WAS Server)
I usually use Powershell to add my pre-requisites, that way I make sure I do the same thing each time I deploy a particular role (I keep all my Powershell install commands in my Lync commands cheat sheet).The command you will need to run on Windows Server 2012 (no need to import-module on Server 2012) is:
Add-WindowsFeature NET-HTTP-Activation,NET-Non-HTTP-Activ,NET-WCF-HTTP-Activation45,Web-Includes,Web-Static-Content,Web-Windows-Auth,Web-Mgmt-Console,InkAndHandwritingServices -source r:\sources\sxs -restart
NOTE: I have added the -source flag which is a reference to the Windows Server 2012 installation media (a bit like the i386 directory of old on Windows Server 2003). I have simply mounted the Windows Server 2012 ISO (my R: drive) on my virtual machine, but you may choose to copy the Windows Server 2012 Sources media to somewhere on your server.
Create the Office Web App Farm Certificate
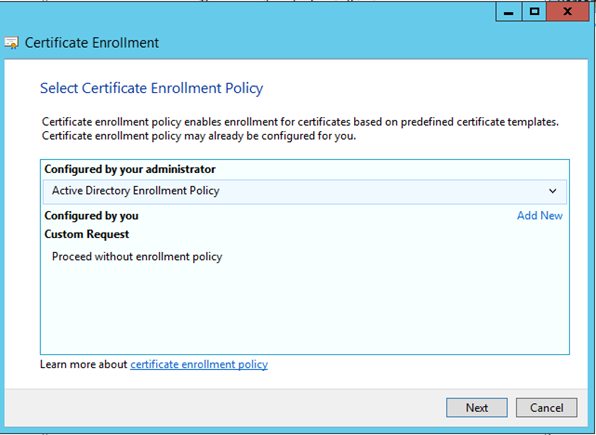
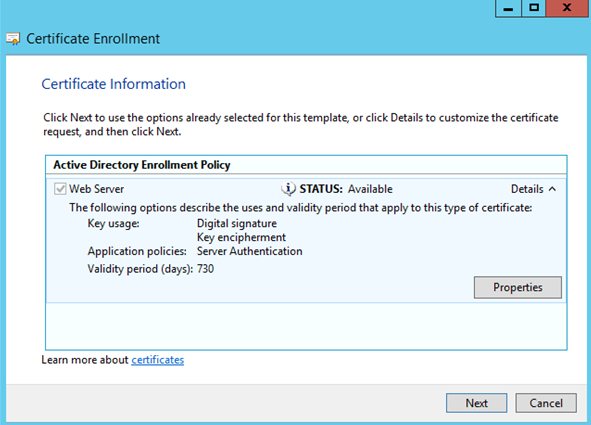
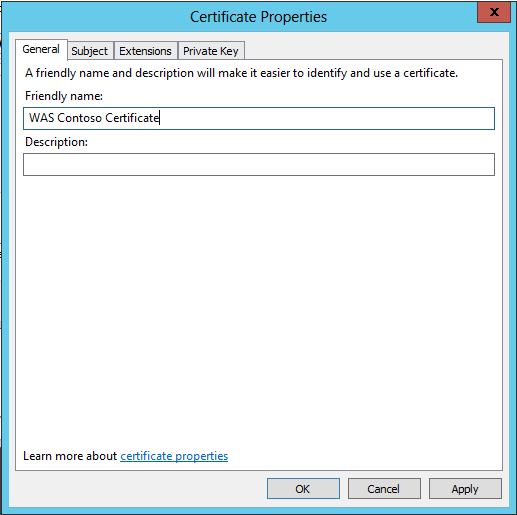
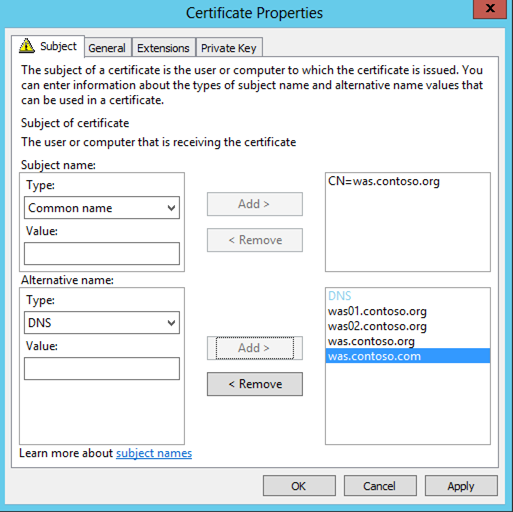
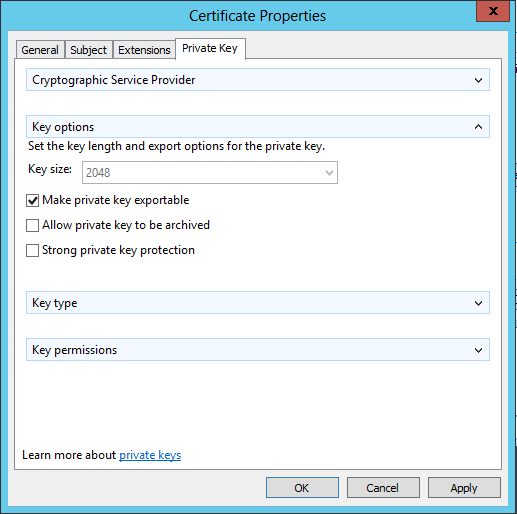
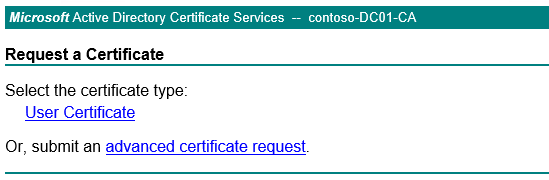
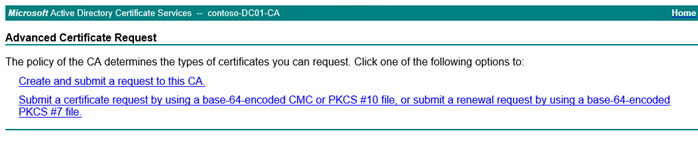
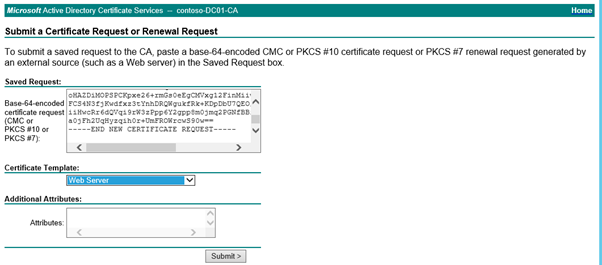
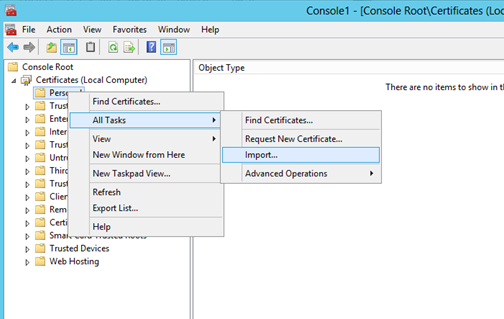
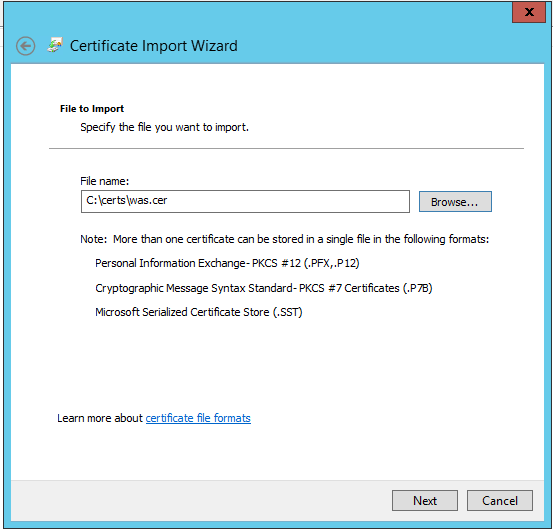
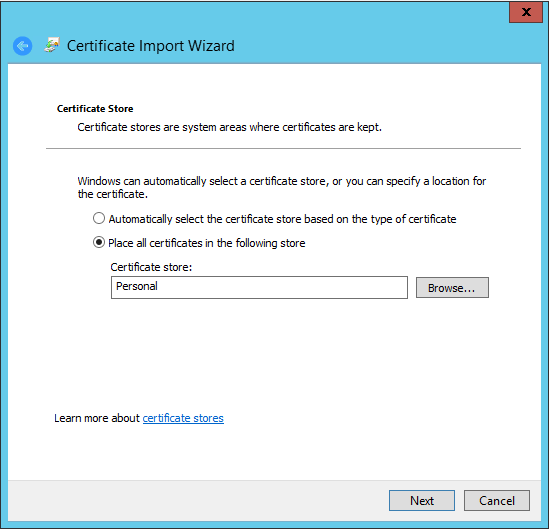
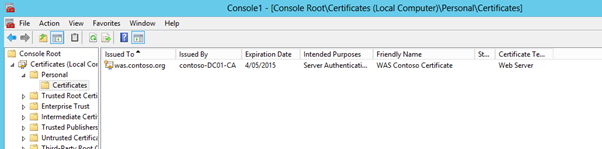
The next step is to apply for a certificate from your internal CA for the Office Web App farm. This request (and certificate creation) will be performed on one of your Office Web App Servers; and then once the cert is created it will be exported and installed on each of the subsequent Office Web App servers. So it is important to request your certificate with the Mark Private Key as exportable option. The other thing I am going to do when I generate the request is make sure that I have in the Subject Alternative Name (SAN) field for the certificate the FQDNs for each of the WAS servers. I don't believe this is strictly required as the Lync servers will talk directly to the farm and don't know about the individual WAS servers. I'll post more on this when I have done some more digging into whether this is strictly required. Technically, you can create this certificate after you have installed the Office Web App application, but the step must be done before the creation of the Office Web App farm. I am doing it at this point so I can get the certificate on each WAS server before I commence the install.
The key things to know about this process are (this has a lot of pictures so I am going to include these steps at the end of this blog):
- Make sure your certificate is created with the private key marked as exportable, so you can have the same certificate on each WAS server;
- Add the FQDNs of your Office Web App servers as a Subject Alternate Name on the certificate;
- Make the common name of the certificate as the name you choose for the WAS farm (the internal FQDN of the WAS farm). For me this was was.contoso.org;
- Add the FQDN of the external URL for your WAS farm. I don't believe this is strictly required as the external URL will be terminated on the reverse proxy. (I will post back on this topic to confirm whether or not the external name is required for Office Web App Farm. This I different for Lync FEs which require the external web service name be included on the certificate).
- The Friendly name of the certificate will be referred to when creating the WAS Farm, so use a name that is simple and write it down for use in a later installation step;
- The Certificate will need to be exported from the first server in the farm where the request is performed, and then imported into each subsequent WAS server's Computer/Personal certificate store;
- Make sure the Office Web App Farm name is also included as a Subject Alternate Name as well as the common name of the certificate. i.e. make sure was.contoso.org is a SAN on the certificate.
Install Office Web App on each WAS server
The next stage of the process is to install Office Web Apps Server on each of the WAS servers. The good news is for us "Next Next Kids" the installation process is pretty much that, Next Next Next and you are done. So put the Office Web Application Server 2013 in the WAS server's DVD drive. The only decision you'll have to make at this point is what directory you wish to install the Office Web Apps media in. Install Office Web Apps Server on each WAS server.
Next you need to install the Office Web Apps Server 2013 KB 2760445 update, which is the major Office Web Apps patch released in March 2013. You can find the update here https://support.microsoft.com/kb/2760445. It's a big patch so don't be surprised when you kick off a 500MB download :).
Once you have installed the KB, restart the WAS server.
Configure the Office Web App Farm in Powershell
Next we'll setup the WAS farm. I have elected to call my Web App Farm was.contoso.org. On the first WAS server in your farm (doesn't matter which one), fire up a Powershell session as an administrator. You'll then run the following commands:
import-module OfficeWebApps
New-OfficeWebAppsFarm -InternalUrl https://was.contoso.org -ExternalUrl https://was.contoso.com -CertificateName "WAS Contoso Certificate" -AllowHttp
NOTE: The -CertificateName argument uses the "Friendly Name" of the certificate that you created in previous steps, so make sure you get this argument right.
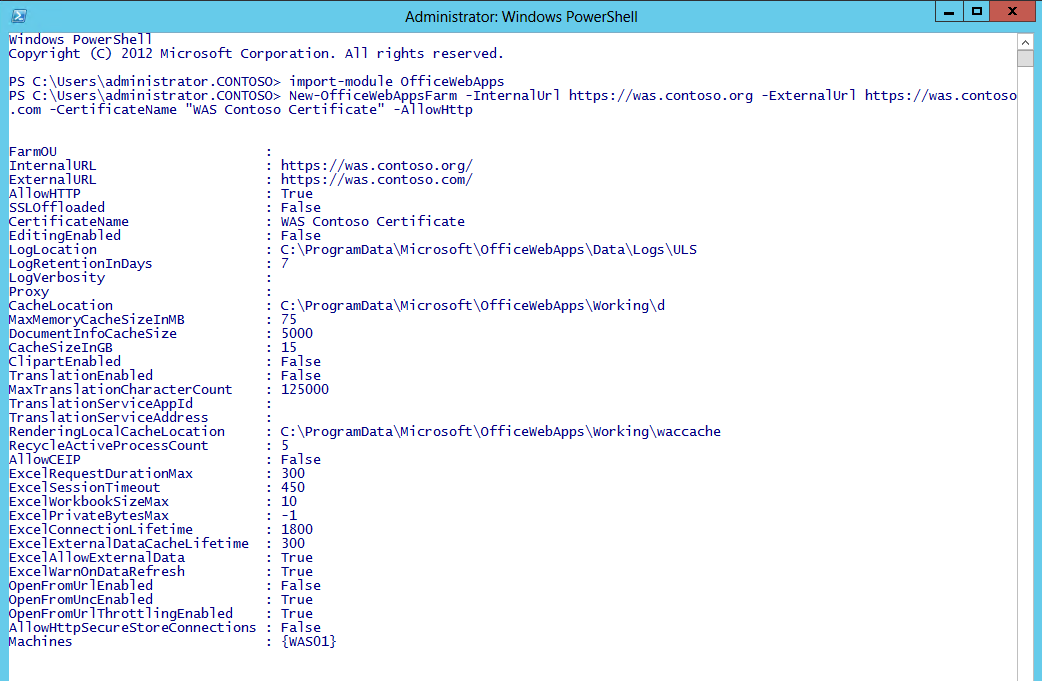
Figure 2 - Create the Office Web Apps Farm
The other command that we can optionally run is the New-OfficeWebAppsHost cmdlet which is used to control what hosts can connect to the Office Web App Farm. If you are deploying your WAS servers in a DMZ where you want to control what machines connect to the farm, make sure you use this command. This is discussed further here https://technet.microsoft.com/en-us/library/jj219459.aspx.
If I was to use this command in my deployment I would perform the command. This is an optional command and is typically performed for security reasons.
New-OfficeWebAppsHost -Domain "contoso.org"
Add additional WAS Servers to the Office Web App Farm in Powershell
So at this point we have a working WAS farm on the first server you have. The next step is to add additional WAS servers to the farm. Again we do this with Powershell. My first WAS server was called WAS01.contoso.org. This is important as on each subsequent WAS server I am going to reference that first WAS server which we created the farm on. So on my 2nd WAS server, WAS02.contoso.org, fire up a Powershell session as Administrator and run the following command:
Import-Module OfficeWebApps
New-OfficeWebAppsMachine -MachineToJoin "was01.contoso.org"
NOTE: It is very important that you run this command on the new WAS server (WAS02), and reference the first WAS server (WAS01) you created the WAS farm on.
So if you have 2,3,4 or more WAS servers in your farm just make sure you run the above command on each of the WAS servers, other than the first machine which you used to create the WAS farm.
You will get notification from the command that the new server was added correctly.
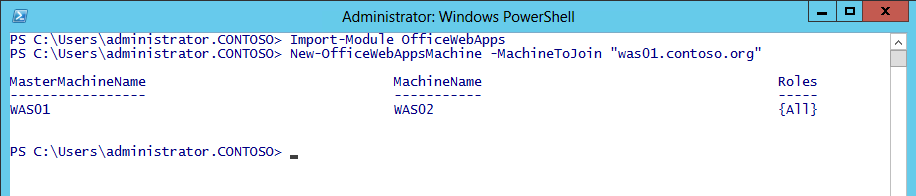
Figure 3 - Add additional servers to the Office Web Apps Farm
If you get this error when attempting to add a WAS server to the FARM it is because you haven't exported the WAS farm certificate from the first or primary WAS server in the farm, and then imported into the Computer Personal Certificate store, so the same certificate can be utilised by this subsequent WAS server.
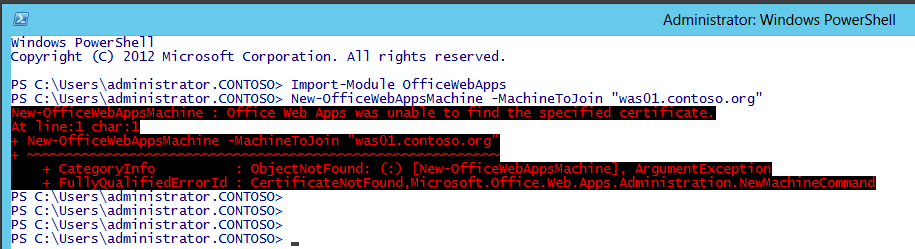
Figure 4 - Adding WAS servers without the Farm certificate imported
Now that I have both WAS servers in the farm I should be able to navigate to the https://was01.contoso.org/hosting/discovery and https://was02.contoso.org/hosting/discovery URLs to confirm the WAS server is operating correctly. I save what this looks like for the final test once the HLB configuration has been done. It is a good idea to make sure at this point that each individual WAS server works fine.
NOTE: For these 2 URLs to work correctly (with no HTTPS errors) you will need to make sure that the WAS FQDNs are on the WAS farm certificate.
Configure Load Balancing and add the DNS record for the WAS farm
Now that we have two working WAS servers and a WAS farm we need to configure load balancing of traffic across the two WAS servers. As I mentioned earlier I am going to do this using a very vanilla HLB configuration, but hopefully the high level approach will be re-usable in your respective environments. I am using a Kemp Loadmaster v6.0-34 for Hyper-V. It works well and fills the role of my lab HLB beautifully.
I have not configured SSL Offloading, so I will be using the HLB to purely manage connections from clients to each of the two WAS servers. The key configurations I have setup in my Kemp HLB are:
- Service Name: WAS 443
- Service Type: HTTP/HTTPS
- Persistent Options: Mode - Source IP Address, Timeout: 20 minutes
- Scheduling Method: Least Connection
- And I have used the /hosting/discovery URL to be used by the HLB on 443 as a HTTPS request to ensure each server is still up and running;
I've included my WAS service configuration options from the Kemp VLM below:
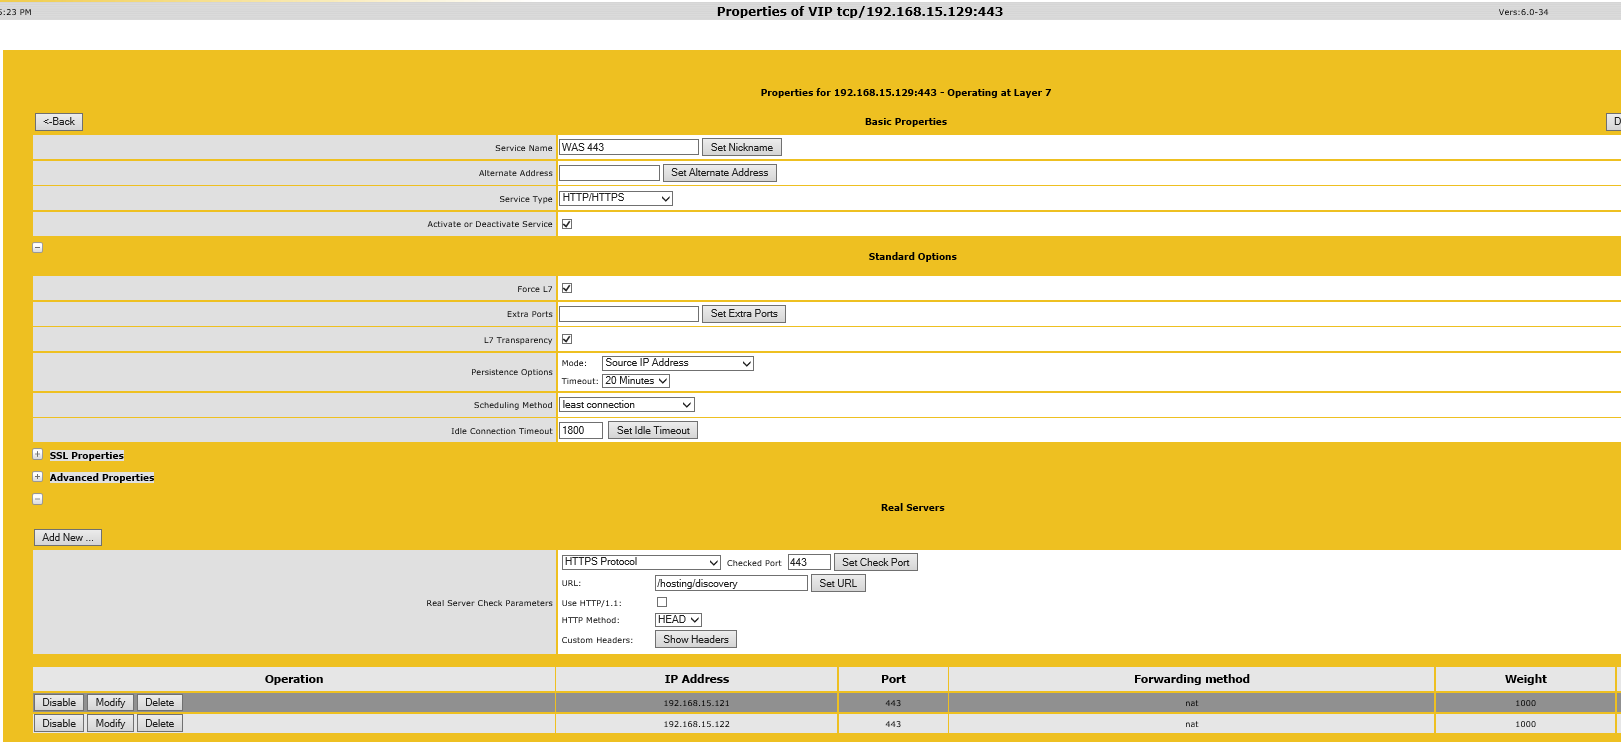
Figure 5 - WAS HLB Service Configuration
I then added a DNS record for the WAS.contoso.org FQDN into my internal contoso.org DNS zone. The IP address of the farm should align with the Virtual IP being hosted by your load balancer.
I can now open a browser and attempt to navigate to https://was.contoso.org/hosting/discovery. If things are working well I should be presented with a bunch of XML from the WAS farm.
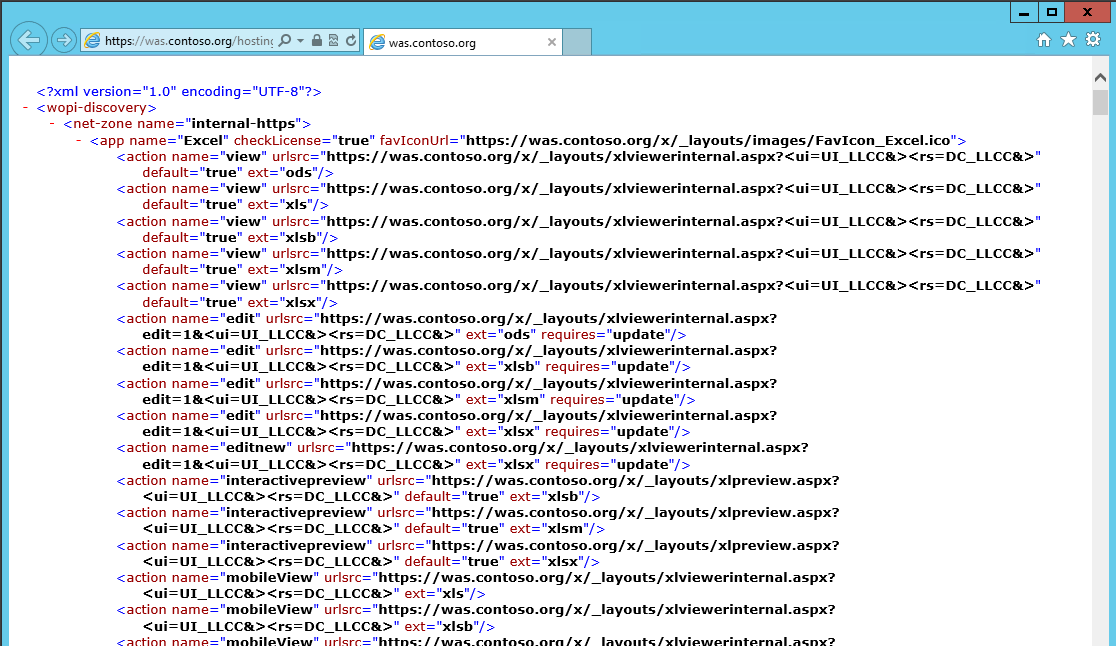
Figure 6 - WAS Hosting Discovery URL XML results
Add the WAS servers to the Lync Server 2013 Topology and associate to the Front End pools
Next let's fire up Lync Server 2013 Topology Builder. In the Shared Components section add a new Office Web Apps Server, make sure the FQDN of the farm is the same as the Common Name of the WAS certificate. I expect most deployments of Office Web Apps Server will be deployed internally so for this blog I have deployed this farm as an internal farm. It is important to note that technically this change can be done before or after you have deployed your WAS farm. In order to make sure a non-existent WAS farm wasn't being contacted by Front Ends I elected to add the WAS farm to the topology after having the WAS farm setup and running beautifully.
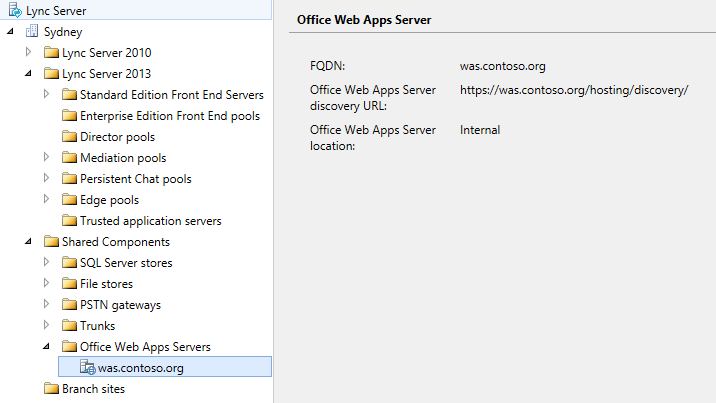
Figure 7 - Add the Office Web Apps Farm to the Lync topology
Once you have added the WAS farm to the topology we need to make sure that each Front End pool in your Central site are consuming the new WAS server. Go to the properties of your Front End pool and associate the new WAS farm.
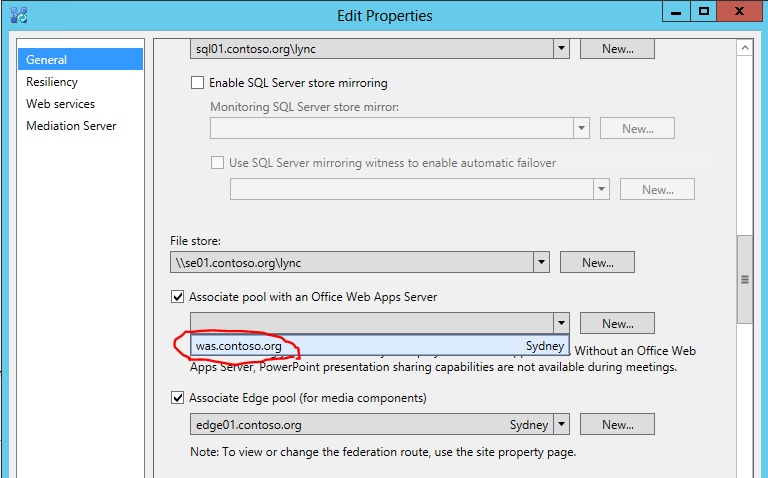
Figure 8 - Associate the Office Web Apps Farm to the Lync Front End pools
The WAS farm is now associated with my Front End Pool. Now publish the changes you have made and wait for the topology changes to replicate out to all your Lync servers.
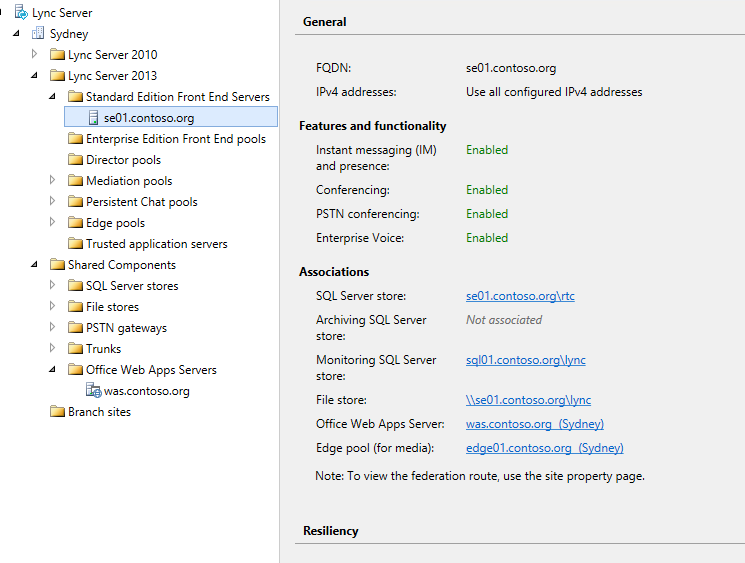
Figure 9- Associated Office Web Apps Farm in Lync TB
Once these changes have replicated to your Front End Servers you should receive some success messages (Source: LS Data MCU, Event Id:41032) in the Front Ends "Lync Server" event log.
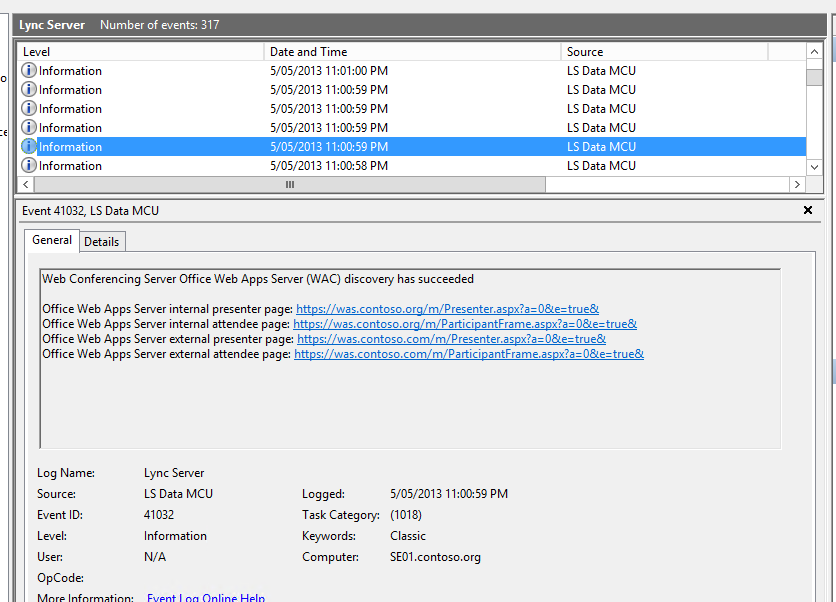
Figure 10 - Front End is successfully talking to the WAS server
You can also use the following commands to check each of your Front Ends are logging 41032 success events.
Get-Eventlog -logname "Lync Server" -computername fe01.contoso.org -after (get-date).adddays(-1) |where {$_.source -match "ls data mcu" -and $_.eventid -eq 41032}
Get-Eventlog -logname "Lync Server" -computername fe02.contoso.org -after (get-date).adddays(-1) |where {$_.source -match "ls data mcu" -and $_.eventid -eq 41032}
You now have a working WAS farm that is ready to rock and roll and be utilised by Lync. Just remember that the WAS farm is accessed directly by Lync clients so you will need to make sure that your WAS servers can be contacted by clients in your network, and you don't have any firewalls blocking this HTTPS traffic. This of course also goes for those staff working externally, they will need to access the WAS external URLs via your Reverse Proxy. I won't go into specifics on setting up WAS for remote access in this blog, and will get to this topic in a future blog.
HTH and Happy Lync'ing.
Steve
PS I included the screen shots I used to create the first certificate on WAS01, as it is not completely straight forward. Sorry about the lack of comments around those screen shots, it is late where I am and I am desperate to go to sleep!
PPS If you have any questions please feel free to use the Email Blog Author link up on the right of this page.
[UPDATE - August 2015]
I have written a new blog post on simplifying the OWA certificate creation process. You can find the blog here.....https://blogs.msdn.com/b/canberrapfe/archive/2015/08/19/simplifying-creation-of-office-web-app-2013-farm-certificates.aspx
(ignore the dialogs below and go and have a look at the new post, I promise a lot easier and all with the command line)
---------------------------------
Create the Office Web App Farm Certificate (Appendix)