Manage Change, Mitigate Risk: Part Three
( For those of you just joining, please see Part One and Part Two. Thanks! )
Third Step: Establish test data
Cool! Now we are off-line, we have a testing database all ready to test against, all in the comfort of our own “sandbox”. Now let’s talk about another large topic: How to create the data that we can fill our test database with and ultimately test against.
There are a number of big challenges to testing databases in today’s environments, not the least of which is the data you use to test against. What data do you use to test your databases? Many organizations do not have the luxury of testing against production data ( enter the onslaught of government regulations ).
We have created a rich test-data generation mechanism to handle this problem. I will dip into just a sliver of the functionality that you’ll find in our data generation feature, but let me outline some of the highlights:
- Since we have a full-up off-line representation of your database meta data, data generation can be done with full adherence to the referential integrity constraints resident in that meta data. So data is generated in the proper order, etc.
- We attempt to give you as many switches and knobs to control how data is generated, down to the column level, in order for you to create data that looks as close to production data as possible, yet isn’t production data!
- One of these knobs is the ability to import actual statistics from your production database and have that histogram and distribution information drive the data generation designer that you’ll see in a second. HOWEVER, this functionality did not make our TechEd CTP, so stay tuned!
- We give you the ability to control not only how many rows to insert, but establish explicit relationships between tables that have relationships expressed in the meta data, and drive a ratio that can control the number of rows generated for this table, vs. another. ( More on this later )
- We provide a rich and extensible “Generator” mechanism that will allow you to write custom generators to support your UDTs, UDAs, etc., as you see fit. In fact, that same mechanism is used by us to give you the generators that we ship out of the box. We’re “eating our own dogfood” in this regard.
So let me show you some of this capability.
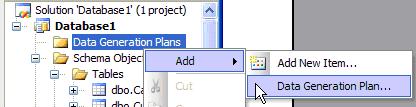
Back to our database project, let’s right click on the “Data Generation Plans” node, and select Add->Data Generation Plan…:
I’ll just take the defaults and hit the “Add” button in the resulting dialog.
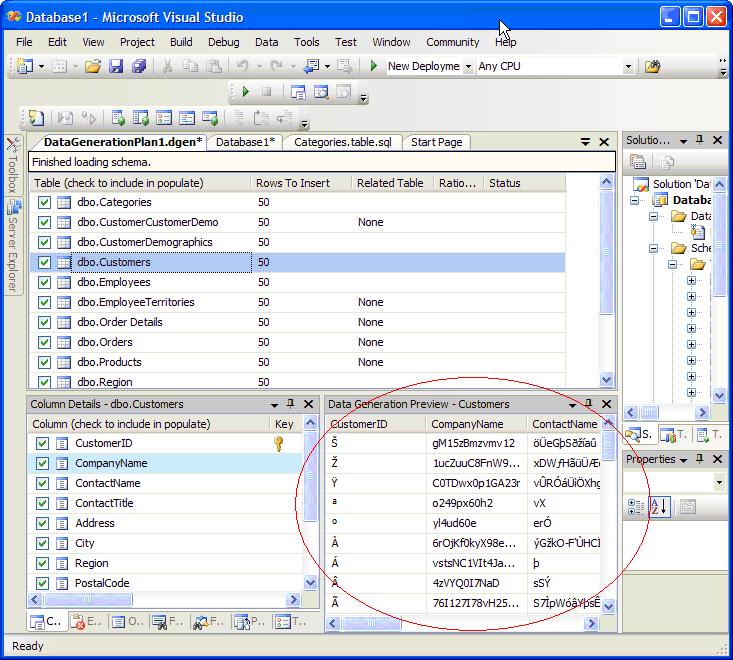
Now our Data Generation designer is displayed, as seen below:
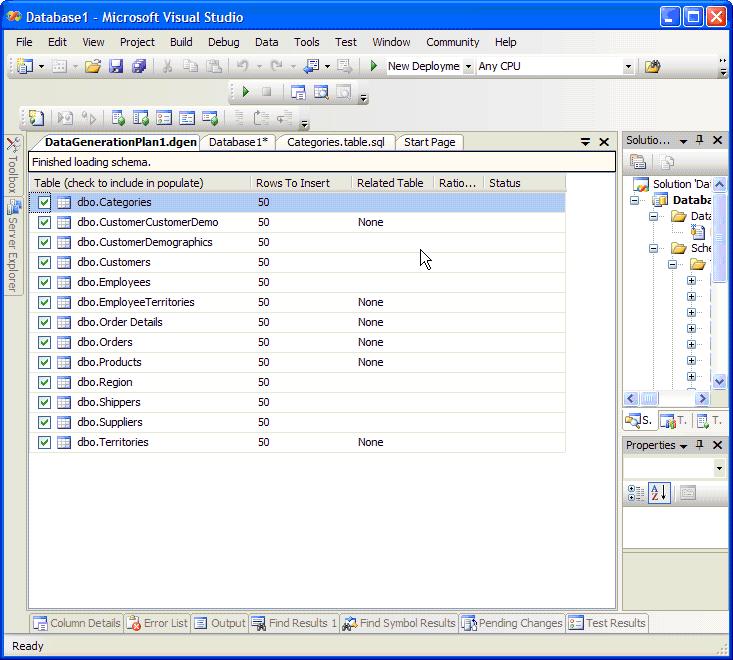
This designer shows you the tables in our off-line meta data, and gives us the ability to control how many rows to insert, etc. I want to show you some of the capabilities of two of our “out of the box” generators, specifically the Regular Expression generator and the Data Bound Generator. To do this, double-click on the Customers table. You should see the “Column Details” tool window display:
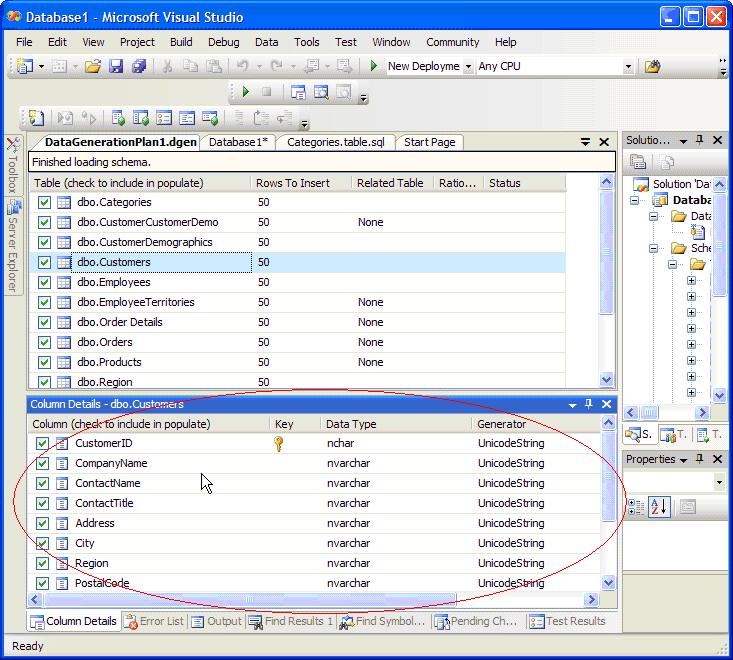
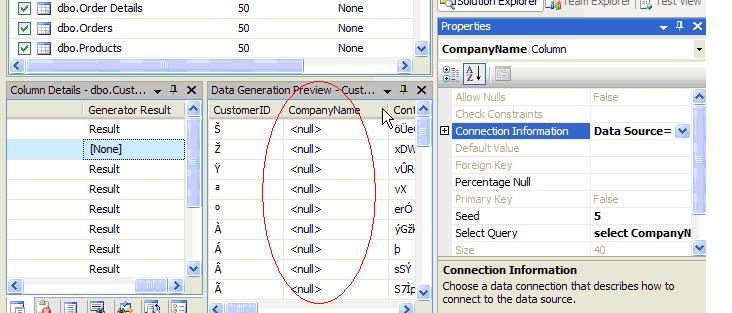
Now please notice the “Generator” column. You can select a particular column of the selected table, and drop down a list of generators. So if I select the CompanyName Generator column, a combobox is displayed similar to what you see below.
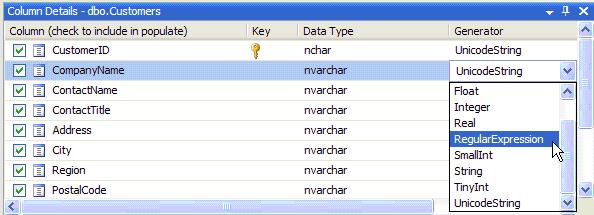
I will select the “RegularExpression” option.
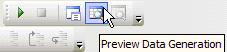
Now what I would like to do is come up with a pattern that will drive how data is generated for this particular column. Before I start manipulating the regular expression that will drive that data, I’m going to bring up the “Data Generation Preview” tool window, by selecting the “Preview Data Generation” toolbar button:
A new toolwindow will be displayed, showing an example of how data will be generated for the selected table if the “Generate Data” button is hit ( NOTE: If the window comes up blank, select a different table then select your original Customers table. This is a glitch in the TechEd CTP bits J )
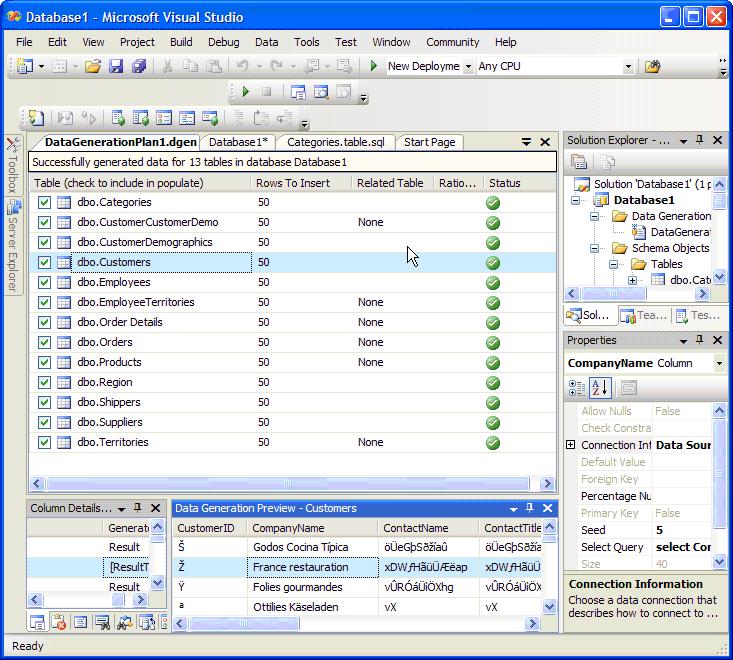
With the CompanyName column selected, direct you focus to the Properties window. You’ll notice an “Expression” property. That is where you can enter in your regular expression that controls the data generation. Below is a snapshot of the expression I will use, and the effects on the preview window:
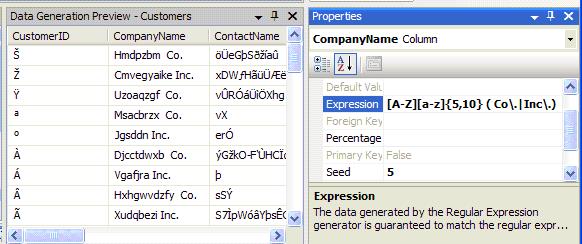
What that expression is saying is “generate me values that always start with a capital letter ( A-Z ), followed by 5 to 10 random characters in the a-z range, then give me a space followed by “Co.” or “Inc.” See how the data is still random, but is starting to take a more “realistic” form?
But what if you already have gobs of data that your organization has made available to the IT organization? How can you leverage that data? Enter the “Data Bound Generator”. The Data Bound Generator allows you to specify an alternate source for the data, such as another database, and excel file, and xml file, etc.
So to pull actual customer names instead of generating from thin air, select the “Data Bound Generator” instead of “RegularExpression”. This generator requires that you specific the datasource, then the query to get the data you want from the source. In my case, I’m going to pull data from a database I have previously established that holds the company names resident in my production data. So I fill in my “Connection Information” property, as well as the “Select Query” property.
You’ll immediately notice that the CompanyName column is replaced with “<null>” values.
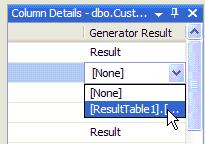
That’s ‘cause I haven’t selected the right Generator Result option, which you do by scrolling to the Generator Result column in the Column Details tool window, and selecting the “[ResultTable1]” option, as seen below:
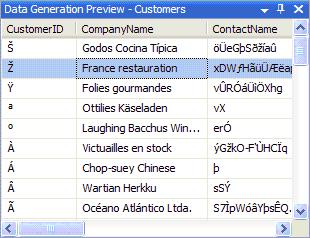
Now the CompanyName column in the preview window will show actual values from my scrubbed database ( values from the original CompanyName column from the Customers table in Northwind ).
Alright, this is all great stuff ( and is just the tip of the iceberg! ), but how do we get the data described in this data generation plan, into our test database? Simply hit the “Generate Data” button ( not to be confused with the “Debug” button J ):
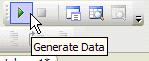
You’ll be prompted for a connection ( just create a new connection to our test database ), asked if you want to blow away all the data in that database ( just click “Yes” ), and away it goes! This is how the designer should look once it successfully completes: