使用C++ Coroutines技术简化UWP的异步代码
[原文发表地址] Using C++ Coroutines to simplify async UWP code
[原文发表时间] 2016/4/4
通用windows平台(UWP)引入了许多异步API,目前已经有近1700个API。每个API之间的切换只需要50毫秒左右即可完成异步模式。
编写异步模式的代码并不是轻松的事情, 尤其在C++中必须创建一个PPL任务并且在lambdas表达式中使用continuation (.then)。 实际上许多情况代码本身并不难写, 只不过阅读性不佳。
C++ Coroutines技术可以简化编写的异步代码, 使代码可读性提高,易于维护编写。 下面我们直接看实例:
这段代码中我们尝试打开图片,使用 PickSingleFileAsync和OpenAsync:
void AsyncDemoForBuild::MainPage::PickImageClick(Platform::Object^ sender,
Windows::UI::Xaml::RoutedEventArgs^ e)
{
using namespace Windows::UI::Xaml::Media::Imaging;
using namespace Windows::Storage::Pickers;
using namespace concurrency;
auto picker = ref new FileOpenPicker();
picker->FileTypeFilter->Append(L".jpg");
picker->SuggestedStartLocation = PickerLocationId::PicturesLibrary;
create_task(picker->PickSingleFileAsync()).then([this]
(Windows::Storage::StorageFile^ file)
{
if (nullptr == file)
return;
create_task(file->OpenReadAsync()).then([this]
(Windows::Storage::Streams::IRandomAccessStreamWithContentType^ stream)
{
auto bitmap = ref new BitmapImage();
bitmap->SetSource(stream);
theImage->Source = bitmap;
OutputDebugString(L"1. End of OpenReadAsync lambda.\r\n");
});
OutputDebugString(L"2. End of PickSingleFileAysnc lambda.\r\n");
});
OutputDebugString(L"3. End of function.\r\n");
}
代码由于需要运行在异步模式而变得复杂。 如果使用同步模式, 就很方便阅读。
// 伪代码
Void ShowImage()
{
auto picker = ref new FileOpenPicker();
picker->FileTypeFilter->Append(L”.jpg”);
picker->SuggestedStartLocation = PickerLocationId::PicturesLibrary;
auto file = picker->PickSingleFile();
auto stream = file->OpenRead();
auto bitmap = ref new BitmapImage();
bitmap->SetSource(stream);
theImage->Source = bitmap;
}
有了Coroutines, 我们可以使用co_await关键字, 我们还需要做点事情,改写代码为:
#include <experimental\resumable>
#include <pplawait.h>
using namespace Platform;
task<void> AsyncDemoForBuild::MainPage::PickAnImage()
{
auto picker = ref new FileOpenPicker();
picker->FileTypeFilter->Append(L".jpg");
picker->SuggestedStartLocation = PickerLocationId::PicturesLibrary;
auto file = co_await picker->PickSingleFileAsync();
if (nullptr == file)
return;
auto stream = co_await file->OpenReadAsync();
auto bitmap = ref new BitmapImage();
bitmap->SetSource(stream);
theImage->Source = bitmap;
OutputDebugString(L"1. End of OpenReadAsync lambda.\r\n");
}
然后这样调用:
void AsyncDemoForBuild::MainPage::PickImageClick(Platform::Object^ sender,
Windows::UI::Xaml::RoutedEventArgs^ e)
{
PickAnImage();
}
这段代码就变得简单多了, UWP C++代码通过使用co_await关键字,变得易于编写, 几乎和同步模式的代码相差不多。 我们也会发现co_await同样适用于C++/CX代码, 也就是说你可以使用^引用, 并且这样不会带来二义性。
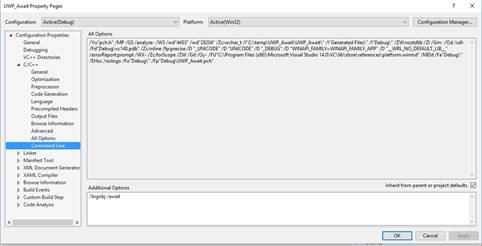
使用时也要注意在编译选项中使用/await开关:
需要重点提示在VS2015 U2版本中,你也可以使用/SDL选项去检查异步模式中隐含的警告。
使用co_await是一种方便使用Coroutines技术的形式。然而,C++ Coroutines可以完成更多的事情, 比如,你可以:
· 在使用已有的Coroutines类型的环境中自定义新的awaitables类型
· 定义新的Coroutines类型
关与自定义awaitables类型, 可以参考这篇文章, 我们也有很多关于异步代码为主题的文章。
注意Coroutines还未成为C++标准的一部分, 目前只能在TS(技术规格)中找到, 通过experimental目录进行引用(参考这里)。 由于我们在VS 2015 U2中移除了/RTC和/SDL选项之间的兼容性, 所以我们考虑在产品中使用使用Coroutines。 请告诉我们您的使用情况,以及遇到的一些问题反馈。
Build2016大会也有相关的视频。