
Using VSTS 2008 memory allocation profiling
I wanted to learn about the memory allocation profiling feature that is available VSTS 2008. While the profiler was also in VSTS 2005, the profiler will now also profile memory usage in addition to performance. A very good place to start is Ian Huff’s blog. He’s written a number of posts about the profiler.
- Pinpoint a performance issue using hotpath in Visual Studio 2008
- The Visual Studio Profiler Data Collection Control Part 1: Excluding Application Startup Time
- Comparing performance reports with the Visual Studio Team System Profiler
- The Profiling Team’s Greatest Hits: Volume Two
To use profiling on an application that’s started outside of Visual Studio, you must run the vsperfclrenv.cmd batch script to set some environment variables and then run your application (it’s not necessary if you have the profiling GUI in VS start the application for you). See Ian’s post about command line profiling for more on this batch script. Unfortunately, vsperfclrenv.cmd is not in the path for the Visual Studio 2008 Command Prompt. You’ll have to add %ProgramFiles%\Microsoft Visual Studio 9.0\Team Tools\Performance Tools to your path in order to call it.
The VSTS 2008 version adds some new options. Here’s part of the help output from that batch script.
C:\Program Files\Microsoft Visual Studio 9.0\Team Tools\Performance Tools>vsperfclrenv.cmd
Microsoft (R) Visual Studio Performance Tools .NET Profiling Utility for managed code
Copyright (C) Microsoft Corporation. All rights reserved.Usage: VSPerfCLREnv [/?]
[/sampleon|/samplegc|/samplegclife|/samplelineoff|
/traceon |/tracegc |/tracegclife |
/globalsampleon|/globalsamplegc|
/globalsamplegclife|/globaltraceon|
/globaltracegc|/globaltracegclife|
/off|/globaloff]This script is for setting the profiling environment for managed code.
Options:
/? Displays this help
/sampleon Enables sampling ‘attaching’ to managed applications (excluding allocation profiling)
/samplegc Enables sampling ‘attaching’ to managed applications (including allocation profiling)
/samplegclife Enables sampling ‘attaching’ to managed applications (including allocation profiling and objects lifetime)
The new memory-related switches are /samplegc and /samplegclife. I figured I’d turn on all of the allocation profiling, so I ran the following command.
C:\Program Files\Microsoft Visual Studio 9.0\Team Tools\Performance Tools>vsperfclrenv.cmd /samplegclife
Enabling VSPerf Sampling Attach Profiling. Allows to ‘attaching’ to managed applications.Current Profiling Environment variables are:
COR_ENABLE_PROFILING=1
COR_PROFILER={0a56a683-003a-41a1-a0ac-0f94c4913c48}
COR_LINE_PROFILING=1
COR_GC_PROFILING=2
From the same command prompt, I ran the build notification application that I posted previously, which is an app similar to CCTray for those of you familiar with CruiseControl.NET.
Back in VS 2008, I needed to start the Profiler. In my build of VSTS 2008 (pre-release, post beta 2), you can get to it by going to Analyze -> Profiler -> New Performance Session. According to a post by an Ian Huff, it looks like it’s going to be in the Developer menu for RTM.
Next I attached to the process. The first time that I did this, I got a warning about needing to run vsperfclrenv.cmd, which is what caused me to go run it. One thing to keep in mind is that when you stop profiling, either from VS or from the command line via that script, it will kill the process that it was profiling.
After running a build to get a build notification and bringing up some of the different dialogs in the application, I stopped profiling. At this point, VS started processing the profiling data to produce a report. This took a really long time. About 10 minutes or so into it, I left for lunch, so I don’t know how long it took to finish.
The Report071009.vsp file itself is 863MB. This is after only spending a few minutes profiling a small application. It shouldn’t be too surprising that it’s a lot of data, but 863MB was more than I would have expected. When I did another run using /samplegc rather than /samplegclife, the object lifetime feature appears to be what causes the huge jump in data collection, as the report using /samplegc was much smaller.
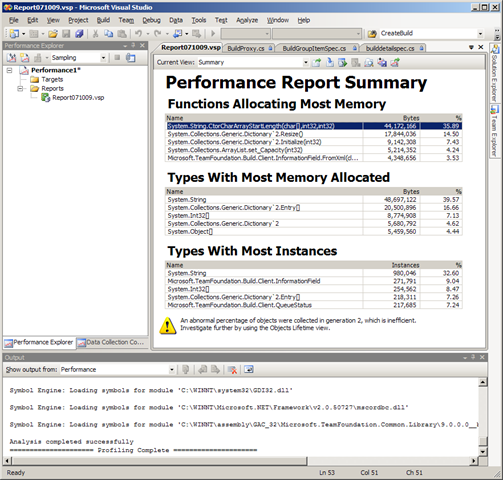
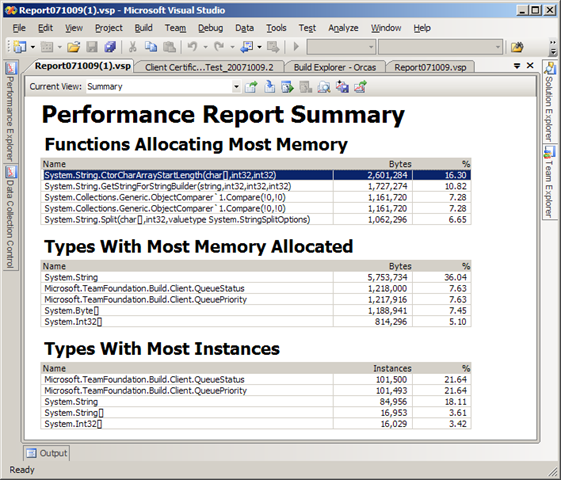
After it finished processing all of that data, I was presented with the following report. The summary does a great job of giving you a place to start with the top five memory issues.
Investigating memory allocation
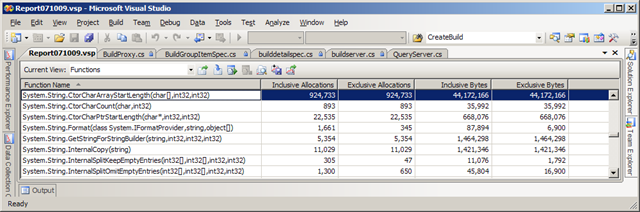
Let’s start with the first function, System.String.CtorCharArrayStartLength(), and drill into it by double clicking on it.
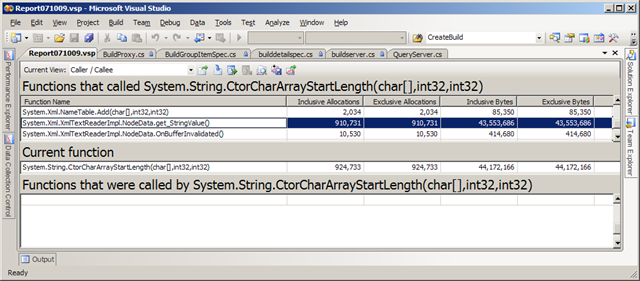
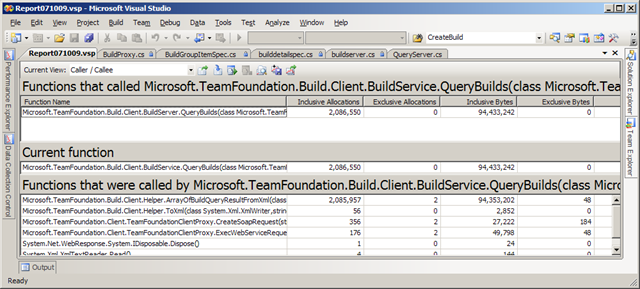
I double clicked that function one more time and scrolled the “Functions that called” section to get the following. I’ve selected the row highlighted below because it has by far the largest Inclusive Allocations number. For me, the scroll bar on the right was not shown initially, and I had to make the window wider to see it.
Continuing to double click on the largest function in the top grid allowed me to chase the call chain up to something I recognize. Repeatedly double clicking on the functions showing the largest inclusive allocations took me to the culprit, which is the QueryBuilds() method on IBuildServer.
Another way to get to this information is to switch the Current View combo box (upper left) to the Call Tree view. In this window, you’ll notice that you don’t actually see the QueryBuilds() function. What you do see is the function from the summary page, CtorCharArrayStartLength(), and calls related to BuildInformationNode objects. IBuildInformationNode objects (the concrete classes are internal and the interfaces are public) store build steps, compilation errors and warnings, and other data about the build. In this application, we don’t need all of that extra information in this application.
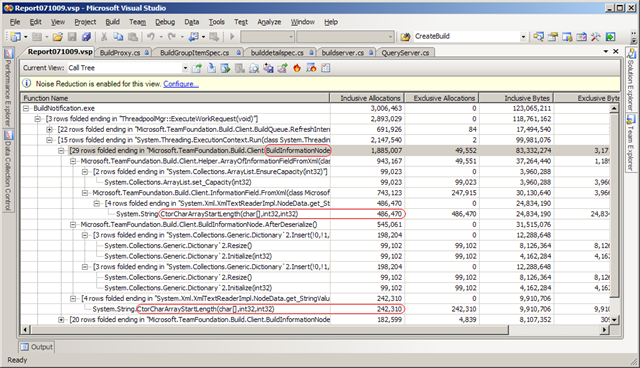
Tying this all together, we have QueryBuilds() returning a bunch of IBuildInformationNode objects.
So, we need to change the code so that we don’t request this information. Looking at the code, we’re already requesting only builds that have completed, and we are only getting the definitions associated with the builds (we don’t need the build agents, for example). The new line that we need to add is to clear the InformationTypes property, which defaults to “*” thus getting all information nodes, by assigning null to it. The newly-added line is shown in bold.
// Query the server to set the latest completed build status information for definitions subscribed to in this team project.
IBuildDetailSpec buildSpec = m_buildServer.CreateBuildDetailSpec(TeamProject);
buildSpec.Status = BuildStatus.Succeeded | BuildStatus.PartiallySucceeded | BuildStatus.Failed | BuildStatus.InProgress;
buildSpec.QueryOptions = QueryOptions.Definitions;
buildSpec.InformationTypes = null;
IBuildQueryResult queryResult = m_buildServer.QueryBuilds(buildSpec);
So how did this happen? Earlier this year we changed the default behavior of QueryBuilds() to return all of the data for builds. The reason was that we had seen some users try using the API and not understand why they weren’t getting all of the data that they expected. We decided that we’d make the default case give you everything, and you’d only need to hunt through the API if you decided you wanted to optimize your application by not requesting what you don’t need. In this case, I think we should have refined the API more to make both easier. As it is, it’s not obvious.
Investigating object lifetimes
If you look back at the screen shot of the Performance Report Summary, you’ll notice a yellow triangle at the bottom with the following message.
An abnormal percentage of objects were collected in generation 2, which is inefficient. Investigate further by using the Objects Lifetime view.
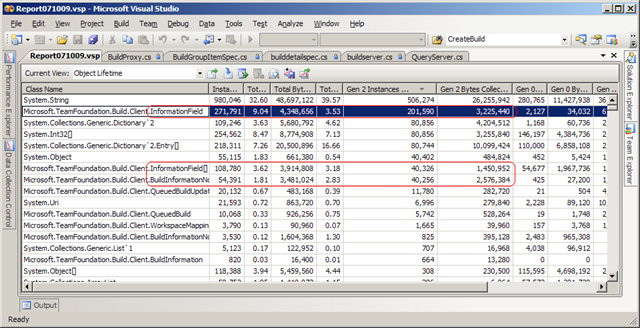
I changed the Current View comb box to Object Lifetime. This view has a lot of columns in it. Before taking this screen shot, I moved the Gen 2 Instances Collected and the Gen 2 Bytes Collected closer to the left side of the table (drag and drop, just like Excel!), resized the other columns by double clicking on the splitters, and sorted by Gen 2 Instances Collected.
You’ll see that I’ve highlighted a few rows. In this case, it appears that the information nodes are again the culprit. This is due to the fact that the application is holding on to the build details, which includes the information nodes (the fix mentioned earlier hasn’t been applied at this point). So it looks like we can solve two problems for the price of one fix.
Fixing the issue
I fixed the code and ran the build notification application again. This time, I used /samplegc rather than /samplegclife. The report file generated this time was substantially smaller at 103MB. If you’re going to do much profiling, you’ll want to make a mental note to clear out old report files that you don’t need since they are so large (mine were saved in the default location: My Documents\Visual Studio 2008\Projects). I didn’t do exactly the same thing as before, but I did approximately the same kinds of things. VS still took quite a while to process the report file.
After making the fix, the string allocations have dropped substantially. As is typically the case with this sort of stuff, fixing one problem reveals the next problem. I drilled into this issue by following the same approach as above: I followed the callers with large allocations until I got to the point that I recognized the culprit. One of the things the build notification application does is use the build queue polling that is part of the build client object model (OM). It turns out that this issue is due to the fact that the build client OM itself is querying for too much information when it polls the build queue.
The next thing that struck me as interesting was the list showing the types with the most instances. Why are there so many instances of QueueStatus and QueuePriority? Double clicking on that didn’t seem to help me get to the functions that were creating them.
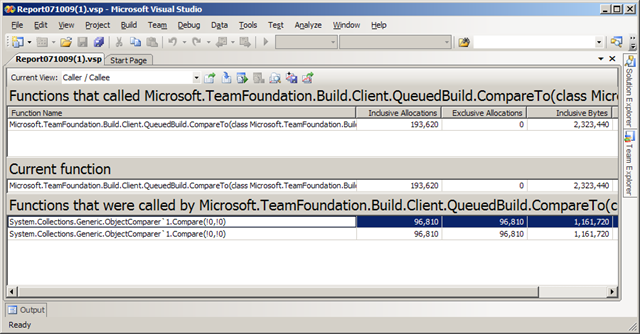
I decided instead to double click on the Compare methods listed in the Functions Allocating Most Memory table. That quickly led me to the CompareTo() method in the build OM’s QueuedBuild class. Note that the inclusive allocations for the two generic comparers are very close to the numbers in the list of types with the most instances.
Looking at the source for that method, there are the following calls.
result = Comparer<QueueStatus>.Default.Compare(Status, build.Status);
if (result == 0)
{
result = Comparer<QueuePriority>.Default.Compare(Priority, build.Priority);
}
It looks that’s what’s causing the large allocations of QueueStatus and QueuePriority. I don’t why it was coded that way, but I wouldn’t have guessed that it would allocate new objects. After some investigation, it turns out that while Int32, for example, implements IComparable<Int32>, Enum only implements the non-generic IComparable. The result is that every Enum comparison calls CompareTo(object), resulting in the enumeration values being “boxed” (i.e., wrapper objects are created for them). Since Int32 has a CompareTo(Int32) method, there are no objects allocated when comparing ints rather than enums.
One other interesting thing of note is that after fixing that last problem, I started noticing the impact of the wsdl.exe-generated SOAP proxy used by the Team Foundation registration service proxy. Outside of version control and build, all of the client-side TFS proxies were generated by wsdl.exe. At some point, we’ll get the rest of the proxies converted over. The SoapHttpClientProtocol-derived proxies generate lots of strings when they create the temporary assemblies the first time they are executed. The way it works is that they generate C# on the fly as they reflect over the assemblies and compile that C# code into a temporary assembly and load it. You can generate the assemblies at build time using sgen.exe and avoid that extra overhead (TFS doesn’t currently use it to generate proxy assemblies).
Comparing runs
I tried the Comparison Report feature just to see it, and it looks like a very useful feature. Because my runs weren’t identical (and in fact, I found a bug in the build notification application while doing my second run, so that distracted me for a little while), the comparison wasn’t that meaningful in this case. It’s easy to see how useful it could be, though.
Conclusion
I like the UI and the overall experience of using the profiler in VSTS 2008. It’s a great feature. I found it easy to navigate, and it helped me find the causes for memory issues quickly.
If I could improve a few things, here’s what I would suggest.
- Provide better support in the GUI for handling what vsperfclrenv.cmd does. While I don’t mind running stuff from a command line, it slowed me down. I had to go find the file, add it to my path, read the help, run it, then run my app, etc. There’s nothing terrible about that. It’s just all stuff that the computer could do for me.
- Add Hot Path functionality to the memory allocation such that I could right click on on the top function allocating the most memory and choose “Show Hot Path” to see which call path allocates the most of those objects (i.e., do for me what I was doing manually). UPDATE: It turns out that you can select something in the Allocation view, right click on it, and choose Show Hot Path. I don’t think I tried it in that view. It would be great to have this available from the Summary view.
- Make the report analysis faster. I understand that it’s a lot of data, but I’d love for the processing to be substantially faster. Even without the object lifetime tracking turned on, it took more than five minutes to process the report file.
- Right clicking on a function and transitioning to the call tree view with the instances of the function that clicked on highlighted in the call tree view, expanding as necessary to show them.
- A simple search box would be great. It would be nice to just jump to a function. I looked at the Filter capability (there’s a Show Filter button on the toolbar), but that only allows equality and inequality. UPDATE: It turns out that you can use Ctrl-F (or Edit->Find from the main menu) to search.
- Add the ability to right click on a type in the list of types with most instances and choose to jump to the function that’s creating the most of them. In the example above, right-clicking on the QueueStatus would have taken me to the generic collection comparison function.
[UPDATE 11/01/07] I’ve updated this post based on feedback from Ian Huff and a few things I’ve learned since writing it, such as the issue with Enum and generic comparison.
 Light
Light Dark
Dark
0 comments