How to Implement a Service Architecture on Windows Azure using WCF, WPF, and Unit Testing
Overview
In this hands-on lab, you will learn how to:
Set up the expenses infrastructure
Create some unit tests for our client application
Add a ViewModel feature and expose it in a view
How setup a WCF service inside if IIS
How set permissions so IIS can access the WCF Service Folders
How to add asynchronous unit tests to a WPF project
How to use the Fake Assembly capability of Visual Studio to do dependency injection
How to perform unit tests for WPF Application
How to use converters to set the background color of a grid based on the pending approvals
Prerequisites
The following is required to complete this hands-on lab:
- Microsoft Visual Studio 2013
- SQL Express 2012 with Tools (SQL Server Management Studio)
- Microsoft Web Platform Installer 2.6 or later
Exercise 1: Setting up the environment
In this exercise, we’ll go through the process of setting up our environment.
Task 1: Setting up the WCF service
In this task, we’ll set up the WCF service that includes our server-side logic and data access. The service will be hosted by IIS on port 83.
- Unzip the source to a convenient place on your system.
- You can download the code for lab 1 here: https://1drv.ms/1esyekh
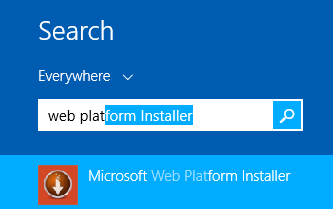
- Launch the Microsoft Web Platform Installer.
Finding the Web Platform Installer
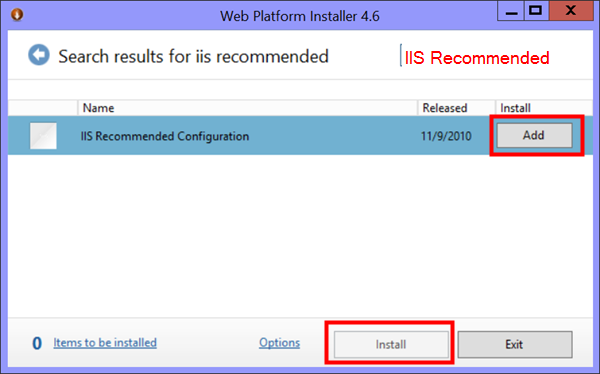
- In the search box, type “iis recommended” and press Enter. In the search results, click Add for IIS Recommended Configuration. Click Install to install. Accept the license agreement. Click Finish to close the dialog when complete. Close the application.
Running the Web Platform Installer
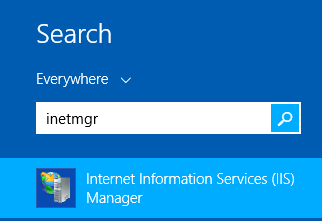
- Launch the IIS Manager.
Starting IIS
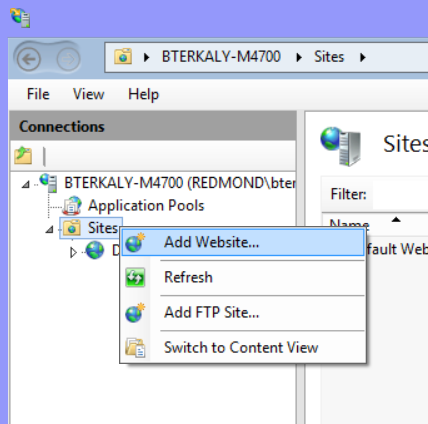
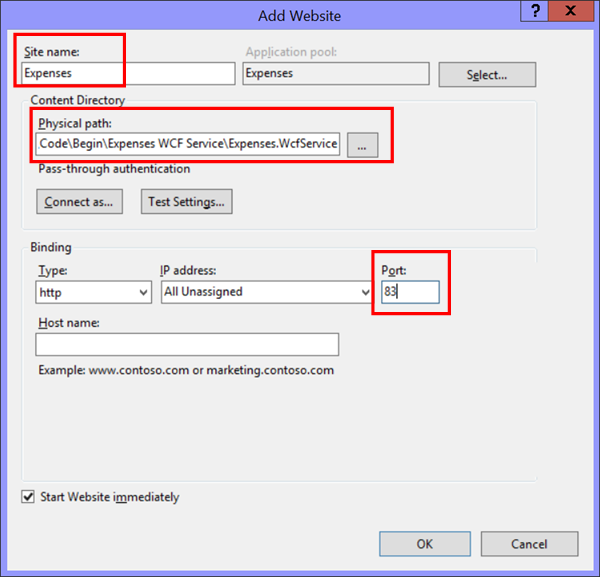
- Right-click the Sites node under the local server and select Add Website… .
- In the Add Website dialog:
- Set the Site name to “Expenses”.
- Set the Physical path to the Expenses WCF Service\Expenses.WcfService directory inside the unzipped source folder.**
- My path happens to be:
- C:\evangelism\ AzureDevCamp\ Scenario\ 2 What is a Services Architecture\ Lab1Code\Code\Begin\ Expenses WCF Service\ Expenses.WcfService
- My path happens to be:
- Set the Port to 83. We’re using port 83 here to avoid conflicts with other sites that might be hosted. If you have another site hosted at this port, please stop it so this site can use it for the duration of this lab.**
- Click OK.
Adding the "Expenses" WCF Service
- IIS Manager should look like this:
Confirming the web site creation (WCF Service)
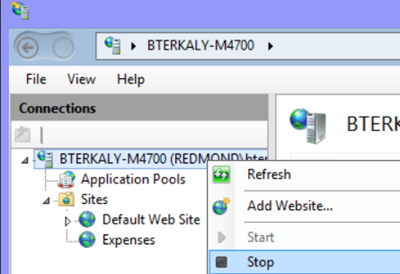
- Restart IIS. First Stop then Start the web server.
Stopping and starting IIS
- Close IIS Manager.
Note: An Internet Information Services (IIS) application pool is a grouping of URLs that is routed to one or more worker processes.
Because application pools define a set of Web applications that share one or more worker processes, they provide a convenient way to administer a set of Web sites and applications and their corresponding worker processes.
Key point here: Process boundaries separate each worker process; therefore, a Web site or application in one application pool will not be affected by application problems in other application pools.
Application pools significantly increase both the reliability and manageability of a Web infrastructure.
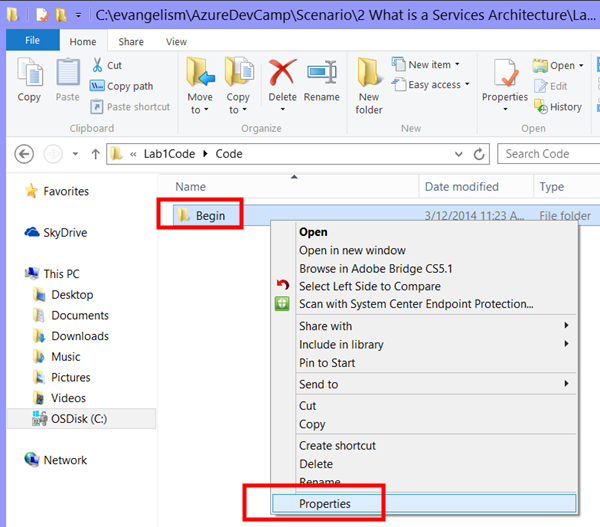
Now that we’ve set up the site in IIS, we’ll need to make sure the IIS app pool process has permission to access the site directory. In File Explorer, navigate to the folder containing the Web site folder.
Right-mouse click on the folder and select Properties.
Setting Folder Properties
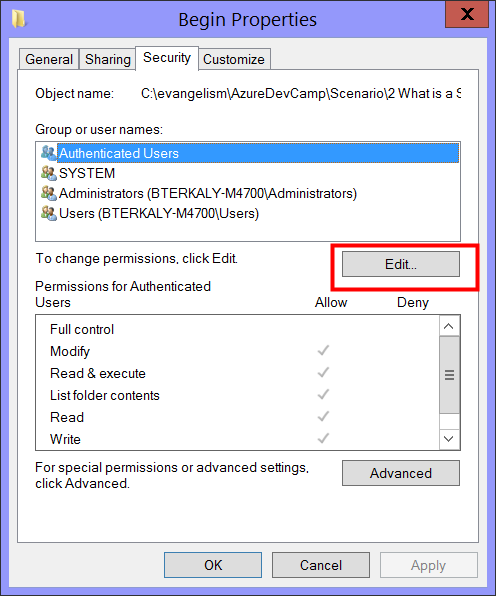
- On the Security tab, click Edit… .
Editing a the user security
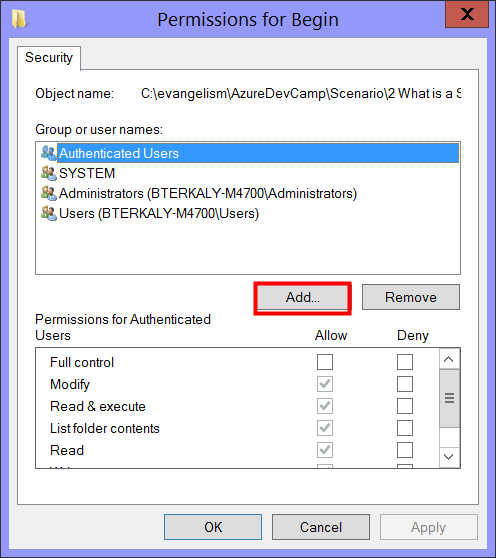
- Click Add… to select a user or group to add.
Adding IIS_USRS
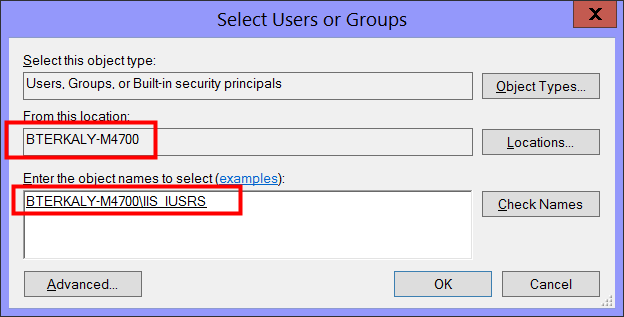
- Enter “IIS_IUSRS” as the object name and click OK to allow them permissions to the folder.
- NOTE This object represents all of the app pool identities used by IIS.
- In the past, the runtime account was Network Service, but that changed to IIS_IUSRS as of IIS 7 in order to isolate it from other services that used the Network Service account.
- By default, the account is granted Read & Execute, List folder contents, and Read, which is enough for our purposes.
Entering thie IIS_USRS
Task 2: Setting up the local database
In this task, we’ll create the local database used by our expense reporting system.
- Open .. \Expenses WCF Service\Expenses WCF Service.sln in Visual Studio 2013. This solution contains our WCF service, and also a database project that includes our schema.
Opening the solution
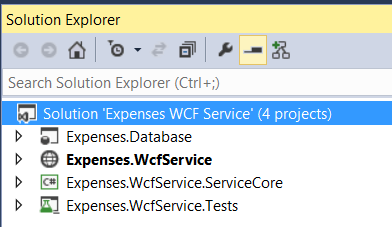
- There are four projects in our solution.
Viewing the four projects
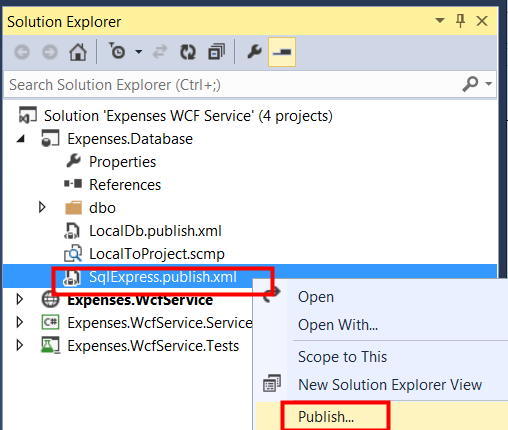
Expand the database project.
Right-click the SqlExpress.publish.xml file in the Expenses.Database project and select Publish… .
Publishing the XML
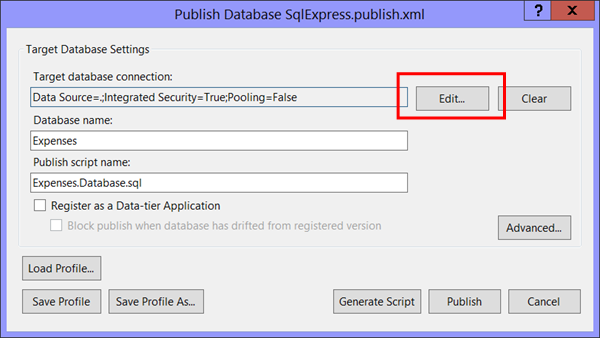
- If you don't have SQLEXPRESS installed and want to use your existing database, do the following:
- You may not have SQLEXPRESS installed.
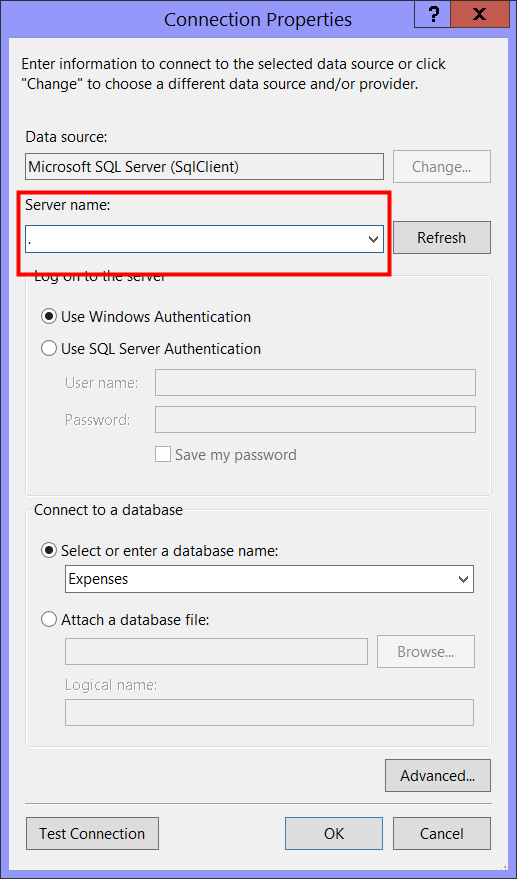
- So what you can do is choose the local instance of SQL Server that may be installed.
If you don't have SQLEXPRESS
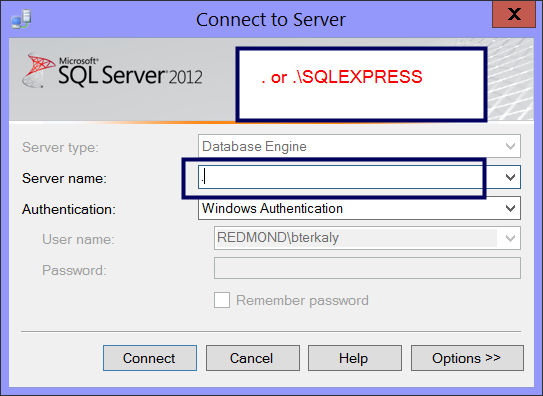
Changing the server name to period (.)
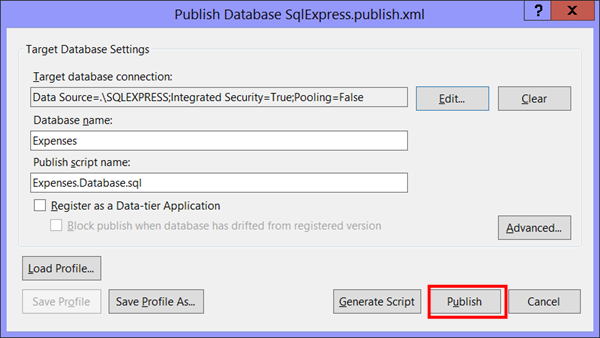
- Click Publish to publish the database to your SQL Express instance. It should complete the deployment within seconds.
Launch SQL Server Management Studio. We’ll use this tool to add the IIS user for our Web site to the SQL logins so it can access the database using Windows Authentication.
Connect to the local database using the Server name “.\SQLEXPRESS” . Or use "." from Step 5 if you used a database other than “.\SQLEXPRESS” . Use Windows Authentication and click Connect.
Logging into SQL Server
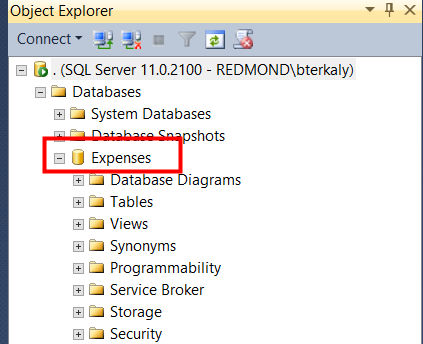
- You should be able to see the Expenses database.
Database Expenses
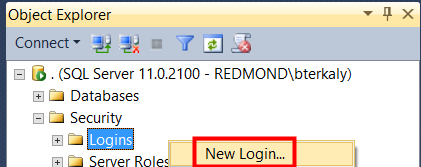
- Expand the Security node under the local server and right-click the Logins node and select New Login… .
Adding a new login
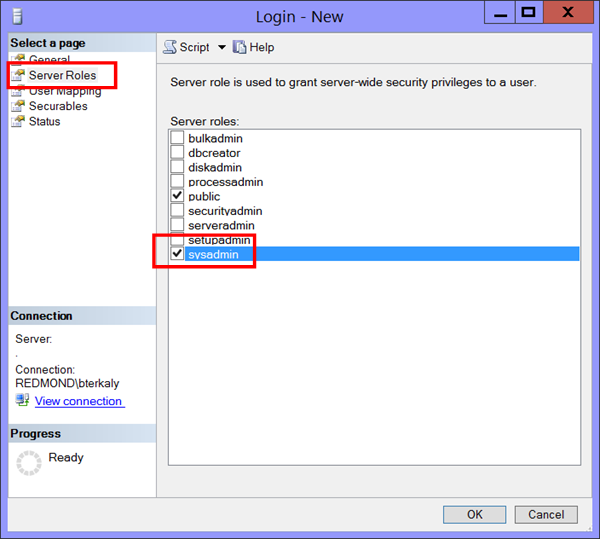
- Select the Server Roles page and check the sysadmin role in Server roles. In the real world we would be more granular with security, but for the purposes of our lab we’ll just use sysadmin to keep things simple.
Enabling the IIS user for our Web site to be able to access the database using Windows Authentication
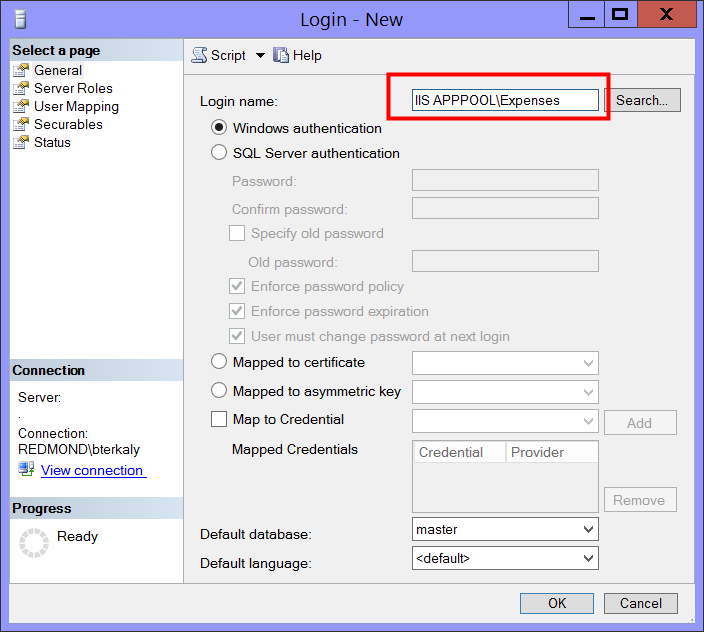
- Select the General page and enter IIS APPPOOL\Expenses (note the space in “IIS APPPOOL”) as the Login name. Click OK to create the login.
Setting up the login user Expenses
Task 3: Understanding the WPF Clienet Application
In this task, we’ll take a look at the features of our WPF application.
Open \Expenses WPF\Expenses.sln in Visual Studio 2013. This solution contains our WPF application, as well as its dependencies.
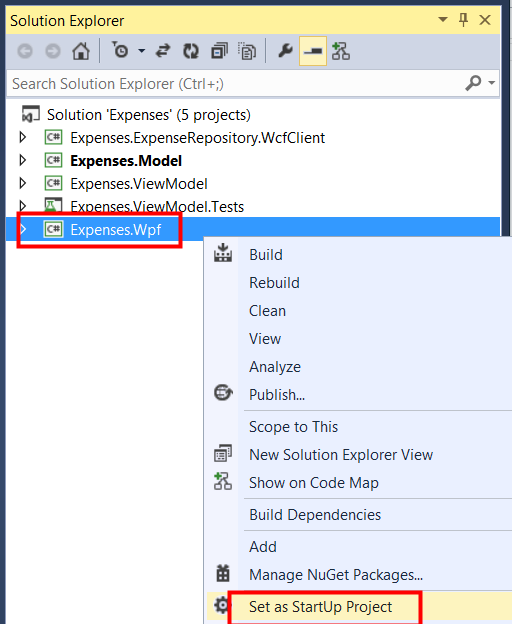
There are five projects in this solution. Set the startup project to be Expenses.Wpf.
The WPF Project
Expenses.Model defines the data model classes, constants, and interfaces that are shared across projects.
- It is a portable class library that can be used in WPF, Windows Phone, or Windows Store applications.
Expenses.ViewModel implements most of the business logic as ViewModels and also includes some business-level utilities.
- It references the model project. It is a portable class library that can be used in WPF, Windows Phone, or Windows Store applications.**
Expenses.ExpenseRepository.WcfClient is a project that implements an IExpenseRepository as defined in the model project.
- It contains all the logic for communicating with the WCF service. It is a portable class library that can be used in WPF, Windows Phone, or Windows Store applications.**
Expenses.Wpf is our WPF application, and references the model, ViewModel, and WCF client projects.**
Expenses.ViewModel.Tests is our testing project, which contains unit tests that target the ViewModel library.**
- In the Expenses.Model project, open IExpenseRepository.cs.
This interface defines the various methods needed to work with the data in our system.
Note that the implementation could take virtually any form, such as a SQL store, a WCF service, a file-based system, etc.
And just as important, by abstracting away the implementation, we can build software at higher layers that take a dependency on the interface, which we can mock up for testing purposes.
Another important detail to note is that the methods here all return Task objects.
- This allows the caller to use the await keyword in order to enjoy the benefits of simpler asynchronous programming.
- In the Expenses.ExpenseRepository.WcfClient project, open WcfClientExpenseRepository.cs.
- This is an implementation of our IExpenseRepository that knows how to fulfill the methods using our backend WCF service.
- You’ll note there are two constructors. The overloaded takes a required parameter for the URL of the service.
- The default constructor is marked private so that it is not available for creating new objects without the configuration parameter.
- In the Model VMs folders of the Expenses.ViewModel project, open the ChargeViewModel.cs file.
- This is a ViewModel that derives from our ViewModelBase class that includes some base services, as well as implements INotifyDataErrorInfo for data validation and error binding in XAML.
- If you scroll down to the constructor, you can see that we’re loading the IExpenseRepository from a global service locator.
- The service locator pattern is controversial, but is how this particular dependency is loaded.
- Depending on how the service locator was set, this could be our WcfClientExpenseRepository from earlier, a mocked-up IExpenseRepository from our test layer, or a completely different implementation we haven’t yet considered.
- In the Expenses.Wpf project, open App.xaml.cs.
- In OnStartup you can see where we load the WCF service URL from the app settings, as well as create the WcfClientExpenseRepository and set it in the ServiceLocator.
- If we wanted to change the IExpenseRepository used for the entire application, we could do so here.
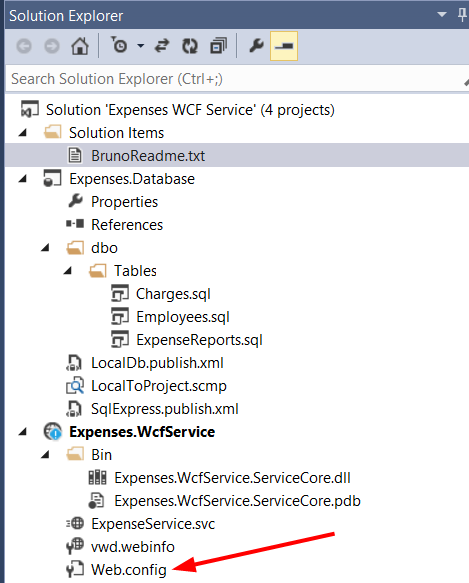
- You may need to do some adjustments to the code base in terms of machine names and cinne
Web.config
XML
  <connectionStrings>
<add name="Expenses.WcfService.ServiceCore.Properties.Settings.ExpensesConnectionString"
  connectionString="Data Source=.;Initial Catalog=Expenses;Integrated Security=True"
  providerName="System.Data.SqlClient" />
</connectionStrings>
Web.config connection string
Notice I changed "SQLEXPRESS" to " . " (Because I'm using the full version of SQL Server, not the EXPRESS edition).
You may not need to make this change if you used SQLEXPRESS in a previous step. Recall that you can use either the SQLEXPRESS instance of SQL Server or the traditional FULL version of SQL Server.
- Full version use " . "
- Express install use " .\SQLEXPRESS"
I also modified LocalToProject.scmp, and SqlExpress.publish.xml.
Notice that the database is actually Expenses, not LOBCampExpenses. .
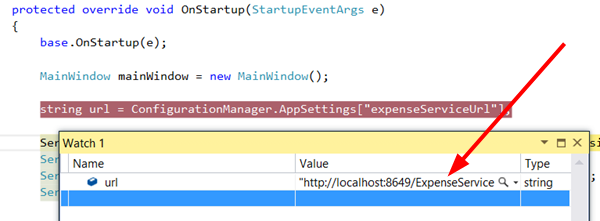
In the next step you will run the client-side WPF project. Be aware that it calls into the WCF Service we just created:
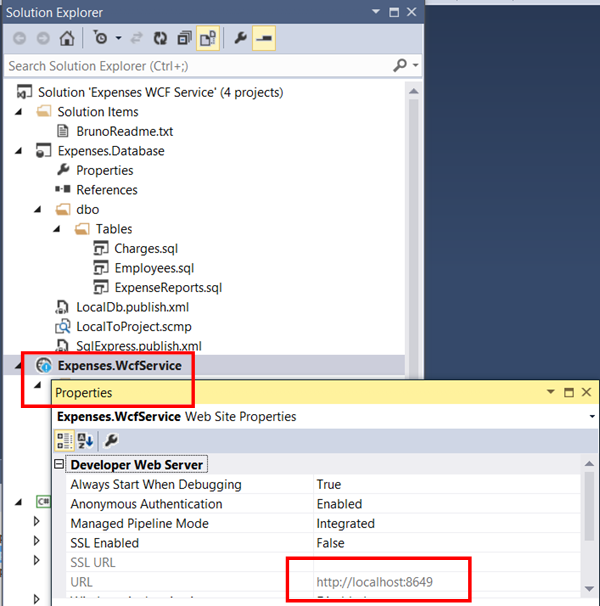
Calling into the WCF Service
Notice that the server side WCF Service specifies the endpoint here:
WCF Exposed Endpoint
9.
Press F5 to build and launch the application.
- It will automatically log you in as the user “Robert Green” with the alias “rogreen”.
- The first time you log in, it will generate some sample data for your account.
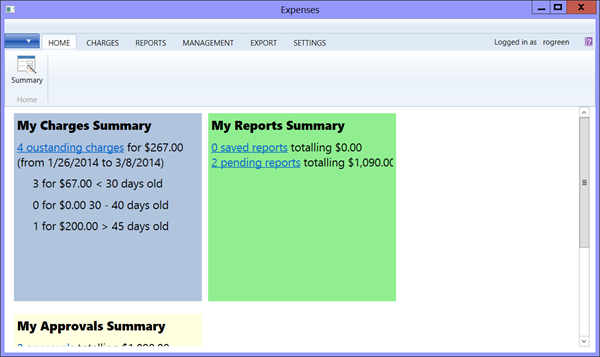
- The default view is the “Summary” that highlights some general details about your current status.
The running WPF application
10.
There are three basic features to this application: managing your charges, managing your expense reports, and approving subordinate expense reports.
- Under Charges, you have the ability to manually create new charges and the ability to view outstanding charges that have not been assigned to an expense report.
Charges
11.
On the Reports tab, you can create a new report, as well as view reports that you’ve saved but not yet submitted, reports you’ve submitted but have not been resolved, and reports that have been resolved.
Reports
12.
On the Management tab you can find reports that your subordinates have submitted for your approval.
- By default, there are two.
Management
13.
The Export tab functionality has not been implemented for this lab.
- The Settings tab provides two options. Change User isn’t used in our labs, so you can ignore it.
- Reset Data, however, will reset the database to its original state and prepopulate pending reports, etc.
- This is a very useful option if you want to play around with the features and then revert back to the original data at the end.
Export
14.
Feel free to explore the app. When done, be sure to click Reset Data before moving to the next exercise.
Exercise 2: Adding a test unit project
In this exercise, we’ll go through the process of adding a unit test project for our ViewModel project.
One of the great benefits of dependency injection and inversion-of-control is that they encourage software that has a more testable surface area.
This in turn aids the development process by making progress more apparent and avoiding regression issues.
You can read more about it here:
Article on Dependency Injection
Note: In the Dependency Injection pattern, this decision is delegated to the "injector" which can choose to substitute different concrete class implementations of a dependency contract interface at run-time rather than at compile time. Being able to make this decision at run-time rather than compile time is the key advantage of dependency injection.
Task 1: Setting up the test unit project
In this task, we’ll set up the unit test project. This will include the project creation, as well as adding the necessary references. We’ll also add some Fakes, which are like mocks, to help us with dependency injection.
1.
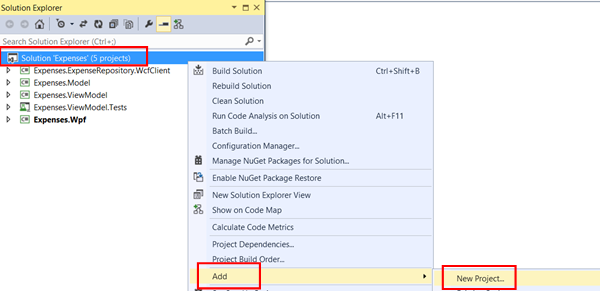
Right-click the Solution node and select Add | New Project…
Adding a unit test project
2.
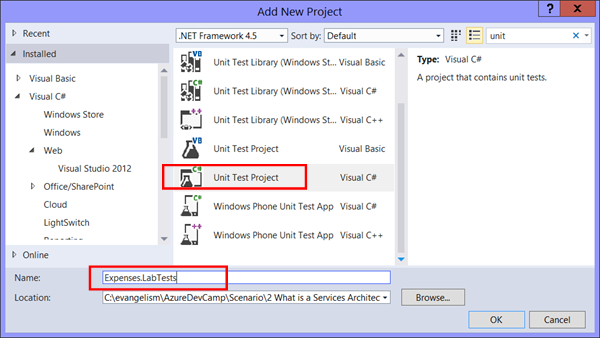
Select Test from under the Visual C# node in the left project types panel. Select the Unit Test Project template and set the Name to Expenses.LabTests. Click OK to create the project.
Add unit test
3.
The project will set up the basic things we need to create a unit test.
- However, we’ll also need to add some references to the solution projects we want to include as part of our testing.
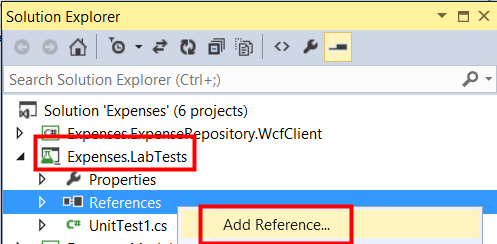
- Right-click the References node under the new Expenses.LabTests project in the Solution Explorer and select Add Reference… .
Adding references
4.
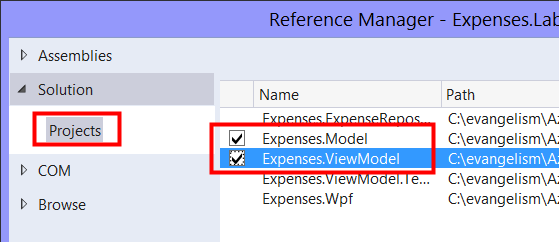
Select the Solution list from the left panel and check Expenses.Model and Expenses.ViewModel in the assemblies list.
- Click OK to add references to them.
Adding references to Model and ViewModel
5.
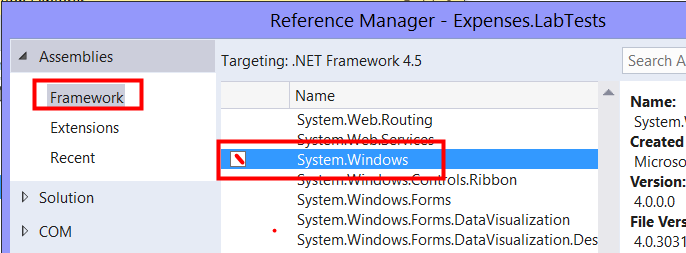
Next, we’ll add a reference to System.Windows as needed by the ViewModel project.
- Right-click the References node under the new Expenses.LabTests project in the Solution Explorer and select Add Reference… .
Select the Assemblies list from the left panel and type “windows” in the search box in the top right corner.
- Check System.Windows in the assemblies list and click OK to add the reference.
Adding System.Windows
7.
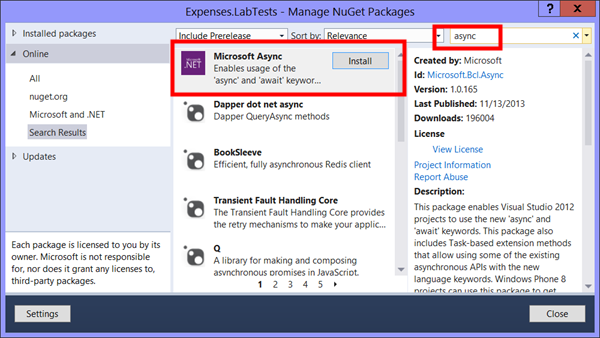
We’ll also need to add NuGet packages to support the Task model used by these libraries.
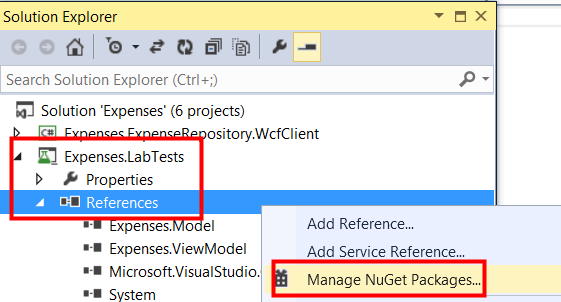
- Right-click the References node under the test project and select Manage NuGet Packages… .
Manage NuGet
8.
Select the Online option from the left pane.
- Next, type “async” into the search box in the top right corner.
- When the search results load, click Install next to the Async for .NET Framework 4, Silverlight 4… package created by Microsoft.
- Accept the license agreement and click Close.
Add async to the LabTests project
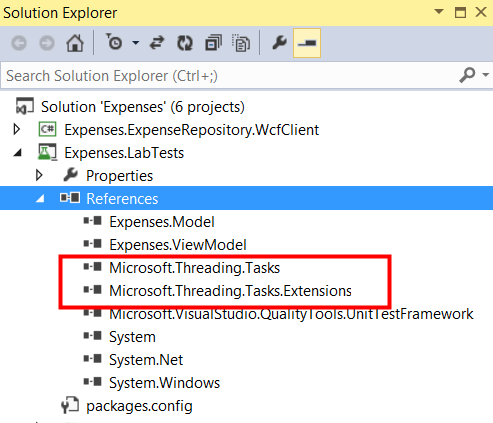
Once complete, you will see new references.
New references for threading
Task 2: Creating Fake Assemblies
In this task, we’ll add some Fakes assemblies to make it easier to work with referenced classes and interfaces.
1.
We want to write a test for our ChargeViewModel, which relies on two interfaces that it picks up from the ServiceLocator: IViewService and IExpenseRepository.
- Rather than build out complete implementations of these for testing purposes, we can rely on Microsoft Fakes to support basic stubbing.
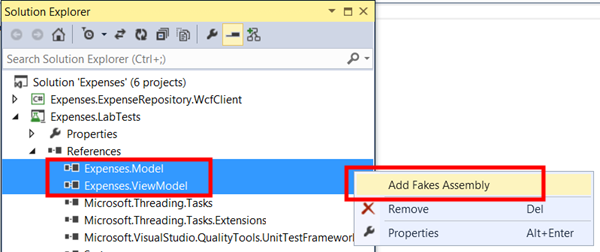
- Under the References node of the test project, select both Expenses.Model and Expenses.ViewModel (hold the Shift key to multi-select).
- Right-click the selection and select Add Fakes Assembly.
Adding a fake assembly
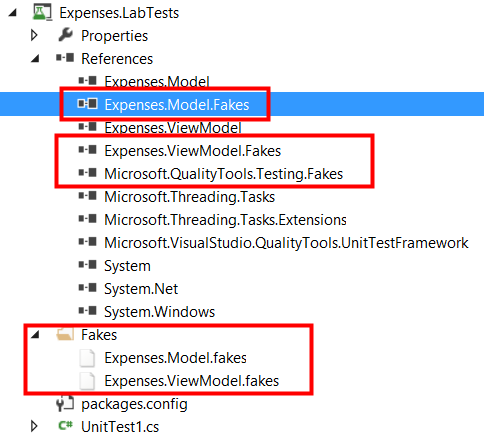
Note: A Fakes assembly is a generated helper assembly that contains all of the shim and stub types for a referenced assembly which can then be used in tests. Right-clicking any assembly in your test projects References should show the new “Add Fakes Assembly” option, which will create the assembly and a .fakes configuration file which can be used for customization of the generation and behavior of the assembly’s Fakes. Once Fakes have been created for an assembly, two new types of objects are available to use in your tests: Stubs for interfaces, and Shims for classes.
Visual Studio will now generate “fake” versions of the types in the assembly so that you can easily override their behavior and/or implement their required methods and properties.
The generated code for a fake assembly
3.
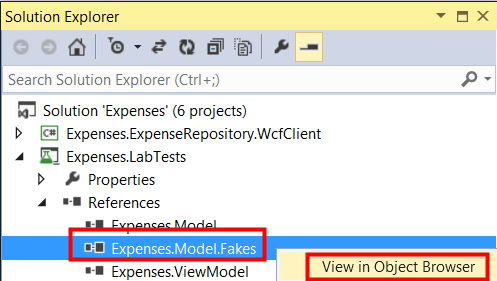
Right-click the Expenses.Model.Fakes assembly and select View in Object Browser.
Viewing the assembly in the Object Browser
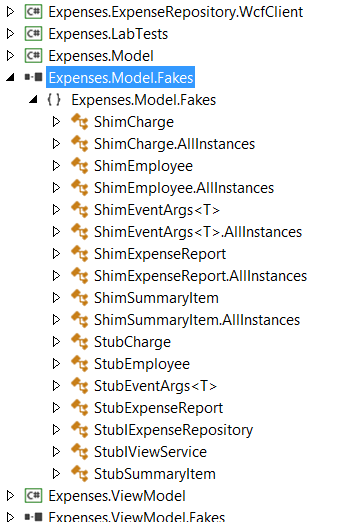
You should see the following:
Object model for Expenses.Model.Fakes
Task 3: Writing and running a test
In this task, we’ll write and run our test. 1. Now let’s turn our attention to building a unit test. Open UnitTest1.cs and find TestMethod1.
1.
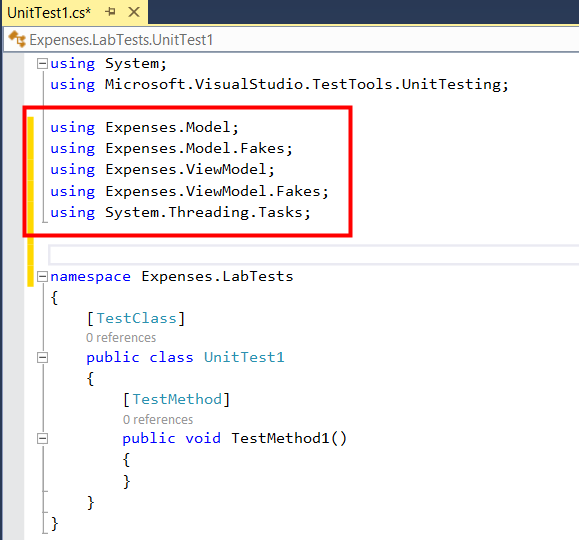
To start off with, let’s add the using declarations at the top so we can resolve the types we need.
Adding using statements
(Code Snippet - using statements)
C#
  using Expenses.Model;
using Expenses.Model.Fakes;
using Expenses.ViewModel;
using Expenses.ViewModel.Fakes;
using System.Threading.Tasks;
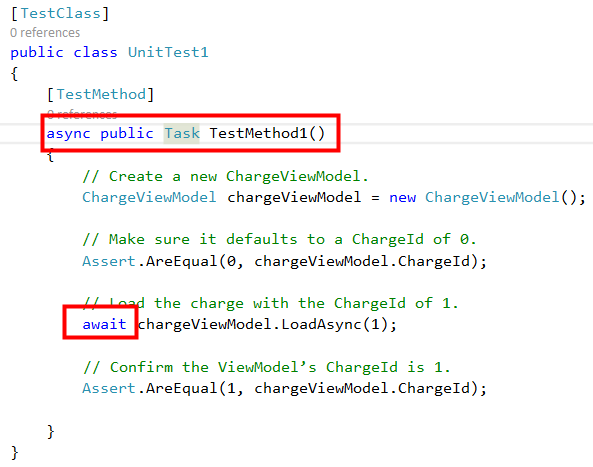
Since we’re looking to perform some basic testing for the ChargeViewModel, let’s paste in the initial code. The comments explain the code.
C#
  // Create a new ChargeViewModel.
ChargeViewModel chargeViewModel = new ChargeViewModel();

// Make sure it defaults to a ChargeId of 0.
Assert.AreEqual(0, chargeViewModel.ChargeId);

// Load the charge with the ChargeId of 1.
await chargeViewModel.LoadAsync(1);

// Confirm the ViewModel’s ChargeId is 1.
Assert.AreEqual(1, chargeViewModel.ChargeId);
Adding some unit testing code
Note: 1. The first thing you’ll notice from the code above is that it raises an error on the await statement. This is because await requires the method to be marked as async, and it should almost always return some sort of Task. Update the method definition to the line below.
Now the code will build. It’s also important to note that the Visual Studio testing engine supports async testing just like it does synchronous testing, which makes life much easier for developers.
However, just because the code will build doesn’t mean it’s ready to test. We provide three dependencies to this ViewModel via our ServiceLocator, so we’ll need to set those up before we can test.
First, we’ll add an INavigationService. Since this isn’t actually used in our code path, we can just give it the default stub object.
- Add this code to the beginning of the method before any other code.
C#
      ServiceLocator.Current.SetService<INavigationService>(
    new StubINavigationService());
Next, we need to provide the ServiceLocator with an IViewService.
Our code path will use the ExecuteBusyActionAsync method on this interface, so we’ll need to provide a method for the ExecuteBusyActionAsyncFuncOfTask stub.
It won’t do anything special, so this method simply runs the function it’s provided.
You don’t need to understand this code because it’s not relevant as far as our testing is concerned.
Add the code below directly after the code from the previous step.
C#
      ServiceLocator.Current.SetService<INavigationService>(
    new StubINavigationService());
However, one service that does play an important role for our test is the IExpenseRepository.
Since this is the object that is used to load the specified charge, we need to provide a method to run when its GetChargeAsync gets called.
Fortunately, there is a GetChargeAsyncInt32 stub that we can fill out. Paste this code after the code from the previous step.
At this point, the next line of code after this block should be the line that creates the ChargeViewModel that we added in first.
(Code Snippet - The whole UnitTest1.cs class)
C#
  using System;
using Microsoft.VisualStudio.TestTools.UnitTesting;

using Expenses.Model;
using Expenses.Model.Fakes;
using Expenses.ViewModel;
using Expenses.ViewModel.Fakes;
using System.Threading.Tasks;

namespace Expenses.LabTests
{
      [TestClass]
      public class UnitTest1
      {
          [TestMethod]
          async public Task TestMethod1()
          {

                ServiceLocator.Current.SetService<INavigationService>(
                                          new StubINavigationService());

                StubIViewService viewService =
                              new StubIViewService()
                {
                      ExecuteBusyActionAsyncFuncOfTask =
                          async (Func<Task> func) =>
                          {
                                await func();
                          }
                };
                ServiceLocator.Current.SetService<IViewService>(viewService);
                StubIExpenseRepository repository = new StubIExpenseRepository()
                {
                      GetChargeAsyncInt32 =
                          (chargeId) =>
                          {
                              return Task.FromResult(
                                      new Charge()
                                      {
                                          ChargeId = chargeId,
                                      });
                          }
                };
                ServiceLocator.Current.SetService<IExpenseRepository>(repository);

                // Create a new ChargeViewModel.
                ChargeViewModel chargeViewModel = new ChargeViewModel();

                // Make sure it defaults to a ChargeId of 0.
                Assert.AreEqual(0, chargeViewModel.ChargeId);

                // Load the charge with the ChargeId of 1.
                await chargeViewModel.LoadAsync(1);

                // Confirm the ViewModel’s ChargeId is 1.
                Assert.AreEqual(1, chargeViewModel.ChargeId);

          }
      }
}
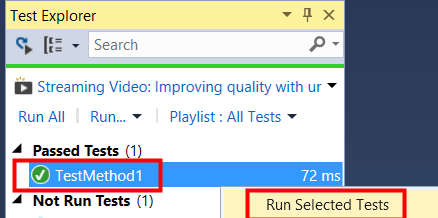
Open the Test Explorer by selecting Test | Windows | Test Explorer from the main menu.
Right-click inside Test Explorer / TestMethod1 method and select Run Selected Tests. It can take a few moments to run.
Running the unit test
Exercise 3: Adding a new feature
In this exercise, we’ll go through the process of adding a new feature to our app. We’ll add a color-coding feature in the ViewModel portable class library and databind it to the background of a grid in the WPF app.
Note: The Portable Class Library (PCL) project enables you to write and build managed assemblies that work on more than one .NET Framework platform.
If we were working purely in a WPF app, this would be a simple thing to accomplish.
However, we’re using a PCL to contain as much business logic as possible so we can share it across different device targets.
As a result, we’re going to need to apply a few techniques to make it all run smoothly.
Task 1: Adding the ViewModel Property
In this task, we’ll add the color coding property to the SummaryItemsViewModel.
This will allow the user to quickly see whether they have outstanding reports to approve (red) or if they’re all caught up (green).
However, since we’re working with a PCL, there is no support for the Brush or Color objects, so we’ll need to work around this using a Tuple</byte,> to return the RBG data.
1.
Open \Expenses\Expenses.sln in Visual Studio 2013 if not already open.
- In the Expenses.ViewModel project, open the SummaryItemsViewModel.cs class.
- Path = ..\Expenses WPF\Expenses.ViewModel\View VMs\SummaryItemsViewModel.cs
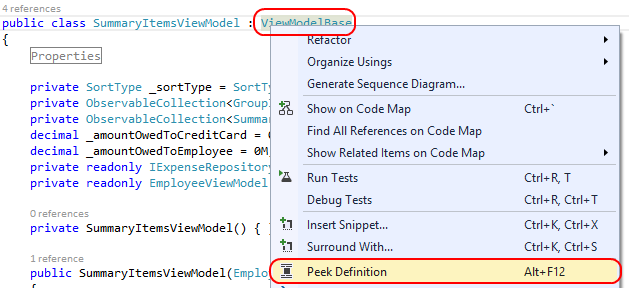
- At the class definition, right-click the inheritance reference to ViewModelBase and select Peek Definition. This will bring up a peek view of ViewModelBase.
The SummaryItemsViewModel.cs class
4.
ViewModelBase implements INotifyPropertyChanged and manages how we notify any databinding clients of changes in property value.
- Since we’re working in a PCL, we don’t have DependencyObject to derive from, so we need to do a little extra work.
- Fortunately, all this functionality carries with our assembly-in binary form-across Windows Phone and Windows Store apps as well.
- Another neat trick employed here is the use of Expressions to perform the property change notifications. Since the notifications themselves use strings, there is the risk of error whenever property names are changed or modified, such as by refactoring.
- Thanks to the NotifyOfPropertyChange method, child classes can pass a reference to the property itself, from which the property name is retrieved at runtime. Press Esc to close the Peek Definition window.
Add the following code directly inside the class definition so that it’s the first property in the class.
- This is the property that represents the background color we want to display in the summary view where we’re summarizing the status of the reports waiting for the user to approve.
- The Tuple is a nifty object that allows us to group a set of values together, which is perfect for our purposes in this lab.
Add this code
C#
public class SummaryItemsViewModel : ViewModelBase
{
  ...
    // Add this method
  public Tuple<byte, byte, byte> MyApprovalsBackgroundColor
  {
      get { return _myApprovalsBackgroundColor; }
      set
      {
          this._myApprovalsBackgroundColor = value;
          this.NotifyOfPropertyChange(() =>
              this.MyApprovalsBackgroundColor);
      }
  }
    // Add this property
  private Tuple<byte, byte, byte> _myApprovalsBackgroundColor;
Find the GetSummaryItems method. Scroll down to the bottom and add the following code directly before the “return this.SummaryItems” line.
- This code sets our preferred background color to a light red if there are any pending reports waiting for the user’s approval, or light green if they are all caught up.
C#
if (this.NumberOfReportsNeedingApproval > 0)
{
    this.MyApprovalsBackgroundColor = new Tuple<byte, byte, byte>(255, 127, 127);
}
else
{
    this.MyApprovalsBackgroundColor = new Tuple<byte, byte, byte>(0, 255, 127);
}
Task 2: Binding a view to the property
In this task, we’ll bind the summary view to use the new property.
1.
Right-click the Converters folder in the Expenses.Wpf project and select Add | Existing Item… .
Adding a converter
2.
Call the file TupleToColorConverter.cs.
3.
Paste in the following code.
C#
  using System;
using System.Collections.Generic;
using System.Linq;
using System.Text;
using System.Threading.Tasks;
using System.Windows.Data;
using System.Windows.Media;

namespace Expenses.Wpf
{
      [ValueConversion(typeof(Tuple<byte, byte, byte>), typeof(SolidColorBrush))]
      public class TupleToColorConverter : IValueConverter
      {
          #region IValueConverter Members

          public object Convert(object value, Type targetType, object parameter,
                System.Globalization.CultureInfo culture)
          {
                Tuple<byte, byte, byte> rgbData = value as Tuple<byte, byte, byte>;
                return new SolidColorBrush(Color.FromRgb(rgbData.Item1, rgbData.Item2, rgbData.Item3));
          }

          public object ConvertBack(object value, Type targetType, object parameter,
                System.Globalization.CultureInfo culture)
          {
                throw new NotSupportedException();
          }

          #endregion
      }
}
Code Snippet = TupleToColorConverter.cs
4.
Keep TupleToColorConverter.cs open.
- This class is a simple converter that accepts a Tuple</byte,> and returns a SolidColorBrush.
- We’ll need it in the next step where we bind the new property to a Grid’s Background.
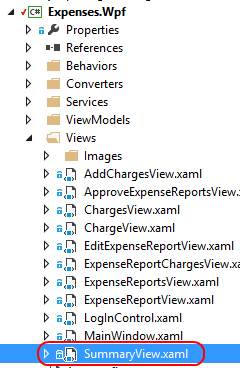
In the Solution Explorer, double-click the SummaryView.xaml file in the Views folder of the Expenses.Wpf project to open it.
SummaryView.xaml
6.
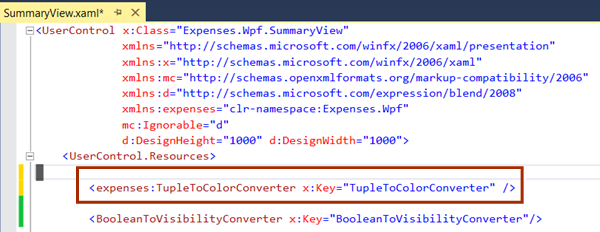
Before we can bind our Tuple property to a Brush property, we’ll need to add our converter as a resource. Add the following line as the first line under the node.
C#
<expenses:TupleToColorConverter x:Key="TupleToColorConverter" />
SummaryView.xaml UserControl.Resources
7.
Now we can perform the binding itself. At around line 84 there is a Grid with the background set to ”LightYellow” .
- Change the background value inside the quotes to the following (this is one continuous line without a line break).
- This tells the Grid to use our property as its background color, and that it can use the referenced converter to find a Brush from the Tuple value.
XML
{Binding MyApprovalsBackgroundColor, Converter={StaticResource TupleToColorConverter}}
Binding the color for the grid
Binding the background color in SummaryView.xaml
Task 3: Confirming the feature
In this task, we’ll build and run the app to confirm our feature works as designed.
1.
Press F5 to build and run the app.
2.
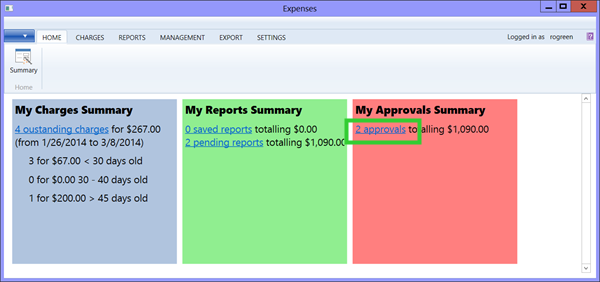
Note that when it loads, the “My Approvals Summary” now has a red background. Click the 2 Approvals link to view the items awaiting approval.
Home Screen
3.
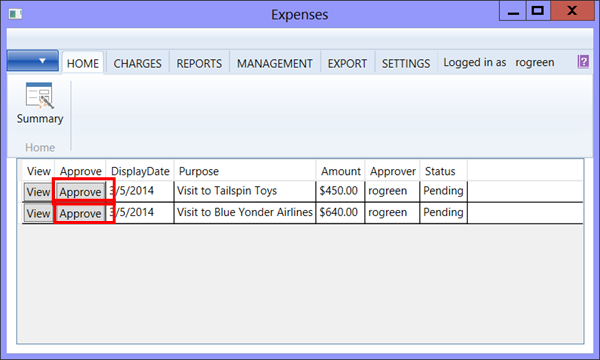
For each item, click the Approve button and conform the approval.
Red Approval Box - Need to approve
4.
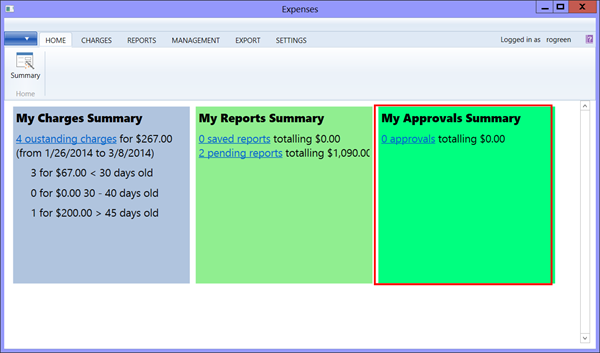
From the Home tab, click the Summary button to view the summary view. Note that the approvals section now has a green background.
Box is green - our code worked
Summary
In this lab we learned:
-
How setup a WCF service inside if IIS
-
How set permissions so IIS can access the WCF Service Folders
-
How to add asynchronous unit tests to a WPF project
-
How to use the Fake Assembly capability of Visual Studio to do dependency injection
-
How to perform unit tests for WPF Application
-
How to use converters to set the background color of a grid based on the pending approvals
