How to Migrate an On-Premises SQL Server 2012 Database to Windows Azure SQL Virtual Machine
Overview
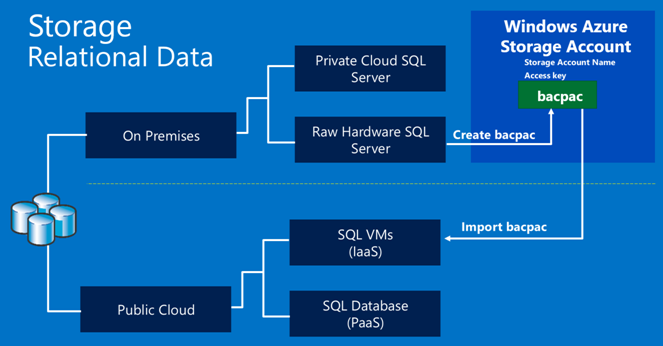
This next section is about migrating on-premises SQL Server database to the public cloud.
Windows Azure SQL Server for VMs (IaaS) makes it possible for you to host your cluster in a Microsoft datacenter. The key advantage this public cloud-hosted option offers is a high level of compatibility with existing on-premises SQL Server installations. Because this option supports a full-featured version of SQL Server, you’re able to leverage HA, transparent data encryption, auditing, business intelligence (BI) such as analysis services and reporting services, distributed transactions, support for active directory (Active Directory Federation Services, or AD FS 2.0), and more. Moreover, you can build your own VM or leverage a template from the Windows Azure image gallery (described later). Finally, this offering allows you to build your own virtual private networks (VPNs) easily, bridging your cloud resources to your on-premises network and providing a seamless experience that blurs the lines between the massive Microsoft datacenters and your internal servers.
Choosing a base image from the gallery
Objectives
In this hands-on lab, you will learn how to:
- Provision a virtual machine with SQL Server 2012 and Windows Server 2012 (SQL Server 2012 SP1 Enterprise on WS 2012)
- Use Remote Desktop to start SQL Server Management Studio and import the bacpac file
- Configure Named Pipes on SQL Server Express 2012
- Open port 1433 on the virtual machine to allow incoming connections to SQL Server 2012.
- Configure the Firewall to allow incoming connections
- Enable SQL Server Authentication and add a new login user
- Test the connectivity to the virtual machine using various tools
- Create a connection string that can be used to leverage the Windows Azure SQL Virtual Machine we create
Prerequisites
The following is required to complete this hands-on lab:
- A Windows Azure subscription
- A bacpac file in Windows Azure storage (previous lab)
- Visual Studio 2013 Ultimate RC
- SQL Server 2012 Express
- How to Export an On-Premises SQL Server Database to Windows Azure Storage
Setup
In order to execute the exercises in this hands-on lab you need to set up your environment.
- Start by logging into the Windows Azure Portal (https://manage.windowsazure.com)
- How to Export an On-Premises SQL Server Database to Windows Azure Storage
- How to create a Windows Azure Storage Account
A set of database-oriented posts
This post is part of a set of posts that go together:
- How to create a Windows Azure Storage Account
- How to Export an On-Premises SQL Server Database to Windows Azure Storage
- How to Migrate an On-Premises SQL Server 2012 Database to Windows Azure SQL Virtual Machine
- How to Migrate an On-Premises SQL Server 2012 Database to Windows Azure SQL Database
- Setting up an Azure Virtual Machine For Developers with Visual Studio 2013 Ultimate and SQL Server 2012 Express
Exercises
This hands-on lab includes the following exercises:
Creating a Windows Azure SQL Virtual Machine and importing a database
In this section, you will log into the Windows Azure Portal and create an Windows Azure SQL Virtual Machine using the Windows Azure Gallery.
Task 1 – Creating an Azure Virtual Machine using the Windows Azure Virtual Image Gallery
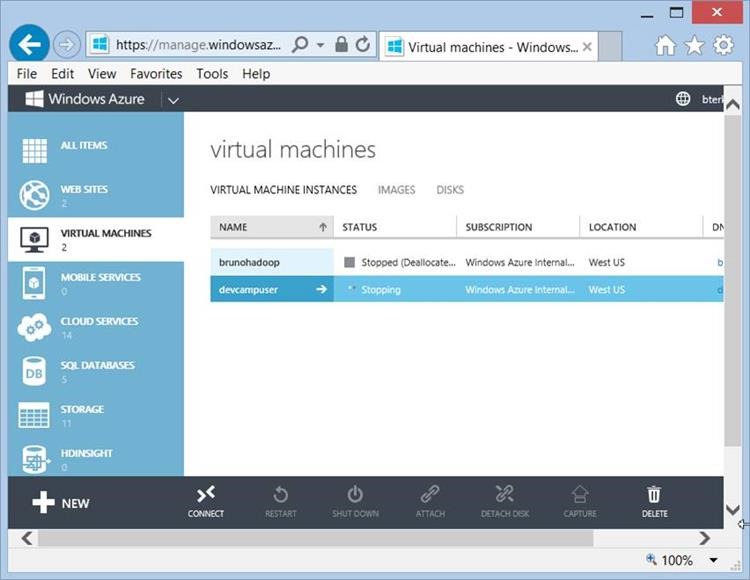
Return back to the Windows Azure Portal. To start select virtual machines from the left menu panel. Next, click the +New button in the lower left corner.
Creating a Windows Azure SQL Virtual Machine
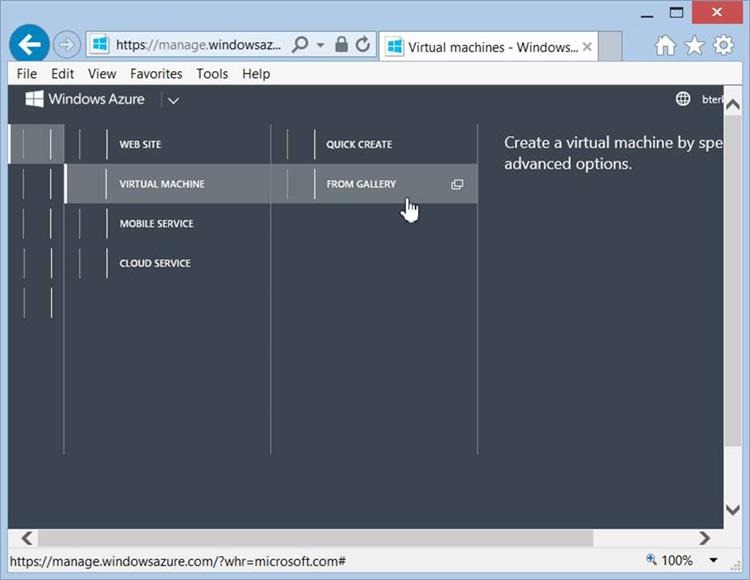
Next, select Virtual Machine | From Gallery from the portal. You will then be provided a list of virtual machine images to choose from. We are interested in SQL Server 2012 Sp1.
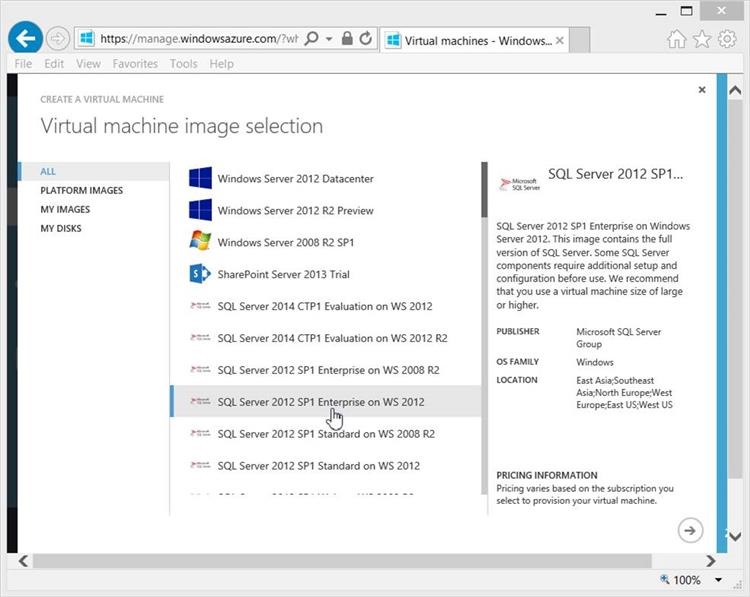
Choosing a base image from the gallery
Notice that there are many versions of SQL Server available on various operating systems. Make the selection as seen below, SQL Server 2012 SP1 Enterprise on WS 2012.
Selecting SQL Server 2012 SP1 Enterprise on WS 2012
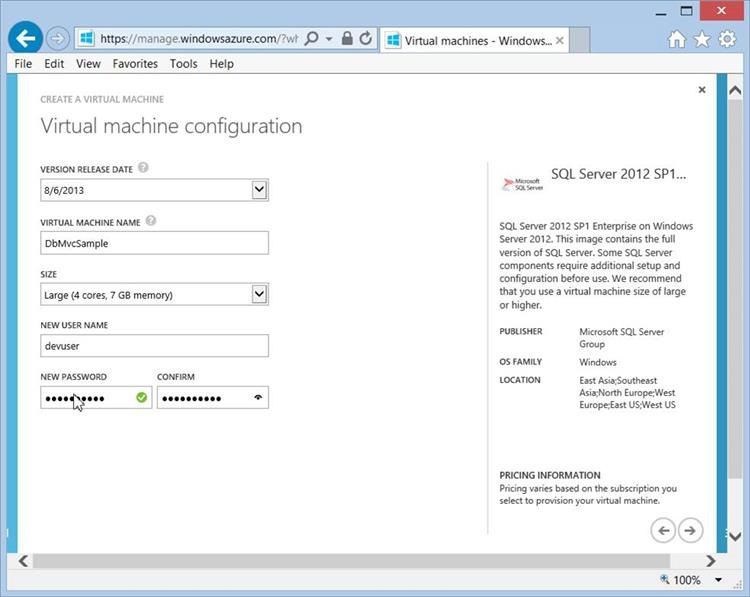
This next screen allows you to specify a virtual machine name. You will need to choose a unique name that is not already chosen. This screen also allows you to specify the machine size. For testing purposes we recommend a small size as there won’t be much load for an individual developer. You will also need to specify a username and password that will be used to log into the machine. This will not be the same username and password for the web application. We will need to add a database user separately using SQL Server Management Studio in a future step.
Configuring the Virtual Machine
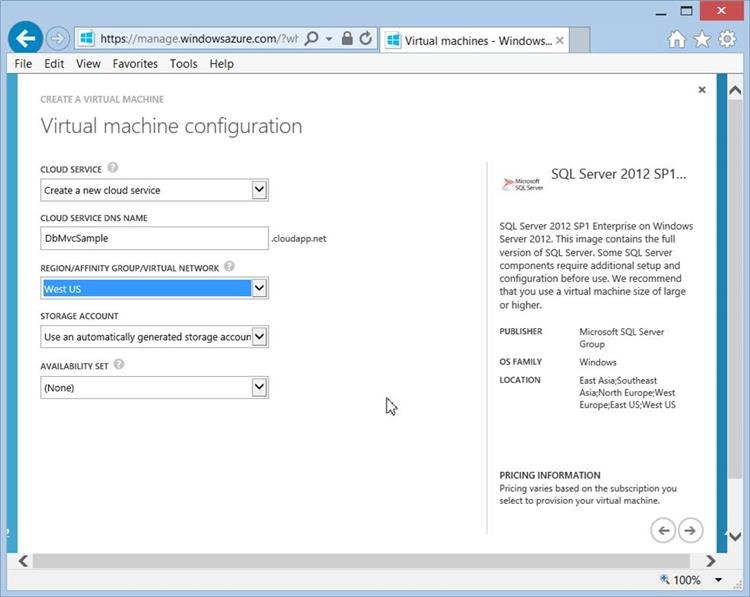
You will also need to provide a DNS name, which represents the unique name of the server on the web. It also specify a Region, we should generally be the same Region as the applications that will be consuming the database to minimize latency.
Configuring the Virtual Machine
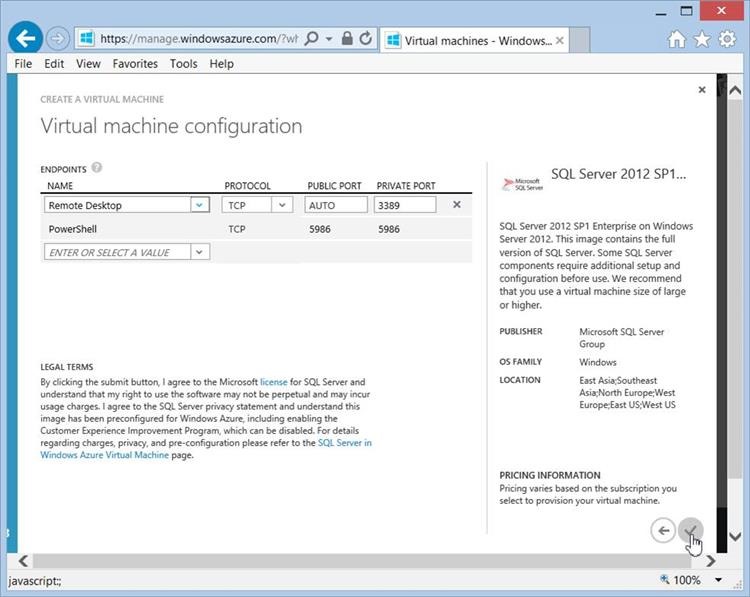
No changes or modifications are needed for this final step in the virtual machine configuration.
Configuring the Virtual Machine
Task 2 – Remote Desktop into Virtual Machine
The goal of task 2 is to configure the virtual machine and the underlying database. You will import the bacpac file. You may need to re-visit the Windows Azure portal to get the details of your storage account where the bacpac file resides.
We are now ready to begin the importing of the Bacpac file that was created in Task 1. To accomplish this task, we will need to use Remote Desktop to connect to the Virtual machine directly. From there we will start SQL Server 2012 Management Studio to perform the actual import process. For this step, click the Connect option from the bottom menu bar.
Importing into Windows Azure SQL Virtual Machine
A popup window will appear at the bottom of the browser window. Click on the Open button to start a remote desktop session. You will need to use the Username and Password specified when you created the virtual machine in the previous step.
Opening a Remote Desktop Session
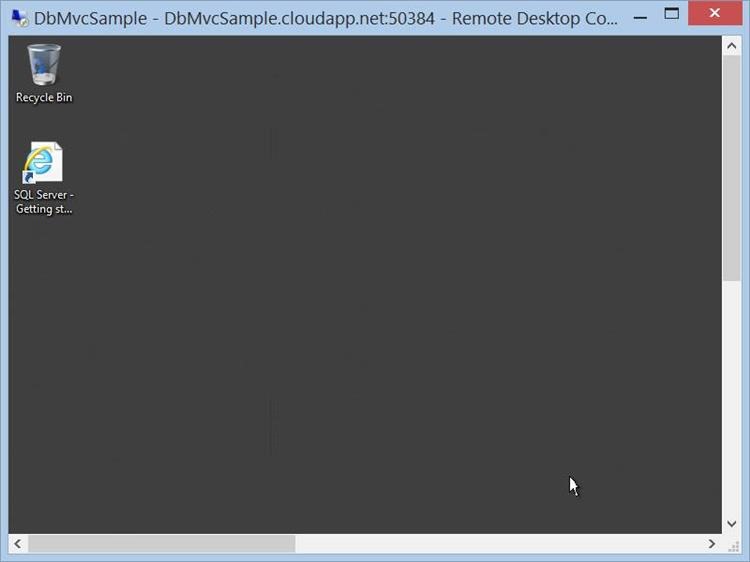
You are now remotely connected to the virtual machine you just created. The next step is to start SQL Server 2012 Management Studio.
Starting SQL Server 2012 Management Studio
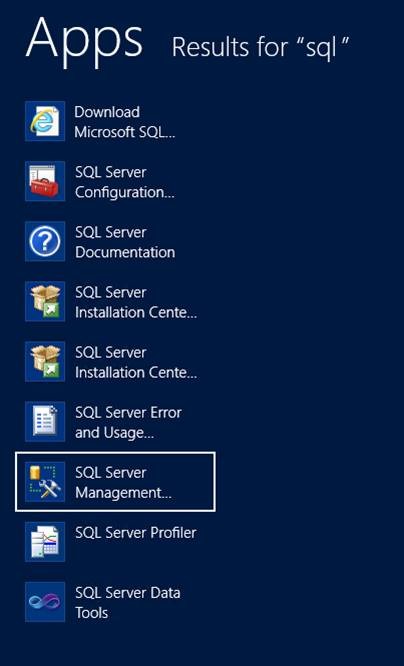
The virtual machine comes equipped with SQL Server 2012 Management Studio. Select from the start menu and launch it.
Starting SQL Server 2012 Management Studio
It may take a few moments to load the first time.
Starting SQL Server 2012 Management Studio
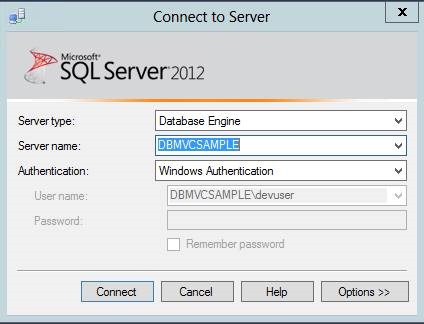
You will be presented with the appropriate default parameters to connect to the database server. You don't need to enter anything. Just click the connect button.
Connecting to database with Windows Authentication
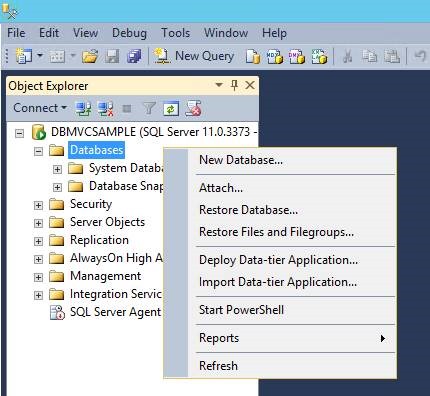
We are now ready to import the data tier, which is really the Bacpac file that we had created earlier. As you recall, that file is sitting in Windows Azure storage. Right mouse click on Databases and select Import Data Tier.
Importing a Data-tier Application
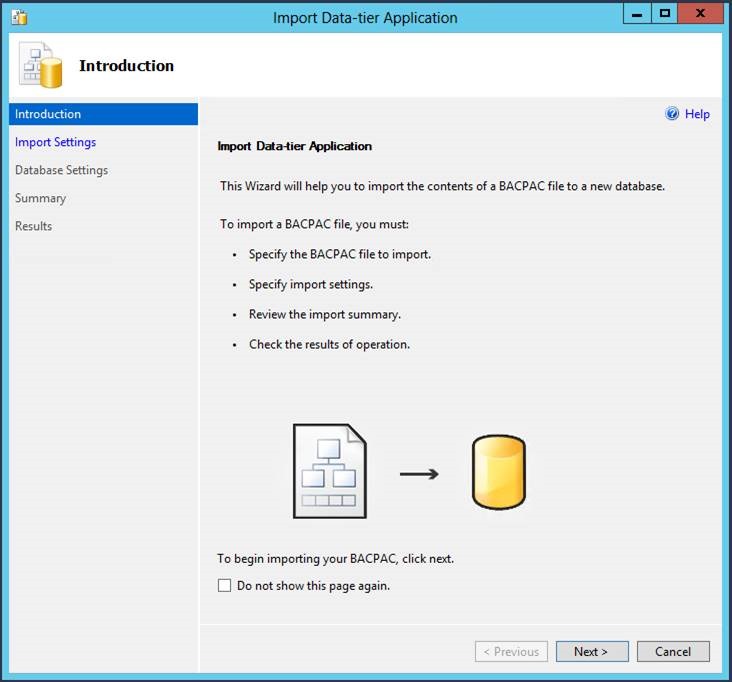
The wizard will begin and you will be presented with various screens to import the database. Click Next on the Import Data-tier Application Wizard.
Starting the import wizard
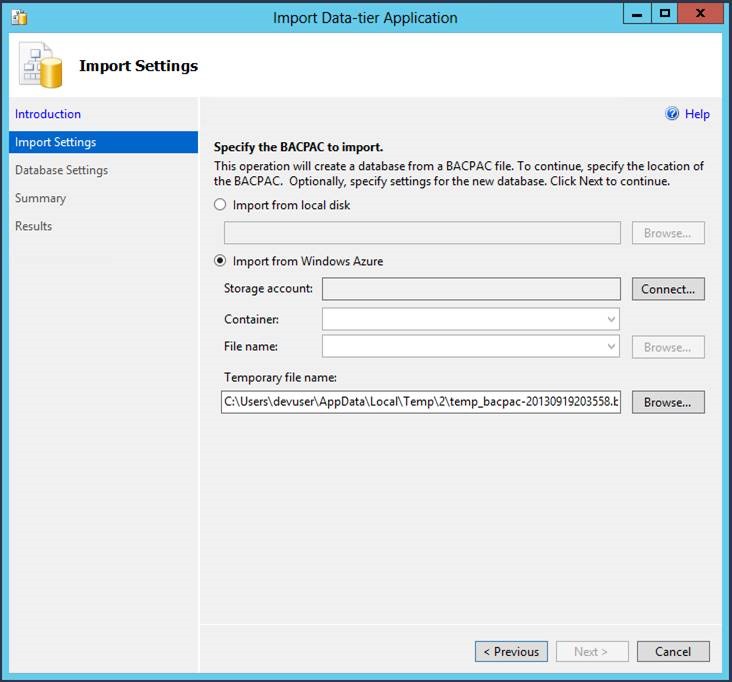
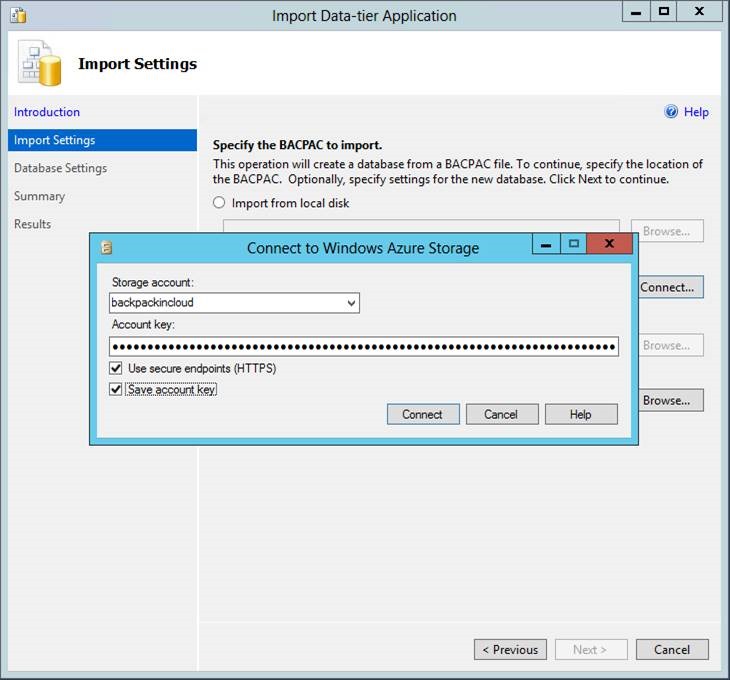
Because the Bacpac file is sitting in Windows Azure storage, select the radio button | Import from Windows Azure. At this point you should click Connect, assuming you have the storage account information. If you do not, the next steps will allow you to get that information. If you have the Storage Account Name and the Primary Access Key, you can skip past the portal help section in the next 2 steps.
Importing Data-tier Application
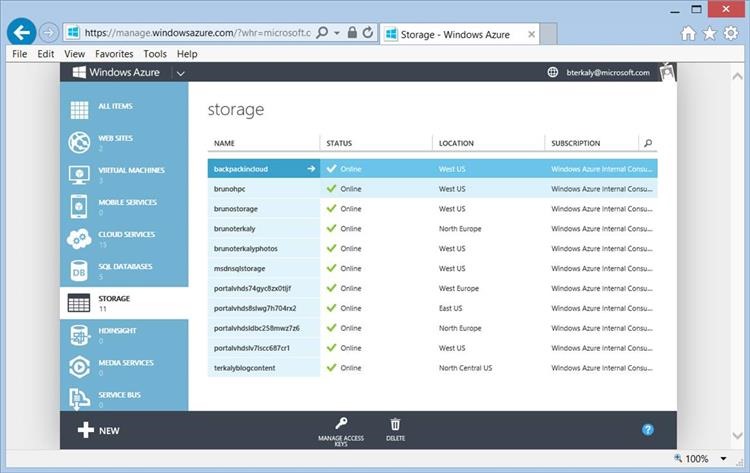
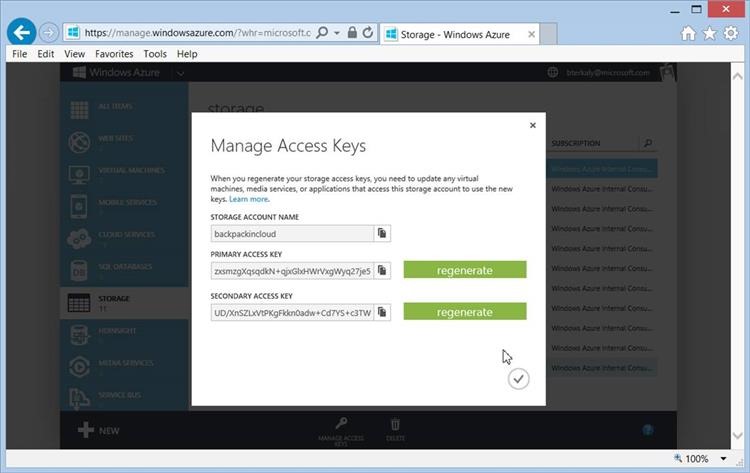
The point of this step is to verify that you have not forgotten the details of the Bacpac file inside of Windows Azure Storage. You can return back to the Windows Azure portal and click Storage on the left menu. You should be able to easily identify the Bacpac file that you had created previously in an earlier exercise. Once you highlight the Bacpac file, you can select Manage access keys from the bottom of the screen. The access key will be needed for the import process in SQL Server Mangement Studio.
Importing Data-tier Application
As explained previously, you may need the primary access key. When at the portal, note that you can now access the primary access key and copy it to the clipboard so that it can be used for the import within SQL Server Mangement Studio in this step. Notice you need to provide the Storage Account Name as well as the Account Key. Enter that information then enter Connect.
Importing Data-tier Application
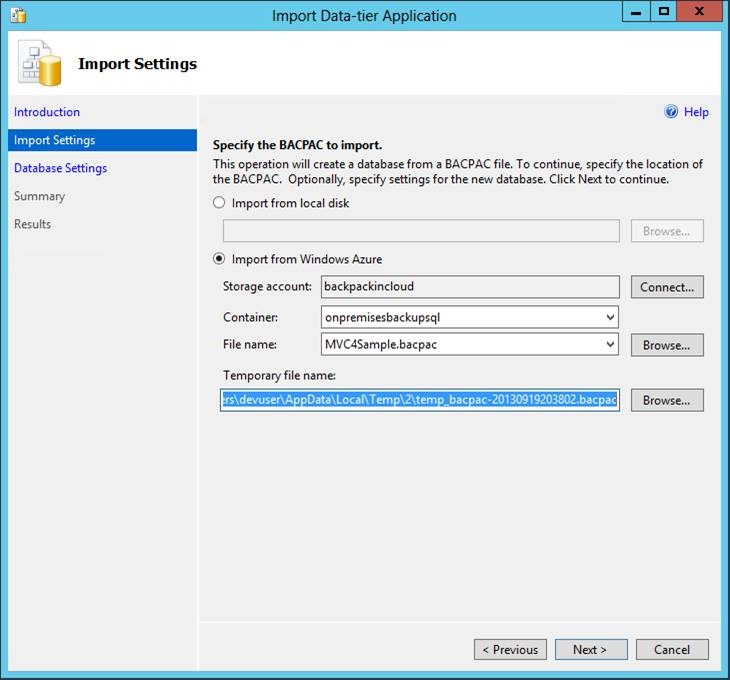
You should be able to select the Container name from the drop down combo box. Click Next to continue.
Importing Data-tier Application
You will also be able to select the file name for the Bacpac file.
Importing Data-tier Application
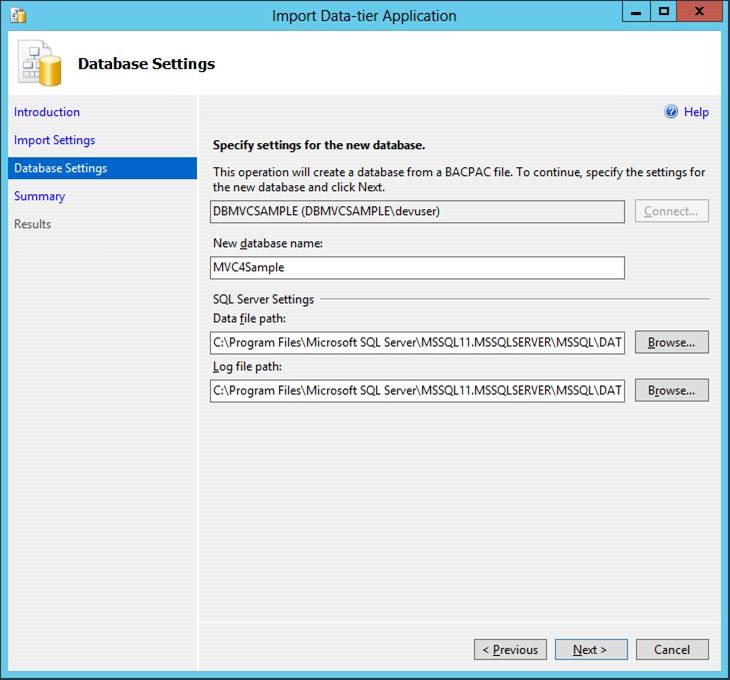
Accept the default values and click the Next button.
Importing Data-tier Application
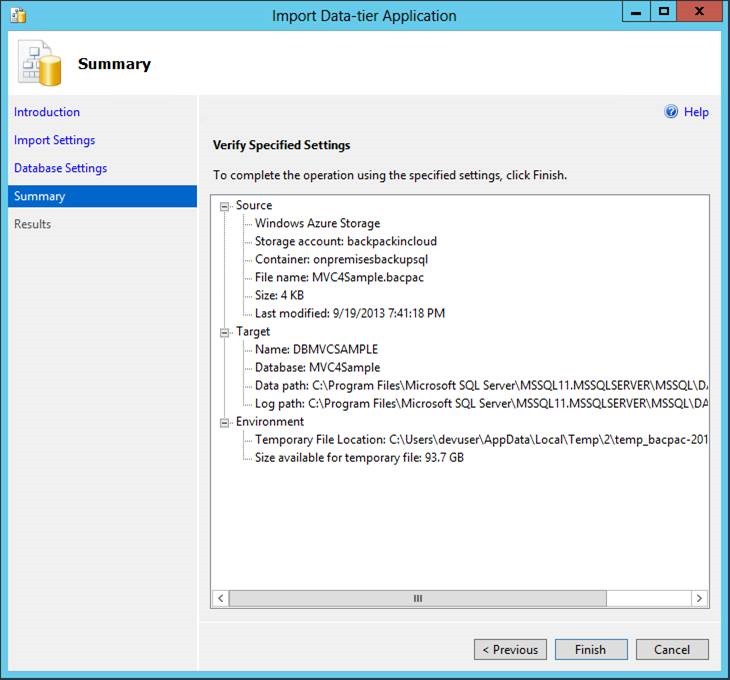
The import process is now complete. Click Finish to dismiss the import data tier wizard.
Importing Data-tier Application
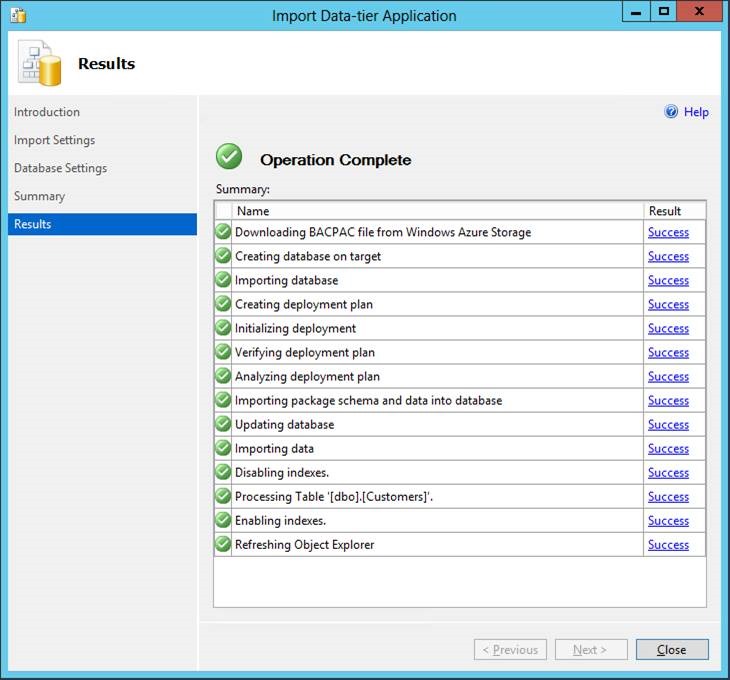
Verify that your import a successful and click Close.
Importing Data-tier Application
Task 3 – Verifying a correct import of the bacpac file
The goal of task 3 is to verify that the database imported correctly. You enter some basic queries to do so.
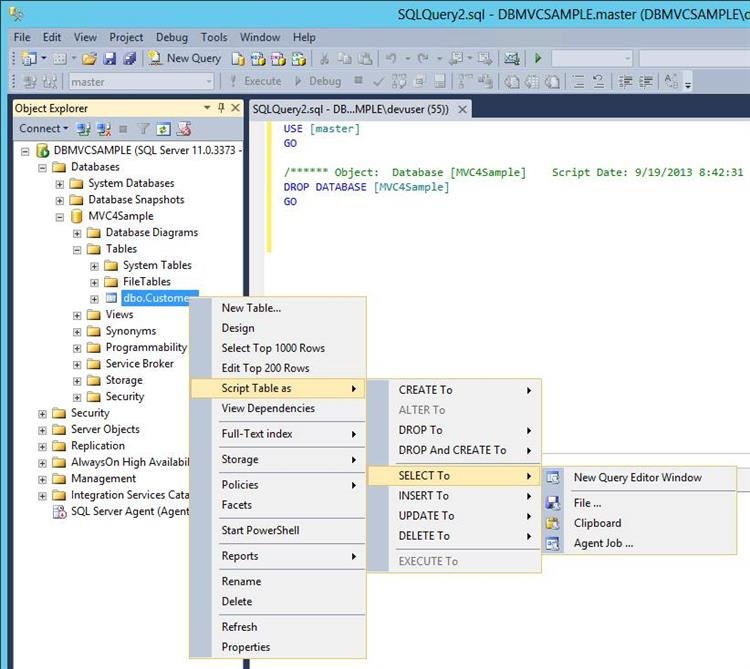
You can now verify that all the database structures, as well as the data is available. Right mouse click on the Customers table and create a select Query in a New query editor window. A simple query can verify if all the appropriate data structures and data are made it through the import process.
Verifying the import with SQL Server 2012 Management Studio
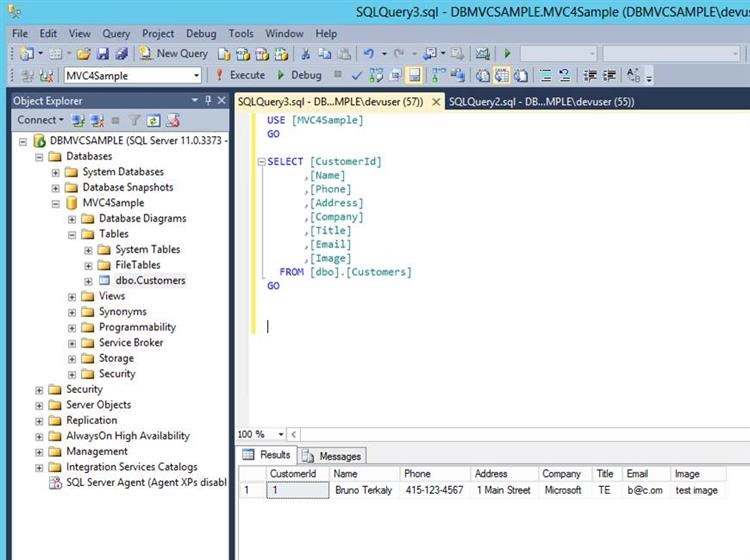
Execute the query and verify that the correct data appears in the results pane below.
Verifying the import with SQL Server 2012 Management Studio
Task 4 – Configuring Named Pipes, and opening up TCP port 1433
Your database and virtual machine is not accessible by client applications. This lab is about enabling Named Pipes and port 1433.
Named-pipes provide a way for inter-process communication to occur among processes running on the same machine. What named pipes give you is a way to send your data without having the performance penalty of involving the network stack.
SQL Server is a Winsock application that communicates over TCP/IP by using the sockets network library. SQL Server listens for incoming connections on a particular port. The default port for SQL Server is 1433. The port doesn't need to be 1433, but 1433 is the official Internet Assigned Number Authority (IANA) socket number for SQL Server.
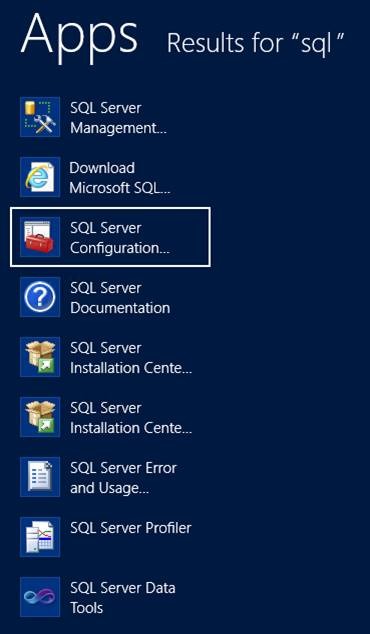
Let’s begin by starting SQL Server Configuration Manager.
Starting SQL Server Configuration Manager
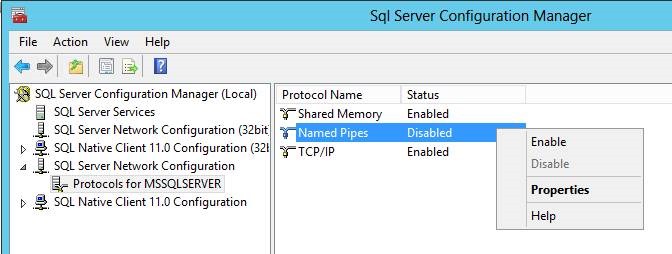
Once SQL Server Configuration Manager is open, navigate to the section on the left called SQL Server network configuration | Protocols for MSSQLSERVER. Be sure to enable Named Pipes. You can close SQL Server Configuration Manager now.
Changing SQL Server Configuration Management
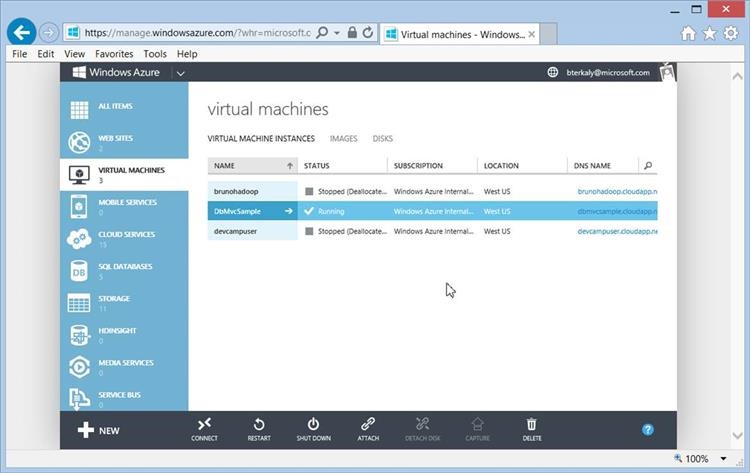
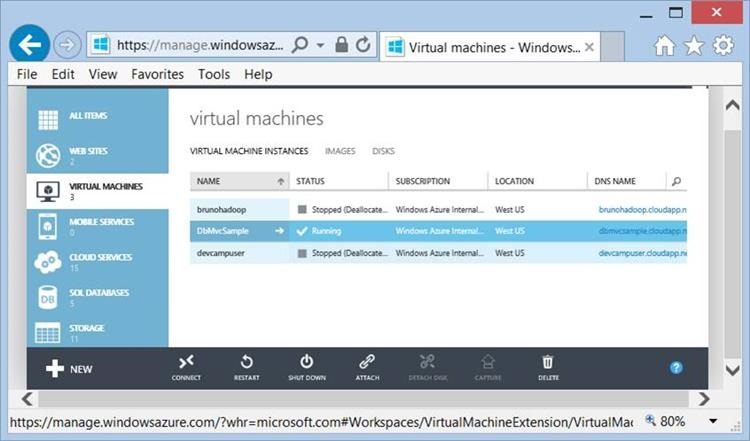
We now need to return back to the portal and open up TCP port 1433 the virtual machine. Start by selecting the virtual machine previously created, and click the -> to the right of the virtual machine name (DBMvcSample).
Opening up TCP Port 1433
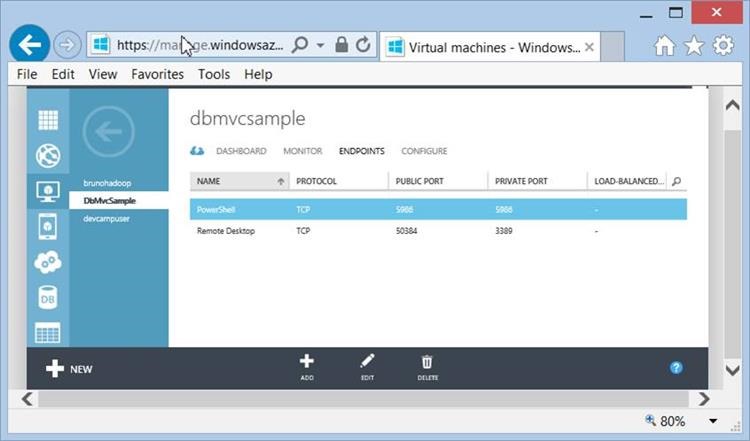
From the top level menu select Endpoints, then click the Add button from the bottom of the portal window.
Opening up TCP Port 1433
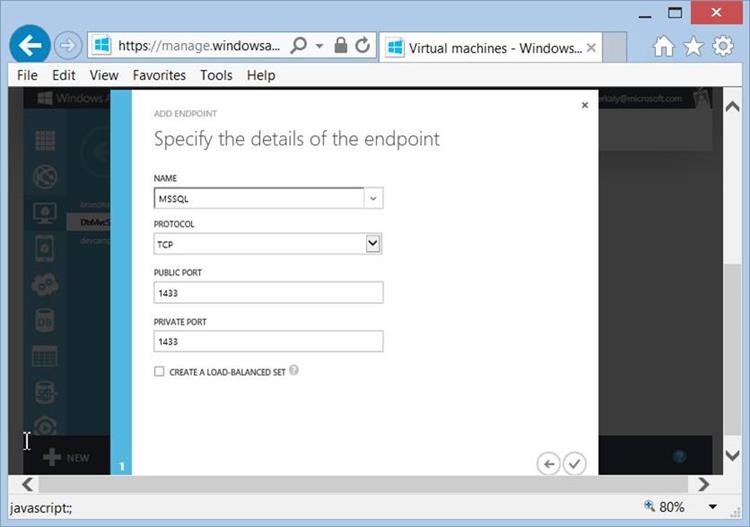
The dialog box is for you select the Name, Protocol, the Public and Private ports. Fill in the dialog box as seen below. As mentioned previously, for security purposes, it might make sense to use another lesser-known port then 1433.
Opening up TCP Port 1433
Task 5 – Enabling Connections by Configuring Windows Firewall
Inbound rules explicitly allow, or explicitly block, inbound network traffic that matches the criteria in the rule.
For example, you can configure a rule to explicitly allow traffic secured by IPsec for Remote Desktop through the firewall, but block the same traffic if it is not secured by IPsec.
When Windows is first installed, all unsolicited inbound traffic is blocked.
To allow a certain type of unsolicited inbound traffic, you must create an inbound rule that describes that traffic. For example, if you want to run a Web server, then you must create a rule that allows unsolicited inbound network traffic on TCP port 1433.
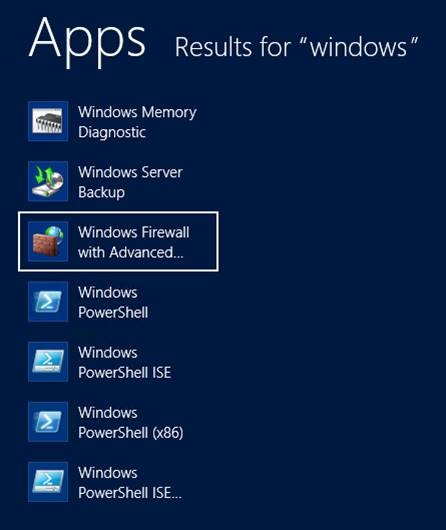
From the Start menu, choose Windows Firewall with Advanced... .
Starting the Windows Firewall
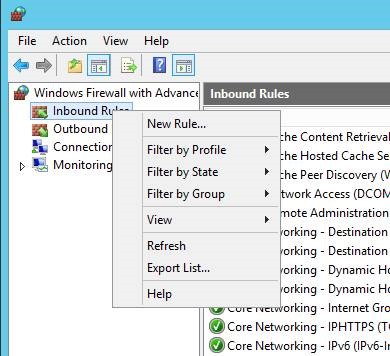
Right mouse click on Inbound Rules and choose New Rule.
Adding an Inbound Rule
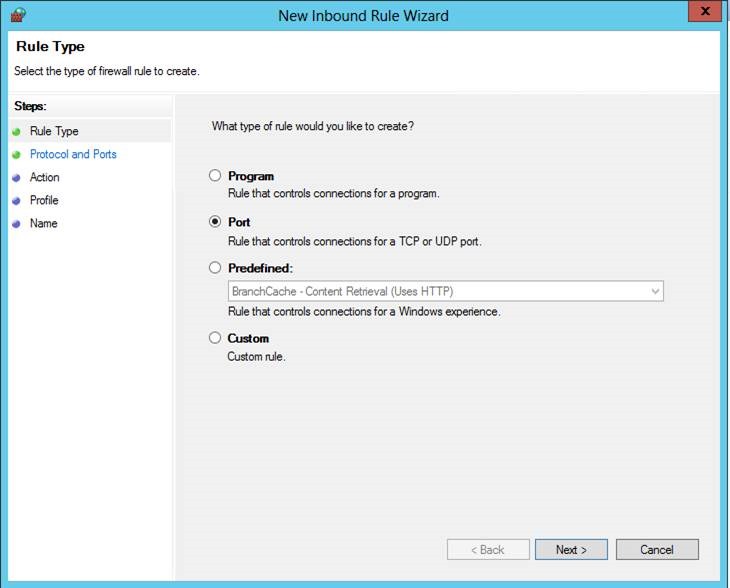
The second radio button is Port, so select Port and click the Next button.
Adding an Inbound Rule
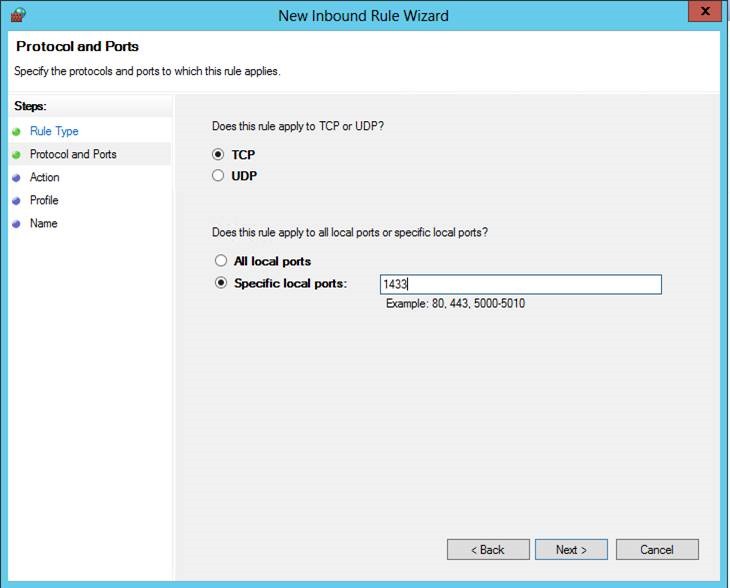
Be sure that the rule applies to TCP ports, specifically port 1433, as seen below.
Adding an Inbound Rule
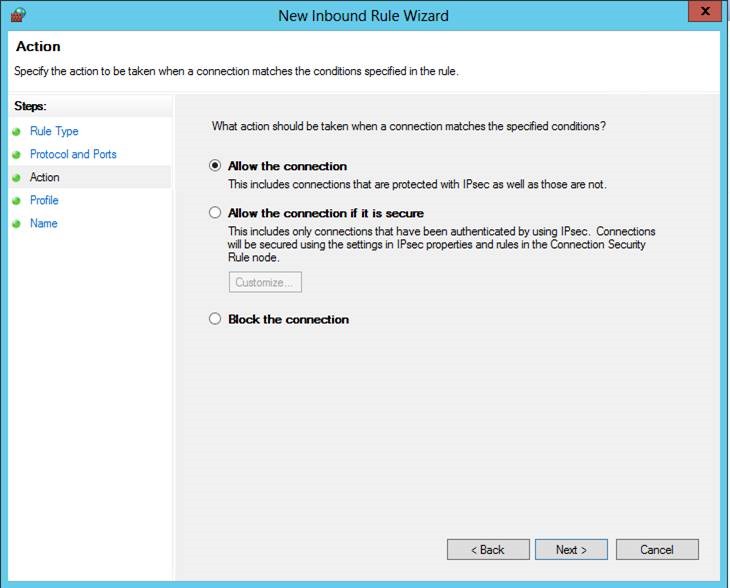
The action that we desire is to Allow the Connection. Then click Next.
Adding an Inbound Rule
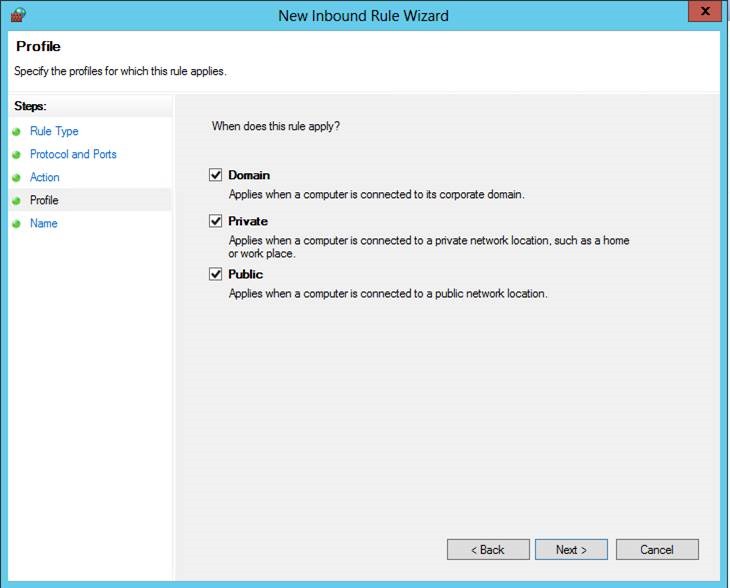
By default all three checkboxes are enabled. Do not change them and click Next.
Adding an Inbound Rule
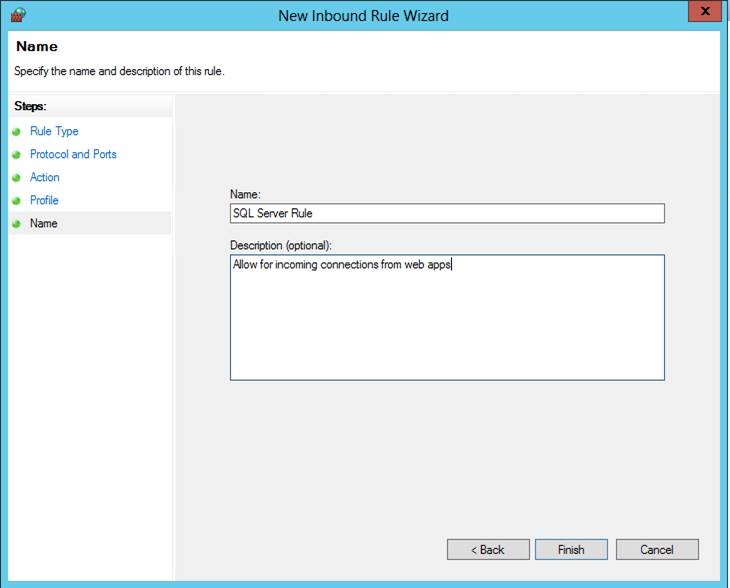
Provide a Name for the new Inbound rule that we just created and click Finish. You are now done configuring the Windows firewall to allow Incoming TCP connections on Port 1433.
Adding an Inbound Rule
Task 6 – Enabling SQL Server Authentication and Adding a User
During setup, you must select an authentication mode for the Database Engine.
There are two possible modes: Windows Authentication mode and mixed mode. Windows Authentication mode enables Windows Authentication and disables SQL Server Authentication. Mixed mode enables both Windows Authentication and SQL Server Authentication. Windows Authentication is always available and cannot be disabled.
When using SQL Server Authentication, logins are created in SQL Server that are not based on Windows user accounts.
Both the user name and the password are created by using SQL Server and stored in SQL Server.
Users connecting using SQL Server Authentication must provide their credentials (login and password) every time that they connect.
When using SQL Server Authentication, you must set strong passwords for all SQL Server accounts. For strong password guidelines, see https://technet.microsoft.com/en-us/library/ms161962.aspx.
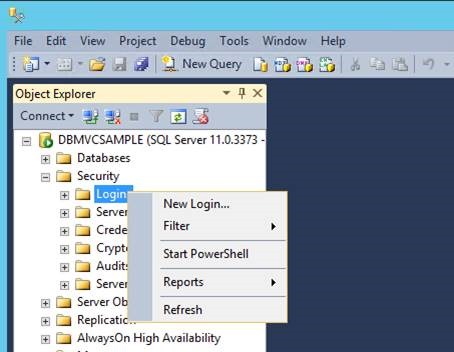
As previously stated, because our connection string will leverage SQL Server standard security, we will need to create a new login user that leverages SQL Server Authentication. Right mouse click Security | Logins | New Login.
Adding a New Login and SQL Server Authentication
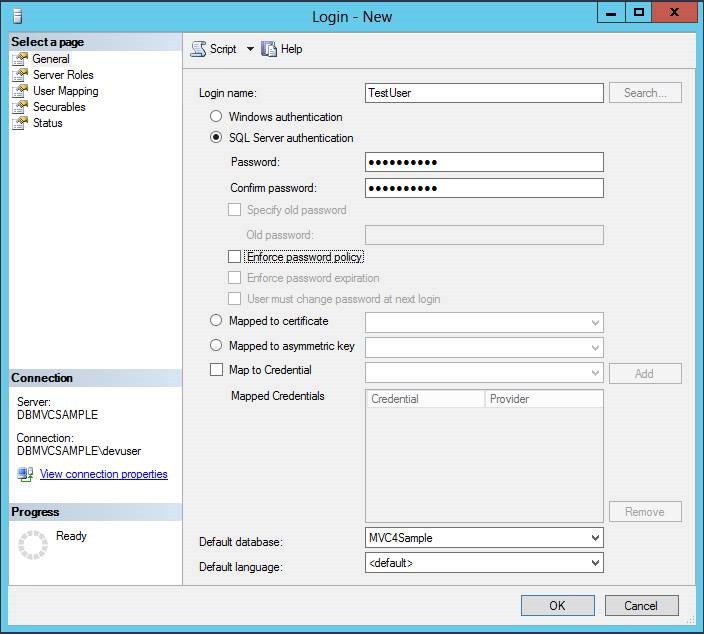
Enter a login name and remember what you indicated. It will be needed in the connection string later from our web application. In this example we will call the login name TestUser. De-select Enforce password policy.
Adding a New Login and SQL Server Authentication
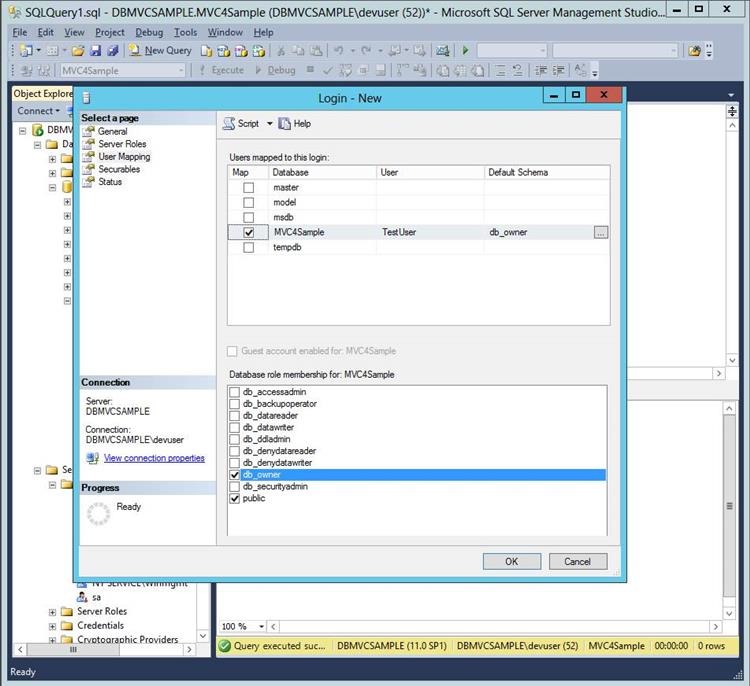
From the left side of the dialog box under Select a Page, click on User Mapping. Be sure to map TestUser to MVC4Sample. Make sure the Default Schema reads db_owner. Lower in the dialog box for Database Role Membership, select db_owner and public.
Adding a New Login and SQL Server Authentication
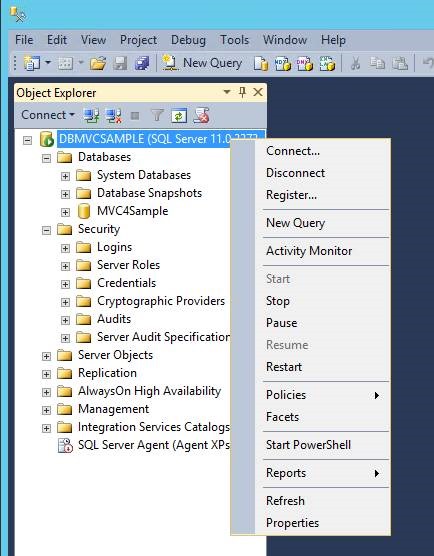
In the final step we will need to enable SQL Server Authentication. This can be done by choosing properties after right mouse clicking on SQL Server and the Object Explorer, as seen below.
Enable SQL Server Authentication
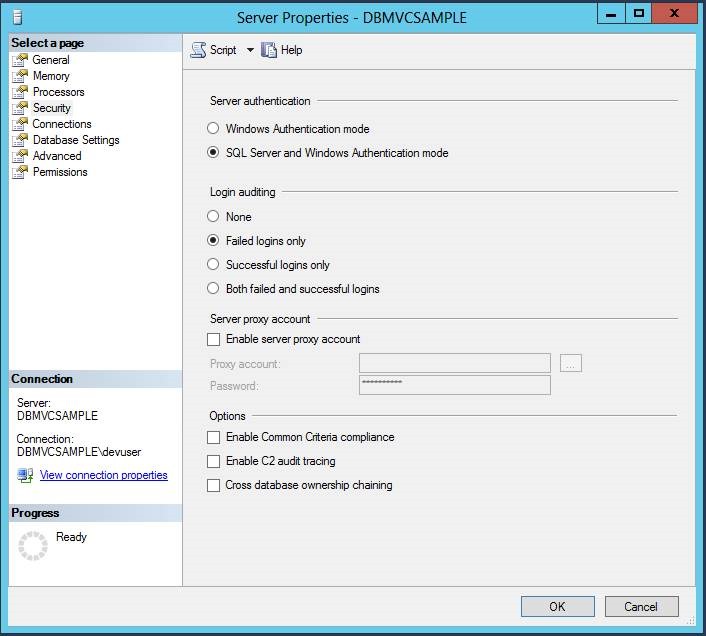
On the left side of the dialog box choose Security and be sure that under server authentication you have chosen SQL Server and Windows authentication mode. Click OK when finished.
Modifying Server Properties
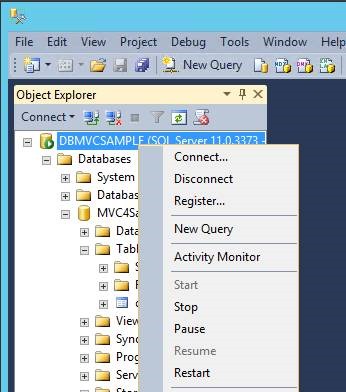
In order for all these changes take effect, you will need to restart the database. Right mouse click on SQL Server and choose Restart.
Restarting SQL Server
Choose Yes from the pop-up dialog box to indicate that you do wish to restart the server.
Verifying the restart
Task 7 – Verifying Connectivity
This final task is to verify that we can indeed connect to the database from the outside world (from client web applications).
Start Visual Studio 2013 Ultimate RC. From the View menu, choose Server Explorer.
Starting Server Explorer in Visual Studio 2012 Ultimate or Visual Studio 2013 Ultimate RC
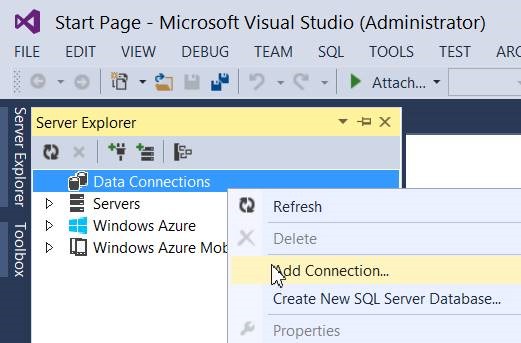
Right mouse click on Data Connection in Server Explorer and choose Add Connection
Adding a database connection
Select Microsoft SQL Server and click Continue.
Choosing the data source
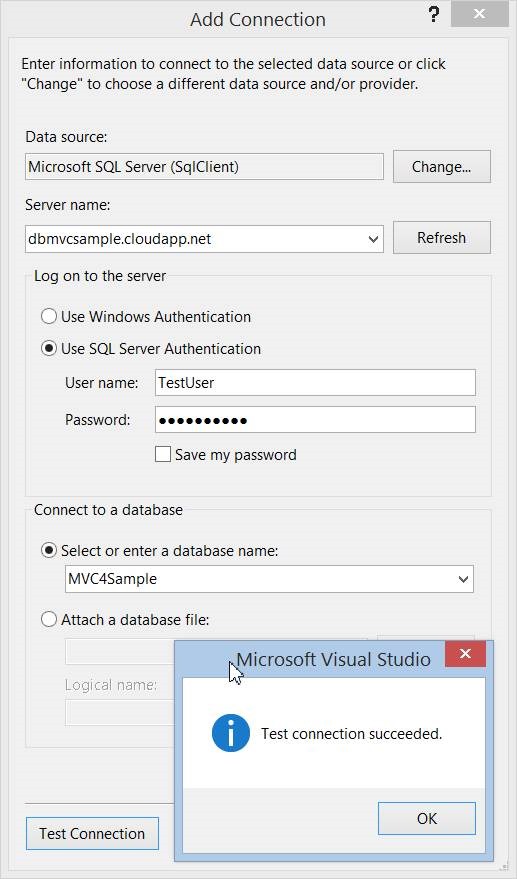
Type in the server name of the Windows Azure SQL Virtual Machine you created earlier. Yours will be different from dbmvcsample.cloudapp.net. Next select Use SQL Server Authentication and type in the User name and Password. Next, select Selet or enter a database name and you should be able to see MVC4Sample. Finally, click Test Connection to verify the database is available.
Adding the connection
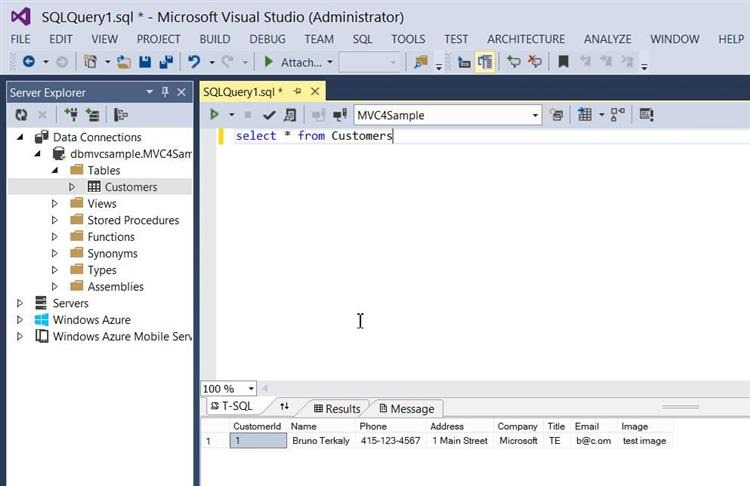
Right mouse click on Tables | Customers and select New Query. Next, type in select * from Customers.
Creating a query
Task 8 – Viewing the connection string
As a final note, this is what the connection string might look like. Your server name will be different however.
(Code Snippet - Connection String)
C#
Data Source=dbmvcsample.cloudapp.net;
Initial Catalog=MVC4Sample;
User ID=TestUser;Password=***********
Summary
In this lab, you saw how to configure a Windows Azure SQL Virtual Machine. Specifically you learned:
- How to use the Windows Azure Gallery to quickly provision a virtual machine
- How to import a bacpac file to load a database into the Windows Azure SQL VM
- How to configure named pipes, tcp ports, and firewall settings to allow outside access to the database
- How to validate connectivity to the virtual machine
